1
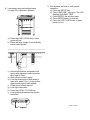
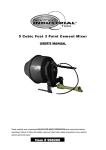
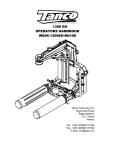
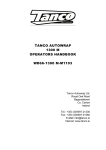
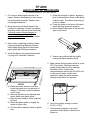
TP 2000
QUICK START UP PROCEDURE
(For Detailed Instructions- See User’s Manual)
1. Cut, remove and properly dispose of all
straps. Remove and dispose of main carton
top and packing materials. Retain carton
containing accessories.
2. Move the printer off the skid and to the
location for operation. At least two people
should be used to lift and move the printer.
Follow all proper lifting techniques to
prevent injury, as printer weighs
approximately 100 lbs. Dispose of carton
tray and skid.
f) Place the cartridge in printer, engaging
pins in rear and pivot down under spring
retention clips. The ribbon loop must go
in front of platen.
g) Place the guide on the nose of the print
head and snap down into position.
h) Route ribbon behind pins to the left and
right of print head.
3. Open carton containing accessory items,
remove contents and dispose of carton.
Install Paper Stack Rack and Anti-static
paper guide with Phillips screwdriver.
4. Install the ribbon using instructions below.
(or page 43 in Operator’s Manual)
i) Remove any ribbon slack by slightly
turning the ribbon advance knob.
5. Make certain that the power switch is in the
OFF (0) position. The host computer
system should also be off or manually
switched off-line. Connect the
communications cable to the RS-232C port
on the rear of printer and the host
computer. Adjust the serial interface
settings under Menu 5 if required.
a) Raise the printer access cover and
locate the green knob on right side of
chassis. Turn knob counter clockwise
until it stops.
b) Remove the ribbon from package and
elastic band from ribbon guide.
c) Move the print head to center of printer
by hand.
d) Place the ribbon guide in roughly the
center of ribbon loop.
e) Turn the ribbon advance knob to tighten
loop.
6. Verify that voltage setting is correct
(U.S.A.=115V).
7. Verify power receptacle is properly
grounded. Attach power cord and turn
power on.
8. Load paper using instructions below.
(or page 32 in Operator’s Manual)
9. Run a printer self-test to verify proper
operation.
a) Press the SETUP key.
b) Press FEATURE ^ key once. The LCD
displays RUN SELF TEST.
c) Press ENTER, the self-test starts.
d) Press ENTER again, to stop test.
e) Press the LINE / LOCAL key to place
printer on line.
a) Press the LINE / LOCAL key to take
printer off line.
b) Place and align supply of forms directly
below tractor guides.
c) Unlock both tractors and position left
tractor with alignment mark on printer,
allow right to “float”.
d) Open doors on both tractors.
e) Load top three holes of both sides of
form (min. width 8.5 in.) on the bottom
three-tractor pins on both wheels.
f) Close doors on both tractors.
g) Lock right side tractor.
h) Press the LOCAL FF LOAD key.
i) Load profile that matches the current
document.
Part No. 109610