1
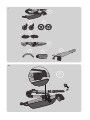
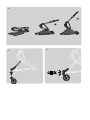
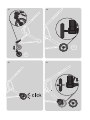
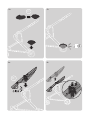
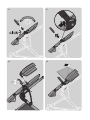
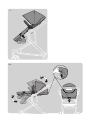
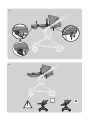
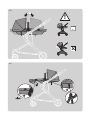
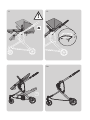
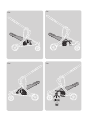
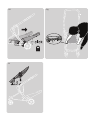
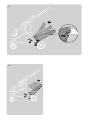
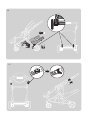
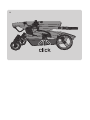
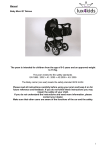
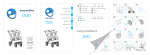
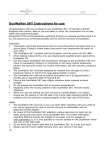
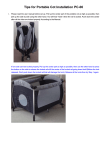
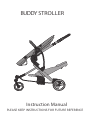
BUDDY STROLLER
Instruction Manual
PLEASE KEEP INSTRUCTIONS FOR FUTURE REFERENCE
SAFETY GUIDELINES AND INSTRUCTIONS MUST ALWAYS BE
FOLLOWED BEFORE MAKING USE OF THIS PRODUCT. PLEASE
RETAIN THESE INSTRUCTIONS FOR FUTURE REFERENCE.
THIS PRODUCT COMPLIES WITH PRODUCT SAFETY STANDARD
AS/NZS 2088:2009
WARNING
FOLLOW THE MANUFACTURER’S INSTRUCTIONS.
PUT ON ALL THE BRAKES WHENEVER YOU PARK THE STROLLER.
ALWAYS APPLY THE BRAKES WHENEVER THE STROLLER IS
STATIONARY.
DO NOT LEAVE CHILDREN UNATTENDED.
SECURE THE CHILD IN THE HARNESS AT ALL TIMES.
DO NOT CARRY EXTRA CHILDREN OR BAGS ON THIS STROLLER.
DO NOT USE THIS SEAT WITH ANY OTHER MODELS OF STROLLER.
DO NOT USE THIS BASSINET ONCE THE CHILD CAN SIT UP UNAIDED.
USE THE SEAT IN THE UPRIGHT ONCE THIS OCCURS.
ALWAYS LOAD THE HEAVIER CHILD IN THE FRONT SEAT THEN
PLACE THE LIGHTER CHILD IN THE REAR SEAT. ALWAYS UNLOAD
THE REAR CHILD FIRST.
MAKE SURE CHILDREN ARE CLEAR OF ANY MOVING PARTS IF YOU
ADJUST THE STROLLER, OTHERWISE THEY MAY BE INJURED.
USE THE HARNESS AT ALL TIMES.
WHEN NOT IN USE DISCONNECT SHOULDER STRAPS FROM THE
WAIST STRAP AND/OR BUCKLE.
THE HARNESS CAN FORM LOOPS WHICH MAY BE A STRANGULATION
HAZARD.
NEVER LEAVE A HARNESS CONNECTED WHEN NOT FITTED TO A
CHILD IN THE STROLLER.
TO AVOID SERIOUS INJURY ALWAYS USE THE HARNESS PROVIDED
TO SECURE THE CHILD. (ADJUST THE STRAPS TO SUIT THE SIZE OF
YOUR CHILDS BODY) IT IS UNSAFE TO USE ACCESSORIES OTHER
THAN THOSE SUPPLIED BY POCHOLIN BABY.
CARE SHOULD BE TAKEN IF THE STROLLER IS TO BE USED ON
STAIRS OR ESCALATORS.
THIS STROLLER SHOULD NOT BE USED NEAR AN OPEN FIRE OR
AN EXPOSED FLAME.
CARE SHOULD BE TAKEN WHILST FOLDING AND UNFOLDING THE
STROLLER TO PREVENT FINGERS BEING TRAPPED.
ENSURE YOUR CHILDS FINGERS, HANDS AND ALL OTHER BODY
PARTS ARE CLEAR FROM ANY MOVING PARTS WHEN ADJUSTING
THE SEAT OR HANDLE ON YOUR STROLLER.
WHEN USED IN THE UPPER POSITION MAX WEIGHT OF SEAT: 15KG
- MAXIMUM WEIGHT WHEN USED IN BASSINET MODE: 9KG (SUITABLE
FOR NEWBORN) WHEN USED IN LOWER POSITION MAX WEIGHT OF
THE SECOND SEAT : 15KG (SUITABLE WHEN CHILD IS ABLE TO SIT
UP UNAIDED) MAXIMUM WEIGHT FOR BASKET: 3KGS
MAXIMUM WEIGHT CAPACITY IS: 33KG
*PICTURES USED IN THIS MANUAL ARE FOR ILLUSTRATIVE PURPOSES
ONLY. THE ACTUAL STROLLER MAY VARY IN DISPLAY.
CLEANING AND MAINTENANCE
ALL POCHOLIN BABY PRODUCTS HAVE ONE YEARWARRANTY FROM THE DATE OF PURCHASE.
IT IS RECOMMENDED TO REGULARLY INSPECT AND MAINTAIN MOVEMENT OF LOCKING
DEVICES AND SECURITY OF ESSENTIAL COMPONENTS.
REGULARLY CHECK ALL PARTS FOR WEAR AND TEAR. LUBRICATE IF TIGHT.
DO NOT USE SPRAY LUBRICANTS, SIMPLY WIPE CLEAN AFTER USE.
THE SEAT LINER CAN BE CLEANED BY SPONGING WITHWARM SOAPYWATER AND A MILD
DETERGENT. A MILD DISINFECTANT MAY BE USED IF DESIRED.
STUBBORN MARKS MAY BE REMOVED WITH A NON ABRASICE CREAM CLEANER.
NEVER CLEAN WITH ABRASIVE, AMMONIA BASED, BLEACH BASED OR SPIRIT TYPE CLEANERS.
IF THE WHEELS BECOME DAMAGED OR WORN DISCONTINUE USE AND REPLACE.
FABRIC CARE
- HANDWASH ONLY
- DO NOT BLEACH
- DO NOT TUMBLE DRY
- DO NOT IRON
- DO NOT WRING
- DO NOT DRY CLEAN
1
A
B
B
C
D
E
F
H
G
2a
A
2
1
2b
3a
3b
4a
3c
1
C
2
B
4b
4c
1
2
5a
D
6a
5b
6b
E
2
1
7b
7a
=
F
1
2
8a
8b
9
10a
2
2
1
10b
2
1
3
10c
!
10d
!
10e
2
1
12
11
!
13a
H
13b
13c
13d
13e
13f
14
13g
15
2
1
16
18
17
RIDE
STOP
18
1
2
1
20
1
2
21
1
2
22
24a
24b
Shoulder straps
Release
Button
Waist
Strap
24c
24d
Strap
Adjusters
Crotch Strap
Waist
Strap
Instructions : In words
1.Parts List
A. Tango Frame(Chassis)
B. 2x Front wheels
C. 2x Rear wheels
D. 2x Rear Mud Guards
E. Main Seat
F. Main Seat - Front Bar
G. Main Seat - Canopy (Hood)
H. Toddler Seat - (Sold Separately)
2.Unfold the Frame
2.To unfold the frame press the button located on the side of the frame at
point (A). After pressing the button then raise the handle upwards.
2b. While the frame is on the foor and the stroller has been unlocked, raise the
handle upwards. It should click once the handle is raised to the top. The stroller
is now unfolded.
3. Attaching and using the Front wheels.
3a. To attach the front wheels, place the item (B) front wheel into the opening
sockets located at the front of the Frame (A).
3b. Once the wheels are placed into the sockets they should click into place.
Pull on the wheel to ensure that it is attached correctly. Repeat with the other
front wheel.
3c. To lock the front wheels into the straight position, push the latch located
on the front of the wheels holder downwards. To release it to swivel mode push
the latch upwards. To remove the front wheel push the release button located
at point 1 and the remove the wheel at point 2.
4. Attaching and using the Rear wheels.
4a. Place the rear wheels (c) into the sockets located at the rear of the frame.
4b. Push the wheels inwards until you hear them click.
4c. To remove the rear wheels, pull the lever located at point 1 on the rear
wheel axel and then pull the rear wheel from the sockets on the frame.
5. Attaching the Mud Guards
5a. To attach the mudguards (D) onto the frame, place them on the top of the
rear wheels, the slot them into the allocated positions of the rear wheel axel.
5b. Push the mud guards downwards until you hear them click into position.
Repeat on both sides.
6. Attaching and removing the Main seat to the frame.
6a. To attach the main seat (E) onto the frame, place the seat into the desired
position (front or rear facing) into the slots located on each side of the frame.
Push the seat downwards until you hear it click. Pull slightly on the seat to
ensure it is attached correctly.
6b. To remove the main seat from the frame, press the buttons located on the
side of the seat (point 1) and then lift the seat up out of the slots (point 2)
7. How to attach and remove the front bar
7a. To attach the front bar (F) to the main seat, place the bar into the slots
located on the main seat. Push it downwards until it clicks into place.
7b. To remove the front bar from the main seat, press the button (located at
point 1) on both sides of the seat unit, then lift the bar upwards (point 2),
8. How to attach and use the Canopy (Hood)
8a. To attach the canopy (G), slot the ends of the canopy into the slots located
at the top of the main seat. The front of the canopy should open forwards. The
canopy should click into position.
8b. To use the canopy pull the front of it forwards to extend it outwards, or
push it to close the canopy.
9. Using the Foot rest
9. To use the foot rest up and down press the release button located on each
side of the main seat. They should click into place once the right position is
chosen.
10. How to use the main seat Unit
10a. To recline the main seat, push the lever located at the top (point 1) then
upwards or downwards, depending on the desired position.
10b. Seat changes to carrycot: Pull the adjust buckle of the bottom of footrest
upward (Point 1), press the seat to the bottom at the same time (point 2).
Adjust the webbing behind the backrest, and adjust the seat cover of backrest
to horizontal position (point 3).
10c. Attention : When use as carrycot, you must place the carrycot in level,
otherwise baby will be probably in danger of droping. When use as carrycot, only
baby less than 6 months is permitted using the carrycot.
Do not recline the seat once you are in bassinet mode.
10d. You can place the bassinet in the forward or rear facing position. Do not
recline the seat once it is bassinet mode.
10e. Carrycot changes to seat: Push the bottom of the carrycot upward (Point 1),
then adjust the webbing behind the backrest, and adjust the seat cover of
backrest to the highest position (point 3).
11. Do not leave the main seat in the flat position (180 degrees) with the footrest
in the upright position.
Adjust the position and the footrest before you place your child in the stroller.
12. Adjusting the Handle
12. Press two side buttons of handle bar, and adjust the handle
bar to the desired height.
13. How to Attach the toddler seat
13a. To attach the toddler seat (H) to the frame please remove the main seat to
give you more room to attach the toddler seat.
13b. Place the toddler seat onto the rear part of the main frame. Attach the
toddler seat to the right side first.
13c. The toddler seat should then click onto the right side.
13d. Then you should start on the left hand side and align the catch from the
toddler seat onto the bottom frame.
13e. Push the lever inwards to open the arm of the toddler seat to latch onto the
frame. The toddler seat should then click onto the sides of the frame.
13f. Slide the toddler seat towards the rear axel. The toddler seat should then
click into place. The toddler seat should now be attached to the frame.
14. You should then re-attach the main seat back onto the frame.
15. Adjusting the toddler seat backrest
15. To adjust the back rest for the toddler seat, push the lever located at the back
(top of the seat)(point 1) upwards then move the seat into the desired position.
16. Using the toddler seat canopy (hood)
16. To use the canopy for the toddler seat, just push it forwards or backwards
depending on the position desired.
17. How to use the brakes
17. To unlock the brakes for the stroller, kick the red brakes on the back of the
stroller upwards.
To Apply the brakes, push the red lever downwards. You will not be able to
move the stroller.
18. Adjusting the Main seat
18. To adjust the position of the seat, use the lever located at the top of the
main seat (point 1), push the lever upwards and then move the seat upwards
or downwards as required (point 2).
19. Adjusting the toddler seat.
19. To adjust the position of the toddler seat, use the lever located at the
top/back of the toddler seat (point 1).
Push the lever then move the seat up or down.
Warning: The toddler seat can not be adjusted to be over 150 degrees. The
toddler seat should only be adjusted over 150 degrees when folding.
20. Removing the toddler seat
20. Recline the toddler seat as far back as possible, then press the toddler seat
release button located at point 1, and then push the seat backwards then lift
the seat from the holders. Make sure there isnt any toddlers in the seat when
the seat is being removed.
21. How to Fold the stroller
21. Press the red second-lock button on the right handle tube. Release the
second lock (Point 1), pull the folding sliding cover of two sides of the handle
tube upward (point 2).
22. You can leave the toddler seat on the frame when you fold it but it must
be reclined over 150 degrees. Once the stroller is folded downwards it should
click once it is locked into place.
23. How to use the Harness
23a. For newborns or smaller children you should use the lower height
position on the seat units. You can change the position of the height of the
harness by threading the harness through the seat. As the child gets taller
you should use the top position.
23b. The installed 5-point harness should look like this.
23c. Carefully place your child into the seat and bring the waist straps around
the childs waist and over the childs shoulders. Place the crotch strap between
your childs legs. Tighten the harness to be snug around the childs waist and
over its shoulders. Attach each of the shoulder straps to the waist strap buckle
with each end. Repeat this for both sides. The should click onto each other.
Once each shoulder strap is attached on the waist buckle insert the waist strap
end to the crotch strap buckle. Repeat on both sides. You can then adjust the
straps further if required.
23d. To release the harness squeeze the centre of the crotch strap buckle to
release all straps.
WARNING
USE THIS HARNESS AT ALL TIMES
WARNING
WHEN NOT IN USE DISCONNECT SHOULDER STRAPS
FROM THE WAIST STRAP AND/OR BUCKLE
24. Attaching the tether strap.
24. To attach the tether strap, loop it over the handle. Open the end of the tether
strap hanging over the handle and insert the opposite end through the opening
created. Pull until the tether strap is tightened around the handle. Place the loop
over the desired wrist using the stroller. If you need to change the wrist, loosen
the tether strap and slide to the desired side of the handle.
WARNING
USE THIS STRAP TO STOP THE
STROLLER ROLLING AWAY
WARRANTY AGAINST DEFECTS
ALL POCHOLIN BABY PRODUCTS ARE GUARANTEED FOR TWELVE
MONTHS FROM THE DATE OF PURCHASE.
OUR GOODS COME WITH GUARANTEES THAT CANNOT BE
EXCLUDED UNDER THE AUSTRALIAN CONSUMER LAW. YOU ARE
ENTITLED TO A REPLACEMENT OR REFUND FOR A MAJOR FAILURE
AND FOR COMPENSATION FOR ANY OTHER REASONABLY
FORSEEABLE LOSS OR DAMAGE. YOU ARE ALSO ENTITLED TO
HAVE THE GOODS REPAIRED OR REPLACED IF THE GOODS FAIL
TO BE OF ACCEPTABLE QUALITY AND THE FAILURE DOES NOT
AMOUNT TO A MAJOR FAILURE.
THIS COVERS AGAINST FAULTS WHICH DEVELOP THROUGH
FAULTY MATERIALS AND WORKMANSHIP. MISUSE, ACCIDENTAL
DAMAGES, NORMAL WEAR AND TEAR OR NEGLECT ARE NOT
COVERED.
IF A FAULT BECOMES APPARENT, PLEASE RETURN THE ITEM TO
THE STORE OF PURCHASE WITH YOUR RECEIPT. YOU MUST
INFORM THE STORE WHAT THE DEFECT IS. WE WILL THEN
ARRANGE FOR ITS REPAIR OR IT WILL BE ASSESSED FOR
REPLACEMENT AS EXPEDIENTLY AS POSSIBLE. THE BENEFITS OF
THIS WARRANTY ARE IN ADDITION TO OTHER RIGHTS AND
REMEDIES UNDER THE LAW IN RELATION TO THE GOODS ABD
SERVICES TO WHICH THIS WARRANTY RELATES.