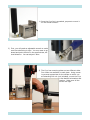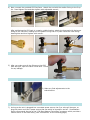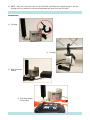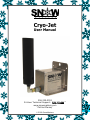
1
Cryo-Jet
User Manual
256-229-5551
24-Hour Technical Support: 1-800-745-8599
888-391-7669
www.snowmasters.com
Lifetime
One YearWarranty
Warranty
© 2009 SnowMasters
1) Once the Cryo-Jet is unpacked, prepare to mount it
on the chosen surface.
2) First, you will need an adjustable wrench to make
sure the tube fitting is tight. You may want to go
ahead and point the tube in the approximate, desired direction. You can adjust it later.
3) The Cryo has mounting plates on two different sides.
Four holes are available on each plate. Using mounting screws appropriate for the surface to which you
are attaching the unit (not included), mount the Cryo
in the desired orientation and
location. Make sure all the
screws are tight.
4) Next, connect the provided CO2 line/hose. Attach the end with the smaller fitting to the CryoJet. Hand tighten first and then tighten with adjustable wrench.
After positioning the CO2 tank in a nearby, stable location, attach the hose end with the larger
fitting to the CO2 tank, making sure the plastic O-ring seal is in place inside the hose fitting.
Hand tighten and then tighten with wrench.
5) After you make sure all the fittings on the CO2
tank are tight, open the valve on the tank. Check
for any leakage.
6) Make any final adjustments to the
tube direction.
7) As long as the unit is plugged into a constant power source, the Cryo valve will be open, so
plug the power cord into a power source that can easily be turned on and off. SnowMasters
highly recommends the use of the “C02 Blast Master Control Box” accessory which provides a
control switch or the DMX Relay. (See “Accessories” on the following page).
8) NOTE: After use, close the valve on the CO2 tank, and bleed any remaining gas in the line
through the Cryo and then you can safely detach the hose from the CO2 tank.
Accessories:
1) C-Clamp
2) Trussing
3) DMX Controller
Module
4) C02 Blast Master
Control Box