1
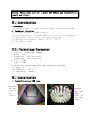
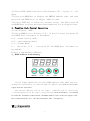
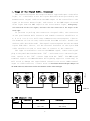
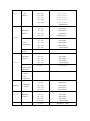
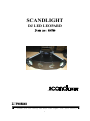
SCANDLIGHT
DJ LED LEOPARD
Item no:
935789
I、 Preface
Thank you for using our 4eye LED light. For your safety,
1
please read the User’ s Manual carefully before your operation.
Note : This Manual includes the important information of
installation 、 operation、 safety instruction. Please install and
operate as requested in the Manual, meanwhile, please keep the
manual for any unexpected requirement.
This Manual includes the important information of installation
and operation. Please install and operate th e light according to
the instructions strictly. And it must be power off when open the
light or before repair.
A: Please read the complete contents of this manual ( please keep
this manual attach with the light for any preview )
B : In order to make sure the co rrect and safety installation 、
operation and maintenance, well know and follow to the
instructions of Manual is necessary.
C:We will not take any responsibility to the light damage 、property
loss or body injure which caused by the incorrect installation 、
operation and maintenance.
NOTICE: the data which inside the Manual maybe changed due to the
continuous improvement, and we ’ ll not make another notice.
We will keep the right to any specification update during
improvement
Warning:if the protection screen 、lens or UV screen got a visible
damage, e.g.: scratch or chasm.
1. Packing Content
( accessories)
( Selectable)
1: Power Cable( 1PCS)
2: Signal Cable ( 1PCS)
3: User’ s Manual( 1PCS)
4: Maintenance Card( 1PCS)
a: Bracket
b: Clamp
d: Safety Cable
2. Unpacking Instruction :
Please check if all the contents are completed after unpacking ?
then, check if the light is undamaged ? Please you can keep the
original package and return to the factory if it ’ s damaged
3.AC Power:Check if the voltage is accordance with the rated power.
2
4 . Safety Specifications : All the safety items of operation
(includes installation) and before operating.
( 1) Unpacking the light case and take out all the accessories ,
and open the poly package, take out the light from the flight
case, and put it in a certain platform for operation.
( 2)This device for indoor use only ,the protection grade is: IP20.
the light must keep dry and avoid to use under the Moist、
Overheat or Dusty surroundings. And keep the light far away
from the water or other liquid.
( 3) Installing of the light must keep a distance with any flammable
objects by 1M at least.
( 4) Please never install the light on the surface of the flammable
objects.
( 5) The installation 、 operation and maintenance must be managed
by the qualified professional, and make sure to operate it
under the instruction of the Manual.
( 6)Make sure the work environment temperature of the light maximum
40℃ , and minimum 20 ℃
( 7)The temperature of the light surface will up to 85 ℃ even under
the normal cooling, so never touch it by hand.
( 8) The light was designed by electric shock protection type, a nd
must connect to the power supply system which well earthed .
Furthermore, the ground wire of the light must connect to the
ground wire of the power supply system, ground wire interface
of the light must well connect with the light body(or light
must well earthed)
(9)Please check if the voltage is accordance with the rated power before
installing.
( 10 ) Please never use the power cable which was damaged the
insulation cover, meanwhile, never put the power cable on any
other wire. Please pull out the power cable by handle the plug
when light is stop working or cleaning, never pull o ut it
roughly or handle the wire directly.
( 11) The light with safety cable hole, please take the attached
safety cable go through the hole as a supporting hanging basic
on safety consideration.
( 12) The light doesn ’ t include any spare parts for repair, plea se
check if all the parts are well installed and screws are
drove tightly before operating. It’ s prohibited to use the
light when the cover is opened.
3
Notice: Please make sure it ’ s power off before any installation 、
repair and clean!
Ⅱ 、 Introduction
1.Features:
(1)auto-move mode、(2)sound controller mode、(3)master slave mode
2. Technical Features
(1) Control channel: 6 DMX channels
(2) Operating modes: standard DMX512 controller control mode
(3) Appearance: metal shell, streamlined designs.
(4) Working envir onment: indoor, 20 ℃ ~ 40 ℃
(5) IP degree: IP20
III、 Technology Parameter
1. Voltage : AC100V-240V 60/50HZ
2. P ower: 20W
3. Outline siz e : 50 0 ×350×180mm
P acking size: 590×4 10×245mm
4. N/W :
5 .3 Kg
G/W:
5. 8 Kg
5 . LED La mp: 244 LED (Red, Green, B lue, White fou r co lor LED)
( 1) LED: φ 5
( 2) LED ang le: 24 o ±1 o
( 3) LED curren t: 5 00 mA
Ⅳ 、 Installation
1. Install/replace LED lamp
Unscrewed
the 6pcs
screw on
the
Unscrew
the 4pcs
fixed
screw on
the light
board.
helmet
4
First, unscrewed the three screws of the helmet, then removed to
helmets, if a part of LED damaged, you need to use the thermostat
electric iron be removed. Installation method is just the opposite.
Warning
1: The light power supply must be disconnected when
replacement of the LED does not bright
2: you can repair the light before y ou must use a
thermostat with anti-static electric iron, and wear anti -static
rings
2. Power supply, wire Connection
Using a dedicated plug to connect the 4eye LED light and power.
4eye LED light should pay attention to whether the voltage and
frequency between signs and on the power s upply are the same or not.
Suggested that each light has a separate power supply switch, this
can be turned on or off at random for each 4eye LED light. The 4eye
LED light selection of input voltage and frequency parameters as
follows:
Voltag
AC100V~ 240V
Frequency
60/50Hz
e
If the power cable is damaged, please contact the area agents or
ask professional to replace; please use the same specification
cable when you replace the power cable.
Tip: When connecting the power , ground wire must (yellow / green
color wire) safety grounding, electrical installation must comply
with all relevant standards.
3. Fixed installation of lighting (including light hook and safety
rope how to use)
5
Hook installation
安装灯钩
Before positioned the light, ensure the stability of the
installation site. In the reverse hanging installation, use two
sets of M10 bolts with a professional big hook, link the hanging
screw hole on the bottom of the light, must be ensure that the light
will not fell down from support rack, through the support rack and
light hand use the safety rope for auxiliary lifting handle to
ensure safety, to prevent the light falling and sliding . Light in
the installation, the bottom prohibit pedestrians. Safety rope
regularly checked whether there is wear and tear, whether there is
loose hook. The manufacturer does not take any responsibility i f
the light falling because hanging installation is not sta ble.
Warning
1. Hook use only for light lifting.
2. Hook as a handle move the light t o prohibit, carrying,
please use the handle.
V、 Operation
1. Panel Operation
1) Press MODE (mode) key to switch modes:
A001: DMX Mode
G-1-: strobe mode, G-2-: AUTO-running mode, G-3-: sound control
auto-running model
S -: slave machine mode
6
(2) Press FUNC (mode) button to switch modes: SP -: speed, d -: off
Show
(3) Press the MODE key to display the DMX512 address code, and then
press UP and DOWN keys to adjust address code.
(4) Press FUNC key to enter the feature set up, and then press UP
and DOWN keys to enter the function parameters for setting optio ns.
2. Function Code Control Operation
(1) On display: A001
(2) Press MODE key to display: G -3-, in the G-3-state can press UP
and DOWN keys increment or decrement.
G-3-: sound control mode
G-2-: auto-running model
G-1-: Strobe Mode
S -, the state of S – can press UP and DOWN keys increment or
decrement,
Select a sub-machine address.
3. DMX Address Code Setting
MODE
FUNC
UP
DOWN
Every light should be set with DMX address code when you are
using the controller to control multi lights , i t is u sed t o rece i ve th e
signal fro m the con troller.
The present address code of the light = ( address code of l a st light)
+( channel quantity of the light).4eye L ED light with 6 Chann els ,so it sh ould
be under the 1 6c hann le control mode, the DMX address code o f the first lig ht is 00 1,
the second shou ld be : 0 17, the th ird shou ld be 0 49, analogousl y.
Ⅵ 、 Appendix
7
1、 Usage of the Signal Cable 、 Connector
The connecti on bet we en the output of mas t er light and i nput o f the sa lv e
light, it’ s availab le to use the 3 pins XLR cable which pro vided by th e
manufacturer. Signa l cable from the D MX output of the con tr oller to the
input of th e first m aster light, and co nnect to th e DMX inp ut of secon d
slave light from the DMX output of the first master light, analogou sly,
till connec ted a ll the slave lights, and insert the last conn ecto r to th e outpu t of the
final light.
If you want to pr olo ng the connection of signal cable, the c onnection
of the pins betwee n male connector an d female connec tor s hould be:1 to
1; 2 to 2 ; 3 to 3,or it will cause com mu nication inter rupti on. ( Notice:
the diameter o f core of every cab le shou ld be 0.5mm a t least , double core
shelter cable shoul d be used) .The signa l connecting must us e the attached
3 pins X LR cabl e. N otice, all the inte rnal lead wire of t he 3 pin s XLR
cable should not to uch to each other o r connect to the co nnector.
The light is availab le to receive the DMX 512 signal, connect the signal
plug to the panel whi ch marked w ith “ IN ” , and connect it to t he next lig ht.
then, connect to t he “ IN” of next ligh t from the “ OUT” . The DMX si gnal
terminal organ is recommended when the lighting signal is connecting. I t
will avoid to damag e the signal which caused by the noise , DMX termina l
organ is a XLR co nne ctor, conne c t wit h a 120 Ω resistor between the pin 2 and pin 3 of
the XLR connector, and connect it to the last OUTPUT socket of the final light.
OUT
IN
DMX IN
Re
sist
or
2、 DMX channel list
D MX
c ha nn el
OUT
F un ct io
D MX v alu e
F ea tu res
n
Individual control(speed adjustment
fast→slow)
0~100
101~150
8
3rd light
IN
2nd light
OUT
1st light
IN
120R 1W
Total control
Gobo mode1
Gobo mode 2
Gobo mode 3
Gobo mode 4
Gobo mode 5
151~160
Channel
1
All
function
161~170
171~180
181~190
191~200
201~255
individual
control 1
Channel
2
Total
control mode
Gobo
control
individual
control 2
Channel
3
Overall
control speed
adjustment
Gobo
controls
peed
adjustment
Channel 4
Channel
5
Channel 6
individual
control 3
individual
control 4
dimmer
Sound control
Off
Auto mode1
Auto mode 2
Auto mode 3
0~9
10~69
70~129
130~194
195~255
Static Display
0~9
10~69
70~129
130~194
Off
Auto mode1
Auto mode2
Auto mode3
195~255
0~255
Static Display
Set gobo by self
0~9
10~69
70~129
130~194
Off
Auto mode1
Auto mode2
Auto mode3
195~255
0~255
Static Display
fast~slow
0~255
fast~slow
0~9
10~69
70~129
130~194
195~255
Off
Auto mode 1
Auto mode2
Auto mode 3
Static Display
0~9
10~69
70~129
130~194
Off
Auto mode1
Auto mode2
Auto mode3
195~255
0~255
Static Display
Brightness~dark
9
Ⅶ 、 Maintenance
1. Clean and use frequency
To confirm the power supply have cut off before disconnect the light or repair
it ,it is very important to keep the light cleaning .not only can keep the
light maximum brightness output but also can prolong their use life . please
use the high quality professional glass and soft cloth to clear up the
equipment ,not permission to use the alcohol and organic liquid clean at least
once each year use vacuum dust collector .
When the light does not start, check whether the light power
supply fuse blown or not, if blow, install the appr opriate fuse,
and start the light after find out troubleshooting, but please
attention to the technically person allowed to carry out
maintenance work.
2. Product Return Procedure
A. No charge
(1) First customer talking the return matters with customer service
personnel.
(2) Until the customer returned the bad product to factory , the
customer service personnel need to make sure their warranty period,
truthfully fill out the "maintenance services list."
(3) Both customer service and warehouse personnel to transfer
responsibilities production units.
(4) The responsibility of production units arrange repair.
(5) The responsibility of production units truthfully fill out the
"maintenance service card" after finish repair, and transferred the
finished products to warehouse.
(6) The warehouse personnel should be talk with customer service
timely, to confirm the shipping issues.
B. Charges
(1) First customer talking the return matters with customer service
personnel.
(2) Until the customer returned the bad product to factory , the
customer service personnel need to make sure their warranty out
10
period, truthfully fill out the "maintenance services list."
(3) Both customer service and warehouse personnel to transfer
responsibilities production units.
(4) The responsibility of production units arrange repair.
(5) The responsibility of production units truthfully fill out the
"maintenance service card" after finish repair, and transferred the
finished products to warehouse.
(6) The warehouse personnel should be talk with customer service
timely, to confirm the shipping issues. There are customer service
personnel need to confirm the repair costs and send to the finance department.
3. Complain
( 1) The salesman will check the details of complained problem,
included the item no、delivered quantity 、delivery time 、faulty
and pictures, and the requirement of customer
( 2 ) QC and Technology department will analysis the complained
problem, and give a final solution to customer
Ⅷ、Faulty Disposal
Familiar Faulty
Light can not start
Disposal
1.Check if the fuse burnt out or not
2.Check if the power connect well or not
3.Check if the circuit board +12V or +5V short
circuit of earth
Light can be shine well, but 1.Check if the light’s DMX original address setup
can not be control by
right or not.
controller
2.Check the connection details of communication
control wire
5W white LED not brightness 1、Check if LED lamp damage or not
11