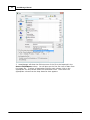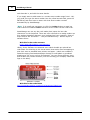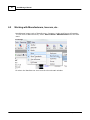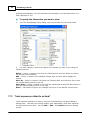
1
AssetManage 2015
Getting Started Guide
Copyright © 2015
I
AssetManage Manual
Table of Contents
Foreword
0
Part I General Info
1
1 What Can
...................................................................................................................................
AssetManage Do?
1
2 How to ...................................................................................................................................
buy AssetManage and Contact Info
2
3 Upgrading
...................................................................................................................................
from an earlier version of AssetManage
3
4 Installing
...................................................................................................................................
AssetManage
4
5 The Main
...................................................................................................................................
Window
6
6 Legal Notices
................................................................................................................................... 9
7 What's...................................................................................................................................
new in Version 2015
11
Part II Importing and Exporting Data
13
1 Importing
...................................................................................................................................
data into AssetManage
13
2 Exporting
...................................................................................................................................
data to an Excel or Access file
18
3 Exporting
...................................................................................................................................
data to an HTML file
19
Part III Keeping Records
20
1 Creating
...................................................................................................................................
item records
20
2 Changing
...................................................................................................................................
item info
26
3 Removing
...................................................................................................................................
items
28
4 Moving
...................................................................................................................................
or Copying Items
29
5 Finding
...................................................................................................................................
Items
30
6 Queries
................................................................................................................................... 32
7 Using ...................................................................................................................................
AssetManage with Barcodes
35
8 Depreciation
................................................................................................................................... 38
9 The View
...................................................................................................................................
Tab - What is it used for?
40
10 Linking
...................................................................................................................................
Assets
41
11 Check...................................................................................................................................
In/Check Out
43
12 Disposing
...................................................................................................................................
Assets
49
Part IV Managing Locations
53
1 What are
...................................................................................................................................
Locations?
53
2 Creating
...................................................................................................................................
new locations
54
3 Editing...................................................................................................................................
and printing location barcodes
54
4 Removing
...................................................................................................................................
Locations
55
Part V Generating and Using Reports
56
1 Running
...................................................................................................................................
Reports
56
© 1999-2015 Liberty Street Software
Contents
II
2 Creating
...................................................................................................................................
Reports
61
Custom Reports
.......................................................................................................................................................... 63
Label and Report
..........................................................................................................................................................
Designer
65
Step-by-Step
.........................................................................................................................................................
Example: Report
67
3 Reporting
...................................................................................................................................
Fields Explained
72
4 Depreciation
...................................................................................................................................
Reports
73
5 Sorting
...................................................................................................................................
& Filtering Data Within Reports
74
Part VI Managing Employees, Manufacturers,etc..
77
1 Working
...................................................................................................................................
with employee data
77
2 Working
...................................................................................................................................
with Manufacturers, Insurers, etc..
81
Part VII How Do I
83
1 Use AssetManage
...................................................................................................................................
with a PDA type Barcode scanner?
83
2 Backup
...................................................................................................................................
My Data?
83
3 Change
...................................................................................................................................
Field Names?
85
4 Change
...................................................................................................................................
multiple records simultaneously?
89
5 Change
...................................................................................................................................
the Data File (or Image files) location?
90
6 Check...................................................................................................................................
Service Agreements or Warranties
90
7 Create...................................................................................................................................
a new Category or Department?
91
8 Edit a ...................................................................................................................................
Category?
92
9 Remove
...................................................................................................................................
a Category or Department?
93
10 Set the...................................................................................................................................
beginning of my companies fiscal year?
94
11 Sort Items?
................................................................................................................................... 94
12 Specify
...................................................................................................................................
which columns I want to see?
94
13 Track ...................................................................................................................................
expenses related to an item?
95
14 How Do
...................................................................................................................................
I Generate Asset Numbers Automatically?
96
15 Make my
...................................................................................................................................
Labels print out properly
96
Part VIII Troubleshooting
99
1 Trouble-shooting
...................................................................................................................................
and Frequently asked questions
99
Part IX User Permissions
101
1 Assigning
...................................................................................................................................
Permissions to AssetManage Users
101
Index
106
© 1999-2015 Liberty Street Software
II
1
AssetManage Manual
1
General Info
1.1
What Can AssetManage Do?
AssetManage is designed to provide a complete asset tracking solution for virtually
any business. AssetManage is currently being used by thousands of companies
and organizations to keep track of assets such as: Tools, Computer Equipment,
Rental Property, Police Car Equipment, Office Furniture, Museum Artifacts and
many more types of property.
AssetManage Features include:
Multi-User capable. More than one user can make changes to the same data
simultaneously. Just place the AssetManage data file in a central location on
your network.
Barcodes. Scan & Print barcodes to attach to your assets.
Attach up to 16 pictures to each of your records by scanning, pasting or
importing them.
Attach files and links to your records. Click on the attachment link to visit the
specified website address or launch the attached file.
Show a live video feed from your Webcam and take pictures of your assets.
Check when service agreements and warranties expire on catalogued items.
User Permissions. Assign permissions to users such as whether they can delete
items, backup data and much more.
Track repairs, maintenance costs and other expenses related to an item.
Check In / Out to keep track of tools and other equipment.
The integrated Report Designer lets you create Reports, Labels & File Cards.
Track changes in an item's location or status.
Calculate both Monthly & Annual depreciation schedules.
To purchase spiral-bound printed copies of this manual, select Purc ha se Ha rd Copy
Use r M a nua l... from the main menu.
© 1999-2015 Liberty Street Software
General Info
1.2
How to buy AssetManage and Contact Info
How to buy AssetManage
AssetManage Order Page
http://www.assetmanagesoftware.com/Purchasing.aspx
AssetManage Web-Site
http://www.AssetManageSoftware.com
To Contact Liberty Street Software:
You can contact Liberty Street Software Liberty Street Software at any time:
Sales - [email protected]
Tech Support - [email protected]
Forum - http://www.libertystreetsoftwareforums.com/forumdisplay.php?f=7
Instructional Videos - https://www.youtube.com/channel/
UCXOals2o0xcmxGEu472dyVg
or Select HELP > ASSETMANAGE VIDEOS... from the main menu
Online Chat
© 1999-2015 Liberty Street Software
2
3
AssetManage Manual
Click on the Online Chat Operator Graphic at:
http://www.assetmanagesoftware.com/ContactUs.aspx
Mailing Address
Liberty Street Software
228 Park Ave S. #26512
New York, NY
10003-1502
or
Liberty Street Software
3126 Lednier Terrace
Mississauga, ON
L4Y 4A1
Canada
Phone
Sales: (888) 250-6615
Technical Support: (905) 566-5082 or (347) 960-6466
Note that you can access our website and e-mail through hyperlinks in the About
dialog box.
1.3
Upgrading from an earlier version of AssetManage
To upgrade to AssetManage 2015 from an earlier
version
1. Install Version 2015 either by running the downloaded
setup file or from the CD.
2.
3.
Make sure you select the same installation directories
as were used in the previous version of AssetManage.
These directories will appear as the defaults in their
respective install screens.
Run AssetManage. You may see a message box
asking if you would like to update the AssetManage
data file. Select Yes to upgrade the file. If you do
not see this message box, it means the data file is
already compatible with the version of AssetManage
that you have installed.
The 2014 version of AssetManage has a new feature
called Open AssetManage File. (File > Open
© 1999-2015 Liberty Street Software
General Info
AssetManage File...) This feature will let you
switch which data file is being used by the program.
It will also set the data folder to that used by the
selected data file. This feature can be useful when
moving a single user install of AssetManage to a new
computer and in other situations.
For Multi-User installation Upgrades Only
4.
5.
IMPORTANT: Install AssetManage on all your other
workstations that will be using the program.
When installing on the other workstations, make sure
that the Data directory & Images directories are
the same for all users.
No te : AssetManage must be able to both read from and write to the source of
the file's data, so backup files should be saved on hard drives or other
writeable media and not read-only CD-ROMs. A data import from a read-only
CD will not work.
1.4
Installing AssetManage
System Requirements
AssetManage 2015 requires the following minimum system configuration to operate
properly:
Windows XP, Vista or Windows 7, 8 and 10 (All versions 32 and 64 bit)
800x600 SVGA display
At least 50 MB free hard drive space.
The Setup program will show you exactly how much space is required, and
let you know if there is not enough space available on the selected drive.
Images can greatly increase the amount of space AssetManage uses. All
images you attach to records are converted to jpg format and stored in the .
\AssetImages directory. If you attach a lot of images to records by scanning or
importing, take note of the image size.
How Do I Install From The CD?
© 1999-2015 Liberty Street Software
4
5
AssetManage Manual
Simply insert the CD into your CD-ROM drive. The setup program should start
automatically. If the Setup program does not start automatically, run AUTORUN.
EXE or SETUP.EXE from the root directory of the CD.
Multi-User installation
1. Install Version 2015 either by running the downloaded
setup file or from the CD.
2.
3.
4.
When choosing directories for the Data and Images,
make sure the directories are accessible to all users.
Each user must have read and write permissions for
the chosen directories.
After completing the initial installation. You can now
install AssetManage on all your other workstations
that will be using the program.
When installing on the other workstations, make sure
that the Database directory & Images directories
are the same for all users.
You can change the data file location and other directory locations in AssetManage
from within the Preferences dialog, under Tools > Preferences..
If for some reason you cannot run AssetManage, the locations can
also be changed by using RegEdit. To do this:
1.
2.
3.
Select Start > Run... for Windows XP. For Windows Vista and Windows
7, click on the Window button at the lower left corner of your screen
and type regedit.exe into the "Search" edit box.
type regedit into the Open edit window
Open HKEY_CURRENT_USER\Software\Liberty Street
Software\AssetManage
or HKEY_LOCAL_MACHINE\Software\Liberty Street
Software\AssetManage if you installed the software using the All
Users option in the setup program.
HKEY_LOCAL_MACHINE if you installed the program for All Users.
Single-User installation
© 1999-2015 Liberty Street Software
General Info
Install Version 2015 either by running the downloaded
setup file or from the CD.
Registration Code information
Liberty Street Software supplies a unique registration code with each software
purchase. The code appears on the CD if you bought the CD-ROM version. If you
ever lose the code, please email us and we will look it up for you.
Installing AssetManage on a network server
AssetManage can be run from a network server. To use
the program in this manner, all users must install the
software on their machine as well. The reason is that
AssetManage uses the Windows registry on each user's
machine.
1.5
The Main Window
***
AssetManage Main Window
© 1999-2015 Liberty Street Software
6
7
AssetManage Manual
The main window of AssetManage software. Here you can get an overview of all
your assets, view all assets belonging to a particular location or Department.
Main Toolbar
[Top]
Caption Window
Description of what is currently being displayed in the main window.
This can be the currently displayed Location, Department, Asset
Category, Employee list, etc...
[Top]
© 1999-2015 Liberty Street Software
General Info
8
Location Window
Shows an overview of the Locations and Departments currently
defined in the AssetManage database.
[Top]
Image Window
Show all images that have been attached to an item. Click on the
image to show it in your default image editor. Up to 16 images can
be attached to each asset record.
[Top]
Status Bar
The status bar shows additional information related to the menu
item being selected, selected image, etc...
[Top]
© 1999-2015 Liberty Street Software
9
AssetManage Manual
List window
A List of the assets belonging to the currently selected Location or
Department. To sort on a particular column, click on the column
header, to reverse the sort, click on the header again. The columns
being shown and their order can be changed from the Preferences
dialog (Tools > Preferences).
[Top]
***
1.6
Legal Notices
AssetManage version 2015
Copyright © 1999-2015 Liberty Street Software
All Rights Reserved
License Agreement
You should carefully read the following terms and conditions before using this software.
Unless you have a different license agreement signed by Liberty Street Software your use of
this software you indicates your acceptance of this license agreement and warranty.
Registered Version
One registered copy of AssetManage may either be used by a single person who uses the
software personally on one computer, or installed on a single workstation used
nonsimultaneously by multiple people, but not both.
You may access the registered version of AssetManage through a network, provided that
you have obtained individual licenses for the software covering all workstations that will
access the software
through the network. For instance, if 8 different workstations will access AssetManage on
the network, each workstation must have its own AssetManage license, regardless of
whether they use AssetManage at different times or concurrently.
© 1999-2015 Liberty Street Software
General Info
You may return the Software for a full refund within thirty days of the date of purchase.
Governing Law
This Agreement is subject to the laws of the Province of Ontario, Canada. All disputes
arising from this Agreement shall be determined under the law of the Province of Ontario,
Canada exclusively by the court having competent pecuniary and territorial jurisdiction over
the city Liberty Street has its principal office.
Disclaimer of Warranty
THIS SOFTWARE AND THE ACCOMPANYING FILES ARE SOLD "AS IS" AND
WITHOUT WARRANTIES AS TO PERFORMANCE OF MERCHANTABILITY OR ANY
OTHER WARRANTIES WHETHER EXPRESSED OR IMPLIED. Because of the
various hardware and software environments into which AssetManage may
be put, NO WARRANTY OF FITNESS FOR A PARTICULAR PURPOSE IS
OFFERED.
LIMITATION OF LIABILITY FOR DAMAGES
IN NO EVENT SHALL LIBERTY STREET SOFTWARE OR ITS SUPPLIERS BE LIABLE TO
YOU, OR TO ANY OTHER PERSON, REGARDLESS OF THE CAUSE, FOR ANY DIRECT,
SPECIAL, INDIRECT, INCIDENTAL OR CONSEQUENTIAL DAMAGES WHATSOEVER
(INCLUDING WITHOUT LIMITATION DAMAGES FOR LOSS OF PROFIT, BUSINESS
INTERRUPTION, LOSS OF BUSINESS INFORMATION, OR ANY OTHER PECUNIARY
LOSS) ARISING OUT OF OR RELATING TO THE USE OR INABILITY TO USE THIS
SOFTWARE, EVEN IF LIBERTY STREET SOFTTWARE HAS BEEN ADVISED OF THE
POSSIBILITY OF SUCH DAMAGES. IN THE EVENT THE FOREGOING LIMITATION IS
FOUND BY A COURT OF COMPETENT JURISDICTION TO BE INEFFECTIVE, THE
PARTIES AGREE THAT LIBERTY STREET SOFTWARE'S MAXIMUM LIABILITY FOR ANY
CLAIM ARISING HEREUNDER (WHETHER IN CONTRACT OR TORT INCLUDING
NEGLIGENCE, PRODUCT LIABILITY OR OTHERWISE) SHALL NOT EXCEED THE
LICENSE FEES, IF ANY, PAID BY YOU TO LIBERTY STREET SOFTWARE FOR USE OF
THE PRODUCT.
Good data processing procedure dictates that any program be thoroughly tested with noncritical data before relying on it.
The user must assume the entire risk of using the program. ANY LIABILITY OF THE
SELLER WILL BE LIMITED EXCLUSIVELY TO PRODUCT
REPLACEMENT OR REFUND OF PURCHASE PRICE.
ASSIGNMENT
You may not transfer or assign the Software or license granted hereunder to another party
unless the other party agrees to all the terms and conditions of this EULA and provided that
you transfer all copies of the Software, registration keys and/or codes, and related
documentation to the same party and destroy any copies not transferred. Any such transfer
terminates your license.
COSTS
© 1999-2015 Liberty Street Software
10
11
AssetManage Manual
You agree to reimburse Liberty Street Software for all expenses incurred by Liberty Street
Software in the enforcement of any of its rights hereunder, including without limitation,
solicitors fees.
1.7
What's new in Version 2015
1. Internet Backup / Restore
You can now backup your data (and images) to a secure, cloud-based location. The
ultimate data protection to guard against computer theft, natural disaster, etc..
This feature also makes moving data between machines much easier. You can download
the latest data file to your laptop that will be used on a business trip, or make
it much easier to migrate your AssetManage data to a newly acquired computer.
Note: This feature will not work in the trial version, it requires a valid activation code.
2. User Permissions
We have received many requests for this feature from current and potential customers.
Assign permissions to your users that will dictate what they can and cannot do while
using AssetManage.
© 1999-2015 Liberty Street Software
General Info
12
3. Data Caching
We have spent alot of time optimizing the performance of the program. Users with large
amounts of data should notice smoother scrolling and faster updating as a result.
4. Web Cam Capture
You can take pictures of assets using your Web Cam. This feature is present in the
Item Picture window and is used in the new Add Items Using WebCam... feature.
© 1999-2015 Liberty Street Software
13
AssetManage Manual
2
Importing and Exporting Data
2.1
Importing data into AssetManage
AssetManage can import delimited text files, Microsoft Access database files
and Microsoft Excel spreadsheets. Not only can you import data pertaining to
assets, but you can also import Dealer, Employee, Customer, Manufacturer and
Insurer information. If you have been using another application to store your
data, check to see if the application has the option to export data. Many
programs allow you to export to a .CSV (comma separated variable file).
Tip: The formatting of Microsoft Excel spreadsheets sometimes
causes problems with the AssetManage import feature. If you are
having trouble importing an Excel Spreadsheet save the spreadsheet
as a CSV file and then try the import again.
© 1999-2015 Liberty Street Software
Importing and Exporting Data
To import asset data into AssetManage
1. Select Import... from the File menu
2. Choose a Text File (.csv, .tab, .txt, .asc), Access (.mdb) or Excel (.xls) file.
and then select the Open button.
© 1999-2015 Liberty Street Software
14
15
AssetManage Manual
3. AssetManage will show the field structure of the file to be imported in the
Source Field Names column. You will also see the first few rows of data from
the import file. To select a Destination Field for each column, click on the
appropriate row and column within the Destination Field. Then select the
appropriate column from the drop-down list that appears.
© 1999-2015 Liberty Street Software
Importing and Exporting Data
4. Do this for all the columns in the Source Field Names section that you
want to import.
5. Click on the OK button to begin the import.
© 1999-2015 Liberty Street Software
16
17
AssetManage Manual
Notes regarding the import feature:
The Assigne d t o Em ploy e e destination field should contain the name of the
employee. A new employee record will be created automatically with the
specified name if it does not already exist.
The Assigne d t o Em ploy e e - Em a il and Assigne d t o Em ploy e e - Em ploy e e ID
will only import data if the Assigne d t o Em ploy e e field is used as well.
If no field is mapped to the Asse t # field, AssetManage will create random
unique asset numbers for every asset imported.
The Assigne d t o Cust om e r destination field should contain the name of the
customer. A new customer record will be created automatically with the
specified name if it does not already exist.
If no source field is mapped to the AssetManage Loc a t ion field, all the data
will be imported into the currently open Location.
To import images
1. Select Image 1, 2, 3 or 4 as the destination column. Make sure the FULL
pathname of the image is specified in the file to be imported Image column.
You can also import images directly from the internet. The FULL URL of the
image must be specified in the Image column of the file that is being imported.
© 1999-2015 Liberty Street Software
Importing and Exporting Data
To import Employee and other data into AssetManage
1. Select Employees or whatever type of data you want to import.
2.2
Exporting data to an Excel or Access file
AssetManage can export data to 3 formats:
HTML
Microsoft Access – MDB files
Microsoft Excel – XLS files
To export data to an Access or Excel file:
Under the File menu,
Select the 'Export…' command. The following dialog will appear:
© 1999-2015 Liberty Street Software
18
19
AssetManage Manual
Choose an existing Excel or Access file, or specify a new file.
Select the locations you would like to export.
Click the 'Export' button.
Another way to export AssetManage data is by using the AssetManage
reporting features. You can specify that a report is to be exported to Excel,
HTML, XML and other formats.
2.3
Exporting data to an HTML file
Under the File menu, select 'Export to HTML…'.
appear:
The following dialog will
© 1999-2015 Liberty Street Software
Importing and Exporting Data
Select an existing HTML file, or specify a new one.
Select the fields to be exported.
Click on the 'Export' button.
If the Show in Browser after Export checkbox is selected, your
default Internet Browser will open with the resulting HTML Document.
Like many other features in AssetManage, the Export to HTML
feature exports the data that is currently being shown in the
program.
Use the Save in Zip File option to save all the html files and images
in a single Zip file. The zip file can then be uploaded to a web-site or
emailed.
3
Keeping Records
3.1
Creating item records
To add an item
There are numerous ways to begin adding items in AssetManage.
© 1999-2015 Liberty Street Software
20
21
AssetManage Manual
1. Select Add Item(s) from the Actions menu, as shown below.
2. Click the Add Item(s) button on the Toolbar, as shown below.
3. Use the Keyboard shortcut: Ctrl+N
4. Click using your right mouse button within the AssetManage window and
select Add Item(s) from the menu that appears, as shown below.
5. You can also create a new item by dragging image files into the
AssetManage list view. The example below will launch the Add Item(s) dialog
with the AddNote.JPG image as an image. AssetManage supports most major
image types including JPG, BMP, GIF, TIFF, PNG, WMF, ICON and EMF.
© 1999-2015 Liberty Street Software
Keeping Records
T h e Ad d Ite m (s ) d ia lo g , s h o win g th e im a g e a s d e s cr ib e d a b o v e .
© 1999-2015 Liberty Street Software
22
23
AssetManage Manual
To add an item using Images
This feature lets you add assets using images you already have on your
computer. These images have usually already been downloaded from a digital
camera.
1. Select Add Items using Images... from the Actions menu.
© 1999-2015 Liberty Street Software
Keeping Records
2. Choose the folder that contains the images that will be used when adding
assets.
3. Select 1 or more images from the thumbnail list that will be associated with
the asset.
4. Enter a description for the asset.
5. Choose either the Quick Add or Add with Details button, a new asset with
the selected images will be created.
© 1999-2015 Liberty Street Software
24
25
AssetManage Manual
To add an item using Your Webcam
If you have 1 or more Webcams attached to your computer, they can be used
to take pictures of assets.
1. Select Add Items using WebCam... from the Actions menu.
2. Click on the Take Snapshot button to take a picture using the WebCam.
3. Use the Quick Add and Add With Details... buttons to add an asset with
the pictures taken using your WebCam.
© 1999-2015 Liberty Street Software
Keeping Records
3.2
Changing item info
After you create an item record, you can make changes to the information by
opening the Item Properties dialog. You can also move or copy an item from
one location to another using the Move/Copy Item Dialog.
To edit an item
There are several ways to edit an item, including:
1. Select the item you want to change or view in the right AssetManage
window and click on Properties under the File menu. The Item Properties
dialog appears. You can also right mouse-click and select Properties from the
popup menu that appears.
© 1999-2015 Liberty Street Software
26
27
AssetManage Manual
Ed itin g a n ite m b y r ig h t- clickin g o n it, a s d e s cr ib e d a b o v e .
2. Double-clicking on an item will also bring up the Edit Item(s) dialog.
3. Selecting Alt+Enter on the keyboard
To edit multiple items at once
1. Select all the items you wish to edit or view in the list window and click
Properties under the File menu or from the context menu which appears when
you right-click in the AssetManage window.
2. The Item Properties dialog appears. The example below shows a change in
the Status and Comments fields for the 3 records selected. Clicking OK will
result in the data entered in these 2 fields to be changed in all 3 records. Any
data previously entered in the Status or Comments fields will be overwritten
on all selected records.
© 1999-2015 Liberty Street Software
Keeping Records
3.3
28
Removing items
Deleting Items
Select the item or items you want to remove and then select Delete from the Actions
menu or context menu. You can also delete items using the keyboard Del key.
AssetManage prompts you to confirm the deletion.
All deleted a sse t re c ords go to the Deleted Items folder. This does not permanently
delete them until you select Empty 'Deleted Items' Folder under the Actions menu,
or right-click on the Deleted Items folder and select the option there. Other records,
such as Dealer, Customer, Insurer or Manufacturer records, are permanently deleted.
© 1999-2015 Liberty Street Software
29
AssetManage Manual
Recovering items from the Deleted Items Folder
1) Open the Deleted Items folder by clicking on item
2) Select and then "Drag" the items you wish to restore back to a location or room
folder.
The same result can be accomplished by using the Move/Copy Items dialog to move the
item(s) out of the Deleted Items folder and back to a location.
3.4
Moving or Copying Items
To move or copy records
1. Select the asset record(s) you wish to move or copy and click Move/
Copy Items... from the Actions menu. The Move or Copy Items dialog
appears, as shown below.
© 1999-2015 Liberty Street Software
Keeping Records
2. Select the location or Room/Dept. to which you want to move or copy
the selected records.
3. If only 1 item is being moved, and the item has a quantity of more than
1, you can choose how many units of the item to move.
4. Check the Copy checkbox to copy the selected record(s) or uncheck
the checkbox to move the records. Click OK.
No te : Items can also be moved between locations and categories using Drag
and Drop. Simply select the items to move, then "drag" them to the new
location or category in the tree view on the left side of the AssetManage
window. To copy items using drag and drop, hold the Ctrl key down while
you are dragging the items.
3.5
Finding Items
To quickly select an asset based on the asset number.
Click in the asset list. Then type the asset number of the asset that should be
located. The status bar at the bottom of the main window will show the text
you are typing as you type it in. If an asset with that number is present in the
list it will be selected. If not, the selection will remain on the presently
selected asset.
Use AssetManage to find a string in any of an asset's Text
fields (Comments, Description, Brand Name, etc..)
Select Actions > Find... from the main menu. You can also use the keyboard
shortcut Ctrl + F
© 1999-2015 Liberty Street Software
30
31
AssetManage Manual
The Search for Text dialog box will appear.
© 1999-2015 Liberty Street Software
Keeping Records
In v o kin g th e S e a r ch fo r T e x t d ia lo g b o x b y s e le ctin g Actio n s > Fin d , a s d e s cr ib e d
abov e.
Enter the text to search for in the Find What box. Then click on the Find
button. Use the Print button to print the results of a search.
Use the Go to record button to close the Search for Text dialog and select
the record in the AssetManage main display.
3.6
Queries
Suppose you would like to view all the assets that you acquired in December of
2000, or perhaps you would like to view all the assets you own that are worth
more than 1000 dollars. You can accomplish this by creating an AssetManage
Query. To create a Query either:
Select Add Query from the Actions menu
Type Ctrl+Q on your keyboard
The following dialog will appear:
© 1999-2015 Liberty Street Software
32
33
AssetManage Manual
A valid query requires a name, and at least 1 condition. The Create and
Create and Execute buttons will only be enabled when a valid query has been
specified. Below is an example of a query. When executed, this query will
display all assets that were last audited in the first quarter of 2011.
Once you have successfully added a Query, you can be view it in the Queries
section as seen below
To run a report that will only include asset that meet the query parameters,
right mouse click on the query, and the select Run Report Using from the
© 1999-2015 Liberty Street Software
Keeping Records
popup menu.
AssetManage uses the Query capabilities built into Microsoft Access. Any
queries you create are stored directly within the AssetManage data file
(ASSETS.MDB).
© 1999-2015 Liberty Street Software
34
35
3.7
AssetManage Manual
Using AssetManage with Barcodes
As shown below, each item record in AssetManage has an asset # field.
When adding or editing records, associate a bar code with a record by placing
the cursor in the Asset # field, then scan the bar code using your bar code
scanner. The text representation of the bar code will automatically be
inserted into the field.
Use the Bar Code Lookup dialog to later retrieve the item record.
The Bar Code Lookup dialog lets you search for assets based on the Asset #,
Barcode or Serial Number. Use the Search In dropdown to specify what field
will be searched.
© 1999-2015 Liberty Street Software
Keeping Records
The Bar Code lookup dialog has many options that dictate what will happen if
an asset is found.
If a bar code scanned within the Bar Code Lookup dialog is not associated
with the Asset any asset, the selected action in the If M a t c hing Asse t Is Not
F ound section will be performed. The option selected in the screenshot below
will result in theAdd Item dialog will appear with the asset number field
already filled in.
The Bar Code Lookup dialog can be used to add many assets in this manner.
For example, if you have purchased pre-printed barcode labels, you can scan
© 1999-2015 Liberty Street Software
36
37
AssetManage Manual
each barcode in, and edit the asset details.
If you simply want to add assets in a certain asset number range from 1-100,
you could just type the asset number into the yellow barcode field, press the
ENTER key and then have an asset with that asset number created
automatically by AssetManage.
Note: It is usually not necessary to click the Lookup button as most bar
code scanners will add an Enter character at the end of the bar code scan.
AssetManage can use any bar code reader that inputs the bar code
characters via the keyboard. These are often referred to as wedge readers as
they wedge themselves between your keyboard and your computer. Some of
these devices are "driverless" -- they are hardware only. Others require a
software driver.
Web Site for bar code scanners
http://www.idautomation.com/scanners/
Liberty Street Software recommends users obtain durable pre-printed bar
code labels for attaching to the actual asset items rather than attempting to
print their own on standard laser printers and paper. Labels are available in
materials ranging from laminated paper through to solid plastic or anodized
aluminium to suit every end use environment. You can choose different sizes
and formats with custom features (such as including your company name and
logo on the label).
Web Site for bar code labels
http://www.barcodesinc.com/services/preprinted-labels.htm
© 1999-2015 Liberty Street Software
Keeping Records
3.8
Depreciation
AssetManage 2011 supports the following five methods of calculating
depreciation:
-
Straight Line
Double Declining Balance
125%, 150% and 175% Declining Balance
Sum of Years Digits
Percentage per Year
Specify Depreciation for an asset by clicking on the Depreciation tab when
adding or editing an asset, as shown below.
Assets with Depreciation set will show both the Monthly & Annual Depreciation
tables in the details view, as shown below.
© 1999-2015 Liberty Street Software
38
39
AssetManage Manual
There are various methods for calculating Partial Year Depreciation. The
method you wish to use can be specified in the Depreciation section of the
Preferences dialog, under the Tools menu (Tools > Preferences), as shown
below.
© 1999-2015 Liberty Street Software
Keeping Records
Depreciation Conventions Used in AssetManage
Full Year: A full year's depreciation is recorded in the first year and none
in the last.
Half Year: Half of one year's depreciation is recorded in the first year and
half in the last.
Full month: Depreciation is prorated according to the number of months
in service during the year, including the month placed in service.
Half Month: Depreciation is prorated according to the number of months
in service during the year. The month the asset is placed in service is
included only if the placed-in-service date falls on or before the 15th.
Actual days: Depreciation is prorated according to the number of days in
service during the year.
3.9
The View Tab - What is it used for?
This section describes the View tab (highlighted in the figure below), and its
uses.
The View tab lets you view information in many additional ways. In the
example below, the Status icon tree menu has been expanded to show the
different Status values used by asset records within AssetManage. Clicking on
the Status icon will show all records where the Status field is populated (not
empty). For example, clicking on the Checked Out icon will only show those
records with Checked Out as the status.
You can access this function this way from the Status, Assigned To, Colors,
Year Made and Made Of icons.
The Manufacturers, Employees, Dealers, Customers, Insurers, Queries
and Groups icons work in a slightly different manner. Clicking on the main icon
does not show asset records, but rather a list of the items from the table
corresponding to the icon. In the example below, the Manufacturer icon has
© 1999-2015 Liberty Street Software
40
41
AssetManage Manual
been selected, resulting in a list of all the Manufacturer records from the
Manufacturer table.
This information can be printed, exported, etc., in the context in which it is
viewed on the screen. For example, selecting Export to HTML at this point will
export a list of Manufacturers to the HTML file of your choosing. For more
information on exporting to HTML, see Exporting data to an HTML file.
3.10
Linking Assets
AssetManage allows assets to be linked together. An asset can be a parent or a child of another
asset, but not both. The following applies to a group of linked assets:
1/ When one asset in the group is moved to another location/dept. all assets in the group are moved
as well.
2/ When one asset in the group is assigned to somebody new, all the linked assets are re-assigned
as well.
3/ When the status of an asset in the group is changed, the status of all the other linked assets is
changed as well.
To link assets:
Select the Linked Assets tab in the Item Properties for one of the assets to be linked. In this
example, we are going to edit a Dell Computer asset and link a keyboard as a child asset.
© 1999-2015 Liberty Street Software
Keeping Records
42
Go back to the AssetManage main window and select the asset that will be the child of the asset
that is currently being edited.
Now return to the Item Properties dialog and select the Add Selected as Children button. The
keyboard asset selected in the main window is now a child of the Dell computer asset currently
being edited.
© 1999-2015 Liberty Street Software
43
3.11
AssetManage Manual
Check In/Check Out
Check Out Tools or other Equipment to an Employee
Select ACTIONS > CHECK OUT TO EMPLOYEE... from the main menu or Ctrl+F8 on
your keyboard.
Process check out transactions automatically with a barcode scanner.
© 1999-2015 Liberty Street Software
Keeping Records
44
1/ Scan the employee's barcode number from the employee badge or enter it manually in
the Employee # field. The employee name will be shown.
2/ Scan or enter the asset #'s for the items to be checked out to the employee.
3/ Press the Complete Checkout button to finish
To Check Out or Check In a single asset first select the asset and the right mouse click.
Choose Check In or Check Out from the popup menu.
© 1999-2015 Liberty Street Software
45
AssetManage Manual
The Check Out or Check In dialog will appear with the asset already selected. Another
list will contain a list of assets with the current status "Checked In" that you can add to
the Items to Check Out list. Use the Employee # field to scan an employee badge
that would contain the employee number in barcode format. The Print Check Out
Receipt checkbox will result in a check out receipt being printed once the Complete
Checkout button is selected.
© 1999-2015 Liberty Street Software
Keeping Records
46
The Check In or Check out feature can also be selected from the main menu (Tools >
Check In...) or using the F9 key in the case of a check in.
© 1999-2015 Liberty Street Software
47
AssetManage Manual
The Check In dialog window will appear with a list of
assets that currently have the status "Checked Out".
Select the assets that should be checked in and then
press the OK button.
Batch Check Out / Check In using a text file
AssetManage supports batch check out / check in using
a simple text file. The text file must be formatted with
one asset per line.
Use the Loa d F rom F ile ... button in the Check Out or
Check In dialog to choose the text file
© 1999-2015 Liberty Street Software
Keeping Records
This feature is useful with PDA-type barcode scanners.
Most of these scanners will allow the scanning of
multiple asset tags, which can then be exported to a PC
as a text file.
AssetManage makes it easy to view all assets with a
particular status such as all Checked Out items. Open
the View tab and then expand the Status section as
seen in the screenshot below.
To run a report that only contains assets with a
particular status such as "Checked Out", simply right
mouse click on the status and then select the report from
the popup menu.
© 1999-2015 Liberty Street Software
48
49
3.12
AssetManage Manual
Disposing Assets
There are several ways to dispose assets in AssetManage:
1/ Select:
TOOLS > DISPOSE...
from the main menu
© 1999-2015 Liberty Street Software
Keeping Records
50
Enter or scan the asset numbers of the items to be disposed. Enter the Out of Service
and Disposal Reason, then click on the OK button.
2/ Select the assets you wish to be dispose in the asset list window. Right mouse click
to show the popup menu:
© 1999-2015 Liberty Street Software
51
AssetManage Manual
Select Dispose.. from the popup menu.
3/ 'Drag' the items to be disposed into the Dispose d Asse t s folder. This action will bring
up the Disposal dialog.
It is also possible to 'Undispose' an asset by 'dragging' it out of the Dispose d Asse t s
folder to another location folder. Note that doing this will set the disposal fields to
empty. An asset is considered disposed if the Date Sold, Disposal Method or Placed out
of Service fields are set to a non-empty value.
© 1999-2015 Liberty Street Software
Keeping Records
52
4/ Edit the asset you wish to dispose by double clicking on the item or choosing
Properties.
Click on the De pre c ia t ion tab. Enter the Disposal information in the section highlighted
in the screenshot above. Click OK to save the Disposal information and dispose the
asset.
All Disposed Assets are moved to the Dispose d Asse t s folder.
© 1999-2015 Liberty Street Software
53
AssetManage Manual
4
Managing Locations
4.1
What are Locations?
Locations
Locations represent a particular home or office, although it is certainly possible
to use locations to represent something else, such as a vehicle, company or
person. AssetManage provides flexibility, allowing you to use locations in the
most convenient manner for you. In the example shown below, the locations
are Toronto Office and Main Office (highlighted).
The way locations work for you depends on your needs. Some things to keep
in mind when organizing your locations are:
Where are the items physically located?
Remember, if you change your locations later, you can easily move the
appropriate items into the new locations and remove the obsolete locations
Departments
© 1999-2015 Liberty Street Software
Managing Locations
54
AssetManage allows you to specify which department an asset is located in.
Click on the Dept. To see only the assets found in the selected Department.
4.2
Creating new locations
You can create locations at any time. A location consists of a Name and
Comments. If you need to change the name of the location, you can change it
by choosing the "Properties" menu item while the location is selected. This is
described in more detail in the following section on Editing Locations. You can
create as many locations as you need.
To create a location
1. Click New Location from the File menu. The Create a New Location dialog appears.
2. Provide a descriptive Name for the location. You can optionally add information
about the location in the Description area.
4.3
Editing and printing location barcodes
You can modify the location's description as well as the information that
appears on the status bar when the location is opened.
To edit a location
1.
2.
Select the location you want to modify in the Locations tab in the main
window.
Cllick Properties from the File menu. The Location Properties dialog
appears.
Make changes to the Name and description and other information as
necessary.
© 1999-2015 Liberty Street Software
55
AssetManage Manual
Ch a n g in g th e te x t in th e Lo ca tio n b o x , a s d e s cr ib e d a b o v e .
The Barcode field lets you print out barcodes for your location. Select Tools >
Print Location Barcode Labels
4.4
Removing Locations
You can remove locations at any time. Remember to move your items to
another Location before deleting the location where they reside.
© 1999-2015 Liberty Street Software
Managing Locations
56
To remove a location
1.
2.
3.
Select the location you want to delete in the Locations tab on the main
window.
Click Delete on the File menu. AssetManage asks you to confirm your
deletion.
Click Yes to remove the location.
Deleting a location will delete all assets that belong to that location. To
recover items accidentally deleted, open the Deleted Items folder and
'drag' the items out to another location.
5
Generating and Using Reports
5.1
Running Reports
There are several ways to run a report in AssetManage. To run a pre-defined report
that includes ALL assets, select the report from the REPORTING section of the main
menu.
Running a report from the main REPORTING menu will include all assets in the report
except for Disposed and Deleted assets.
To run a report that only includes items from a particular location, category,
department, etc...
1/ Select the item that will be used as a source for the report. Right mouse click on the
item and then select RUN REPORT USING and then the report to be used.
© 1999-2015 Liberty Street Software
57
AssetManage Manual
In the example above, only the items from the location Bio Net will be included in the
report.
When running a report, the Print Opt ions dialog will appear. The default is to print the
report directly to the Printer, click on the Direct to... dropdown to select another output
such as to a Microsoft Excel spreadsheet or PDF file.
Running a report that you have created
To run reports that you have created, use the Output Report Using... feature.
© 1999-2015 Liberty Street Software
Generating and Using Reports
From the main menu, you can select Reporting > Output Report Using All
Data...
You will be prompted for the name of the report to run. All AssetManage reports
have the file extension .lst.
The Run Report Using command can also be used with a particular Location,
Category, Department, etc.. To run a report using on the items in a particular
category, right mouse click and select Run Report Using... from the popup menu as
seen below.
© 1999-2015 Liberty Street Software
58
59
AssetManage Manual
Running a report using only selected assets
To run a report using only certain assets, simply select the assets and right mouse
click. Then choose the appropriate report from the popup menu.
© 1999-2015 Liberty Street Software
Generating and Using Reports
The same concept applies to Employees and other data groups that can be found
in the View section of the main window.
© 1999-2015 Liberty Street Software
60
61
5.2
AssetManage Manual
Creating Reports
The quickest way to generate a simple report is to use the Generate Asset Report
command Reporting > Generate Asset Report... from the main menu.
Enter the name of the report, then specify which fields should be shown, sorting and
grouping options. The Create Report and Design... button will create the report and
open the HomeManage report designer with the newly created report in edit mode. The
Create Report and Close button will simply create the report immediately with no
further actions necessary.
© 1999-2015 Liberty Street Software
Generating and Using Reports
62
Once a report is created, you can execute it by selecting Output Report Using... from
a popup menu or from the Reporting main menu.
© 1999-2015 Liberty Street Software
63
5.2.1
AssetManage Manual
Custom Reports
AssetManage allows you to customize your own reports.
Creating Custom Reports
If the report you are creating is similar to one already in the program, Select
Reporting > Edit Report... from the main menu and choose the report. Then
save the report under a different filename and start making changes.
AssetManage also includes a Create Assets Report... feature. Use it to create
simple asset reports.
© 1999-2015 Liberty Street Software
Generating and Using Reports
Select Reporting > Create Assets Report... and the following window will
appear:
© 1999-2015 Liberty Street Software
64
65
AssetManage Manual
The Sa v e As Re port field is mandatory, enter a name for the new report there.
The Cre a t e Re port a nd De sign... button will bring up the Report Designer with
the new report in edit mode. The Cre a t e Re port a nd Close button will create
the report and save it to the AssetManage reports folder.
AssetManage also has a New Report Wizard command that is useful in some
instances.
From the Reporting menu, select New Reports Wizard. The Project Wizard
will appear, directing you through the steps to create a new project:
1.
2.
3.
4.
5.
Set print options and paper size
Set options for page numbering and title:
Choose table options and summary
Choose the data for the list
Create Your Report, proceed to the Label and Report Designer.
For more information on using these steps, see Step-by-Step Example: Report
5.2.2
Label and Report Designer
The Label and Report Designer allows you to create custom labels, file cards,
and reports to complement AssetManage's functionality. To open the Label and
© 1999-2015 Liberty Street Software
Generating and Using Reports
Report Designer, select
Reporting > Create New Report... to create a new report working with .lst
files, or
Reporting > Create / Edit Labels... to create new labels or work with existing
label (.lbl) files, or
Reporting > Create / Edit File Card... to create new file cards or work with
existing card (.crd) files.
Note: In order to use the Edit... feature, you must have previously created .lbl
or .crd files. To edit labels or cards, select a .lbl or .crd file in the Open dialog
box.
Choosing Create... under Reporting takes you directly to the Project Wizard
main screen, as shown below:
For more information about using the Project Wizard, please see Step-by-Step
Example: Report. If you do not want to use the Project Wizard to begin your
project, you can close it by clicking on the X in the top right-hand corner, which
takes you directly to the main Label and Report Designer screen, as shown
below.
© 1999-2015 Liberty Street Software
66
67
AssetManage Manual
T h e La b e l a n d R e p o r t D e s ig n e r in te r fa ce , with a r e p o r t s h o win g As s e ts b y P ictu r e
in p r o g r e s s .
No te : The Label and Report Designer is third-party software, not provided by
Liberty Street Software, included with AssetManage to provide the features
described here. It comes with its own help file (not provided by Liberty Street
Software, and not part of this help file).
To access the specific Label and Report Designer Help, click on the ? in the
menu bar (as shown above), then select Contents to view the entire help file, or
click Context Sensitive and move the ? mouse cursor icon to click on a part of
the interface. This will show help topics relevant to that part of the interface.
S e le ctin g Co n te x t S e n s itiv e h e lp in th e La b e l a n d R e p o r t D e s ig n e r .
5.2.2.1
Step-by-Step Example: Report
To create a report as described in Custom Reports, follow these five steps:
© 1999-2015 Liberty Street Software
Generating and Using Reports
1.
Set print options and paper size: First, using the radio buttons, choose
whether all pages will be printed on the same printer, or whether the cover
page will be printed on a different printer than the following pages. Click Next
to proceed, or Back to return to the Project Wizard welcome screen. Then
set the printer for the report from the available printers (to change a printer
from the default setting, click Choice, which will invoke the Print Setup dialog
box). Then select whether you wish the print to cover the page format, or the
available printing area of the page, using the Force Page Format(s), if
possible and Use physical paper size and not the printable area checkboxes.
Click Next to proceed to Step 2, or Back to return to the initial
printer screen.
T h e P r o j e ct W iz a r d s cr e e n s e ttin g s o m e p r in t o p tio n s , a s d e s cr ib e d a b o v e .
2.
Set options for page numbering and title: AssetManage's default setting is
to number pages, so if you do not wish to have numbered pages, uncheck the
Add Page Numbering check-box. Then, under Options for the title, using
the radio buttons, choose whether your report title will appear only on the first
page or on every page of your report. Click Next to proceed to Step 3, or
Back to return to step 1.
© 1999-2015 Liberty Street Software
68
69
AssetManage Manual
S e ttin g p a g e o p tio n s a n d title in th e P r o j e ct W iz a r d .
3.
Choose Object Type: You To create a report with a single table, simply
select the Table option.
Ch o o s e Ob j e ct T y p e .
4.
Choose the table that will be used for the report: AssetManage can create
reports based on data from different sources. The report designer can also
create nested tables. Choose the table that will be used as the initial base
table for this report. For this example, we will select the Asset table.
© 1999-2015 Liberty Street Software
Generating and Using Reports
S e le ct S o u r ce T a b le s cr e e n in th e P r o j e ct W iz a r d .
5.
Choose the data for the list: This box lets you choose which data goes into
the report. Click on entries in the Available Fields box to select them
(Ctrl+click to select multiple entries, Shift+click to select multiple sequential
entries), then use the > arrow to move the selected entries to the Selected
Fields box. To move all available fields, click the >> button. To remove fields
from the Selected Fields box, click the < button. To remove a ll fields from
the Selected Fields box, click the << button. You can also sort the selected
fields into whatever order you like (the default is the order in which they're
selected) by clicking on them to highlight them, then using the up- and downarrow keys to move them up and down the list to their desired places.
Unchecking the Add Column Titles check-box at the bottom right will remove
headings from the report. Click Next to proceed to Step 6, or Back to return
to step 4.
© 1999-2015 Liberty Street Software
70
71
AssetManage Manual
P o p u la tin g th e lis t with d a ta , u s in g th e Av a ila b le a n d S e le cte d Fie ld s b o x e s in th e
P r o j e ct W iz a r d .
6.
Create Your Report: When you have selected all the data to be included, and
sorted it as you want, click Done! to proceed through the Project Wizard to
the Label and Report Designer, or Cancel to escape the Project Wizard without
generating a report.
© 1999-2015 Liberty Street Software
Generating and Using Reports
T h e La b e l a n d R e p o r t D e s ig n e r in te r fa ce .
To access the specific Label and Report Designer Help, click on the ? in the
menu bar (as shown above), then select Contents to view the entire help file, or
click Context Sensitive and move the ? mouse cursor icon to click on a part of
the interface. This will show help topics relevant to that part of the interface.
5.3
Reporting Fields Explained
Reporting Fields you can use
Most of the fields you can use in a report are self-explanatory. For
example, the Asset.AssetNum field will show the asset number.
Listed are some fields that may need more explanation:
Asset.AskingPrice - If you have an item for sale, this is the asking price for
the item. Not to be confused with Asset.SellingPrice which is the price that
item was actually sold for.
Asset.Created - the date/time the item was first entered into
HomeManage.
© 1999-2015 Liberty Street Software
72
73
AssetManage Manual
Asset.I tem Detail - this report field will show an entire HMTL display for
that asset, similar to what you see in the item detail window when you
view an asset in the program.
Asset.HasNotebookI tem s
Asset.HasNotebookI tem sDueDate
Asset.HasNotebookI tem sI nvoiceDate
Asset.HasNotebookI tem sCom pletionDate
Asset.HasM aintenance
Asset.HasM aintenanceI nvoiceDate
Asset.HasM aintenanceCom pletionDate
Asset.HasM aintenanceDueDate
Asset.HasRem inders
Asset.HasBeenCom pleted
Asset.HasW arranty
Asset.HasLease
Asset.HasI nsurance
Asset.HasI m age
These boolean fields can be used as filters in a report. So if you are creating a
report that should only show items with a valid warranty. You can use the
Asset.HasWarranty field.
5.4
Depreciation Reports
AssetManage ships with several Monthly and Annual Depreciation report
templates. These reports will show depreciation data grouped by
Category, Department, or simply in a list sorted by Asset Number.
To run a Depreciation Report:
1/ Select the Location, Department or Category whose assets will be
included in the report. To use all assets, select the Use All Assets in
Report checkbox in Step 2.
© 1999-2015 Liberty Street Software
Generating and Using Reports
You can also select Reporting > Depreciation Report Using from the main
menu.
2/ The Depreciation Report dialog will appear. If you want to run an
annual report choose the Year End date from the list provided. The pulldown list contains all valid year-end or month-end dates. If a year-end
or month-end date is not in the Annual or Monthly list, it is because no
assets have depreciation in that period.
5.5
Sorting & Filtering Data Within Reports
AssetManage allows you to sort data within reports using whichever data field
© 1999-2015 Liberty Street Software
74
75
AssetManage Manual
(s) you prefer. To specify a field by which to sort the report, go to
Reporting > Edit Report
and, when the Report Designer appears, go to
Project > Sort Order of Data.
The selection of Sort Order dialogue box will appear, as shown below:
T h e s e le ctio n o f S o r t Or d e r d ia lo g u e b o x , s h o win g th e a v a ila b le s o r t o p tio n s .
Click on an option to select it, and then click OK. When using groups in
reports, it is important to sort by the grouping field. The example above
shows the sorting that should be used in a report that has assets grouped by
category.
© 1999-2015 Liberty Street Software
Generating and Using Reports
T a b le S o r tin g
In addition to choosing the sorting field that will be used by the report, each
table can have a sort field associated with it. Select the table in the Report
structure view and then choose the sort field in the Properties window. In the
example shown, the report will be grouped by Category. The Categories will
be shown in alphabetical order. Within each category group the assets will be
sorted by Asset Number.
AssetManage also has a report filter, which allows you to set up parameters
by which to select the data appearing in a report. To access the report filter,
choose Project > Filter from the Report Designer main menu. When the Edit
Filter Condition dialog box appears, follow the tooltips and the internal Report
Designer help to create the filter, as shown below. In the example below
Asset.Category != "" specifies that assets without an assigned category
© 1999-2015 Liberty Street Software
76
77
AssetManage Manual
should not be included in the report:
T h e Ed it Filte r Co n d itio n d ia lo g b o x , s h o win g Va r ia b le s a n d Fu n ctio n s . T o a cce s s
th e h e lp to p ics fo r th is d ia lo g b o x , click th e ? ico n in th e lo we r le ft, a s s h o wn
abov e.
6
Managing Employees, Manufacturers,etc..
6.1
Working with employee data
AssetManage lets you keep track of the employees that work for your organization. To
view the list of Employees, select View > Show > Employees from the main menu
© 1999-2015 Liberty Street Software
Managing Employees, Manufacturers,etc..
78
You can also view the employee list by click on the View tab, then selecting the
Employees icon.
To add a new employee to the program, select Actions > Add Employee.. from the
main menu.
© 1999-2015 Liberty Street Software
79
AssetManage Manual
You can also add a new employee dynamically from the Add Asset dialog. Simply type
the the last name, then the first name separated by a comma.
Or the first name, then last name separated by a space.
To print employee badge(s). Select the employees, you wish to print the badges for,
then right mouse click and press the Print Employee Badges... command from the
popup menu.
© 1999-2015 Liberty Street Software
Managing Employees, Manufacturers,etc..
80
The AssetManage report feature is context-sensitive, to run a report based only on the
assets that belong to a particular employee, expand the Employees section in the View
main window by double-clicking on the Employees icon or clicking on the box with a plus
sign to the left of the employees icon.
Then right mouse click on the employee whose assets you wish to view, pick a report
from the popup menu as shown below.
© 1999-2015 Liberty Street Software
81
6.2
AssetManage Manual
Working with Manufacturers, Insurers, etc..
AssetManage keeps track of Manufacturer, Customer, Vendor and Insurer information.
To view a list of Manufacturers, select View > Show > Manufacturers from the main
menu.
Or select the Manufacturer icon from the View tab main window:
© 1999-2015 Liberty Street Software
Managing Employees, Manufacturers,etc..
82
To View assets from a particular manufacturer, expand the Manufacturer section by
double clicking on the icon or clicking in the box with a plus sign to the left of the icon:
Then click on one of the Manufacturers listed to see the assets that use the particular
manufacturer.
© 1999-2015 Liberty Street Software
83
AssetManage Manual
7
How Do I
7.1
Use AssetManage with a PDA type Barcode scanner?
Using a barcode scanner such as the Palm OS-Powered Symbol SPT1550 or SPT1800, you can take
a complete inventory of your assets, then later upload the inventory to AssetManage. To do this you
will need an application such as
On Hand from Stevens Creek Software for the Palm Operating System
http://www.stevenscreek.com/palm/onhand.html
or DoInventory from WakefieldSoft
http://www.wakefieldsoft.com/doinventory/
Both of these software programs will export collected data from the the PDA/Barcode scanner to a
text file on your PC. This data can then be imported into AssetManage.
7.2
Backup My Data?
Select File > Backup Database... from the main menu. To automatically
backup your data, configure the Backup Directory & Frequency section in
the Preferences dialog - Tools > Preferences
© 1999-2015 Liberty Street Software
How Do I
AssetManage stores your backed up data in a ZIP file. The backup includes
the program data file ASSETS.MDB and any image files that you have
attached to entered items. To view your backup files, choose File >
Manage Backup Files... from the main menu.
To view the contents of a backup, you can open the ZIP file by doubleclicking on it or opening the file. The backup file name includes the Date and
Time of the backup in the filename. Older backup ZIP files can be deleted if
necessary.
To restore backed up data into AssetManage
AssetManage can ONLY import a Microsoft Access .MDB file that was
backed up to another location.
Previous versions of AssetManage (2007 and older) would create a new
filename for the backup data file and store it in the Backup folder. If this
applies to your case, first rename the file to ASSETS.MDB
If you are restoring from version 2011, first unzip the backup file.
© 1999-2015 Liberty Street Software
84
85
AssetManage Manual
Copy the ASSETS.MDB file to the Data folder in your current
AssetManage installation, replacing the ASSETS.MDB file that is currently
there (To be safe, rename the current ASSETS.MDB file or make a backup
copy in another location)
The location of the Data folder can be found in the program Preferences
(Tools > Preferences).
There is no need to import data unless you have suffered a system crash
or accidently deleted records.
7.3
Change Field Names?
To change field names, Select the Field Names tab from the AssetManage
Preferences dialog. Click on the appropriate column to enter a new field
value. Leave the New Field Name blank to keep the old field name. Note that
the << Asset User Field Tab Title >> is used to change the title of the tab in
the Asset Properties dialog named "User Defined Fields," as shown below.
© 1999-2015 Liberty Street Software
How Do I
AssetManage has over 100 user defined fields, including 100 Text, 3 Boolean, 2
Currency and 2 Date fields. You can also change the names for fields such as:
Color, Made Of, Year, Number Made, Size and Shape as seen below.
© 1999-2015 Liberty Street Software
86
87
AssetManage Manual
When you set the User defined fields in AssetManage.
© 1999-2015 Liberty Street Software
How Do I
You will notice a User Fields tab when adding or editing assets this tab will let
you enter information for each user defined field that will be stored for the
asset being added/edited.
© 1999-2015 Liberty Street Software
88
89
AssetManage Manual
The Color, Made Of and Year fields have the added advantage of appearing in
the View display. So you can enumerate these fields and view records by field
value.
7.4
Change multiple records simultaneously?
You may occasionally wish to go back and change some information common to
more than one item record at a time. For example, you may wish to add
insurance information for 8 items. Rather than edit each record individually and
fill in the insurance fields, there is a much easier way:
Changing information for multiple records
1.
Select all the items records whose data you wish to change. Then select
© 1999-2015 Liberty Street Software
How Do I
2.
7.5
Properties from the main menu or from the right mouse-click context
menu.
Specify the information to be updated in all the selected records. Note
that leaving a field blank will NOT result in any information in that field
being set to empty (erased). The field will retain the data (if any) it
contained previously.
Change the Data File (or Image files) location?
The location of the AssetManage data file (ASSETS.MDB) or the directory used
to store images can be changed from within the Preferences dialog (under
the Tools menu).
If you are using the multi-user capability of AssetManage, be sure that all users
have read-write permission on both these directories.
AssetManage stores images attached to records as jpg images in the Images
directory. The number after the prefix 'Asset' is the unique id of the asset
record. The number in parenthesis "( )" is the image number. Each record can
have up to 4 images. Images belonging to other record types will have a
different prefix, for instance, Dealer images will have the prefix "Dealer" (instead
of "Asset").
As s e t im a g e s with p r e fix e s a n d n u m b e r s , a s d e s cr ib e d a b o v e .
7.6
Check Service Agreements or Warranties
You can check for expired (or soon to expire) Service Agreements/Warranties
that apply to items you have entered into AssetManage.
Checking for Expiring Service Agreements/Warranties
1. Click Check Svc. Agreements/Warranties from the File menu. The Check
Warranties dialog appears, as shown below.
© 1999-2015 Liberty Street Software
90
91
AssetManage Manual
2. Select the date from which you would like to begin checking warranties.
3. Select the end date, then click the Check button.
All the items whose warranties expire between the 2 dates selected will be
shown. You can then print the list by clicking on the "Print..." button.
An Easier way to view Expiring Warranties, Leases or Service Agreements is
from the View tab. Expand the Expiring Warranties section to see the Month/
Year expiration date for all assets with valid Expiration Dates.
7.7
Create a new Category or Department?
Creating Categories
There are several ways to create a category or room:
1. Click the Add Category… or Add Room... button in the Preferences
dialog, as shown below.
© 1999-2015 Liberty Street Software
How Do I
2. Type the name of the new category in the Category window when
adding or editing an item. To add a room "on the fly," perform the same action
in the Room/Dept. field.
3. A third way to create a new category is to right mouse-click in the
Category view and select Add Category…
7.8
Edit a Category?
To edit a category
1.
2.
Select the category you want to modify in the Category tab in the main
window.
Click Properties from the File menu, or from the popup menu that appears
when you right mouse-click. The Category Properties dialog appears, as
shown below.
© 1999-2015 Liberty Street Software
92
93
7.9
AssetManage Manual
Remove a Category or Department?
AssetManage ships with many pre-defined categories and rooms. You many
want to simplify data entry by removing unnecessary rooms and/or categories.
To delete unused Rooms and/or Categories
1. From the AssetManage Setup dialog, select the rooms and categories you
would like to remove. Note that you can select multiple items in both the
room and category list controls. You many select multiple items by holding
down the Shift or Control keys on the keyboard and using the mouse pointer
to click on the entries and select multiple items. The Shift key will select
multiple sequential entries, and the Control key will select multiple individual
entries.
2. Click the delete button.
3. Click the OK button to permanently delete the items, or
4. Click the Cancel button to abort the process.
S e le ctin g m u ltip le ite m s in th e S e tu p d ia lo g , a s d e s cr ib e d a b o v e .
© 1999-2015 Liberty Street Software
How Do I
7.10
94
Set the beginning of my companies fiscal year?
You can set the start of the fiscal year from the AssetManage Preferences dialog,
as shown below. (Tools > Preferences)
7.11
Sort Items?
How Do I Sort Items?
To sort items by column, click on the column header. Click on the header again to
toggle the sort from Ascending to Descending and vice-versa. The example below
shows a Descending sort on the Description field.
7.12
Specify which columns I want to see?
Each company or individual has different needs and requires different information from
AssetManage. Liberty Street Software has kept these differences in mind when
© 1999-2015 Liberty Street Software
95
AssetManage Manual
designing AssetManage. You can determine the information you need most often or is
most important to you.
To specify the information you want to view
1.
From the AssetManage Setup dialog, open the Columns tab, as shown below.
2.
For each category, select and organize the columns you want to see using the
following buttons:
Delete — Select a column in the Show the Following area and click Delete to remove
the column from the display.
Add — Select a column in the Available Columns area and click Add to display the
column.
Move Up — Select a column in the Show the Following area and click Move Up to have
the column display further to the left.
Move Down — Select a column in the Show the Following area and click Move Down to
have the column display further to the right.
Reset — Click Reset to ignore your changes and return to the default column setup.
7.13
Track expenses related to an item?
Track expenses related to an item by using the 'Item Notebook' tab when adding or
editing items. This tab is for tracking repairs, part replacements, and other expenses
incurred related to an asset. Use the Add..., Edit... and Delete buttons to manage
entries.
© 1999-2015 Liberty Street Software
How Do I
7.14
96
How Do I Generate Asset Numbers Automatically?
AssetManage allows you to either specify or automatically generate asset
numbers for use within its database. To automatically generate asset
numbers, go to
Tools > Preferences > Preferences tab
and check the check-box labelled Generate a unique Asset Number if
field is left blank. (This is the default setting, as shown below.)
S e ttin g As s e tM a n a g e to generate unique Asset Numbers
To specify numbers, uncheck the check box described above, and then
enter the asset number in the Asset# field.
7.15
Make my Labels print out properly
AssetManage includes pre-defined label templates for labels from the manufacturers:
Avery, Herma and Leitz. If you are using another type of label, you can customize your
label template by entering the measurements (offsets, width, height, etc...) for the label.
These measurements can usually be found in the label packaging or online.
To enter the measurements for your labels:
© 1999-2015 Liberty Street Software
97
AssetManage Manual
Choose Reporting > Edit Labels... from the main menu.
Select the label template you want to use. Then select Project > Page Setup from the
Report Designer main menu.
© 1999-2015 Liberty Street Software
How Do I
98
Click on the Regions tab...Expand the Layout Definition section. Then enter the
measurements for the label and then click on the OK button to save your changes.
If you are using a label printer that prints out labels one per row, such as the Zebra label
printer below
Make sure to set both the Horizontal Count and Vertical Count to 1.
© 1999-2015 Liberty Street Software
99
AssetManage Manual
8
Troubleshooting
8.1
Trouble-shooting and Frequently asked questions
Q: I can't see newly imported data after using the Import
A: Try closing and reopening the application.
function
Q:
I am trying to print out labels for several assets. Only the first label prints
out. Or the first label prints out multiple times. Or the labels are cut off at the
right or bottom.
A:
This usually happens if you are printing to a label printer that prints 1 label
per row. If this is the case...Edit the label template you are using (Reporting >
Edit Labels...). Select Project > Page Setup from the report designer main
menu. Expand the Layout Definition section of the Regions tab.
© 1999-2015 Liberty Street Software
Troubleshooting
Set the Horizontal count and Vertical count to 1. If the problem is that the
labels are cut off when printing. Find out the offsets and measurements of the
labels you are printing to and enter them into the Layout Definition section.
Save the label template and then try printing again.
Q: Importing an Excel spreadsheet is not importing all my data correctly.
A: This usually happens because of the formatting of the Excel spreadsheet.
Try save the spreadsheet as a CSV file and import again.
Q:
I change the database location. AssetManage cannot find the database
afterward.
A:
Try closing and reopening the application.
© 1999-2015 Liberty Street Software
100
101
AssetManage Manual
Q:
A:
I get "Divide by Zero" errors, or GPFs when trying to add items
Try this:
1. Run Regedit.exe
2. Delete All ../Software/Liberty Street Software/AssetManage nodes in both
HKEY_CURRENT_USER and HKEY_LOCAL_MACHINE
4. Try running AssetManage again.
Q:
A:
AssetManage crashes when exiting, or when adding items.
Q:
When trying to run AssetManage, a message similar to this appears:
This is usually because the Headers.wcd has become corrupted. Delete the
file and try running AssetManage again.
"T he M ic rosoft Je t da t a ba se e ngine c a nnot ope n t he file ...
\Asse t M a na ge \Asse t s.m db. It is a lre a dy ope ne d e xc lusiv e ly by a not he r use r, or
y ou ne e d pe rm ission t o v ie w it s da t a ."
A:
This usually happens when a file called Assets.ldb gets corrupted. Delete
Assets.ldb ( NOT ASSETS.mdb !!) from your AssetManage directory and try
running the program again.
9
User Permissions
Enter topic text here.
9.1
Assigning Permissions to AssetManage Users
One of the major new features in AssetManage 2015 is User Permissions. Users can be granted or
denied permission to perform various tasks.
It is not mandatory to set user permissions. If no users are added, the software will behave as if every
user has full permission to any features in the program.
© 1999-2015 Liberty Street Software
User Permissions
To begin setting user permissions with AssetManage:
1/ Select File > Manage Users... from the main menu.
Note that the first user added must be an Administrator. Only users with the permission level of
Administrator can add, delete and edit other user permissions.
© 1999-2015 Liberty Street Software
102
103
AssetManage Manual
2/ You will see the Manage Users dialog open with no users define. Select the Add User button to
begin by adding yourself as an AssetManage Administrator.
2/ Enter your Username and permissions. The first user must be an Admin so that option defaults to
True and cannot be changed.
© 1999-2015 Liberty Street Software
User Permissions
3/ Add additional users as needed. Setting the desired permission levels.
© 1999-2015 Liberty Street Software
104
105
AssetManage Manual
© 1999-2015 Liberty Street Software
Index
copyright
9
create a category
91
Create Report and Close
63
Create Report and Design...
63
csv 13
custom reports
63
Index
-..asc
.tab
.txt
13
13
13
-Ddelete an item
28
delete unused Rooms
93
Deleted Items
55
departments
53
depreciation
38
Depreciation Report
73
Disposed Assets
49
Divide by Zero
99
Double Declining Balance
38
-1150% Declining Balance
38
-550comupd.exe
99
-A-
-E-
Access
18, 32
Add Category
91
Assets.mdb
1, 32, 83
edit a category
92
edit a location
54
edit item
26
EMF
20
employee badge
77
example how-to
67
Excel
13, 18
expenses
95
export
18, 19
Export data to an Access or Excel file
Export to HTML
19
-Bbackup
3, 83
backup your data
Bar Code lookup
bar code support
Batch Check Out /
BMP
20
83
35
35
Check In
43
-Ccalculating depreciation
38
Category Name
92
Category Properties
92
Check In/Check Out
43
Check Out Tools or other equipment to an Employee
43
Check Warranties
90
column
94
Columns
94
Contact Information
2
Copy
29
© 1999-2015 Liberty Street Software
-FFAQ
99
features
1
find item
30
find what
30
-GGIF
20
18
106
107
AssetManage Manual
-H-
-N-
home
HTML
new category
91
New Location
54
New Reports Wizard
53
19
-I-
-O-
ICON
20
images
20
import
3
import images
13
Importing data
13
installation
4
Installing AssetManage on a network server
interface
40
Item Notebook
95
item properties
26
item records
20
office
4
queries
-L-
-MManage Users
101
manipulating report data
74
Manufacturers
81
Move Down
94
Move Up
94
move/copy item
26
Move/Copy Note
29
Multi-User installation
4
Multi-User Setup
4
Percentage per Year
38
PNG
20
pre-printed barcode labels
Print Employee Badges...
Print Options
56
project wizard
63, 67
Properties
92
35
77
-Q-
20
label and report designer
63, 65, 67
label printer
96
Legal Notices
9
Liberty Street Software Technical Support
Liberty Street Software web-site
2
Limitation of Liability
9
locations
53
53
-P-
-JJPG
63
32
-R2
records
20
recover deleted item
28
RegEdit
4
Registration Code information
remove a location
55
report
67
report filter
74
reports
61, 63, 74
Reset
94
rooms
53
4
-Sscanner
35
search
30
search string
30
search text
30
setup
4
Single-User installation
4
© 1999-2015 Liberty Street Software
Index
Sort
74, 94
Sort report data
74
Sorting
94
Straight Line
38
Sum of Years Digits
38
System Requirements
4
-TTake Snapshot
20
Technical Support
2
TIFF
20
To add an item
20
To add an item using Your Webcam
To import images
13
Track expenses
95
Troubleshooting
99
20
-Uunused Rooms
93
upgrade
3
Upgrade to from an earlier version
3
using AssetManage with bar codes
35
-Vview information
View tab
40
40
-Wwarranties
90
Web Site
2
website
2
What Are Locations
WMF
20
53
© 1999-2015 Liberty Street Software
108