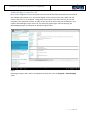
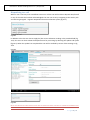
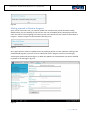
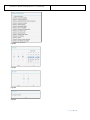
1
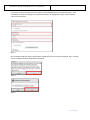
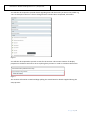
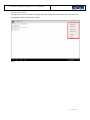
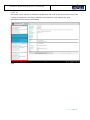
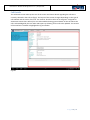
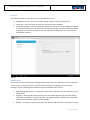
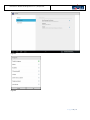
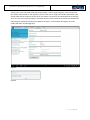
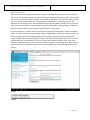
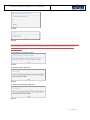
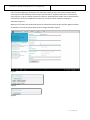
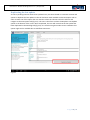
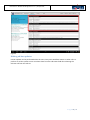
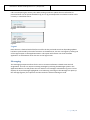
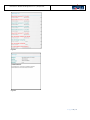
User Manual
Mobile Job Management v2.1.7
Heinrich Etsebeth
User Manual – Mobile Job Management v2.1.7 | 15 April 2014
Contents
Introduction ............................................................................................................................................ 4
Introduction to Mobile Job Management .............................................................................................. 4
Installation .............................................................................................................................................. 5
Configuring the Samsung Galaxy Note 10.1 device ............................................................................ 5
Email Setup ..................................................................................................................................... 5
Allowing for the installation of applications from Unknown Sources ............................................ 8
Enabling the Global Positioning Satellite options ......................................................................... 10
Downloading MJM ............................................................................................................................ 11
Installing MJM ................................................................................................................................... 14
Overview of the Interface ..................................................................................................................... 15
Login Screen ...................................................................................................................................... 15
Title Bar ............................................................................................................................................. 16
Application Menu.............................................................................................................................. 17
Call List .............................................................................................................................................. 18
Call Details......................................................................................................................................... 19
Description Tab ............................................................................................................................. 20
Worklog Tab .................................................................................................................................. 21
Activity Tab.................................................................................................................................... 22
Asset Tab ....................................................................................................................................... 23
CA CSS Tab..................................................................................................................................... 24
Performing common operations........................................................................................................... 25
Login .................................................................................................................................................. 25
Synchronizing the Cache ................................................................................................................... 26
Reloading the Cache ......................................................................................................................... 26
Performing a backup of the Cache.................................................................................................... 26
Changing application settings ........................................................................................................... 26
General .......................................................................................................................................... 27
Notifications .................................................................................................................................. 27
Data & Sync ................................................................................................................................... 29
Acknowledge receipt of a call ........................................................................................................... 30
Dispatching to a call .......................................................................................................................... 31
Placing yourself in Work in Progress................................................................................................. 32
P a g e 2 | 47
User Manual – Mobile Job Management v2.1.7 | 15 April 2014
Making an appointment ................................................................................................................... 34
Referring a call to a vendor ............................................................................................................... 36
Resolving a call .................................................................................................................................. 38
Supplying return end travel .............................................................................................................. 40
Duplicating the last update ............................................................................................................... 43
Making ad-hoc updates .................................................................................................................... 44
Logout ............................................................................................................................................... 45
Messaging ............................................................................................................................................. 45
Glossary ................................................................................................................................................. 47
Abbreviations .................................................................................................................................... 47
Definitions ......................................................................................................................................... 47
P a g e 3 | 47
User Manual – Mobile Job Management v2.1.7 | 15 April 2014
Introduction
The purpose and aim of this document is to provide guidelines to IMS Mobile users when using the
Samsung tablet to update and manage support incidents assigned to them. IMS Mobile is the
handheld device extension of the EOH IMS system and in its present form, allows for basic support
call management.
Introduction to Mobile Job Management
Mobile Job Management is an Android application written in Java for the management of calls
assigned to engineers providing field support. The MJM application also keeps track of the user’s
time spent traveling as well as onsite and mileage covered while traveling to and from sites. Above
this the user’s GPS co-ordinates are also recorded and periodically sent to the server to enable the
Call Co-Ordinators to assign calls more appropriately.
P a g e 4 | 47
User Manual – Mobile Job Management v2.1.7 | 15 April 2014
Installation
Configuring the Samsung Galaxy Note 10.1 device
Email Setup
From the Application Drawer open the Settings application (fig 1.1).
Fig 1.1
Locate the Accounts and sync section and select the + Add account option shown in fig 1.2.
Fig 1.2
P a g e 5 | 47
User Manual – Mobile Job Management v2.1.7 | 15 April 2014
In the next screen presented select the option marked Add Microsoft Exchange ActiveSync. Then
select Manual setup and supply the required information as highlighted in fig 1.3. Once filled in
select the Next option.
Fig 1.3
The exchange setup will require confirmation regarding security restrictions imposed. Fig 1.4 and fig
1.5 are examples of these confirmation messages.
Fig 1.4
Fig 1.5
P a g e 6 | 47
User Manual – Mobile Job Management v2.1.7 | 15 April 2014
You will then be required to provide details regarding how and what mails you want to be pulled. Fig
1.6 is an example as the user is free to change these as needed. Once completed, select Next
Fig 1.6
You will then be requested to provide a name for the account. This account name is for display
purposes on the device and can be set to anything that you want. In order to continue select Done.
Fig 1.7
The account will now be created and begin pulling the emails based on details supplied during the
setup process.
P a g e 7 | 47
User Manual – Mobile Job Management v2.1.7 | 15 April 2014
Allowing for the installation of applications from Unknown Sources
The Android Operating System prevalent on the Samsung Galaxy Note 10.1 devices will, for security
reasons, not install applications outside of the Google Play Store. If you attempt to install an
application from an external source by default you will receive the message depicted in fig 2.1.
Fig 2.1
In order to allow the installation of the MJM client on one of these devices, external installation
sources needs to be enabled on the device. To do so you need to open the Settings application by
first opening the Application Drawer (fig 2.2) and selecting the Settings application (fig 2.3).
Fig 2.2
P a g e 8 | 47
User Manual – Mobile Job Management v2.1.7 | 15 April 2014
Fig 2.3
Once the Settings application is open locate the section titled Security (fig 2.4). In this section make
sure that the option titled Unknown sources is selected and shows a check mark next to it as shown
in fig 2.4.
Fig 2.4
When you select the option you will be notified of the risks involved with the installation of
applications that are not distributed through the Google Play Store. Accept and close this message
by selecting the Ok button (fig 2.5).
P a g e 9 | 47
User Manual – Mobile Job Management v2.1.7 | 15 April 2014
Fig 2.5
Enabling the Global Positioning Satellite options
In order for the MJM application to function correctly the Samsung Galaxy Note 10.1 device needs to
be configured so that it collects Global Positioning data through Satellite positioning. This is done by
opening up the Settings application as described previously under Email Setup. Once the Settings
application is open locate the section marked Location services and ensure that the option titled Use
GPS satellites is enabled (fig 3).
Fig 3
P a g e 10 | 47
User Manual – Mobile Job Management v2.1.7 | 15 April 2014
Downloading MJM
The MJM application is downloadable from the IMS Portal website. In order to download the client
on the Samsung Galaxy Note 10.1 device you will need to locate and open the Internet application
from the application drawer. This can be done by opening the application drawer as previously
described under Allowing for the Installation of Applications from Unknown Sources and selecting
the Internet application (fig 4.1).
Fig 4.1
P a g e 11 | 47
User Manual – Mobile Job Management v2.1.7 | 15 April 2014
Once the Internet application has been, opened replace the address in the address bar with
http://ims.eoh.co.za (fig 4.2) and select the Go option on the onscreen keyboard (fig 4.2).
Fig 4.2
P a g e 12 | 47
User Manual – Mobile Job Management v2.1.7 | 15 April 2014
Once the IMS Portal landing page has completed loading you will notice that it contains a list of
client versions with links to their respective release notes (fig 4.3). Note that all clients that are not
currently supported by the server will not be available for download.
Fig 4.3
To download the clients simply select the name of the desired client. This will start the download
process and feedback will be provided in the notification section of the Android Operating System’s
interface once the download is complete.
P a g e 13 | 47
User Manual – Mobile Job Management v2.1.7 | 15 April 2014
Installing MJM
When the notification is displayed that the application has been downloaded simply click on the
notification and the application will be installed. You will be presented with an installation
confirmation screen (fig 5.1). On this screen select the Install option.
Fig 5.1
Once the installation is completed the installation process will present the screen depicted in fig 5.2.
Fig 5.2
P a g e 14 | 47
User Manual – Mobile Job Management v2.1.7 | 15 April 2014
If you see the message in fig 5.3 please refer to the previous sections of this manual regarding the
pre-installation setup.
Fig 5.3
Overview of the Interface
Login Screen
The Logon Screen will be the first thing the user sees when opening the application (fig 6). It
comprises of an EOH logo, a username field, a password field and a login button.
Fig 6
P a g e 15 | 47
User Manual – Mobile Job Management v2.1.7 | 15 April 2014
Title Bar
The application title bar is located at the top of the screen and contains the name of the application
and the currently installed version (fig 7). If applicable it also shows navigates tabs.
Fig 7
P a g e 16 | 47
User Manual – Mobile Job Management v2.1.7 | 15 April 2014
Application Menu
The application menu is situated in the right top hand corner of the application and can be accessed
by tapping the button situated there (fig 8)
Fig 8
P a g e 17 | 47
User Manual – Mobile Job Management v2.1.7 | 15 April 2014
Call List
This section of the interface is situated on the left hand side of the screen and contains a list of calls
currently assigned to the user (fig 9). It displays various data on a per call basis for quick
identification and to enhance accessibility.
Fig 9
P a g e 18 | 47
User Manual – Mobile Job Management v2.1.7 | 15 April 2014
Call Details
The call details screen takes up the rest of the screen and shows details regarding the call that is
currently selected in the Call List (fig 9). The layout of this section changes depending on the type of
call selected and the status of the call. For instance: Should a call be in an Assigned – Assigned for
Assessment status there will only be one tab available showing general details of the call. When the
call is acknowledged by the user other tabs opens up allowing for the call to be updated. This section
of the interface is located as highlighted in fig 10.1 below.
Fig 10.1
P a g e 19 | 47
User Manual – Mobile Job Management v2.1.7 | 15 April 2014
Description Tab
General details regarding a call are displayed on the Description Tab (fig 10.2). These details include
the contact details of the requestor, the site, description and priority related details of the call.
Fig 10.2
P a g e 20 | 47
User Manual – Mobile Job Management v2.1.7 | 15 April 2014
Worklog Tab
The Worklog Tab contains a list of all the activities on the call (fig 10.3). The activities are ordered so
that the latest entry is at the top of the list. The list, by default, contains only the first five items. This
can be changed by the filter options at the right top hand side by means of the provided options. The
user can filter the list of activities to only show the first five entries, only CA entries, only IMS entries
or all of the entries.
Fig 10.3
P a g e 21 | 47
User Manual – Mobile Job Management v2.1.7 | 15 April 2014
Activity Tab
This section of the application allows the user to update the calls (fig 10.4). This is also where the
user progresses through the workflow by transitioning the call through different statuses.
Fig 10.4
P a g e 22 | 47
User Manual – Mobile Job Management v2.1.7 | 15 April 2014
Asset Tab
Through the Asset Tab (fig 10.5) the user can inspect the details of all the assets attached to the call
as well as update the asset details as required.
Fig 10.5
P a g e 23 | 47
User Manual – Mobile Job Management v2.1.7 | 15 April 2014
CA CSS Tab
The user has the option of allowing the customer to enter a Customer Satisfaction Survey (fig 10.6)
should the call be related to a CA integrated customer. The CSS displayed is pulled directly from the
CA server and is not cached like the rest of the call details. This means that the CA CSS Tab might be
blank should the device not have sufficient network connectivity.
Fig 10.6
P a g e 24 | 47
User Manual – Mobile Job Management v2.1.7 | 15 April 2014
Performing common operations
Login
When opening up the MJM application you will be prompted by a login screen (fig 11.1). Simply
enter the corresponding Username and Password combination and select the Login option provided
on the screen. Since version 2.1.0 it is possible to login even when no network connection is
available. This is due to the credentials of previous users being cached locally for offline use. Please
note that should this be the very first login for the user and active network connection will be
required.
Fig 11.1
Upon first login for any user the Cache Processor will need to perform extensive synchronization. As
such the user will be presented with an on screen message which also locks the device for further
input as per fig 11.2.
Fig 11.2
P a g e 25 | 47
User Manual – Mobile Job Management v2.1.7 | 15 April 2014
Synchronizing the Cache
From time to time it may be desired to perform a manual synchronization of the locally maintained
cache data. This can be done by selecting the Sync Cache option in the Application Menu. Using this
method to force the Cache Processor to perform a synchronization attempt will lock the application
to further interaction until the process is completed. During a manual synchronization run the user is
presented by an onscreen message as depicted below in fig 12
Fig 12
Reloading the Cache
The user may at times be instructed from either his/her manager, Call Co-Ordinator or an IMS
Administrator to clear and reload the local cache. This can be done by selecting the Reload Cache
option from the Application Menu. For safety reasons this option will prompt the user to verify the
intent of the user (fig 13.1). Once presented with this select the Continue option.
Fig 13.1
This will completely delete the local cache database and rebuild the database by instructing the
Cache Processor to perform a full synchronization. During this process the user will be presented
with an on screen message (fig 13.2). This will also lock the application to further interaction until
the cache is rebuilt.
Fig 13.2
Performing a backup of the Cache
At times the user may be requested to perform a backup of the cache database. This can be
completed by selecting the Backup Cache option in the Application Menu. Using this option makes a
copy of the current user’s cache database within the Downloads folder on the device. The name of
the backup file is the login name of the current user followed by ims.db. An example of this would be
markm.ims.db.
Changing application settings
Introduced with the 2.1.0 client is an application settings screen. From the application menu select
the Settings option in the Application Menu. The Setting screen is divided into three sections namely
General, Notifications and Data & Sync.
P a g e 26 | 47
User Manual – Mobile Job Management v2.1.7 | 15 April 2014
General
The General section contains three items as depicted in fig 14.1.
•
•
•
Application Version – This is the version number of the currently installed client
Cache Size – This is the total, on disk, size of the local cache database
Site based engineer – This is a setting that identifies to the client that the logged in engineer
is site based. If this is set to Yes the client will assume that the user does not need to record
mileage on any updates. As such the current odometer reading of the user is used for all
subsequent activities.
Fig14.1
Notifications
This section pertains to notification messages presented to the user. Notifications can be raised for
various reasons varying from cache synchronization processes completing to new incoming
messages. Fig 14.2 below notes the different options available in this section.
•
•
•
New Message Notification – Disabling this option will completely stop all notifications from
being raised
Ringtone – Selecting this option presents a list of possible ringtones (fig 14.3) that will be
used when a notification is raised. Should a user which audible notification to be switched
off the user has a Silent ringtone option available.
Vibrate – Turning this option on will cause the device to vibrate when a notification is raised
P a g e 27 | 47
User Manual – Mobile Job Management v2.1.7 | 15 April 2014
Fig 14.2
Fig 14.3
P a g e 28 | 47
User Manual – Mobile Job Management v2.1.7 | 15 April 2014
Data & Sync
The Cache Processor synchronizes the local cache with data from the IMS server on a periodic basis.
The frequency and notification thresholds used for this is contained within this section (fig 14.4)
•
•
Sync Frequency – This controls the frequency in which the Cache Processor will attempt to
synchronize the cache with the IMS server. The user has options available ranging from 1
minute to 1 hour. Setting this value lower will ensure that updates are synchronized speedily
while raising the value will minimize the amount of data used by the client. A balance can be
maintained by the user depending on his/her needs
Sync Threshold – After a protracted duration of no synchronization activity the Cache
Processor will raise a notification to the user notifying him/her thereof. The threshold for
raising this notification I set through this option.
Note that the combination of these can have a noticeable effect to the user. Setting the Sync
Frequency to 5 minutes and the Sync Threshold to 15 minutes, which is the default, will mean that
the Cache Processor will make three attempts of synchronizing the cache. If the third one fails and a
successful synchronization could not be completed the user will be presented by a notification.
Fig 14.4
P a g e 29 | 47
User Manual – Mobile Job Management v2.1.7 | 15 April 2014
Acknowledge receipt of a call
Once a call is assigned to a user the Cache Processor will automatically download the call and all of
the available data relevant to it. The call will appear on the Call List of the user. When the user
selects a call that is in an Assigned – Assigned for Assessment status there will only be one tab
available in the Call Details section. In order for the rest of the tabs to become available the user
needs to acknowledge receipt of the call. This is done by opening the call and selecting the
Acknowledge Receipt of Call option as detailed in fig 15 below.
Fig 15
Selecting this option will create a call update that places the call in an Assigned – Acknowledged
status.
P a g e 30 | 47
User Manual – Mobile Job Management v2.1.7 | 15 April 2014
Dispatching to a call
When a user is not busy with a workflow action on a call the user will be able to dispatch him/herself
on any of the calls that has been acknowledged. The user can do so by navigating to the Activity Tab
and selecting Assigned – Engineer Dispatched from the Call Status option (fig 16.1).
Fig 16.1
In addition to this the user has to supply his/her current odometer reading in the provided field (fig
16.2). The user can then submit the dispatch event for processing by selecting the Update Call option
(fig 16.2). When the update has completed the user will be notified by means of the message in fig
16.3.
Fig 16.2
Fig 16.3
NOTE THAT SHOULD THE USER ENTER A VALUE THAT DIFFERENTIATES FROM THE VALUE IN THE PREVIOUS ODO FIELD BY
MORE THAN 1 000 THE USER WILL BE PRESENTED BY THE NOTIFICATION MESSAGE IN FIG 16.4
P a g e 31 | 47
User Manual – Mobile Job Management v2.1.7 | 15 April 2014
Fig 16.4
Placing yourself in Work in Progress
Upon arrival at the client site, you need to update the call status and provide the ODO reading
details before you start working on the call. The user can accomplish this by selecting the relevant
call in the Call List and navigating to the Activity Tab. Upon this tab the user needs to select Work in
Progress – Work in Progress in the Call Status field (Fig 17.1).
Fig 17.1
Once again the user needs to supplement this by supplying his/her current odometer reading in the
provided field (fig 16.2). The user can then submit the work in progress event for processing by
selecting the Update Call option (fig 17.2). When the update has completed the user will be notified
by means of the message in fig 17.3.
Fig 17.2
P a g e 32 | 47
User Manual – Mobile Job Management v2.1.7 | 15 April 2014
Fig 17.3
NOTE THAT SHOULD THE USER ENTER A VALUE THAT DIFFERENTIATES FROM THE VALUE IN THE PREVIOUS ODO FIELD BY
MORE THAN 1 000 THE USER WILL BE PRESENTED BY THE NOTIFICATION MESSAGE IN FIG 17.4
Fig 17.4
P a g e 33 | 47
User Manual – Mobile Job Management v2.1.7 | 15 April 2014
Making an appointment
It frequently occurs that a customer is not available or requests the engineer to assist with the call at
a later time. Appointments like these can be recorded by selecting the relevant call in the Call List
and opening up the Activity Tab. In the Call Status field select Pending – Appointment Made (fig
18.2). Selecting this option will open up the Appointment Date and Appointment Time fields. Using
these fields select the date and time of the appointment (fig 18.3 & fig 18.4) and provide a relevant
comment in the Comments field (fig 18.1). You will notice that the Comments field contains a default
message when making appointments. Once all of the required fields are completed the user can
select the Update Call option at the bottom of the screen which will submit the appointment details.
A confirmation will appear once the appointment has been recorded by means of the message
detailed in fig 18.5.
Fig 18.1
P a g e 34 | 47
User Manual – Mobile Job Management v2.1.7 | 15 April 2014
Fig 18.2
Fig 18.3
Fig 18.4
Fig 18.5
P a g e 35 | 47
User Manual – Mobile Job Management v2.1.7 | 15 April 2014
Referring a call to a vendor
At times it is needed to refer a call back to a vendor for the vendor to perform work on an asset
associated with the call. This is accomplished by selecting the relevant call in the Call List and
navigating to the Activity Tab
P a g e 36 | 47
User Manual – Mobile Job Management v2.1.7 | 15 April 2014
Activity Tab. In the Call Status field select the Pending – Vendor option (fig 19.1). This will open up
the vendor related fields on the interface. The user then has to supply the vender responsible in the
Vendor field and the reference of the call on the vendor’s systems in the Vendor Reference field (fig
19.1). The user also needs to supply a comment relevant to the update in the Comments field before
submitting the update by selecting the Update Call option. A confirmation will appear once the
update has been recorded (fig 19.2).
Fig 19.1
Fig 19.2
P a g e 37 | 47
User Manual – Mobile Job Management v2.1.7 | 15 April 2014
Resolving a call
When the user has completed the customer’s request as detailed in the call he/she can resolve the
call by first selecting the relevant call in the Call List and navigating to the Activity Tab. From here the
user has two options in which to resolve a call available for selection in the Call Status field (fig 20.2).
The user can either select Resolved – Work Completed or Resolved – Awaiting End Travel. The
difference is that the Resolved – Work Completed option will immediately remove the call from the
Call List where the Resolved – Awaiting End Travel option will keep the call available for selection in
the Call List so that the user can supply return end travel at a later stage.
For this example let us assume that the user will be making use of the Resolved – Work Completed
option. The user would select the Resolved – Work Completed option from the Call Status field. This
will in turn open up all of the required fields for call resolution (fig 20.1). These required fields
include the Remote Connection (fig 20.3), Closure Code, Asset and Comments fields. Once all of the
required fields are completed the user is free to select the Update Call option which records the
resolution update and informs the user once the update has been recorded (fig 20.4). Note that the
asset selected in the Asset field is the asset that will be displayed on the docket generated for the
update.
Fig 20.1
Fig 20.2
P a g e 38 | 47
User Manual – Mobile Job Management v2.1.7 | 15 April 2014
Fig 20.3
Fig 20.4
NOTE THAT THERE IS VALIDATION PERFORMED DURING THE PROCESS OF RECORDING THE UPDATE. ANY NUMBER OF THE
BELOW MESSAGES COULD BE PRESENTED TO THE USER AND NEEDS TO BE RECTIFIED BEFORE THE UPDATE CAN BE
SUBMITTED AGAIN.
Invalid Remote Connection Usage
Fig 20.5
No Docket Number Attached
Fig 20.6
No Asset Data Associated with Call
Fig 20.7
P a g e 39 | 47
User Manual – Mobile Job Management v2.1.7 | 15 April 2014
Invalid Closure Code
Fig 20.8
Supplying return end travel
At times the user will need to record travel time and travel mileage when heading home in the
evenings from a customer site. The user would then use the Resolved – Awaiting End Travel option
when resolving a call. This option will not remove the call from the Call List so that the user can
select the call and supply the return end travel data. Supplying the return end travel data can be
accomplished by selecting the relevant call from the Call List
P a g e 40 | 47
User Manual – Mobile Job Management v2.1.7 | 15 April 2014
Call List and navigating to the Activity Tab. Upon this screen the user must select the Record End
Travel option in the Call Status field. As end travel can also be supplied under other circumstances
either fig 21.2 or fig 21.3 will be presented to the user. Selecting Record End Travel in the Call Status
field will open the Current ODO field and the user can enter his/her odometer reading for
submission (fig 21.1).
When the user selects the Update Call option to submit the end travel data and the update has been
recorded the user will be presented with the message detailed in fig 21.4.
Fig 21.1
Fig 21.2
Fig 21.3
P a g e 41 | 47
User Manual – Mobile Job Management v2.1.7 | 15 April 2014
Fig 21.4
P a g e 42 | 47
User Manual – Mobile Job Management v2.1.7 | 15 April 2014
Duplicating the last update
As calls in pending statuses needs to be updated every two hours based on customer contract and
option to duplicate the last update on the call has been made available on the Description Tab. In
order to make use of this option the user needs to select the relevant call in the Call List and
navigate to the Description Tab (fig 22.1). The user is then free to select the Duplicate Last Update
option at the bottom of the screen. Once completed, the user will notice that the last update has
been duplicated in the Worklog Tab (fig 22.2). It is worth noting that under certain conditions this
option might not be available due to workflow restrictions.
Fig 22.1
P a g e 43 | 47
User Manual – Mobile Job Management v2.1.7 | 15 April 2014
Fig 22.3
Making ad-hoc updates
Certain updates can be performed while the user is busy with workflow actions on other calls. To
perform an ad-hoc update a user can select them from the Call Status field after selecting the
relevant call from the Call List
P a g e 44 | 47
User Manual – Mobile Job Management v2.1.7 | 15 April 2014
Call List and opening the Activity Tab. When making an Ad-Hoc update the user will either be
presented with a list of options detailed in fig 23.1 or fig 23.2 dependent on whether another call is
currently in a workflow status.
Fig 23.1
Fig 23.2
Logout
Once the user is finished with all his/her work for the day and made sure that all pending updates
has been synchronized by the Cache Processor to the IMS server, the user can logout by making use
of the Logout option in the Application Menu. This option will however not close the MJM
application. It will however return the user to the login screen.
Messaging
The messaging component allows for the user to receive notifications related to SLA and call
assignments. The user can inspect incoming messages by selecting the Messages option in the
Application Menu. This will present the user with a list of messages as detailed in fig 24.1. This list
displays all unread messages highlighted in red. Selecting a message in the Message List opens up
the message (fig 24.2) for inspection and also marks the selected message as read.
P a g e 45 | 47
User Manual – Mobile Job Management v2.1.7 | 15 April 2014
Fig 24.1
Fig 24.2
P a g e 46 | 47
User Manual – Mobile Job Management v2.1.7 | 15 April 2014
Glossary
Abbreviations
CSS
EOH
GPS
IMS
MJM
ODO
SLA
FSE
–
–
–
–
–
–
–
–
Customer Satisfaction Survey
Enterprise Outsource Holdings
Global Positioning Satellite
Incident Management System
Mobile Job Management
Odometer
Service Level Agreement
Field Service Engineer
Definitions
Cache
Temporary database of relevant call data
Cache Processor
Part of the MJM application that is responsible for maintaining the Cache
Call Co-ordinator
Office based employee that manages the assignment of calls to FSE’s
Google Play Store
Digital distribution platform for the installation and maintenance of
applications on the Android operating system
IMS Mobile
handheld device extension of the IMS system and in its present form, allows
for basic support call and asset management
IMS Portal
web based page used for logging on to IMS
P a g e 47 | 47