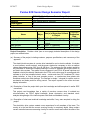
1
Senior Design Report
for
ECE 477 – Spring 2009
submitted by
Prof. David G. Meyer
May 26, 2009
School of Electrical & Computer Engineering
ECE 477
Senior Design Report
5/26/2009
Contents
Course Description …………………………………………………………………………….
1
Course Staff ……………………………………………..…………………………………….
1
Lecture Schedule / Course Calendar ………..…………………………………………………
2
Design Project Specifications / Requirements ……………………………………………..…
4
Design Project Milestones …………………………………………….………………..…….
5
Course Outcomes and Assessment Procedures ……………..………………………………..
6
Course Grade Determination …………………………………………………………………
7
Course Assessment Report ………………………………………………………………….
8
Appendix A: Senior Design Reports
-ii-
ECE 477
Senior Design Report
5/26/2009
Course Description
Digital Systems Senior Design Project (ECE 477) is a structured approach to the development
and integration of embedded microcontroller hardware and software that provides senior-level
students with significant design experience applying microcontrollers to a wide range of
embedded systems (e.g., instrumentation, process control, telecommunications, intelligent
devices, etc.). The primary objective is to provide practical experience developing integrated
hardware and software for embedded microcontroller systems in an environment that models one
which students will most likely encounter in industry.
One of the unique features of this course is that each team gets to choose their own specific
project (subject to some general constraints) and define specific success criteria germane to that
project. In general, this approach to senior design provides students with a sense of project
ownership as well as heightened motivation to achieve functionality.
Course web site: https://engineering.purdue.edu/ece477
Course Staff
Name
Prof. David Meyer
Dr. Mark Johnson
Karl Herb
Mike Sorenson
Title / Role
Faculty / Project Advisor
Faculty / Project Advisor
Teaching Assistant / Project Consultant
Teaching Assistant / Project Consultant
-1-
E-mail Address
[email protected]
[email protected]
[email protected]
[email protected]
ECE 477
Senior Design Report
Lecture Schedule / Course Calendar
-2-
5/26/2009
ECE 477
Senior Design Report
5/26/2009
Design Project Specifications / Requirements
Work on the design project is to be completed in teams of four students. The design project
topic is flexible, and each group is encouraged to pick a product that uses the strengths and
interest areas of their group members. The design must have the following components:
•
Microprocessor: To help make the project tractable, microprocessor choices will be limited
to 68HC12, PIC, Rabbit, and Atmel variants. Development tools are readily available in lab
to support these devices. Further, the devices themselves are relatively low cost and readily
available.
•
Interface to Something: Your embedded system must interface to some other device or
devices. It could be a computer, or it could be some embedded device such as a Palm Pilot,
telephone line, TV, etc. Some interface standards that could be used are: serial to a
computer, parallel to a computer, Universal Serial Bus (USB), Firewire, Ethernet, Infrared
(IR), Radio Frequency (RF), etc. This requirement has a large amount of freedom. To help
with some of the more complex interfaces such as Ethernet, USB, or Firewire there are
dedicated chips which encapsulate the lowest layers of the interface. This makes using these
interfaces easier to handle but not necessarily trivial. Be sure to investigate the interface(s)
you wish to utilize and make a reasonable choice. (NOTE: Interfaces involving A.C. line
current require special permission – see the instructor for details.)
•
Custom printed circuit board: Through the process of the design, each group will be
required to draw a detailed schematic. From the schematic, a two-layer (maximum) printed
circuit board will be created. Board etching will be processed by the ECE Department (the
first one is “free”, but any subsequent iterations are the team’s responsibility). The team is
then responsible for populating the board (solder the parts on the board), and for completing
the final stages of debugging and testing on their custom board.
•
Be of personal interest to at least two team member: It is very difficult to devote the time
and energy required to successfully complete a major design project in which you and/or
your team members have no personal interest. There are lots of possibilities, ranging from
toys and games to “useful and socially redeeming” household items, like audio signal
processors and security systems.
•
Be tractable: You should have a “basic idea” of how to implement your project, and the
relative hardware/software complexity involved. For example, you should not design an
“internet appliance” if you have no idea how TCP/IP works. Also, plan to use parts that are
reasonably priced, have reasonable footprints, and are readily available. Be cognizant of the
prototyping limitations associated with surface mount components.
•
Be neatly packaged: The finished project should be packaged in a reasonably neat, physical
sound, environmentally safe fashion. Complete specification and CAD layout of the
packaging represents one of the project design components.
•
Not involve a significant amount of “physical” construction: The primary objective of the
project is to learn more about digital system design, not mechanical engineering! Therefore,
most of the design work for this project should involve digital hardware and software.
-3-
ECE 477
Senior Design Report
5/26/2009
Project Proposal: Each group should submit a proposal outlining their design project idea. This
proposal should not be wordy or lengthy. It should include your design objectives,
design/functionality overview, and project success criteria. The five success criteria common to
all projects include the following:
•
•
•
•
•
Create a bill of materials and order/sample all parts needed for the design
Develop a complete, accurate, readable schematic of the design
Complete a layout and etch a printed circuit board
Populate and debug the design on a custom printed circuit board
Package the finished product and demonstrate its functionality
In addition to the success criteria listed above, a set of five significant project-specific success
criteria should be specified. The degree to which these success criteria are achieved will
constitute one component of your team’s grade.
Forms for the preliminary and final versions of your team’s project proposal are available on the
course web site. Use these skeleton files to create your own proposal. Note that the proposal
should also include assignment of each team member to one of the design components as well as
to one of the professional components of the project.
Group Account and Team Webpage: Each team will be assigned an ECN group account to
use as a repository for all their project documentation and for hosting a password-protected team
web page. The team web page should contain datasheets for all components utilized, the
schematic, board layout, software listings, interim reports, presentation slides, etc. It should also
contain the individual lab notebooks for each team member as well as the progress reports
(prepared in advance of the weekly progress briefings) for each team member. At the end of the
semester, each team must submit a CD-ROM archive of the group account.
Design Review: Part way through the design process, there will be a formal design review.
This is a critical part of the design process. In industry, this phase of the design process can
often make or break your project. A good design review is one where a design is actively
discussed and engineers present concur with the current or amended design. The design review
is in some cases the last chance to catch errors before the design is frozen, boards are etched, and
hardware is purchased. A friend is not someone who rubber-stamps a design, but rather one who
actively challenges the design to confirm the design is correct.
Approach the design review from a top-down, bottom-up perspective. First, present a block
diagram of your design and explain the functional units. Then drop to the bottom level and
explain your design at a schematic level. Be prepared to justify every piece of the design; a
perfectly valid answer, however, is applying the recommended circuit from an application note.
If you do use a circuit from an application note, have the documentation on hand and be able to
produce it. Your grade for the design review will not be based on the number of errors identified
in your design. The best engineers make mistakes, and the purpose of the design review is to
catch them rather than spend hours of debugging later to find them. The design review will be
graded primarily on how well the group understands their design and the professionalism with
which they present it.
To facilitate the design review process, the class will be split into subgroups that will meet at
individually scheduled times. Both the presenters and the assigned reviewers will be evaluated.
-4-
ECE 477
Senior Design Report
5/26/2009
Design Project Milestones
Each group is responsible for setting and adhering to their own schedule; however, there are
several important milestones, as listed in the table below. Always “expect the unexpected” and
allow for some buffer in your schedule. Budget your time. With proper budgeting, senior design
can be a very rewarding and pleasant experience.
See course schedule for homework due dates.
Week
1
2
Milestone
Formulate project ideas
Preliminary project proposal due
Research parts, create initial block diagram and initial BOM
Final project proposal due
3
Order/sample parts, review/learn OrCad Capture and Layout
4
Create detailed BOM (including resistors, capacitors, etc.)
10
Draw preliminary schematic
Prototype interface circuits
Finalize schematic
Begin PCB layout
Begin prototyping software with EVB/prototype
Finalize PCB layout for Design Review
Continue software development
Prepare for Design Review
Continue software development
DESIGN REVIEWS
Incorporate changes/comments from Design Review
Proof-of-Parts due
Final schematic due
PCB file submission due
Continue software development on EVB
11
PCBs arrive - begin populating/testing
5
6
7
8
9
11-15
16
Finals
Test PCB section-by-section as parts are added, porting software as you go - add
functions one-by-one so you know what it was that “broke” your code or your
board when things stop working
PSSC Demos
Prepare for Final Presentation
FINAL PRESENTATIONS
-5-
ECE 477
Senior Design Report
5/26/2009
Course Outcomes and Assessment Procedures
In order to successfully fulfill the course requirements and receive a passing grade, each student
is expected to demonstrate the following outcomes:
(i) an ability to apply knowledge obtained in earlier coursework and to obtain new
knowledge necessary to design and test a microcontroller-based digital system
(ii) an understanding of the engineering design process
(iii) an ability to function on a multidisciplinary team
(iv) an awareness of professional and ethical responsibility
(v) an ability to communicate effectively, in both oral and written form
The following instruments will be used to assess the extent to which these outcomes are
demonstrated (the forms used to “score” each item are available on the course web site):
Outcome
(i)
(ii)
(iii)
(iv)
(v)
Evaluation Instruments Used
Design Component Homework
Individual Lab Notebooks
Success Criteria Satisfaction (general and project-specific)
Professional Component Homework
Formal Design Review, Final Presentation, and Final Report
Students must demonstrate basic competency in all the course outcomes, listed above, in order to
receive a passing grade. Demonstration of Outcome (i) will be based on the satisfaction of the
design component homework, for which a minimum score of 60% will be required to establish
basic competency. Demonstration of Outcome (ii) will be based on the individual lab notebook,
for which a minimum score of 60% will be required to establish basic competency.
Demonstration of Outcome (iii) will be based on satisfaction of the 100% of the general success
criteria and a minimum of 60% (3 out of 5) of the project-specific success criteria.
Demonstration of Outcome (iv) will be based on the professional component homework, for
which a minimum score of 60% will be required on the final evaluation to establish basic
competency. Demonstration of Outcome (v) will be based on the Design Review, the Final
Presentation, and the Final Report. A minimum score of 60% on the Design Review and a
minimum score of 60% on the Final Report and a minimum score of 60% on the Final
Presentation will be required to establish basic competency.
Since senior design is essentially a “mastery” style course, students who fail to satisfy all
outcomes but who are otherwise passing (based on their NWP) will be given a grade of “I”
(incomplete). The grade of “I” may subsequently be improved upon successful satisfaction of all
outcome deficiencies. If outcome deficiencies are not satisfied by the prescribed deadline, the
grade of “I” will revert to a grade of “F”.
-6-
ECE 477
Senior Design Report
5/26/2009
Course Grade Determination
Several “homeworks” will be assigned related to key stages of the design project. Some of the
assignments will be completed as a team (1, 2, 7, 13, 15, 16, 17), two will be completed
individually (8 and 14), and some will be completed by a selected team member (one from the
set {4, 5, 6, 9} and one from the set {3, 10, 11, 12}).
1.
2.
3.
4.
5.
6.
7.
8.
9.
10.
11.
12.
13.
14.
15.
16.
17.
Team Building and Project Idea
Project Proposal
Design Constraint Analysis and Component Selection Rationale
Packaging Specifications and Design
Hardware Design Narrative/Preliminary Schematic
PCB Design Narrative/Preliminary PCB Layout
PCB Submission, Final Schematic, and Parts Acquisition/Fit
Peer Review – Midterm
Software Design Narrative, and Documentation
Patent Liability Analysis
Reliability and Safety Analysis
Ethical/Environmental Impact Analysis
User Manual
Peer Review – Final
Senior Design Report
Final Report & Archive CD
Poster
Grade Determination: Your course grade will be based on team effort and your contributions:
TEAM COMPONENTS (40% of total)
distribution of team component:
Project Success Criteria Satisfaction* 20%
Design Review*
15%
Final Presentation*
15%
Final Report & Archive CD*
15%
Final PCB, Schematic, and Parts Fit
10%
System Integration and Packaging
10%
User Manual
5%
Senior Design Report
5%
Poster
5%
INDIVIDUAL COMPONENTS (60% of tot.)
distribution of individual component
Laboratory Design Notebook*
20%
Design Component Report*
15%
Professional Component Report*
15%
Significance of Individual Contribution
15%
Design and Professional Attribute Exam 15%
Class Participation / Clicker Exercises
10%
Peer Evaluations of Presentations (2)
5%
Confidential Peer Reviews (2)
5%
* items directly related to outcome assessment
Your Raw Weighted Percentage (RWP) will be calculated based on the weights, above, and then
"curved" (i.e., mean-shifted) with respect to the upper percentile of the class to obtain a
Normalized Weighted Percentage (NWP). Equal-width cutoffs will then be applied based on the
Windowed Standard Deviation (WSD) of the raw class scores; the minimum Cutoff Width
Factor (CWF) used will be 10 (i.e., the nominal cutoffs for A-B-C-D will be 90-80-70-60,
respectively). Before final grades are assigned, the course instructor will carefully examine all
"borderline" cases (i.e., NWP within 0.5% of cutoff). Once grades are assigned, they are FINAL
and WILL NOT be changed. Note that all course outcomes must be demonstrated in order to
receive a passing grade for the course.
-7-
ECE 477
Senior Design Report
5/26/2009
Course Assessment Report
Course: ECE 477
Term: Spring 2009
Submitted by: D. G . Meyer
Course PIC: D. G. Meyer
1. Did all students who received a passing grade demonstrate achievement of each
course outcome? If not, why not and what actions do you recommend to remedy this
problem in future offerings of this course? (Attach additional sheets as necessary)
Yes
a. How many course outcomes are there for this course? 5
b. On a scale from 0 – 4 (0=not at all, 1=marginal, 2=adequate, 3=good, 4=very
good), please rate, on average, the overall degree to which the students in this
course achieved each of the course outcomes. (details on reverse side)
Outcome 1
4
Outcome 5
Outcome 2
4
Outcome 3
Outcome 4
4
Outcome 9
Outcome 13
Outcome 6
Outcome 10
Outcome 14
4
Outcome 7
Outcome 11
Outcome 15
4
Outcome 8
Outcome 12
Outcome 16
2. Are the course outcomes appropriate? If not, explain. (Attach additional sheets as
necessary)
Yes – they are the standard “senior design” outcomes
3. Are the students adequately prepared for this course and are the course prerequisites
and corequisites appropriate? If not, explain. (Attach additional sheets as necessary)
Yes
4. Do you have any suggestions for improving this course? If so, explain. (Attach
additional sheets as necessary) Tweaks in lecture content (additional material on
interfacing, embedded software development, new references for
ethical/environmental lifecycle considerations), additional equipment for lab
(common request is to have enough soldering stations so that one can be issued to
each team), larger quantities of standard supplies, purchase of a professional
software package for maintenance of electronic lab notebooks (still looking for
funds).
-8-
ECE 477
Senior Design Report
5/26/2009
Course Assessment Report, continued
Average Outcome Scores and Outcome Demonstration Statistics for ECE 477
Outcome # 1 Avg Score:
84.2%
Passed:
52/ 52 = 100.00%
Failed:
0/ 52 =
0.00%
Outcome # 2 Avg Score:
81.8%
Passed:
52/ 52 = 100.00%
Failed:
0/ 52 =
0.00%
Outcome # 3 Avg Score:
97.7%
Passed:
52/ 52 = 100.00%
Failed:
0/ 52 =
0.00%
Outcome # 4 Avg Score:
84.0%
Passed:
52/ 52 = 100.00%
Failed:
0/ 52 =
0.00%
Outcome # 5 Avg Score:
89.2%
Passed:
52/ 52 = 100.00%
Failed:
0/ 52 =
0.00%
Demonstrated all five outcomes based on primary assessment:
52/ 52 = 100.00%
This table verifies that each student enrolled in ECE 477 Spring 2009 who received
a passing grade demonstrated all the course outcomes. The chart below documents
the tracking history of the average score for each outcome over multiple offerings.
-9-
ECE 477
Senior Design Report
Appendix A:
Senior Design Reports
5/26/2009
ECE 477
Senior Design Report
5/26/2009
Purdue ECE Senior Design Semester Report
Course Number and Title
Semester / Year
Advisors
Team Number
Project Title
ECE 477 Digital Systems Senior Design Project
Spring 2009
Prof. Meyer and Dr. Johnson
1
Jukebox Heroes – Digital Jukebox
Senior Design Students – Team Composition
Area(s) of Expertise
Name
Major
Utilized in Project
Laura Kassovic
EE
Hardware
Matt Baker
CmpE
Hardware/Software
Jason Eaton
CmpE
Software
Corey Zahner
CmpE
Software
Expected
Graduation Date
May 2009
May 2009
May 2009
May 2009
Project Description: Provide a brief (two or more pages) technical description of the design
project, as outlined below:
(a) Summary of the project, including customer, purpose, specifications, and a summary of the
approach.
The coffee shop jukebox is a digital jukebox which allows users to vote on the music they
hear while enjoying their coffee. Each café patron may submit a vote via a local touch
screen or via Ethernet. The device enables the coffee shop retailer to input a variety of
songs on the jukebox using the provided external flash drive. A USB thumb drive is
provided with the jukebox. A user may upload any large amount of MP3 formatted songs
on the flash drive. The plug and play device will then decode any song for line level audio
output on a speaker system. The use of the product extends to any commercial entity, be it
a café or an apparel store. The jukebox is designed for use in any commerce with intent to
produce pleasant music for its customers. The purpose of the jukebox is to provide patrons
with the freedom to choose what they listen to. This system supports positive customer
feelings and enhances the business. The system promotes fairness by using an algorithm
that chooses songs based on popularity. The Jukebox is composed of 3 main systems:
USB, Ethernet and the LCD touch screen. The USB thumb drive allows the owner to input a
variety of songs from his or hers personal computer. The Ethernet controller allows users to
interact with the device using any internet-enabled device. The touch screen allows users
to interact with the device on a more personal level. The device may be accessed by any
laptop or web enabled device. When accessing either terminal, a user is able to vote on any
song an unlimited amount of times. A user may view the available songs in alphabetical
order and may also view the current play queue. Each display is separated by a tab. The
GUI is designed to be extremely user friendly. The touch screen terminal, which contains
the body of the device, should be placed in a convenient location for easy access. In the
case of the café, the device should be near the bar. As such, costumers will be drawn to
the excitement of the jukebox upon purchase of refreshments. The device was constructed
to be lightweight, cost efficient and with a sleek design that easily blends in the décor.
A-1
ECE 477
Senior Design Report
5/26/2009
(b) Description of how the project built upon the knowledge and skills acquired in earlier ECE
coursework.
The project utilized several skills acquired throughout the years. First and foremost, the
use of our acquired software knowledge was very necessary. Classes that have taught us
C programming proved extremely useful when writing the software. For Jason especially,
graphics and Object Oriented Programming were great for GUI design.
The
microprocessors and interfacing course made it relatively easy to interface all the modules
of the PIC such as the SPI, UART and I2C. It was also beneficial when handling the
interrupts. The final project integration required intensive interrupt knowledge. Many
modules such as the I2C and the TCP/IP stack had strict timing constraints. Without the
prior software knowledge, dealing with such a significant task would have been difficult.
Some networks knowledge proved useful when working on the Ethernet and the IP/TCP
stack as well. Additionally some analog skills were very beneficial to the PCB design such
as proper values for the passive components of the filters and proper capacitor sizes for the
crystals. All of us had taken analog classes such as ECE 207 and 208 and when designing
a filter, these classes surely came in handy.
(c) Description of what new technical knowledge and skills, if any, were acquired in doing the
project.
Several new technical knowledge skills were acquired throughout the project. For each
member of the project, this was the first PCB design and thus many hours went into the
creation of the board. The team learned how to produce footprints and relay components in
an efficient manner. Proper capacitor sizes, crystal use and trace widths were a few items
added to a plethora of acquired skills. We learned to optimize trace lengths, use proper
converters and minimize vias. We also demonstrated new soldering skills considering no
single group members had any experience with surface mount soldering. A few hours went
into the USB stack alone during which tremendous amounts of details were acquired about
the protocol. The SCSI layer, the File System layer, the MSD layer and the low level
interface needed careful research.
The Ethernet stack was a great software
implementation of previously acquired skills. Although several team members had
networks knowledge, other than simple socket programming, no team member had ever
implemented a functioning TCP/IP stack in software.
(d) Description of how the engineering design process was incorporated into the project.
Reference must be made to the following fundamental steps of the design process:
establishment of objectives and criteria, analysis, synthesis, construction, testing, and
evaluation.
We began the planning stages by discussing what our project would be and what our
objectives would be. Then we quickly drew a sort of road map or time line that would define
goals to be achieved by certain dates. We then formally declared our objectives and
criteria as PSSCs. We continued by analyzing what components we would need based on
price, support and ease of use. We continued by developing a schematic and PCB layout
based on the data sheet of the chosen components. Once our PCB was fabricated, we
soldered the parts on the board and began writing the software. During the software phase,
packaging was constructed using a solid plastic case. The casing was perforated in the
appropriate places so the project could be embedded into the proper package with a few
simple screws. The software was carefully divided into equal parts based on each group
member’s strength and preference. Once each piece was written and formally proven to
work by the class TA, the code was integrated into a single entity. With rigorous testing on
A-2
ECE 477
Senior Design Report
5/26/2009
the final software the device was functional. Evaluation of our success was determined by
our peers, TAs and assessed by our teachers at an end of year presentation.
(e) Summary of how realistic design constraints were incorporated into the project
(consideration of most of the following is required: economic, environmental, ethical,
health & safety, social, political, sustainability, and manufacturability constraints).
Economic: The jukebox is not expected to have an economic impact.
Environmental: The jukebox will have a minimal environmental risk. There is no higher
environmental risk than a device with an LCD (mercury) or PCB (lead).
Ethical: The main ethical concern of the jukebox is with RIAA standards. There are no real
ethical risks involved with the device. It is possible however that with the freedom
incorporated when choosing song that a jukebox owner could elect to play illegally obtained
songs. The device is labeled accordingly.
Health & Safety: The jukebox will have a minimal health and safety risk. The device is
packaged in a black case, and does not have the ability to injure users. The only possible
violation is a severed touch screen which must be disposed of appropriately.
Social: The jukebox is here to promote the interaction between patrons and owners. It is
also used to promote the social environment in which it is placed by providing music that is
customized by the client. The jukebox will encourage sales in any environment it resides,
impacting the local community in a positive manner on a social and capital level.
Political: The jukebox is not expected to have a political impact.
Sustainability: The device is expected to have a shelf life of at least 20 years. Each
component is designed to be extremely resilient. The design is such that it is resistant to
misuse. For example the connectors are slightly recessed into the case so that users do
not pull out cables. At the discretion of the owner, the device may be placed at a specific
location to ensure that no child under the age of 10 may play with the jukebox.
Manufacturability: The jukebox is expected to be extremely marketable because parts
were chosen based on their price. As such, the device can be made to be profitable on the
market depending on the final integration of the touch screen. If the touch screen was
removed, the device would be extremely cost effective.
(f)
Description of the multidisciplinary nature of the project.
This project involved skills acquired from both the electrical and computer sides of ECE.
Most of the circuit design pulled from the knowledge learned in electrical engineering
courses such as ECE201, ECE202, and ECE255. The greater portion of the skills needed
for our project came from the computer side of ECE. The software was extremely tedious
and ECE362 provided the greatest amount of help. The class taught us about how
microprocessors function and how they interface with external devices. The analog and
digital sides of the project prove that for a device to function adequately, a multidisciplinary
team is of upmost importance. As such, the team benefitted from having both electrical and
computer engineers.
A-3
ECE 477
Senior Design Report
5/26/2009
(g) Description of project deliverables and their final status.
The final product was delivered on time and completely functional. The project was fully
encased and fulfilled all PSSCs. The USB functioned flawlessly; we were able to retrieve
information including song names and MP3 raw data. The Ethernet stack performed
impeccably, we were able to connect to the device and view the queue, list of songs and vote
effortlessly. The Touch Screen GUI performed the same functions as the Ethernet portion of
our project. Finally, the queue updates following a user vote. The algorithm does promote
fairness when voting and tracts the popularity of a song. The jukebox was packaged in a sleek
black plastic case, delivered with a USB thumb drive, an AC adaptor and a T-5 cable.
A-4
ECE 477
Senior Design Report
5/26/2009
Purdue ECE Senior Design Semester Report
Course Number and Title
Semester / Year
Advisors
Team Number
Project Title
ECE 477 Digital Systems Senior Design Project
Spring 2009
Prof. Meyer and Dr. Johnson
2
Electricivic
Senior Design Students – Team Composition
Name
Benjamin Dannan
Mark Snyder
Mike Mitchell
Matt Klutzke
Major
Area(s) of Expertise Utilized
in Project
EE
EE
VHDL, Signal Processing
Power Electronics, Motor
Control
EE
VHDL, C, Assembly
CmpE Software, UI’s
Expected
Graduation
Date
May 2009
May 2009
May 2009
May 2009
Project Description: Provide a brief (two or more page) technical description of the design
project, as outlined below:
(a) Summary of the project, including customer, purpose, specifications, and a summary of the
approach.
The electricivic drive system is a motor drive intended for use in electric vehicles. It includes
a user interface, sensor network, and the power electronics necessary to drive a medium
voltage three phase motor, 380 VRMS @ 340 ARMS. The customer for this product would be
any individual or automobile company wishing to convert a standard gas engine vehicle to
an electric drive system. The system’s core component is an FPGA. All power switches and
feedback circuitry are directly interfaced to the FPGA, so the drive may be reconfigured with
software to drive any standard electric motor – series and shunt DC, brushless DC, three
phase induction, or one of the most complex motors – a synchronous three phase with
brushless excited rotor field windings. The interface is simple - a keypad for options, and an
accelerator and brake pedal for driving control. The output is power to the motor and user
display information.
(b) Description of how the project built upon the knowledge and skills acquired in earlier ECE
coursework.
This project used knowledge from a variety of previous courses since it included two
microcontrollers, an FPGA, digital interfaces, power electronics, and standard circuit
analysis during design of the inductor power filter bank and feedback circuitry.
(c) Description of what new technical knowledge and skills, if any, were acquired in doing the
project.
The electricivic drive system created a new experience for all members of the team. The
novelty is in the fact that the current sourcing circuitry is completely digital. Many modern
current controlled sources use analog circuitry to monitor current and control the state of the
A-5
ECE 477
Senior Design Report
5/26/2009
switching elements. These circuits require tedious tuning of all feedback circuits that have
high sensitivity to aspects such as source voltage ripple and component tolerances. With a
digital implementation, the switching states are controlled directly and tuning analog values
is eliminated. Algorithms such as phase shifted parallel currents with time-varying hysteresis
bands would be impractical, if even possible, with an analog switching circuit. By using an
FPGA, this method is easily attainable and very reliable.
(d) Description of how the engineering design process was incorporated into the project.
Reference must be made to the following fundamental steps of the design process:
establishment of objectives and criteria, analysis, synthesis, construction, testing, and
evaluation.
The first step in the project was to define the specifications of the final product. It was
decided to design a drive for small to medium size passenger vehicles requiring less than
200 HP. An electric motor was purchased due to its high power to weight ratio and low cost
as a refurbished aircraft product. This motor defined the rest of the requirements of the
power circuitry. Given the circuit performance requirements, the system was modeled in
PSPICE with behavioral models for the control. Upon proving satisfactory results, the circuit
simulation was converted to actual components in a full schematic. The PCBs were
designed and assembled. After multiple revisions, the code for the microcontrollers and
FPGA proved that the system could operate successfully. A simple system was
demonstrated using a three phase induction motor using delta-hysteresis current control and
a simplified field oriented control algorithm on the FPGA.
(e) Summary of how realistic design constraints were incorporated into the project
(consideration of most of the following is required: economic, environmental, ethical,
health & safety, social, political, sustainability, and manufacturability constraints).
Economic: In order to become an economically viable product, the entire vehicle system,
not just the drive, would have to compete well with the existing market for gas driven cars.
The cost of the electricivic drive is relatively low compared to the rest of the components.
Given current technology, the battery system is by far the weakest component. Further
advances in electrical storage would be needed before this product could be sold beyond
the existing niche market for electric vehicles.
Environmental: Electric vehicles have often been a source of debate because of their
environmental effects. While driving on the streets, there is no pollution emitted and they
create less noise than internal combustion engines. The pollution and carbon dioxide
emissions are relocated to the electrical generation facility. Even though there is still carbon
dioxide produced in this energy cycle, restrictions on emissions are regulated to a higher
degree at generation facilities than in vehicles. The electrical storage medium on an electric
vehicle is usually a battery bank due to the high cost of other technologies such as fuel
cells. These batteries can contain harmful elements such as lead, cadmium, and a variety
of strong acids. Responsible recycling programs for these batteries would be required.
A-6
ECE 477
Senior Design Report
5/26/2009
Ethical: The purpose of the product is to propel a vehicle. There are no foreseeable uses
or injurious effects of the product that could be unethical (nothing in addition to accidents
resulting from human error while driving).
Health & Safety: All high voltage or dangerous components are contained within a steel
frame with Lexan sides. Harmful incidents would only occur if the user disassembled the
enclosure while it was powered.
Social: The electricivic provides a more environmentally friendly way for people to travel
between destinations as part of a daily commute.
Political: Electric vehicles and clean technology seem to be part of every political
campaign. This project is a positive example of such progress.
Manufacturability: Since the housing of the drive unit is a car, it is not necessary to be as
compact as other digital devices. The component arrangement on the PCBs is simple and
easily accessible since there aren’t multiple layers of permanently connected
daughterboards or other devices. The final product will be enclosed in a steel frame, so
assembly beyond PCB component placement should not require delicate procedures.
(f)
Description of the multidisciplinary nature of the project.
The electricivic is a fusion of engineering disciplines. The digital component includes
microcontrollers and an FPGA. Software is needed to make a user friendly interface. Power
electronic and basic electrical theories are used to synthesize current waveforms that can
be applied to the motor. Motor theory is used to control the torque and speed of the motor.
There are purely mechanical aspects too: The motor to transmission coupling will be
pushing the limits of a sprocket belt drive at 12,000 RPM and 50 Ft-lbs of torque. Thermal
analysis of the heat sink system is essential. During peak power delivery, more than 10kW
will be dissipated by the IGBTs, so an effective IGBT to radiator heat transfer is needed. All
of these systems must operate together to make the car performance safe and satisfactory
to the user.
(g) Description of project deliverables and their final status.
•
•
•
Ability to control current through an inductive load – This was demonstrated by controlling
the phase currents of an induction motor. The desired current is a sine wave. The
currents that were shown have large harmonic components beyond the fundamental, but
that was a result of the operating conditions. Only a 1.5 Amp sine wave was commanded
with a 1 Amp hysteresis band. This allows a large ripple relative to the fundamental
component. The current did maintain tracking within this band.
Ability to sample and digitally filter analog waveforms – The data coming from the current
sensors currently contains a significant amount of noise. Implementing a simple FIR filter,
a moving window average, reduced this noise. In this case the waveform is the current
feedback. The future implementation of the drive unit in the car will also filter the DC bus
voltage. Here, a much larger ripple (10 Volts or so) is expected due to the sinusoidal
current draw of the motor. An average (filtered) value will be used for the voltage input to
the motor control calculations.
Ability to track rotor position and speed using an optical encoder – The RPM and position
(xxxx out of 4096 per revolution) was shown on the LCD. These are both used as inputs
to the motor control algorithms.
A-7
ECE 477
•
•
Senior Design Report
5/26/2009
Ability to display sensor feedback on UI – Sensor feedback shown on the LCD was
current draw, rotor position and speed, and system temperatures. Once a battery bank is
installed, the battery charge will also be displayed.
Ability to detect system temperature for thermal fail-safes – Multiple temperatures were
accurately sensed and displayed on the screen. A maximum allowable temperature can
be set in code. A heat gun was used to simulate high operating temperatures and the
system responded by giving a warning message on the screen.
A-8
ECE 477
Senior Design Report
5/26/2009
Purdue ECE Senior Design Semester Report
Course Number and Title
Semester / Year
Advisors
Team Number
Project Title
ECE 477 Digital Systems Senior Design Project
Spring 2009
Prof. Meyer and Dr. Johnson
3
Lock, Stock, and Three Smoking Coils
Senior Design Students – Team Composition
Area(s) of Expertise
Name
Major
Utilized in Project
Ryan Eder
CompE Hardware
Thomas Minor
CompE Software
David Grothe
CompE Packaging
Jason Kamuda
CompE Hardware
Expected
Graduation Date
May 2009
May 2010
May 2009
May 2009
Project Description: Provide a brief (two or more page) technical description of the design
project, as outlined below:
(a) Summary of the project, including customer, purpose, specifications, and a summary of the
approach.
The Electric Musket is a single stage coil gun capable of propelling ferromagnetic projectiles
at a maximum speed of 60 feet per second.
The device features three pushbuttons: one to initiate the charging sequence for the
capacitor bank, one to initiate the firing of the loaded ferromagnetic projectile, and one to
safely discharge the capacitor bank to allow for proper and safe shutdown of the device.
Also included is an LCD display to relay the charge status of both 9V batteries, the charge
status of all three capacitors, and the velocity of the projectile after the coil gun has been
fired.
To operate, the coil gun requires two 9V batteries and ammunition. The inner diameter of
the barrel used allows for projectile of .18 inches (4.572mm) or less to be used as
ammunition. Currently, the optimal projectile to use is either an 8-D finishing nail or .177
caliber BBs.
The purpose of the Electric Musket is to explore electromagnetism as a powder-less method
of propelling ferromagnetic projectiles. With advances to the design, the purpose of the coil
gun can be ported over to other uses that require projectiles traveling at high velocities.
The ideal customers for the current version of the Electric Musket are hobbyists. However,
with advances in the design of the hardware and software leading to the increased the
velocity and size of projectiles, practical application can be expanded for possible military
use. Other practical applications can be used.
A-9
ECE 477
Senior Design Report
5/26/2009
(b) Description of how the project built upon the knowledge and skills acquired in earlier ECE
coursework.
The basic concept that this project built upon was first introduced in the physics component
of first-year engineering. The project used a magnetic field to accelerate an object. More
specifically, it used knowledge gained in ECE 201, in that inductors stored energy as a
magnetic field. The project further used the skills gained in ECE 201 for good
approximations of most individual circuit components. It further used skills and knowledge
acquired in ECE 255 about analog electronic circuitry, specifically the switching properties
of various transistors, especially diodes and bipolar junction transistors. Finally, our design
used many elements elements first learned in ECE 362. Internal microcontroller peripherals
were used extensively, and the intuition gained in designing digital and analog circuits built
around a microcontroller was invaluable.
(c) Description of what new technical knowledge and skills, if any, were acquired in doing the
project.
The technical knowledge and skills gained in doing the project was extensive. Designing
the project required a review in basic circuits and transistors, and forced relearning all
material forgotten from disuse. Technical knowledge of the tools used in PCB design were
learned, specifically OrCAD Capture and Layout. All team members who previously did not
know how to solder learned to solder, and finally, in-depth knowledge of microcontrollers
was extended beyond one family. In using the skills gained in ECE 362 and applying them
to a new microcontroller, those skills were generified, and they can now be more readily
applied to microcontrollers of any family. Furthermore, knowledge of a new type of
transistor, an IGBT, was gained.
(d) Description of how the engineering design process was incorporated into the project.
Reference must be made to the following fundamental steps of the design process:
establishment of objectives and criteria, analysis, synthesis, construction, testing, and
evaluation.
The engineering design process was heavily used in the full life cycle of this project. To
begin, we decided on a general idea of a project and refined what we were actually looking
for the project to accomplish by defining success criteria. These criteria outlined what was
needed for the project to be complete and successful. We then analyzed some equations
and models to demonstrate that this idea could actually come to be. A circuit schematic was
created and printed circuit board layout was constructed. We sent the designs away to a
factory to have the circuit board synthesized, and when it came back, we populated it with
components. Software was written and the rest of the project was constructed. The project
was tested extensively so that bugs could be worked out and we could complete a working
project. After we were satisfied that our design was passing its success criteria, we sat back
and evaluated its performance and our own.
(e) Summary of how realistic design constraints were incorporated into the project
(consideration of most of the following is required: economic, environmental, ethical,
health & safety, social, political, sustainability, and manufacturability constraints).
Environmental: The main environmental and design constraints are limited to the
manufacture of the product, specifically the manufacture of the printed circuit board and
components, and the disposal of the product. In an effort to be as environmentally friendly
A-10
ECE 477
Senior Design Report
5/26/2009
as possible while allowing for ensuring the product a decent and realistic life span, RoHS
compliant components will only be used. In the current design, all components except for
the diodes located on the three smaller charge/discharge circuit boards are RoHS
compliant. With later revisions, it will be possible to find appropriate RoHS compliant
substitutes for these diodes. In addition to RoHS compliance, the BLANK on the main board
are also green. When it comes to disposal of the product, proper disposal and recycling
methods are discussed in the user manual to allow for the most environmentally friendly
method of disposal. This will mainly consist of referring the user to the organizations like
that specialize in the recycling of electrical components. Also, the user will have the option
of returning their used or defective product to the company for recycling through the same
venues mentioned earlier.
Ethical: The ethical concerns surrounding the coil gun consist of protecting the user from
the high voltage circuitry inherent in the design as well as enacting proper precautions in
order to prevent any accidental and, to an extent, intentional misuse of the device.
Protecting the user from the high voltage circuitry is accomplished by ensuring that no
exposed wires are present in the packaged product. In addition, it is essential that there is a
physical barrier between internal wiring and the three high voltage charge/discharge circuit
boards packaged next to the barrier. Essentially, high voltage components and wires will
remain packaged near the barrier surrounded by the device’s outer wooden layer. The
ethical concern of preventing misuse of the product can be addressed by incorporating
safety features into the coil gun as well as informing the how to use the device in a safe and
responsible manner and possibly licensing future more powerful revisions of the design.
Integrated safety features include adding in a PIN or including a key requirement for the
device to operate to ensure only qualified and designated individuals use the device. A
physical safety toggle switch can also be added as well as a flip cover over the trigger
pushbutton to prevent an accidental firing of the device. User manual information will also
advise the user of the legal repercussions of firing upon animals, persons, and property and
recommend that this type of use be strictly avoided.
Health & Safety: The safety of the user forced us to hide any and all high voltage wires
and lines from. This made it more difficult for us to route these and the control wires as they
need to be separated from each other, yet remain hidden to the user inside the wooden
barrel. To prevent the user from accidentally shooting themselves with the rifle, we intended
to put an unlock code on the fire sequence for the rifle, controlled by the microcontroller.
Social: The social issues to focus on revolve around the fact that the coil gun could be
used for mischievous purposes. If misused, the coil gun can put in danger persons or
property. It is up to a substantial user manual to inform the user of the dangers inherent in
the coil gun, especially if misused. Safety integration is also to be built into the final product
that will also serve to deter any misuse or accidents. However, despite these precautions,
social safety ultimately rests upon an informed and responsible user.
Political: The only political constraints to be mentioned are possible ways in which the
product is to be license in order to prevent misuse of the product resulting in the potential
harm of persons or property. This will be an increased concern with later revisions that may
prove to be more powerful and destructive.
A-11
ECE 477
Senior Design Report
5/26/2009
Manufacturability: One of the manufacturing concerns comes from the blending of so
many different types of materials. The body of the rifle is wooden, as it is easiest to work
with and mold to our shape and design criteria. The barrel of the rifle had to be plastic to not
interfere with the magnetic fields of the coils.
(f)
Description of the multidisciplinary nature of the project.
There are many disciplines that can be incorporated into this project. Obviously, computer
engineers to work on the software for the microcontroller and electrical engineers to work
on the circuitry and wiring. Mechanical engineers are useful for all the hardware and
packaging involved with the design. Physicists are needed to do analysis and computations
for the forces experienced by the projectile and flight characteristics of the projectile after
the barrel. There are a lot of useful jobs for many different disciplines.
(g) Description of project deliverables and their final status.
The final product includes one fully operational coil gun with the ability to measure velocity
of projectiles fired and monitor the charge status of both system capacitors and batteries.
To operate, the user will need to acquire two 9 V batteries and follow the instructions found
in the user manual for proper set up and use of the coil gun. The final report documenting
the culmination of work throughout the semester is also to be submitted along with the
senior design report and a poster highlighting the Lock, Stock, and Three Smoking Coils
project. A CD for the purposes of archiving the project will also be delivered containing the
Lock, Stock, and Three Smoking Coils website, demo video of the project, and project
documentation.
A-12
ECE 477
Senior Design Report
5/26/2009
Purdue ECE Senior Design Semester Report
Course Number and Title
Semester / Year
Advisors
Team Number
Project Title
ECE 477 Digital Systems Senior Design Project
Spring 2009
Prof. Meyer and Dr. Johnson
4
das Autotünr
Senior Design Students – Team Composition
Area(s) of Expertise
Name
Major
Utilized in Project
Joe Blubaugh
CompE DSP
Diana Mui
EE
PCB and MIDI code
David Sutherland
EE
Microcontroller code
Matthew Swallow
EE
Packaging
Expected
Graduation Date
May 2009
May 2009
May 2009
May 2009
Project Description: Provide a brief (two or more page) technical description of the design
project, as outlined below:
(a) Summary of the project, including customer, purpose, specifications, and a summary of the
approach.
das Autotünr is an automatic guitar tuner and MIDI transcription device that will bring ease
to musicians by providing an automatic means of tuning their instrument. The device will
have a variety of preset tunings as well as some user-customizable tunings in order to
quickly retune the guitar for different songs. The MIDI transcription device also provides a
means for musicians to record the music they play in a format used by many music
transcription programs which would aid the songwriting process. This project will have two
major components – the tuner and the console. The tuner consists of six motors which are
controlled by PWM signals. The console would contain all of the control logic for the tuner,
which involves amplifying the incoming sound signal and analyzing the incoming
frequencies using a DSP chip. The microcontroller is also housed in the console and is
responsible for sending the PWM control signals to the motors to tune to the desired
frequency. The console would also contain the user interface to display information as well
as receive user input. Lastly, the console would record music data from our guitar and write
them to a USB mass storage device as a MIDI file. The MIDI file will be assembled in the
microcontroller using frequency data from the DSP chip and be transferred to the USB host
controller for file writing.
(b) Description of how the project built upon the knowledge and skills acquired in earlier ECE
coursework.
Digital design skills acquired through ECE 270 and ECE 362 were used repeatedly. The
project features two SPI buses, PWM-controlled motors, audio-to-digital conversion, and
UART communications. Analog design skills acquired in ECE 202 were used in the design
of the audio amplifier and low-pass filter. Programming skills acquired and honed
throughout the curriculum were used to structure the project's C source code. The project
also utilized significant knowledge of digital signal processing, since both an FIR filter and
FFT algorithm played a significant part in the frequency analysis portion of the project.
A-13
ECE 477
Senior Design Report
5/26/2009
(c) Description of what new technical knowledge and skills, if any, were acquired in doing the
project.
Knowledge of musical harmonics and overtones on stringed instruments was dramatically
increased. Several circuit design principles were learned, such as bulk and bypass
capacitor sizing and placement as well as other noise-reduction techniques for layout.
Effective layout of power and ground traces as well as appropriate PCB trace sizing was
also learned. The MIDI file format was also studied extensively.
(d) Description of how the engineering design process was incorporated into the project.
Reference must be made to the following fundamental steps of the design process:
establishment of objectives and criteria, analysis, synthesis, construction, testing, and
evaluation.
The idea for das Autotünr stemmed from the perceived usefulness of an automated guitar
tuner to be used by both the avid guitarist and for guitar stores who do many restrings and
retunings every day. After the formulation of the initial idea that the project was to be an
automated, motorized guitar tuner, the team sought out to establish clear and concise
objectives required for design success.
These objectives included the ability to
concurrently control six motors, the ability to analyze frequencies in a sound signal and
compare them to desired frequencies and an ability to write MIDI files to a mass storage
device. With the objectives drawn up, the team set out to analyze how these objectives
could be completed by employing digital design knowledge. After a few design iterations,
the final concept was drafted. This included using two discrete processing units, one for
frequency calculations and one for system control, as well as using a prefabricated,
discrete USB controller module for the mass storage device communications. During the
synthesis phase, microcontroller code was written, the PCB was laid out and the supporting
hardware was chosen and integrated into the device schematic. Soon to follow was the
construction of the device which meant soldering all the components to the PCB and
machining the motor bracket assembly. Once das Autotünr was fully assembled, testing of
the interaction between components was the focus of the team. Each issue that arose was
debugged and resolved by the team members whose primary focus the problem was
involved with. This procedure ensured the fastest and most efficient time to resolution of
any debug issue. After testing and debug was complete, the only remaining task was to
evaluate the extent that design met the team’s initial design objectives. In the end, the
device was able to meet all of the design objectives and was able to both successfully tune
a guitar and write a MIDI file to a mass storage device.
(e) Summary of how realistic design constraints were incorporated into the project
(consideration of most of the following is required: economic, environmental, ethical,
health & safety, social, political, sustainability, and manufacturability constraints).
Economic: This project was to fill the niche between the $40 single string guitar tuner and
the high-end $1000 built-in guitar tuner. It provides more features as compared to the single
string guitar tuner. It is more flexible than the built-in guitar tuner because it is a standalone
device which can be used with different guitars. The cost of the prototype was about $300,
so this would be a good mid-range automatic guitar tuner.
Environmental: Environmental concerns directly affected how the packaging materials
were chosen. We chose to use Lexan for the motor bracket both because it was lighter and
cheaper than aluminum, but also because Lexan is an easily-recyclable material.
A-14
ECE 477
Senior Design Report
5/26/2009
Furthermore, if das Autotünr would go on to be mass produced, the control box would be
made from recycled plastics and the PCB would be assembled without using leaded solder.
Ethical: The main ethical concern involved with the design of das Autotünr was ensuring
that the product would not harm either the user or the user’s property. Various failure
scenarios were identified and accounted for by halting motor operation during these events.
This would ensure that the motors would not be over rotated due to a lack of frequency
feedback, that the rotation direction of positive frequency increase was correctly identified
and that the motors would be sufficiently speed controlled so that the motors would not
accidentally over shoot the tuning target.
Health & Safety: The main safety concern that constrained our design was a concern for
broken strings. Broken strings, especially the higher notes, are capable of causing injuries
to a user’s hands and face. In order to make das Autotünr as safe as possible we have the
motors turn as slowly as possible and have software checks to prevent an over torque
condition. The materials used to make das Autotünr offer no health risks to the user. The
only issue would be disposal of the LCD. There wasn’t really any constraint caused by
health concerns.
Social: Social constraints led to the proposal of this project: the root of the automatic tuner
is to make the process of playing guitar more accessible and convenient. Social constraints
also impacted our user interface design, pushing us to emphasize simplicity in the controls.
Political: Political factors were not a large concern in the design of the project, but
questions of patent liability were significant. Frequency analysis methods were of special
concern here, since the use of DFT-style algorithms is widespread in the patent literature.
Sustainability: Instruments do not change much, so the project will most likely be useable
on guitars in the future as well as the present. The project was also designed to be
adjustable for size and different peg configurations in order to accommodate for differences
in the headstocks of guitars.
Manufacturability: The manufacturability constraint consists mainly of the size of the
device. First of all, we wanted a box for our user interface to be as small as possible (the
size of the LCD screen dictated the absolute minimum size). Secondly, we wanted the
motor brackets to be able to handle both a 3 on a side guitar as well as a 6 in line guitar.
To minimize the amount of material used in the brackets only one side was made long
enough to accommodate a 6 in line guitar.
(f)
Description of the multidisciplinary nature of the project.
There are several different disciplines used in the creation of das Autotünr. Electrical
engineering was the main focus near the beginning of the project when we were creating
our schematic, PCB layout, and populating the PCB. After that computer engineering skills
took over as each member worked on a part of the code needed on development boards
and then on our PCB. When not working on code, mechanical engineering played a large
role in creating the motor brackets and the peg holders. Due to the homework reports
needed, we also used managerial skills.
A-15
ECE 477
Senior Design Report
5/26/2009
(g) Description of project deliverables and their final status.
The final deliverable consists of a motor assembly and a user console box. The motor
assembly consists of two motor brackets, one long bracket and one short bracket. There
are also six servo motors fitted with peg holders which can be arranged in different
configurations on the brackets. The motor assembly connects to the user console box by a
long cable. The user console box has an LCD, microphone input, four pushbuttons, two bicolor LED indicators, stereo phono jack input, and a USB input. The LCD displays the menu
as well as tuning and transcription status. The microphone input is used when the stereo
phono jack is unplugged, such as in the case of acoustic guitars. The stereo phono jack
input allows for direct plug-in with electric guitars. The USB input is for the mass storage
device when MIDI files are written during transcription mode.
A-16
ECE 477
Senior Design Report
5/26/2009
Purdue ECE Senior Design Semester Report
Course Number and Title
Semester / Year
Advisors
Team Number
Project Title
ECE 477 Digital Systems Senior Design Project
Spring 2009
Prof. Meyer and Dr. Johnson
5
The Magic Wand
Senior Design Students – Team Composition
Area(s) of Expertise
Name
Major
Utilized in Project
Zac Greenawalt
CmpE
Task Master
David Wilkinson
EE
Analog Design
Madalina Vintila
CmpE
Software Design
Michelle Zhang
EE
PCB Design
Expected
Graduation Date
Dec 2009
May 2009
Dec 2009
May 2009
Project Description: Provide a brief (two or more page) technical description of the design
project, as outlined below:
(a) Summary of the project, including customer, purpose, specifications, and a summary of the
approach.
The Magic Wand is a hand writing recognition device that uses a 3-axis accelerometer to
acquire acceleration data from normal handwriting, analyze the data, and display a symbol
that closely resembles the character written by the user. The product consists of two
devices, a stylus to obtain the acceleration data and transmit it to a base station which
analyzes the data and displays the most similar character.
There currently exists commercial products that use small infrared cameras with special
paper to detect characters but no product has entered the market that allows the versatility
of being used on any surface. The Magic Wand looks to fill the gap between camera based
handwriting devices and touch screen designs that use a stylus. The Magic Wand hopes to
offer as much functionality as these competing devices which the added bonus of having a
lower cost of ownership due to the limited amount of required supplies while also offering a
wider array of useful applications.
The stylus operates off of two AA batteries (batteries not included), uses a small pressure
sensitive tip to determine when hand writing is taking place, and communicates wirelessly
with the base station using the unlicensed 2.4GHz spectrum. The base station uses the
same transmission standard and is equipped with a multi line LCD, power cord, on/off and
reset buttons.
(b) Description of how the project built upon the knowledge and skills acquired in earlier ECE
coursework.
The project drew heavily upon the skills learned in ECE270, ECE362, and ECE201. A lot of
basic circuit knowledge that was gained in ECE201 was used in the design of the power
supplies. ECE270 factored in heavily when trying to integrate other ICs. Maximum current
draw, fan out, pull up resistors, timing constraints, all of these skills were learned in
A-17
ECE 477
Senior Design Report
5/26/2009
ECE270 and applied to the project. ECE362 was the course that was referenced the most.
The knowledge learned in ECE362 about microcontrollers and how their supporting
modules work was critical to the success of the project. Towards the end of the project
knowledge gained in Data Structures was valuable as we attempted to create efficient data
structures for the acceleration data on both the pen and base station.
(c) Description of what new technical knowledge and skills, if any, were acquired in doing the
project.
The team was able to gain two important skills while designing the Magic Wand: power
supply design and basic PCB layout techniques. The Magic Wand consists of two separate
devices operating off of different power sources. Having the two devices allowed everyone
to see multiple ways to create a proper power supply. The team had the ability to learn how
to implement multiple power sources on a single board, monitor battery life, charge a
battery, and provided multiple voltages to different components on a PCB.
Another learning opportunity was the PCB design process. This was the first opportunity
for most of the team to have formal experience with a PCB and learn some best practices
that come with laying out a PCB. This process gave everyone the chance to gain an
appreciation for the design process and witness the importance of proper planning when
setting out to do PCB design. Everyone found that making sure you have selected the
proper parts before starting your layout can ease the process, as well as double and triple
checking the schematics to make sure one does not leave out any small, but important
parts, like pull up resistors.
(d) Description of how the engineering design process was incorporated into the project.
Reference must be made to the following fundamental steps of the design process:
establishment of objectives and criteria, analysis, synthesis, construction, testing, and
evaluation.
In order to create a successful product the team created 5 PSSCs that allowed for design
flexibility while also ensuring that the team was kept on track and constantly looking
forward to the next objective. The five PSSCS that were created followed a structured
approach so that there was a clear path of progression; however, the PSSCs also yielded
the ability to be worked on independently.
Once the PSSCs were established and objectives were defined the next step was to create
a block diagram showing the required hardware modules that would need to be created.
This step required lots of analysis. Data sheets needed to be read and understood,
concepts needed to be comprehended, and ideas needed to be solidified. Work was made
easier by electing to use Microchip for both microcontrollers and transceiver modules.
Work had already been done by Microchip to ensure their micros worked with the
transceiver modules so more time could be devoted to the power supply design and other
areas that required more analysis.
Once the block diagram and supporting circuit diagrams were created the next step was to
fabricate a PCB that would function both theoretically and practically. This was the first
experience most of us had with a PCB design and required that we not only create a PCB
that functions properly but also is designed for the end use in mind, being used in a writing
device. This required a small thin form. It was found that some selected parts were too
large (our power regulator) and thus it was required to go back to the analysis phase to find
A-18
ECE 477
Senior Design Report
5/26/2009
more appropriate parts. Once the PCB was designed successfully and ordered the next
step was to go from synthesis to construction.
The construction phase was very integrated with the testing phase. A few select parts
would be placed on the PCB and then tested for correctness. If the integration was not
successful, the team analyzed the defect and looked for solutions. Only once all of a small
section was correct would another module be added, independently, tested for correctness,
and then integrated into a previous working module which would again be tested. This
process was very slow and tedious, but if not performed well would be even more difficult to
deal with as the project progressed. The LCD screen is a good example of this process.
An analog circuit was constructed to ensure that the LCD performed basic functions, once it
was found to work correctly its support hardware (headers, power lines) were added to the
PCB and Ohmed out to ensure no shorts existed. The LCD was then interfaced with the
micro (which had already gone through testing) and was tested again. Drivers were then
written to use the LCD screen independently of the main program. The software was then
tested and integrated with already functional code. This summarizes the approach that
was taking.
The construction and testing phase lasted right up until the completion of the project. As
was the rule in the hardware assembly, the software assembling followed the same
guidelines: create a small module and test thoroughly (for example a fuel gauge interrupt),
ensure it worked as needed, integrate it with another working module (a timer interrupt),
and make sure the two worked as needed and continue the process of building, testing,
integrating, and testing again.
The final stage of evaluation was also tied in very closely with the construction and testing
phase. Once the Magic Wand reached a point of simple functionality, it could read,
transmit, and store data from the stylus to the base station, it was evaluated to ensure that
everything was still working together properly. Again the steps of constructing more
functionality and testing appeared and were implemented until a stable operating point
could again be obtained and evaluated. This process repeated several times until a
suitable character set was added, a fitting level of robustness was obtained, and the original
objectives had been met.
(e) Summary of how realistic design constraints were incorporated into the project
(consideration of most of the following is required: economic, environmental, ethical,
health & safety, social, political, sustainability, and manufacturability constraints).
Economic: The main economic constraint was the overall cost of the project. Steps were
taken to try to keep costs down. One step was to combine orders or wait to order a part so
as to limit the shipping costs. Everyone attempted to sample parts from distributes instead
of purchasing small quantities. Costs versus benefits were analyzed to see if the extra
features a more expensive part would bring would be justified for the increase in cost.
Environmental: The environment was taken into considering when choosing how to power
the Magic Wand. Everyone agreed that it would be reckless to not attempt to incorporate
rechargeable batteries into the design. This concern steered the team to choose a
rechargeable battery pack for the base station (which was not implemented due to time
constraints) and to use rechargeable AA batteries for the stylus instead of throw away
watch batteries.
A-19
ECE 477
Senior Design Report
5/26/2009
Ethical: The Magic Wand raises a possible ethical concern when it is advertised as a
handwriting recognition device. Many people initially believe that it can recognize all 26
characters fluently. The team has made great efforts to communicate the true character set
that can be recognized and clear up any doubts about its functionality.
Health & Safety: Very little is expected to go wrong with the Magic Wand that can cause
any physical harm. With that said the safety and comfort of the individual was still taken
into considering when designing the Magic Wand. The first consideration was in the size of
the stylus, it was desired to have a form factor that was not uncomfortable for the user to
use. Also, with the device being held in the hand, we wanted to eliminate all chances of an
individual cutting or slicing their hands by having to hold the stylus PCB to write. That is
why the pen is inside a smooth plastic casing, to eliminate any chance of injury to the
individual.
Social: The Magic Wand was designed with the goal to be used by both left and right
handed people. The team did not want to discriminate against anyone and limit the
potential market share.
Political: The Magic Wand has no political design constraints.
Sustainability: In order to maintain sustainability rechargeable batteries are encouraged to
minimize the need for extra purchases after the initial purchase. Efforts were also made
during the analysis to pick parts that had the highest possible ratings for the price (LDO,
caps, diodes).
Manufacturability: One of the main manufacturing concerns came during the PCB design.
Attempts were made to not locate two different parts too close to each other so that
mounting them could be difficult. When designing the power supply section of each PCB
conscious effort was made to allow for space between the LDO, caps, diodes, and inductor.
Insufficient space would make manufacturing the device difficult. If this product were to be
massed produced different design techniques would be utilized since smaller parts could be
used since an individual would not be hand soldering the parts in place. This would allow
for a smaller PCB and less obtrusive parts.
(f)
Description of the multidisciplinary nature of the project.
The Magic Wand is a highly ECE based design with little overlap to other disciplines. The
main algorithm used to detect characters was designed by the team. Other algorithms
were studied, but due to time constraints they could not be implemented due to their
complexities. The packaging of the final product borrows little, if anything, from other
disciplines. No complex machining was needed, moveable parts were not required. The
only moving parts are a push button and a small ‘shelf’ that can be removed from the stylus
to change the batteries. Outside of ECE skills, the major skills required were verbal and
writing skills. A significant amount of paperwork and presentations accompanied this
product and required that the individual be skilled in both the written and spoken language
along with proper techniques. It should not be interrupted that the presenting and writing
were for moot, as it is a crucial skill for engineers to be able to communicate their ideas
effectively and defend their design decisions in clear and well constructed ways.
A-20
ECE 477
Senior Design Report
5/26/2009
(g) Description of project deliverables and their final status.
The most important deliverable, the Magic Wand, is made up of two pieces. There is the
stylus which is used for handwriting, and the base station that analyzes the stylus data and
displays the written characters. Both of these pieces are completed. The stylus is capable
of running for a few hours off of a single charge of the batteries, and the base station can
run indifferently since it is not run off of batteries. Both devices work as they are suppose
to. The stylus communicates with the base station, transmitting battery information and
hand writing acceleration data. The base station properly displays the battery status of the
stylus, if the two devices are talking or not, and the will display a character if one is written
properly or a question mark if the user makes an unknown character. In summary, all parts
are working as desired and there are no noticeable defects.
A-21
ECE 477
Senior Design Report
5/26/2009
Purdue ECE Senior Design Semester Report
Course Number and Title
Semester / Year
Advisors
Team Number
Project Title
ECE 477 Digital Systems Senior Design Project
Spring 2009
Prof. Meyer and Dr. Johnson
6
ALF
Senior Design Students – Team Composition
Area(s) of Expertise
Name
Major
Utilized in Project
Andrew Hartnett
CompE VHDL
David Eslinger
EE
Circuit Design
Curt Schieler
EE
Programming
Ken Pesyna
EE
Programming
Expected
Graduation Date
Dec 2009
May 2009
May 2009
May 2009
Project Description: Provide a brief (two or more page) technical description of the design
project, as outlined below:
(a) Summary of the project, including customer, purpose, specifications, and a summary of the
approach.
ALF is a device that allows a user to stream audio, with or without an effect, and allows a
user to record approximately 20 seconds of audio with an ability to play that audio back.
The intended customer is anyone that is interested in manipulating audio. The original
purpose of ALF was to implement Rice Coding in an FPGA, however time did not permit
this and instead digital effects, such as a flange, were explored. The project was
approached in logical fashion; first we determined what parts were necessary to complete
our goals, and then selected the parts based on the constraints of the project (such as
speed, size of memory, etc). Next the Printed Circuit Board was designed with
specifications such as SDRAM being physically near the FPGA in mind. After the PCB was
completed, code started to be developed, with small parts being written and tested at a
time. These small parts were integrated and left us with our final project.
(b) Description of how the project built upon the knowledge and skills acquired in earlier ECE
coursework.
This project required a great deal of C and HDL (both Verilog and VHDL). Other skills built
upon were related to microcontroller interfacing, general system design, and timing
constraint awareness, all of which were developed in ECE 362. Circuit design was stressed
in many earlier classes, and proved essential to the success of the project. In ECE 270, we
learned the basics of reading data sheets and drawing schematics in OrCAD. This
knowledge was used in the process of selecting parts and drawing the schematic.
(c) Description of what new technical knowledge and skills, if any, were acquired in doing the
project.
While some of the team members had known VHDL going into the course, other team
members were able to gain knowledge about VHDL. Those that were already familiar with it
A-22
ECE 477
Senior Design Report
5/26/2009
were able to further develop knowledge of VHDL. No team members knew Verilog, but
knowing VHDL allowed them to quickly learn and modify code that was found in Verilog. In
the process of designing our project, team members gained more experience with timing
diagrams and timing constraints, such as when code was written to interface with the Audio
CODEC or the SDRAM. Also, writing code to initialize both the CODEC and SDRAM
required team members to look very closely at datasheets. Trying to figure out what to look
for in a datasheet can be very time consuming, so the more experience obtained, the
quicker that process should go in the future. In addition, the ability to program in C was
further developed by any team members that wrote code for the microcontroller. While not
used in the final project, the process for compressing an audio file into the FLAC was
generally understood by the end of the semester, with one team member being very well
versed in the process. If time had allowed, this knowledge would have been used to allow
the FPGA to compress streamed audio. Instead however, knowledge about digital effects
for audio were obtained and demonstrated in the final project. Finally, the ability to do PCB
layout was strengthened.
(d) Description of how the engineering design process was incorporated into the project.
Reference must be made to the following fundamental steps of the design process:
establishment of objectives and criteria, analysis, synthesis, construction, testing, and
evaluation.
The first step in the process was establishing objectives and goals/criteria. There were five
specific criteria that formed the basis of the ensuing design process. The criteria involved
different abilities to demonstrate various parts of the entire system, with the goal that
accomplishing these fundamental parts would lead to system integration. Once the criteria
were created, analysis was performed to estimate what parts were needed, and to what
extent. For example, a rough estimate of the amount of external memory needed was made
by deciding how many seconds of audio were needed, what the sampling rate was, and the
estimated compression ratio. Another rough analysis was for the number of logic elements
required for the FPGA based on the computations involved. The next step in the design
process, synthesis, involved understanding how the various chips would communicate, and
how various parts of the circuit would interact. The synthesis was most clearly defined in a
block diagram and schematic, which were constantly revised and rewritten as the design
continued. The schematic was also part of the construction phase - actually building what
was designed. Populating the PCB and developing code was the next step. The coding,
testing, and debugging process was quite iterative, and sometimes coding constraints led
led to or introduced problems in the construction step. Although seemingly oxymoronic,
these unexpected problems were not very surprising, and were generally solved by flywiring
or code simplification. Eventually, this iterative process led to the realization that the initial
criteria were not realistically achievable, and it was necessary to choose a new direction of
the project that more closely matched what could be done in the remaining time.
(e) Summary of how realistic design constraints were incorporated into the project
(consideration of most of the following is required: economic, environmental, ethical,
health & safety, social, political, sustainability, and manufacturability constraints).
Economic: The project had a requirement from the sponsor, Southwest Research
Institute, to stay under $1000, so the design was made as inexpensive as possible without
compromising quality. Also, the printed circuit board for the device was a four-layer board,
and cost constraints limited four-layer boards to 30 square inches.
A-23
ECE 477
Senior Design Report
5/26/2009
Environmental: There were few environmental concerns with the project. The largest
concerns would be addressed in the user manual, which would include instructions for
properly disposing of and recycling the PCB, LCD, and plastic enclosure.
Ethical: The ethical concerns that surround the project include citing code sources,
providing bug-free code for the end product, and ensuring the device does not injure the
user. A reliability and safety analysis was done to find the possible faults in the design, and
safety warnings would be included in the user manual or displayed on the device.
Health & Safety: The main concerns with health and safety of the user were addressed in
the user manual. Some of the concerns dealt with the LCD breaking, and opening up or
tampering with the circuitry in the device.
Sustainability: The project was not intended for long-term or heavy use, but there was a
reliability analysis performed on various parts of the circuit. The plastic packaging was
chosen for durability and sustainability.
Manufacturability: The main manufacturability constraint that was incorporated during the
project was choosing packages that were able to be reasonably soldered to the PCB.
(f)
Description of the multidisciplinary nature of the project.
This project clearly required skills that covered both Electrical Engineering and Computer
Engineering. The ability to write code in C, VHDL, and Verilog are things typically
associated with Computer Engineers, or even Computer Scientists (however, Computer
Scientists are not usually associated with microcontroller or FPGAs). Creating a schematic,
designing the layout, designing the power supply circuitry, and figuring out the appropriate
resistors and capacitors (when not given) are typically considered to be in the Electrical
Engineering domain. In addition, the soldering of parts on to the board was a particular
challenge for this project because of the small size of capacitors, and the large number of
pins for the FPGA. This is something some may attribute to an Electrical Engineering
Technology major. All of these aspects were very important to the functionally of the end
product.
(g) Description of project deliverables and their final status.
The final product is a small box with an easy-to-read display and three large pushbuttons. A
9V power supply is need, as well as an auxiliary cable to connect ALF to an audio source,
and of course speakers or headphones (speakers preferred). There are currently no known
bugs in the user interface, but certainly more testing would need to be done to check its
robustness. All of the revised success criteria were met; however, two important intended
criteria were not met; currently ALF has no capability to compress or decode audio. For
future revisions, this would be a priority, as not much uncompressed audio can be stored in
4 MB of SDRAM. Currently, the PCB is complete, but with 3 'flywires' that would be fixed for
a final revision. The packaging design is finished, though it could likely be reduced in size in
future revisions. More effects could also be added in the future (such as high frequency
filters or reverb), and of course this would lead to a necessary update in the user interface.
Also, currently ALF is unable to modify stored audio, but would be a capability that could
certainly be added in the future.
A-24
ECE 477
Senior Design Report
5/26/2009
Purdue ECE Senior Design Semester Report
Course Number and Title
Semester / Year
Advisors
Team Number
Project Title
ECE 477 Digital Systems Senior Design Project
Spring 2009
Prof. Meyer and Dr. Johnson
7
Legacy Game Console
Senior Design Students – Team Composition
Area(s) of Expertise
Name
Major
Utilized in Project
Ryan Sherlock
CmpE
PCB design
Jason Cray
CmpE
Game design
Joseph Mundackal
CmpE
Schematic design
Michael Warsco
CmpE
Peripheral interfacing
Expected
Graduation Date
May 2009
May 2009
May 2009
May 2009
Project Description: Provide a brief (two or more page) technical description of the design
project, as outlined below:
(a) Summary of the project, including customer, purpose, specifications, and a summary of the
approach.
Our project design is a video game console. It utilizes a VGA monitor output for all video
transmissions, a Buzzer for playing simple audio tones and sounds, a USB drive for
sending and receiving game data through a USB flash drive, and a home-made controller
for manipulating game data through a series of buttons. Our customer influence was
people similar in taste to us, those people who grew up with video games which are more
“old school” in nature. Speaking of course of the older video game systems that used 8 bit
technology, not the new consoles with their fancy graphic accelerations. Our system
employs an embedded Linux Tin Can Tools Hammer module with memory mapped I/O for
port pin interaction. We use several serial communications protocols for data transfer,
including UART and SPI. We also use several pins as general purpose, which allow us to
toggle them at our leisure for communications with the controller. The purpose of this
project is entertainment. Video games are one of the best ways in recent history to unwind
after a long day, and just have fun with friends. The escapism allowed in video games has
become likened to that of reading books and watching movies, maybe more so because of
the actual interaction required to reach the conclusion of the game. Finally, our approach to
design was to use our Hammer module with embedded Linux as the backbone, allow it to
control all peripherals itself, and run the games using standard c libraries and code.
(b) Description of how the project built upon the knowledge and skills acquired in earlier ECE
coursework
The Legacy Console required many of the skills from our ECE coursework. The most
important class was ECE 362 Microprocessor Systems and Interfacing. This course gave
us the knowledge required to interface with the peripherals we used when designing the
Legacy Console. With our ECE 362 we would have had no idea how to interface with a
UART, SPI, or even a GPIO. It also gave us a foundation of knowledge in reading
A-25
ECE 477
Senior Design Report
5/26/2009
datasheets and selecting parts. The mini-project at the end of ECE 362 game me
experience in soldering that was vital to the success of the Legacy Console. ECE 201
Linear Circuit Analysis was essential in making sure the circuits on our PCB were correct.
We also drew upon knowledge we gain in ECE 201 when we designed the circuit for the
custom controller. Finally ECE 264 Advanced C Programming made the Legacy Console
possible. All the code that our system runs is written in C.
(c) Description of what new technical knowledge and skills, if any, were acquired in doing the
project.
Many skills were gained during the creation of the Legacy Console. The most knowledge
was gained in printed circuit board design. We learned all the steps from how to draw
schematics to laying traces and debugging them. Along with this knowledge came helpful
insights into the correct way to layout a PCB. Unfortunately we also learned a great deal
about how to fly wire and otherwise correct a bad PCB. The PCB also gave us the
opportunity to learn how to solder many different types of parts including surface-mount,
through hole, and QFN packages.
We also learned a lot about how to debug hardware. We learned how to check ports such
as UART and SPI for correctness and how to use an oscilloscope to check the output from
those ports. We learned a significant amount about checking soldering joints and circuit
debugging as well.
Finally, we gained knowledge about programming for embedded Linux. We learned how to
write programs in C that were compatible with our version, and how to compile those
programs into the Linux kernel.
(d) Description of how the engineering design process was incorporated into the project.
Reference must be made to the following fundamental steps of the design process:
establishment of objectives and criteria, analysis, synthesis, construction, testing, and
evaluation.
During the construction of our project we did not follow any strict procedure or design flow;
instead our engineering design process was more interrupt driven, meaning we
accomplished certain portions of our project when we needed to.
Initially we laid out of objective as “design a game console”, which allowed us to be more
creative with our criteria selection. Since our assumption was that our game console might
be too simple using a Linux operating system to power our peripherals, we decided that we
would include more peripherals initially to make the difficulty of the project more realistic (or
at the very least comparable to other projects). During our criteria selection we looked at
current and past game consoles to see what extra features and peripherals were included.
Ultimately we decided upon the following criteria based on component selection: a
controller to manipulate the game, preferably wired; a USB input, since using ROM
cartridges or CDs was not very practical; wireless 802.11 b/g, but we also considered
Bluetooth; a graphics device that would handle VGA output; and an audio device to play
sounds.
Part of our analysis included component selection. This happened at very sporadic times
because instead of selecting our components all at once we chose the main component
first (our Hammer module), and then everything followed suite in order of importance
(graphics, controllers, sound, and wireless). After we chose one component, we would base
A-26
ECE 477
Senior Design Report
5/26/2009
our next component decision on how many interfaces we had left on our Hammer module,
and then the practicality of the component itself (whether it would be too difficult to interface
to, or if we could find previous documentation on another project using the component).
Once we had selected all of our components we began to work on our schematic and PCB
layout.
Our PCB layout was a trial-and-error based adventure, which meant that we had no clue as
to what to expect of the final product or how difficult it would be to solder. The first revision
of our PCB ended up too large and had incorrect component sizes on the board, but gave
us the chance to analyze our mistakes and reconstruct the board; the second and final
revision turned out to be much smaller. During the time our PCB was undergoing changes,
we were developing software on our development board one component at a time. Since
USB was a simple kernel module, we decided to leave that at the bottom of the list, and
work on our graphics device and controllers first.
Once we had decided that our graphics device was working and changed the controllers,
we moved onto developing wireless and audio. Unfortunately, during testing our wireless
module stopped working and our audio DAC was found to not be compatible with an SPI
interface. We immediately switch gears and dropped our wireless module criteria and used
a buzzer instead of an audio DAC.
When the final revision of the PCB arrived we debugged the rest of our components and
finally decided to purchase our packaging. At the time of writing this we have finalized all
our software and hardware designs, but our microprocessor has decided to turn into a
“brick”. In retrospect, we may have chosen to layout more of our project in a time line based
fashion since using an “interrupt driven” engineering process tends to leave designing to
the last minute. I believe overall our team is satisfied with our project considering our initial
assumptions may have led us to make our project more difficult than we suspected.
(e) Summary of how realistic design constraints were incorporated into the project
(consideration of most of the following is required: economic, environmental, ethical,
health & safety, social, political, sustainability, and manufacturability constraints).
Economic: Economics are very important when designing a console because there is so
much competition in the market. The Legacy Console is no different, and we tried to take
that into account when deciding on parts. With a $160 chip as its main system, the Legacy
Console is extraordinarily economical. However it is well within the industry standard for
video game consoles.
Environmental: The Legacy Console had several environmental design constraints. First
it had to be designed so that disposal was not an issue. This required us to come up with a
plan to dispose of old consoles. It also had to use as little electricity as possible. This
forced us to choose parts that were lower in their voltage and current requirements.
Ethical: When designing a gaming console there are several ethical considerations. The
console must not be harmful to the user. This forced us to make sure that there was
minimal risk for shock damage. The games are where the real ethical concerns were
located. The games needed to be free from possible seizure inducing material as well as
having no obscene content.
Political: While not directly related to the actual designing of the game console, violent and
racial video games have become an issue lately. Some game console manufacturers aim
A-27
ECE 477
Senior Design Report
5/26/2009
to restrict certain developers from creating games for them by licensing development
environments and software that a developer must use to create the game. While we do not
have such software or IDEs, this is definitely something that could be taken in to
consideration had we the time to further develop the software for the game console.
Sustainability: As with any gaming system it is important that the console lasts for a fairly
long period of time. This meant that we needed to choose parts for the Legacy Console
that had long mean times to failure. This had to be balanced against the economic aspect
of the console because more robust parts were more expensive.
Manufacturability: Since the PCB layout has been finalized and many of our peripherals
were chosen as pin-out modules as it is easy to reproduce and solder. Packaging was
chosen as any sort of plastic container that can fit a 4.5”x5.1” rectangular PCB (wood and
metal packaging were not recommended for heat and electrical issues respectively).
(f)
Description of the multidisciplinary nature of the project.
This project utilized many different disciplines. First it utilized networking skills when we
chose parts and tried to have them sampled. Then it relied heavily on electrical
engineering. The PCB and all the circuitry had to be designed using electrical engineering
principles. The next discipline was software engineering. All the game code had to be
designed, debugged and tested. Finally the project utilized industrial design. The product
had to be packaged and presented in a fashion that would be appealing to consumers.
(g) Description of project deliverables and their final status.
The project deliverables include one Legacy Console gaming system and one Legacy
gaming controller. The console is a black plastic box with connections for VGA, audio, and
the controller. The Legacy Console is currently unable to communicate using wifi, but
everything else is fully functional. It has a library of two complete games and can be played
on any VGA screen.
A-28
ECE 477
Senior Design Report
5/26/2009
Purdue ECE Senior Design Semester Report
Course Number and Title
Semester / Year
Advisors
Team Number
Project Title
ECE 477 Digital Systems Senior Design Project
Spring 2009
Prof. Meyer and Dr. Johnson
8
The OCHO
Senior Design Students – Team Composition
Area(s) of Expertise
Name
Major
Utilized in Project
Kevin Dieterle
EE
Control Systems
Peter Laird
CompE PCB Design
Jeff Ostendorf
CompE Software Architecture
Greg Zarse
CompE Peripheral Interfacing
Expected
Graduation Date
May 2009
May 2009
May 2009
May 2009
Project Description: Provide a brief (two or more page) technical description of the design
project, as outlined below:
(a) Summary of the project, including customer, purpose, specifications, and a summary of the
approach.
The OCHO is a digitally controlled quad rotor aircraft. It utilizes the widely used 802.11b
wireless protocol to handle communication with a remote user. It has built in stabilization to
aid in the controlled flight by an end user. It is targeted for hobbyists of both beginner
status and advanced experience. Along with flight hobbyists, software developers are also
targeted with the open protocol for control and attached RJ-11 port for further programming.
The project was designed as a digitally controlled small aircraft that would be easy to fly.
The aircraft is based on a simple frame using aluminum booms from other RC helicopters
and a light weight main frame and motor mounts. The flight is achieved using openly
available motors and motor controllers. The main control system is based off of a custom
made PCB that has a sensor array consisting of 3 gyros, 3 accelerometers, a
magnetometer, a battery monitor, and a barometer. These sensors and the motor
controllers are based around the popular dsPIC33. The dsPIC33 is used for the sensor
handling and motor control to try and stabilize flight for the end user. To communicate with
the end user the microcontroller utilizes the Roving Networks WiFly wireless module and an
RS-232 level translator. These then communicate to a remote end user using either a serial
line or a wireless network.
Based on these parts selected, the design was based around utilizing all of the features
desired in a single, streamlined software package on the microcontroller. This required a
proper PCB layout to give stable and useful data and communication that could be handled
by the microcontroller to allow flight for the end user. With the PCB designed, we were
able to achieve motor control, two way communication, battery monitoring and warning,
and a form of stabilization (though limited to an isolated axis at a time).
A-29
ECE 477
Senior Design Report
5/26/2009
(b) Description of how the project built upon the knowledge and skills acquired in earlier ECE
coursework.
The microcontroller design was based around concepts taught in ECE 362 about interrupt
driven design and peripheral management. We utilized UART, Timers, PWM, SPI, and
ADC in our design based around ideas taught in 362. The software is written in C, which
has been taught in CS 158, ECE 264, and ECE 368. The remote client software used for
demonstration of the communication was written in Python, taught in ECE 364. The
handling of data uses Boolean logical statements, utilizing lessons taught in ECE 270 and
ECE 369. The timing analysis used to correctly streamline the software to work with all of
the peripherals simultaneously was also taught in ECE 368, ECE 270, and ECE 362.
The PCB design gives protection for the microcontroller based around capacitors, resistors,
and diodes. The design of the PCB used skills taught in ECE 201, 202, 255, and 362.
For the control system involved in stabilizing the quadrotor, knowledge from ECE382, 483
and 308 were used heavily. This includes knowledge of digital filters and PID control
algorithms.
(c) Description of what new technical knowledge and skills, if any, were acquired in doing the
project.
The microcontroller used, the dsPIC33, was new to the team and we required to become
familiar with the IDE and compiler. The large amount of peripherals to integrate together
required some new efforts in the software design. The concept of a quad rotor aircraft and
how they are controlled was new to the team and how to properly tune the PID control
system for a two axis system proved difficult.
(d) Description of how the engineering design process was incorporated into the project.
Reference must be made to the following fundamental steps of the design process:
establishment of objectives and criteria, analysis, synthesis, construction, testing, and
evaluation.
The early objects were based around a vague idea of a digitally controlled aircraft,
preferably a stable system such as a helicopter. Due to the lack of desired form (fixed pitch
with plenty of lift) the design turned to the quad rotor design. Upon analysis of the design, it
was believed that we would be able to perform the goals of digitally controlled remote flight.
This required finding proper peripherals and designing a system that could utilize all of the
peripherals and achieve the desired flight. When the system was designed, we were able
to fabricate a PCB to connect all of the parts together and develop the software to properly
control the system and communicate to the end user. Once finished with the development,
we required cleaning and optimizing the system to be of better use to the end user rather
than stay in a stagnant debugging state. To achieve this, we spent time evaluating options
and design choices to utilize in the re-worked design.
(e) Summary of how realistic design constraints were incorporated into the project
(consideration of most of the following is required: economic, environmental, ethical,
health & safety, social, political, sustainability, and manufacturability constraints).
Economic: The cost of production was relatively cheap for the hobbyist market. The major
cost lied in some of the selected sensors and the battery. Some of the parts were sampled
A-30
ECE 477
Senior Design Report
5/26/2009
or sold at discounted prices to us due to our student status. This kept the cost down to an
affordable amount per user.
Environmental: The craft itself uses electric motors, so they themselves do not cause any
pollution, but the means of charging the batteries may draw from non-green energy forms
(such a coal). Another major environmental concern is the disposal of the product since it
contains many non-biodegradable components and heavy metals. This can all be
minimized by encouraging proper recycling and offering support programs to ensure that
this happens. Additionally, portions of the project were designed to minimize the
environmental impact of the project such as monitoring battery status to ensure optimum
usage for maximum battery life.
Ethical: The craft is very dangerous and could be used for harming others because of its
remote control. The use of the craft is limited by federal law from flying in largely populated
areas outside of specified flight areas for other RC crafts. This would legally keep the craft
from harming others, safety designs for the motors would also be included to keep the
danger to others to a minimum.
Health & Safety: Because of the inherent danger in a free moving aircraft, there is an
obvious form of safety risk. Along with the high RPM motors running on the outer edges of
the craft, it is highly warned not to approach the craft when the motors are armed and/or
running. To counter the safety risks, the tips were whited to make it easier for a person to
see the rotation of the motors and avoid any harm. Also, the addition of protective covers
around the rotors would also lessen injury from the blades. The batteries used are Lithium
Polymer, a very light weight but unstable form of battery. They exhibit dangerous reactions
when over charged and can cause serious harm if this occurs.
Social: Because of the dangerous nature of the design, the craft does pose a threat as a
weapon that can be used remotely by an individual with intent to harm. The possible use in
this form is hard to stop beyond keeping the craft itself as safe as possible and the safety
measures being untamperable (i.e. protective shielding around the motors being
unremovable).
Political: Because of the natural danger with flying aircraft, the government keeps strict
guidelines as to where such devices may be operated. The use of this product outside of
these areas is at risk of lawful punishment by the local government. Any use for malicious
actions against other individuals would also be at risk of lawful punishment.
Sustainability: The design is fairly sustainable due to its isolated system. The major
issues are in the degradation of the motors and sensors over time. The batteries can be
easily replaced if they begin to die and do not pose any immediate impact on the design
beyond acting as the power supply. The replacement of the motors, motor controllers, or
batteries is simple and just requires plugging in a new device to replace the broken form.
The code, when finished, should be stable and reliable and not require any maintenance.
Manufacturability: The device itself would show fair manufacturing form. The PCB is a
very simple design and should pose no real challenge to automated population. The parts
used were openly available and easy to connect with. The only issue would be modification
of the software to incorporate a dynamic detection and identification system for the wireless
communication (as it is now, it is explicitly set to connect to a specific, static IP).
A-31
ECE 477
(f)
Senior Design Report
5/26/2009
Description of the multidisciplinary nature of the project.
Using the concepts of a quad rotor aircraft that required a self balancing system to aid in
the flight allowed us to incorporate concepts from aeronautical design and control systems.
The fabrication of the frame from parts and properly mounting and aligning the motors
required knowledge of mechanical design and the physics of lift and balance.
(g) Description of project deliverables and their final status.
The final project is a quad rotor aircraft capable of some balance using two axes, the tuning
the PID could not be completed so it is not advised to use the current design. The PID
tuning could probably be achieved through a longer amount of time using experimental
changing of the various coefficients. The communication to and from the craft works
properly, though there is instability in the packets received by the craft. Efforts at
incorporating checking bytes and headers and tails to the packets gave some gain in
reliability, though the final result is still not fully satisfactory. The battery monitoring of both
the 11V and 7.4V batteries to warn the user of the voltage of either dropping below a cut-off
threshold is complete and produces a loud and annoying buzzing sound. There is a Python
based software client to connect to the craft and use a USB based controller to control the
craft.
A-32
ECE 477
Senior Design Report
5/26/2009
Purdue ECE Senior Design Semester Report
Course Number and Title
Semester / Year
Advisors
Team Number
Project Title
ECE 477 Digital Systems Senior Design Project
Spring 2009
Prof. Meyer and Dr. Johnson
9
FLACtrac Digital Audio Player
Senior Design Students – Team Composition
Area(s) of Expertise
Name
Major
Utilized in Project
Greg McCoy
CmpE
Hardware
Brett Mravec
EE
Software
Isaac Jones
CmpE
Software
Danielle Miller
CmpE
Software
Expected
Graduation Date
December 2009
May 2009
May 2009
May 2009
Project Description: Provide a brief (two or more page) technical description of the design
project, as outlined below:
(a) Summary of the project, including customer, purpose, specifications, and a summary of the
approach.
The FLACtrac is a targeted as a portable battery-operated consumer device. Its purpose is
to play FLAC audio files from an SecureDigital (SD) memory card loaded by the user.
(b) Description of how the project built upon the knowledge and skills acquired in earlier ECE
coursework.
Developing the FLACtrac was the culmination of our studies in Electrical & Computer
Engineering. The hardware aspect of the device built up on previous small-scale
experience in ECE 270 and ECE 362, as well as reinforcing basic EE principles from ECE
201, 202, and 255. Software development occurred entirely in the C programming
language, and thus built upon CS 156/158 and ECE 264.
(c) Description of what new technical knowledge and skills, if any, were acquired in doing the
project.
Through completing our senior design project, we gained invaluable skills, more so than
any other class we have taken so far in ECE at Purdue. Greg substantially increased his
skills at soldering and assembling circuit boards with very small surface mount components.
None of us had any experience with PCB design, so this was an eye-opening experience.
The issues we encountered were sometimes frustrating, but they are valuable as a lesson
on what to look out for on projects in the future.
(d) Description of how the engineering design process was incorporated into the project.
Reference must be made to the following fundamental steps of the design process:
establishment of objectives and criteria, analysis, synthesis, construction, testing, and
evaluation.
A-33
ECE 477
Senior Design Report
5/26/2009
The engineering design process was at the heart of our entire senior design project. From
the very beginning, we established our Project-Specific Success Criteria (PSSCs) which
provided a framework for which to determine the requirements for a successful
implementation. During the first half of the semester, we looked at these requirements and
available hardware to determine an appropriate solution to the requirements. We then
designed a solution with the hardware we selected, and after spring break constructed the
device. After construction was complete, we continued software development and
continued the cycle of testing and evaluating the device performance while tweaking the
software. During this period, we were also able to identify hardware changes that could be
made in the future to improve the performance of the device.
(e) Summary of how realistic design constraints were incorporated into the project
(consideration of most of the following is required: economic, environmental, ethical,
health & safety, social, political, sustainability, and manufacturability constraints).
Economic: Designing a device which was cost-effective was a core focus of our project.
Our goal was to design the FLACtrac for a price point of $100 in order to compete with
existing digital audio players on the market. The cost of our prototype was $161.05, but
with bulk pricing on components (for a run of 100+ devices) our component price could be
decreased to $85.46. Assuming the production run of the PCB costs $33 or less, we were
fairly close to our initial cost constraint declared in the Design Constraint Analysis.
Environmental: The initial design of our device didn’t take environmental constraints into
account, but features of the device could easily be changed in order to improve the
environmental footprint, and require RoHS components.
Health & Safety: Attention was given to ensuring that the battery cannot malfunction and
potentially harm the user. A volume limiter is a plan for long-term software development. In
addition, further iterations of the design will include currently non-implemented components
that will add safety features.
Sustainability: We wanted the FLACtrac to be as sustainable as existing digital audio
players on the market. There isn’t any reason that the FLACtrac wouldn’t last as long as an
iPod, which also has a non-removable lithium ion battery; and it would be trivial for
someone skilled with simple hand tools to replace the battery in the FLACtrac. This area
might be improved by allowing the user to replace the battery after it is exhausted, but
would require changes to the packaging to be easy for all users to accomplish.
Manufacturability: Design for manufacturability is important for all but the most custom
projects. The FLACtrac is fairly easy to build, and was deliberately designed early on to
have components which would fit together well and make assembly simple.
(f)
Description of the multidisciplinary nature of the project.
The FLACtrac incorporates both analog and digital electronic design techniques.
addition, the FLACtrac incorporated microcontroller design and programming skills.
(g) Description of project deliverables and their final status.
The FLACtrac is constructed and meets 4.5 of the five Project-Specific Success Criteria.
A-34
In
ECE 477
Senior Design Report
5/26/2009
Purdue ECE Senior Design Semester Report
Course Number and Title
Semester / Year
Advisors
Team Number
Project Title
ECE 477 Digital Systems Senior Design Project
Spring 2009
Prof. Meyer and Dr. Johnson
10
Not So Deep Blue
Senior Design Students – Team Composition
Area(s) of Expertise
Name
Major
Utilized in Project
Scott Shaw
EE
Hardware/Low Level
Software/PCB
Design/Packaging
Matthew Sbai
EE
Hardware/PCB
design/Packaging/High
Level Software
John Fawcett
CompE High/Low Level
Software
Hussain Vasi
EE
Hardware/Software
integration
Expected
Graduation Date
May 2009
May 2009
May 2009
May 2009
Project Description: Provide a brief (two or more pages) technical description of the design
project, as outlined below:
(a) Summary of the project, including customer, purpose, specifications, and a summary of the
approach.
Not So Deep Blue is targeted at the beginning to intermediate chess player. The user is not
required to have a strong foundation into the possible moves in chess as Not So Deep Blue
displays all possible moves when a piece is lifted. It is meant to allow chess players with
little to no knowledge of the legal moves to be able to play a game of chess.
In this project, we used an ATMega128 microcontroller that interfaces with several LED
drivers, touch sensors, and reed switches via shift registers. The theory behind Not So
Deep Blue is that each square contains its own reed switch. This reed switch will detect a
piece in the presence of a magnet. These magnets are mounted into each of the 32 chess
pieces. The microcontroller was interfaced through SPI to be able to communicate with the
reed switches, I2C to communicate with the LED drivers, and GPIO pins to communicate
with the touch sensors.
(b) Description of how the project built upon the knowledge and skills acquired in earlier ECE
coursework.
The courses that lent themselves as the most useful were without a doubt ECE 270 and
ECE 362. The information contained within these courses, such as low level logic,
embedded systems design, and general microcontroller programming, helped with the initial
design and debugging throughout the project. The other class that was of use was ECE
264, Advanced C programming. Not only did this class familiarize us with C programming,
A-35
ECE 477
Senior Design Report
5/26/2009
but it also introduced us to advanced programming techniques which allowed us to write a
more organized, efficient program.
(c) Description of what new technical knowledge and skills, if any, were acquired in doing the
project.
One of the main technologies used in our project is the reed switch. Nobody in our group
had ever used a reed switch, so a lot of testing was required to find out how sensitive they
were. Another unknown involving the reed switches was the orientation of the reed switch in
regards to the magnet. In the end, we found the reed switch needed to be mounted
vertically to work correctly with the magnet.
The other main skill that was learned was PCB design. The first step in this process was to
learn the general rules and regulations of laying traces. After learning how to place traces, it
was up to us to read the documentation about PCB design for each part we were using.
After doing that research, laying out the PCB itself was a trial and error process. We
learned that it takes several attempts to layout a PCB with all of your components while still
using up as little space as possible.
Finally, the most important skill we learned was how to integrate an entire project from start
to finish. Knowing how to conceptualize, design, debug, and complete an entire project with
a given deadline is a skill that will be useful to all of us as we enter the work force.
(d) Description of how the engineering design process was incorporated into the project.
Reference must be made to the following fundamental steps of the design process:
establishment of objectives and criteria, analysis, synthesis, construction, testing, and
evaluation.
The first step this semester was to develop an idea for a project. It needed to be something
that we were all interested in. After deciding on our idea for the project we needed to
develop a measurement for success. We were given five general criteria for success, and
we developed five more which were specific to our project.
After this, we needed to start deciding on the major parts involved in the project. This
required us to do research and compare and contrast several parts, including the
microcontroller, the LED drivers, the reed switches, voltage regulators, and LEDs. We had
to analyze each part separately to see if it would meet the needs of our project, and all
together to see if all parts could be integrated with each other.
After doing research and selecting parts, we needed to create a preliminary schematic. The
schematic allowed us to map out the connections to and from all components in the project.
Knowing which parts needed to interconnect gave us a starting point for our PCB design.
The PCB design was a multi-step process. The first step was to find the footprint for each of
the parts in our design. This was an important step, because if the footprint is wrong,
soldering the part to the board would be nearly impossible. After finding all the footprints,
we needed to layout the board. Several of the parts required special consideration in PCB
design, such as a ground pours around it. Finally, we needed to connect all the traces
between the parts. This process required a lot of trial and error to find an effective way to
lay all the traces on the PCB.
A-36
ECE 477
Senior Design Report
5/26/2009
Submitting our PCB was the next step, which was followed by populating it and testing.
Instead of testing all PCBs as a whole, we decided to test each individually. This allowed us
to keep the guesswork that comes along with debugging to a minimum.
Finally, when all the hardware testing was completed, construction of the actual package
and software testing and debugging followed. The construction of the package needed to
include thought about the sensitivity of the reed switches, touch sensors, and dispersion of
LEDs. After completing the project, we needed to evaluate at which point we wanted to stop
adding features and iron out all the bugs to make a perfect project.
(e) Summary of how realistic design constraints were incorporated into the project
(consideration of most of the following is required: economic, environmental, ethical,
health & safety, social, political, sustainability, and manufacturability constraints).
Economic: As a first design prototype, we were pleased at the final cost of our design. A
goal was to make this project attractive to beginning chess players who most likely would
not want to overpay for a chess board trainer. Extrapolating our initial design cost into a
refined, mass produced product, our project would become very affordable.
Environmental: Not So Deep Blue does not use an excessive amount of environmentally
dangerous products. However, instructions on proper disposal will be included to ensure
that our project does as little harm to the environment as possible.
Ethical: Considering the risk of photosensitive epilepsy, we believe that we dimmed and
slowed down the animations as to almost eliminate the risk of seizure. One warning that we
also address is that the chess pieces are a choking hazard and that the game should be
kept out of the reach of small children.
Sustainability: Since Not So Deep Blue does not contain very many moving parts, normal
wear and tear will have little to no effect on the life of the board. Also, the cost for replacing
parts to extend the life of the board, such as magnets, reed switches, LEDs, and chess
pieces, are extremely cheap in relation to the board itself.
Manufacturability: The low cost of the initial design gives a lot of hope to a low priced,
mass produced product. The product is not very large in size, and contains very common
parts, making it very marketable to manufacturing companies.
(f)
Description of the multidisciplinary nature of the project.
This project required both an adequate knowledge of both hardware and software. Within
each of those we needed expertise on embedded software as well as high level code, and
also analog and digital hardware problems. Having three EEs gave a wide variety of
knowledge to spread amongst the project. But without the CompE, none of the integration
could have happened.
Having such a wealth of knowledge allowed us to multi-task, rather than waiting around for
one portion of the project to be completed. For example, one person would layout the PCB,
while another tested touch sensors, while another wrote I2C and SPI libraries, and another
wrote the upper level game logic. This allowed us to efficiently complete our project, leaving
us plenty of time for debugging.
A-37
ECE 477
Senior Design Report
5/26/2009
(g) Description of project deliverables and their final status.
Not So Deep Blue has met all five of its success criteria, and is in a demo-ready state.
There are still a few software bugs that need to be worked out to create seamless game
play; however an entire game can be played with little to no failure.
A-38
ECE 477
Senior Design Report
5/26/2009
Purdue ECE Senior Design Semester Report
Course Number and Title
Semester / Year
Advisors
Team Number
Project Title
ECE 477 Digital Systems Senior Design Project
Spring 2009
Prof. Meyer and Dr. Johnson
11
Digi-iGuide
Senior Design Students – Team Composition
Area(s) of Expertise
Name
Major
Utilized in Project
Greg Ross
EE
Hardware, Software
Aaron Stacy
CmpE
Software
Felix Tanjono
CmpE
Software Tools
Kanchi Daiya
CmpE
Communications
Expected
Graduation Date
May 2009
May 2009
May 2009
May 2009
Project Description: Provide a brief (two or more page) technical description of the design
project, as outlined below:
(a) Summary of the project, including customer, purpose, specifications, and a summary of the
approach.
Our design project was a hand-held personal navigation device and tour guide for Purdue,
much like a Garmin™ or TomTom™, but designed specifically for campus. Aside from just
displaying a map of Purdue and the quickest walking path to the user’s destination, the
device also displayed points of interest, making it perfect for visitors, prospective students,
and even new students.
The purpose of the device is not only to provide the user with directions to any destination
on campus, but also to acquaint the user with Purdue, and showcase what the university
has to offer. The device is small enough to carry easily (3.5” x 2.5” x 2”), and runs on a
rechargeable lithium ion battery that provides up to three hours of power.
At the heart of the device is a Microchip PIC32 micro-controller. The touch-screen display
is an all-in-one solution by 4D Systems that communicates to the PIC32 serially. The
device uses a GlobalSat EM-406a GPS module to determine its current location, which is
also communicated serially to the main micro-controller. When the user enters a new
destination via the touch screen, the display sends the request to the PIC32. The PIC32
then looks up the shortest path to the destination in a large lookup table stored in external
flash chips. Once these flash chips send the shortest path information back to the PIC32
via SPI bus, the PIC32 sends the image information for the path back to the display
controller.
(b) Description of how the project built upon the knowledge and skills acquired in earlier ECE
coursework.
This project drew upon the knowledge and skills we acquired in nearly every previous ECE
course at Purdue. Early in the project as we were selecting parts we had to factor in issues
of supply voltage, logic families, and fan-in/fan-out that we first learned in ECE 270.
A-39
ECE 477
Senior Design Report
5/26/2009
Throughout the entire project we relied heavily on the knowledge and experience we first
gained from working with micro-controllers in ECE 362. As we designed the schematic and
considered the need for pull-up resistors and bypass caps we utilized skills learned in ECE
201, and 202. During the PCB layout portion of the project we were forced to address the
need to eliminate ground loops and minimize vulnerability to external electromagnetic
interference, a principle taught in ECE 311. Our micro-controller firmware code was written
entirely in C, which drew heavily on the skills we learned in ECE 264. We implemented a
shortest path algorithm and used data structures that we were taught in ECE 368. We used
numerous software tools throughout the project, and relied heavily on the use of Python
scripts, which we first encountered in ECE 364, to generate large lookup tables and
transmit information from the PC to the micro-controller. We applied principles of locality
and adding scalability through an extra level of indirection which were ingrained in our
thinking through ECE 337, 437, and 469 lectures and labs. And finally our course website
was written in PHP, using a MySQL database to help organize all of the information and
facilitate communication among team members; these are tools that were first encountered
in ECE 495v.
(c) Description of what new technical knowledge and skills, if any, were acquired in doing the
project.
We acquired a vast array of technical knowledge and skills in this course since it facilitated
the chance to learn in such a practical way. None of our team members ever had
experience with printed circuit board layout, and we all gained a great deal of knowledge
and appreciation for how much time and detailed planning is necessary to produce a
working board.
We also gained experience with power supply design. Since all of our previous coursework
dealt used development boards or external DC power supplies, this project gave us a
chance to design, troubleshoot, and use a switch-mode power supply that produced a 5 volt
and 3.3 volt power rail. Though our group had never implemented a supply such as this
one, we gained significant experience in reducing ripple and spikes in the signal and
observe the impact the load has on the power output.
We also had the chance to deal with a significantly large project. While most of our school
projects are relatively small, and do not require multiple individuals to develop concurrently,
this project spanned numerous files (the PIC32 firmware code alone spanned upwards of
20 files). The only way four our team to complete the project successfully was to work
concurrently, and this gave us the opportunity to use version control and develop coding
standards and habits that facilitated portability.
(d) Description of how the engineering design process was incorporated into the project.
Reference must be made to the following fundamental steps of the design process:
establishment of objectives and criteria, analysis, synthesis, construction, testing, and
evaluation.
We used the engineering design process throughout this project. At the start of the
semester we outlined our goals and criteria for success in a document that became our
Project Specific Success Criteria (PSSC). This established our objectives for the semester
and had a guiding influence on every piece of work we completed.
Once our goals were in place we spent countless meetings researching, discussing,
number crunching, and analyzing how we would implement our project. We found that our
A-40
ECE 477
Senior Design Report
5/26/2009
project was constrained by its fast rates of communication, large non-volatile space
requirements, and physically small size. Based on these constraints we chose a microcontroller and peripherals that could meet these constraints in the most time efficient
manner as possible. We spent a great deal of time analyzing our schematic and layout to
make sure that our design was feasible and could be implemented in the space required.
When we had our design in place we began synthesizing the physical portions including the
IC chips and discrete components, along with the software that we had begun to write and
test. Even well written software modules require a significant amount of debugging in
order to interface.
Constructing the design inevitably brings design flaws to the surface. When this happened
in our project we were forced to make design decisions whether to sacrifice to the time to
go back and redo our work or whether the time was too valuable. Throughout the process
we were forced to continually return to the objectives we had set at the start of the course to
re-evaluate whether we needed to go back and re-analyze an issue, or press forward with
the solution we had in place and fix the bugs in a more direct manner.
As is always the case, we had much less time to test than we would have preferred,
however throughout the project we built inherent tests into the work we were doing so that
we knew we were building a foundation on which our project could stand.
(e) Summary of how realistic design constraints were incorporated into the project
(consideration of most of the following is required: economic, environmental, ethical,
health & safety, social, political, sustainability, and manufacturability constraints).
Economic: Our design was economically constrained in several ways. Since we could
only have a very small LCD screen we had to make allowances for a very small user
interface, which takes more effort than a large interface. We were also limited during
development by how many spare parts we had to use and test. By the end we of course
only had one working prototype, so we were unable to parallelize our work effort and were
forced to take more time.
Environmental: As mentioned in previous documents, there is very little consideration
given to the environmental impact of this project. The current PCB manufacturing
technology uses hazardous materials, leaded solder was used, mercury or other hazardous
chemicals are contained in the LCD screen, and the battery uses highly toxic chemical
components that will probably not be properly disposed of by the end user.
These issues could best be addressed by improving upon the manufacturing process and
using ROHS compliant standards when selecting revisions of parts, but the end user will
ultimately be responsible for disposing of the battery. A recycling program or other
incentive program might be recommended to best combat the environmental impact of this
product.
Ethical: If we were to take our product to market we would face a significant possibility of
patent infringement. There are quite a few products on the market that use GPS to display
a path to a destination via LCD touch screen. We also used code examples from online
sources, to generate lookup tables. While we cited these completely and
A-41
ECE 477
Senior Design Report
5/26/2009
Health & Safety: There are several portions of the circuit design that have very little
protection against failure modes that would certainly have the potential to harm the end
user. Only a small amount of circuitry is dedicated to keeping the battery under control, and
there is no built in protection against pushing the battery beyond its capacity (which might
lead to an unstable and potentially explosive battery). The remainder of the design does
not produce any significant risk to the user, except for the composition of the LCD screen.
A “do not break” warning label would most likely be appropriate to warn the user of the
danger of damaging the electronics.
Political: There is no way in which the Digi-iGuide has any capacity to impact the political
landscape in any region in the world.
Sustainability: The Digi-iGuide will, for the most part, operate in outdoor environments and
be subject to adverse conditions. The current design of the product is unable to weather
any significant amount of inclement weather or rough handling, and as a direct result the
failure rate may be abnormally high. Furthermore, some critical circuitry has a MTTF of
about 3.5 years, which will also mandate a high replacement rate of this revision of the DigiiGuide.
The high failure risk circuitry might be broken out into a separate PCB that a technician
could replace on demand, and the circuits could be redesigned to use higher reliability
components. Ultimately, the case will have to be hardened for outdoor environments as
well, which may impact the GPS functionality of the Digi-iGuide.
Manufacturability: Even the prototype Digi-iGuide was designed with manufacturability in
mind. The product uses a single, small PCB that could easily be built using current reflow
mass production techniques. All the connectors and headers are uniquely designed
according to their function, which allows for quick hand assembly. The LCD screen is an
all-in-one unit that quickly fastens to the outer casing.
The only problem is the placement of the GPS and battery components on the bottom side
of the Digi-iGuide box. These are currently “floating” at the bottom of the box, which can
best be solved by using a custom case with compartments to hold each component. With
this small revision, the entire design will be “manufacturing friendly.”
(f)
Description of the multidisciplinary nature of the project.
Electrical, Computer, and Software engineers were needed for the success of this project.
The hardware component selection and circuit design, as well as the PCB layout and the
optimization of the circuits to ensure reliability, requires the skills of a knowledgeable
Electrical Engineer. Computer engineers are needed to focus on embedded systems code
and low-level interfacing between the various subsystems in the design. Software
engineers are critical to the success of the project as algorithms used in the final design as
well as PC application software support will form the backbone of the interface that the end
user interacts with.
Outside of engineering, marketing and people skills will be needed to create a market for
the device. Documentation and specification sheets would best be handled by technical
writers, who would ensure the public views high quality documents that present a stable
platform for campus navigation.
A-42
ECE 477
Senior Design Report
5/26/2009
(g) Description of project deliverables and their final status.
We fulfilled all five of our Project Specific Success Criteria (PSSC’s):
PSSC #1 – An ability to display a map.
Final Status: Complete, Demonstrated April 27th, 2009
PSSC #2 – An ability to determine the GPS location of the device.
Final Status: Complete, Demonstrated April 23rd, 2009
PSSC #3 – An ability to take input from the user via a touch screen or input buttons.
Final Status: Complete, Demonstrated April 23rd, 2009
PSSC #4 – An ability to determine the shortest map-node path to a destination.
Final Status: Complete, Demonstrated April 23rd, 2009
PSSC #5 – An ability to display path and points of interest to the user.
Final Status: Complete, Demonstrated April 28th, 2009
We also fulfilled all of the standard criteria for success, including:
Use of a microcontroller: Complete
An interface to something such as a PC or an embedded device: Complete
Design and use of a custom printed circuit board: Complete
Neat packaging: Complete
A-43
ECE 477
Senior Design Report
5/26/2009
Purdue ECE Senior Design Semester Report
Course Number and Title
Semester / Year
Advisors
Team Number
Project Title
ECE 477 Digital Systems Senior Design Project
Spring 2009
Prof. Meyer and Dr. Johnson
12
FlySpy
Senior Design Students – Team Composition
Area(s) of Expertise
Name
Major
Utilized in Project
Jeremy Tillman
CmpE
Software
William Ehlhardt
EE
Hardware, Software
Heather Barrett
EE
Hardware
Daeho Hong
CmpE
Peripherals and
packaging
Expected
Graduation Date
May 2009
May 2009
May 2009
May 2009
Project Description: Provide a brief (two or more page) technical description of the design
project, as outlined below:
(a) Summary of the project, including customer, purpose, specifications, and a summary of the
approach.
The FlySpy UAV project is an off-the-shelf RC aircraft modified to autonomously fly to GPS
waypoints and take photographs. The user has the ability to switch between manual and
autonomous control with a switch on a standard RC aircraft transmitter. FlySpy utilizes an
accelerometer, gyroscope, and barometer for flight stabilization, a GPS receiver with active
antenna for navigation, a +7.4V 2500 mAh LiPo battery for power, and three servos and a
motor for control surface manipulation and propulsion. A standard digital camera is used to
take photographs, flight data is logged on a microSD card, and GPS coordinates are
retrieved from the microSD card.
The intended customer is RC hobbyists. The intent of the project was to develop an
autopilot system that could be integrated into off-the-shelf RC aircraft.
(b) Description of how the project built upon the knowledge and skills acquired in earlier ECE
coursework.
The FlySpy project built especially upon skills acquired in ECE270, 362 and C programming
courses. Knowledge acquired in 270 was useful for circuit design and reading datasheets.
Knowledge of 362 was useful in understanding functions of the microcontroller, including
SCI, SPI, PWM, timer and other peripherals. Knowledge of C Programming from freshman
engineering courses and 264 was useful for the software design.
(c) Description of what new technical knowledge and skills, if any, were acquired in doing the
project.
Some of the technical knowledge gained was the Proportional-Integral-Derivative Control
Loop and how it is used to adjust controls to hold a desirable position, how Inertial
A-44
ECE 477
Senior Design Report
5/26/2009
Measurement Units are made and used to keep track of the orientation and position of a
system, and NMEA communication standards to send and receive information from GPS.
We also developed our proficiency in reading datasheets and evaluating components. We
learned how to design a PCB in OrCAD Layout.
(d) Description of how the engineering design process was incorporated into the project.
Reference must be made to the following fundamental steps of the design process:
establishment of objectives and criteria, analysis, synthesis, construction, testing, and
evaluation.
The first week entailed establishment of objectives and criteria. We outlined the intended
functions of the project. The next first four-five weeks entailed iterative analysis and
synthesis. We selected sensors, a microcontroller, and various peripherals based on
intended functionality. We selected a step-down converter based on analysis of our power
needs and interfaces such as the level translator chip based on analysis of selected
components and needs. The next few weeks were comprised of continued synthesis as we
developed a schematic and PCB layout, still performing some analysis and swapping parts
or modifying designs along the way. After spring break, we constructed the PCB and
modified the packaging to house it and the camera. We also developed the software. The
last few weeks consisted of testing and changes to the software design.
(e) Summary of how realistic design constraints were incorporated into the project
(consideration of most of the following is required: economic, environmental, ethical,
health & safety, social, political, sustainability, and manufacturability constraints).
Economic: We acquired many free samples in order to trim costs on the project.
Environmental/Sustainability: We used a lithium polymer battery, which is characterized
by environmentally friendly chemistry. Some components are ROHS compliant.
Ethical: We cannot ensure that our project will only be used for ethical purposes.
Health & Safety: We designed a manual override feature to help prevent loss of control
scenarios.
Political: We cannot ensure that users will comply with FAA regulations.
Manufacturability: Our PCB consists of mostly surface mount components which would be
easy to place. The connectors are fairly simple in nature. The user would be responsible for
assembly of the plane and placing the autopilot system into the plane.
(f)
Description of the multidisciplinary nature of the project.
Although the project did not require interaction with engineers in other disciplines, the
project did require us to work with RC hobbyists. These individuals were knowledgeable
about building and flying RC aircraft and were responsible for piloting FlySpy during all
manual testing.
(g) Description of project deliverables and their final status.
The FlySpy hardware is completely functional; only fine tuning of the control algorithms is
necessary for fulfillment of all PSSCs.
A-45
ECE 477
Senior Design Report
5/26/2009
Purdue ECE Senior Design Semester Report
Course Number and Title
Semester / Year
Advisors
Team Number
Project Title
ECE 477 Digital Systems Senior Design Project
Spring 2009
Prof. Meyer and Dr. Johnson
13
Moto-eV
Senior Design Students – Team Composition
Area(s) of Expertise
Name
Major
Utilized in Project
Michael Stuckenschneider
EE
Motor Control & Hardware
Loren Garby
EE
Motor Control & Hardware
Arin Chakraverty
EE
Software
Janell Niekamp
EE
Packaging &
Documentation
Expected
Graduation Date
May 2009
May 2009
May 2009
May 2009
Project Description: Provide a brief (two or more page) technical description of the design
project, as outlined below:
(a) Summary of the project, including customer, purpose, specifications, and a summary of the
approach
Moto-eV is a project focused on releasing people from the current dependency on fossil
fuels. The combustion of fuel produces harmful emissions and only increases our
dependency on foreign oil. Through the design of a fully electric motorcycle, Moto-eV
strives to provide an economical and environmentally friendly form of commuter
transportation.
(b) Description of how the project built upon the knowledge and skills acquired in earlier ECE
coursework.
The bulk of this project has been built upon the foundation of previous coursework. EE423,
EE321, & EE323 were critical for the motor control aspect of our project. EE362 was
obviously very important in that it introduced the team to microcontrollers. EE201 and
associated lab courses were helpful in the general circuit design. The team skills and
troubleshooting methods that were developed over the past semesters in many different
classes were also very important.
(c) Description of what new technical knowledge and skills, if any, were acquired in doing the
project.
The team learned a great deal about implementing a design in actual hardware. Going
from the computer to the PCB is not as easy as it would first appear. One aspect in
particular that the team had to deal with was the excessive amount of electrical noise. An
electric motor and relatively high switching frequencies both contributed to noise issues on
our PCB traces. A lot of capacitors were added to the board, as well as a few resistors.
A-46
ECE 477
Senior Design Report
5/26/2009
General troubleshooting and diagnosis skills were also further developed over the
semester. The team had several issues with hardware. We used simple techniques to
diagnose the issues. For example, by eliminating all variables except for one, helps
dismiss certain possible issues.
(d) Description of how the engineering design process was incorporated into the project.
Reference must be made to the following fundamental steps of the design process:
establishment of objectives and criteria, analysis, synthesis, construction, testing, and
evaluation.
The first step in our project was to establish the project objectives and budget. The
project’s focus was to create a bike which would be used for commuting. These
requirements dictate certain speed, range, acceleration, weight, and cost restrictions. The
bike needed to be cheap enough for the team to afford, yet be a fully functional, road
worthy vehicle.
Once the individual components had been selected the next step was to design our circuit.
The schematic and pcb layout were refined over several weeks. After spring break we
populated our board and then troubleshot all of our hardware issues. We had lots of
problems with our 20V boost and our differential amplifiers.
After the pcb was 100% complete, coding was started. The software was tested on a
smaller motor and then scaled up to our full size 48V motor. Individual parts of the code
were tested one at a time, then compiled into on master code revision. Assembly and
testing then took place over the final two weeks.
A final evaluation of the project indicates several “less than optimal” design choices. The
pcb has many components fly-wired and our motor drive circuitry has changed quite
dramatically. The project will be handed over to one team member who will continue the
development and implement several improvements. Current control will be used to control
the motor, discrete MOSFETs will be used in place of the IGBT module, a speed sensor will
be installed, as well as more information on the LCD.
(e) Summary of how realistic design constraints were incorporated into the project
(consideration of most of the following is required: economic, environmental, ethical,
health & safety, social, political, sustainability, and manufacturability constraints).
Economic: The economic constraints were strictly adhered to. The team was able to
obtain several sponsors and in the end came in well under budget. Looking at the
economics for the opposite perspective, if the design were to be put to the market we would
hit our price point quite easily. The bike could be sold for around $3000 and make excellent
margins. This all assumes that there are plenty of available used motorcycle chassis out
there though.
Environmental: The whole basis of the project is to improve the environment by reducing
carbon emissions from combustion motors. In this regard the project was successful.
Replacing a small car or even a combustion powered motorcycle with an electric vehicle is
cheaper per mile for the customer and also has a smaller carbon footprint. However the
energy into the production of the bike and its components needs to be taken into account.
It is impossible to estimate the energy put into the design and assembly of the bike. This
information would be necessary if the bike were to go into full scale production.
A-47
ECE 477
Senior Design Report
5/26/2009
The big environmental negative in this project is the disposal of the sealed lead acid
batteries. These batteries will die one day, and proper recycling will be necessary. The
LCD also has mercury in it and the pcb contains lead, both of which require proper
disposal.
Ethical: The Moto-eV project is extremely ethical. The project does use some non RoHS
compliant parts, but this could be changed for production. Giving the population the tools
necessary to make the world a better place is the Moto-eV team’s goal.
Health & Safety: There are many health and safety risks associated with riding an electric
motorcycle or a combustion motorcycle. These are inherent to the mode of transportation.
However there are risks specific to an electric propulsion system. Obviously with any high
power drive there is risk of electrical shock. The team mounted all high current and high
voltage connections underneath the tank. The battery bank is protected from the user by
the battery cage. All switches necessary to operate the bike can be accessed without
endangering the user.
Social: The social impact of the Moto-eV is to empower the individual. Releasing
consumers for the constraints of the oil industry allows people to each contribute to a better
world.
Political: Moto-eV surprisingly also has a strong political impact. The majority of oil in the
United States comes from abroad. The Moto-eV releases people from their combustion
engine cars and allows them to help the environment and save money at the same time.
Reducing America’s dependence on foreign oil is a good thing.
Sustainability: The Moto-eV is designed to be a robust product. Looking over the inherent
motorcycle maintenance, there are a few maintenance issues specifically associated with
the electrical drive. The largest issue would be the batteries. Sealed lead acid batteries
are extremely durable and should last through many cycles. However one day they will
need replacing. This procedure would need to be completed by an approved mechanic
with a thorough understanding of the Moto-eV system.
Manufacturability: The manufacturing of an electric motorcycle is not that much different
from the process that is currently used for combustion powered bikes. A moving assembly
line would be used, with the large modules built off of the main line. These separate
modules would then be installed in the chassis on the main line. Special care will need to
be taken with the sensitive electronics parts.
(f)
Description of the multidisciplinary nature of the project.
This project involved a lot of engineering from the mechanical and materials departments.
The battery cage, electronics plate, and motor mount all needed to be carefully designed to
deal with the stresses and strains they encounter on a motorcycle. These parts were made
out of aluminum due to aluminum’s excellent strength to density ratio. The motor mount is
½” aluminum, the battery cage is 1/8” aluminum, and the electronics plate is 1/16”
aluminum. Also the method of mounting these parts was carefully engineered. Every bolt
used is grade 8, which was chosen for its superior shear strength. The rear drive train ratio
was chosen for optimum acceleration versus top speed performance. The chain size was
chosen so that it can easily be replaced with stock motorcycle chain.
A-48
ECE 477
Senior Design Report
5/26/2009
(g) Description of project deliverables and their final status.
The deliverables of this project can be considered to merely contain the PSSC outcomes.
However this project always looked beyond the end of the semester. So while the project
does successfully meet all 5 of the original PSSC deliverables, it also is practical enough to
be used in the real world. The range, power, acceleration, and general performance are
more than adequate for street use. The Moto-eV is in its infancy as far as development is
concerned.
A-49