1
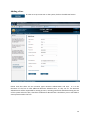
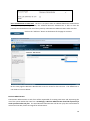
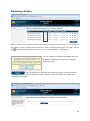
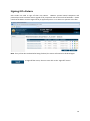
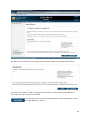
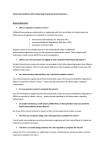
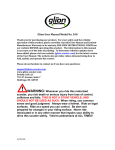
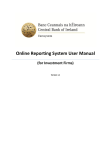
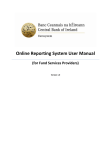
Online Reporting System User Manual Retail Intermediaries Version 1.0 July 2011 Table of Contents Accessing the Online Reporting System ................................................................................................. 3 Changing Your Password......................................................................................................................... 4 The Home Page ....................................................................................................................................... 5 View/Edit Data ........................................................................................................................................ 6 Completing a Section of the Return ........................................................................................................ 8 Saving Data............................................................................................................................................ 11 Managing User Accounts ...................................................................................................................... 13 Adding a User .................................................................................................................................... 15 Finalising a Return................................................................................................................................. 18 Signing Off a Return .............................................................................................................................. 19 2 Accessing the Online Reporting System The Online Reporting System login page can be accessed by typing the following URL into your browser address window https://onlinereporting.cbfsai.ie (Note that the Online Reporting System is a secure site and uses the https prefix). Once the login screen is displayed enter your institution code, username and password: Institution Code: This is the unique code for your firm which is already included on all correspondence issued by the Central Bank of Ireland. It begins with a “C” and is followed by between three and five digits e.g. C999 or C12345. Login Name: This will be issued to the firm’s appointed Business Administrator by the Central Bank before the first online return is due. Password: This will be issued to the firm’s appointed Business Administrator by the Central Bank before the first online return is due. Once these details have been entered, click the login button to enter the Online Reporting System. 3 Changing Your Password On logging on for the first time, or if you have not logged on for more than six months, you will be asked to change your password. Enter the old password, then the new password, and finally confirm the new password. The new password cannot be the same as the old password or any of the five previous passwords. A strong password is required i.e. it is of sufficient length (six characters or more) and/or contains a combination of upper and lower case letters, digits and special characters (e.g. !, “, %, ^, &, *) Please refer to the Online Return Guidance Notes for Retail Intermediaries for further information on password strength and security. 4 The Home Page The above screen shows the HomePage of the Online Reporting System. From here a number of things can be done: Blue: A number of actions can be performed from this menu. Each of these are explained in detail below. Red: Help is available by clicking on either of the areas highlighted in red. Green: This box shows current tasks which are required to be completed and their due date for your firm. Purple::The New Messages box will display any messages from the Central Bank of Ireland to the firm, regarding the system or industry reporting requirements. 5 View/Edit Data Return Types: This screen shows the Retail Intermediaries Annual Return. To access the return, click on the link. Return Types Options: This page shows the options available for the return. Click on View/Edit Returns. 6 Returns This page shows the Retail Intermediaries Annual Return in order of reporting date. Click on the date to view the return. Sections The screen shows the online return. There are either four or five sections on the return, depending on the firm’s legal status. To view one of these sections, click on the link. There are also a number of actions users can carry out from this view: Validate: This shows any errors outstanding on a section. Export to Excel: The return or individual sections can be exported to Microsoft Excel. This allows users the option to complete the return or the section using Excel before they complete the return online. Clear Section: This option clears all data previously entered. 7 Completing a Section of the Return This screen shows the General Information Section of the return. If you want to edit any of the data (a), scroll down to the bottom of the screen and click on “Edit Data” (b). The page will automatically refresh. Once the page has reloaded, clock on a field to edit the data within it (c). a) b) c) 8 To add Notes to a Section, click on the Notes button (the green box). This allows a user to add notes. Please note that these notes will be submitted with the return and thus will be visible to the Central Bank of Ireland. To Edit the Data on a Section, click the Edit Data button (the red box) at the bottom of the screen. Users can also view the section in Microsoft Excel©, by clicking the Export to Excel button (the purple box). This page enables you to enter data into a form or update the data in an existing form. In order to enter data into a particular 'cell' on the form, click on that cell (which will then be highlighted) and enter a value. It is possible to navigate through the cells in a form using the tab key, the arrow keys or by clicking on the individual cells. When a value has been entered in a cell and the cursor moves on to the next cell, the value in the first cell is validated by the reporting system. If validation is passed, you may continue to the next cell and enter data here where the process is repeated. If validation is failed, focus will be brought back to the cell that 9 failed validation and you must enter the correct value type (e.g. positive, negative etc.) and format type. An error message will be displayed if a cell fails validation outlining why validation has failed. For example... Besides entering or editing data, the main operations that can be carried out on this page are: You can save the form by clicking on the 'Save Form' button (see Saving Data below). You can disregard all of the changes you have made to the form by clicking on the 'Cancel' button. After clicking the 'cancel' button, you will be returned to the 'View Form Data' page. 10 Saving Data When saving data by clicking on the 'Save Form' button, the data that is entered must conform to the parameters or 'rules' associated with the form that you are filling out. When the 'Save Form' button is clicked, the form is checked against these rules and if it conforms to them the form is saved and you will be returned to the 'View Form Data' page. If the form does not conform to the rules on clicking the 'Save Form' button, you will remain in the 'Edit Form Data' page. Each of the cells that do not comply with one or more of the rules will be highlighted in red (see the example below). You can view the errors associated with each cell by hovering the mouse over the cell, when you do this you will be presented with a 'tool tip' that displays all of the errors associated with the cell. 11 For a full list of errors on the form, click on the ‘View Errors’ button. This will open a pop-up window that displays all of the errors on the form. A detailed explanation of each error can be viewed by clicking on the arrow beside each error. Also, when viewing a form with errors you will notice a 'Save With Errors' button. You may save the form as a 'draft' containing the existing errors by clicking on this button. 12 Managing User Accounts The Business Administrator should click on the Manage User Accounts option on the main menu. 13 The “Users” screen lists the different users already set up for the firm and includes their user name, full name, the type of user, their last login and last password change. There are a number of actions that can be performed from this view: Edit User Profile: This allows the Business Administrator to edit a user’s profile. They can change details such as email address, telephone number and job title. Note that the system does not allow the login name to be changed. Edit User Access: This allows the Business Administrator to change a user’s access setting. There are three levels of access, which are outlined in the Online Return Guidance Notes for Retail Intermediaries. Reset User Password: This allows the Business Administrator to reset a user’s password. A verification code will be emailed to the user, which they must enter when they log in with their new password. They will then be prompted to change their password. Delete User: This allows the Business Administrator to delete a user. Please note that once a user has been deleted, another user cannot be set up using the same user name. 14 Adding a User In order to set up a new user on the system, click on the Add User button. Please note that there are two accounts types: Business Administrator and User. It is at the discretion of the firm to add additional Business Administrators, as they see fit. The Business Administrator will be responsible for setting up users, resetting passwords and administering the use of the system within the firm, therefore the Business Administrator should be a person who holds a senior position within the firm. 15 User can administer at own level: This box is an option when an additional Business Administrator is being set up. By ticking the box, the additional Business Administrator is able to reset the passwords and administer the use of the system by other Business Administrators within the firm. Click on the “Add User” button at the bottom of the page to continue. On the next page the Business Administrator must set access for the new user. The differences in user levels are set out below: Business Administrator The Business Administrator in each firm will be responsible for creating new Users and supervising the use of the system within their own firm. Accordingly, a Business Administrator should be a person of a senior position within the firm. The initial Business Administrator will be set up by the Central Bank of Ireland and can edit, finalise and signoff an online Return. 16 User with View Access The View role will allow users view only access to the return data. They are unable to edit, finalise or sign-off the return, and accordingly this role should only be used for reviewing purposes only. User with Edit Access The Edit role will allow users to edit and finalise information on the Online Return. The Return must be ‘finalised’ before the sign off and submission process can take place. Please note however that a User with Edit Access will not have permission to sign-off and submit the overall return. User with Verify Access The Verify role allows users to view data as well as and signing off the return. Only individuals who are an approved person under the Central Bank of Ireland’s fitness and probity requirements should be granted this role. Click on the “Set Access” button to complete the set up of the new user. 17 Finalising a Return Before a return can be finalised, the data contained in each form must be valid. Users can look at the “Status” column to ensure that each form is valid. If a form is showing up as “invalid”, click on the button to show any errors in the form. The errors will appear in a pop-up box. If a user attempts to finalise a form before all errors have been amended, the text box on the left will appear on screen. Once all the forms are valid, the user should click on the “Finalise” button in order to finalise the return. Once the return is finalised, the confirmation screen below will appear. 18 Signing Off a Return Sole traders are able to sign off their own Return. However private limited companies and partnerships must have their Return signed off by a separate user to the one that finalised it. Please note that the Return must be signed off by an approved person i.e. a director or partner at the firm. Note: If any of the data is edited after being finalised, the return will need to be finalised again. To Sign-Off the return, the user must click on the “Sign-Off” button. 19 The above screen requires the user signing off the return to agree to the following declaration: Users must tick the box, in order to agree with the statement. Note that the “Sign-Off Return” button will only work once the box is ticked. To sign-off the return and submit the information to the Central Bank, click on the “Sign-Off Return” button. 20 Once the return has been successfully signed off, the above screen will be displayed. 21