1
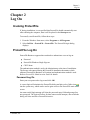
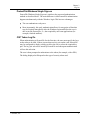
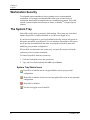
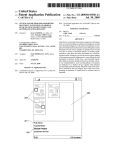
© 2010 SafeNet, Inc. All rights reserved. Part Number 007771-001 (Rev F, 6/2010) Software Version 3.6.3 All intellectual property is protected by copyright. All trademarks and product names used or referred to are the copyright of their respective owners. No part of this document may be reproduced, stored in a retrieval system or transmitted in any form or by any means, electronic, mechanical, chemical, photocopy, recording or otherwise without the prior written permission of SafeNet. SafeNet makes no representations or warranties with respect to the contents of this document and specifically disclaims any implied warranties of merchantability or fitness for any particular purpose. Furthermore, SafeNet reserves the right to revise this publication and to make changes from time to time in the content hereof without the obligation upon SafeNet to notify any person or organization of any such revisions or changes. SafeNet invites constructive comments on the contents of this document. These comments, together with your personal and/or company details, should be sent to the address below. SafeNet, Inc. 4690 Millennium Drive Belcamp, Maryland 21017 USA Technical Support If you encounter a problem while installing, registering or operating this product, please make sure that you have read the documentation. If you cannot resolve the issue, please contact your supplier or SafeNet Support. SafeNet Support operates 24 hours a day, 7 days a week. Your level of access to this service is governed by the support plan arrangements made between SafeNet and your organization. Please consult this support plan for further information about your entitlements, including the hours when telephone support is available to you. Technical Support Contact Information: Phone: 800-545-6608 Email: [email protected] Acknowledgements Windows is a registered trademark of Microsoft Corporation in the United States and other countries. Windows Vista is either a registered trademark or trademark of Microsoft Corporation in the United States and/or other countries. Table of Contents Table of Contents Chapter 1 Introduction..................................................................................................................... 1 Security Overview ........................................................................................................................... 2 Chapter 2 Log On ............................................................................................................................. 3 Invoking ProtectFile ........................................................................................................................ 3 ProtectFile Log On .......................................................................................................................... 3 Password Log On ......................................................................................................................... 3 ProtectFile/Windows Single Sign-on ........................................................................................... 5 CSP Token Log On ....................................................................................................................... 5 Workstation Security ....................................................................................................................... 6 The System Tray .............................................................................................................................. 6 System Tray Status Icons .............................................................................................................. 6 Chapter 3 Operation ......................................................................................................................... 7 The Main Menu ............................................................................................................................... 7 Menu Bar ...................................................................................................................................... 8 Logging Off ..................................................................................................................................... 9 Working with Domains ................................................................................................................... 9 Managing Domains ...................................................................................................................... 9 Adding Domains ......................................................................................................................... 11 Removing Domains .................................................................................................................... 13 Registering a Domain................................................................................................................. 14 Viewing Registered Domains ..................................................................................................... 14 De-registering a Domain ........................................................................................................... 14 Sharing a Domain ...................................................................................................................... 15 Administration of a Domain ....................................................................................................... 15 Managing Exclusions .................................................................................................................... 16 Adding Exclusions ...................................................................................................................... 16 Removing Exclusions.................................................................................................................. 17 Viewing Exclusions .................................................................................................................... 18 Managing Excluded Extensions .................................................................................................... 18 Adding Excluded Extensions ...................................................................................................... 18 Removing Excluded Extensions.................................................................................................. 19 Viewing Current Excluded Extensions ....................................................................................... 20 Chapter 4 Administration .............................................................................................................. 21 Administration Tasks ..................................................................................................................... 21 Changing the User Password..................................................................................................... 21 Hashing a Keyphrase ................................................................................................................. 21 Recovering After Losing the User Password ............................................................................. 22 Dealing With Lost User Passwords ........................................................................................... 22 Temporarily Disabling Protection ............................................................................................. 22 Configuring the Screen............................................................................................................... 23 Upgrading Your License ............................................................................................................ 23 © SafeNet, Inc. i Table of Contents Restrictions .....................................................................................................................................24 Sleeping Domains/Envelopes ......................................................................................................24 Nested Domains/Envelopes.........................................................................................................24 Backup/Restore ProtectFile Domains/Envelopes .......................................................................24 NTFS Compression .....................................................................................................................24 Compatibility Issues .......................................................................................................................25 Dr. Solomon’s WinGuard for Windows 2000/XP .......................................................................25 Glossary ............................................................................................................................................27 ii © SafeNet, Inc. Chapter 1 Introduction Chapter 1 Introduction ProtectFile is a high strength data security solution for network applications. The product operates transparently to the user, but performs encryption for all data files that are found on: the secured network file servers attached to the secured network local hard disks on workstations connected to the secured network local removable media (such as floppy disks) for workstations connected to the secured network The principle behind ProtectFile is to allow users to safely store or transmit sensitive data within a network environment. Files are encrypted locally at the workstation before storage or transmission via the network. Secure files can only be viewed by those users who have access to the correct cipher keys. In this way, ProtectFile not only protects stored data, but also ensures that an unauthorized entity cannot gain access to the contents of sensitive files by using techniques such as wire-tapping. Figure 1: ProtectFile functional overview © SafeNet, Inc. 1 Chapter 1 Introduction ProtectFile is designed to be installed on individual workstations and server computers. The ProtectFile Management Console is an application that provides central user and envelope management, file-based user profiles, token and smart card initialization, and user key recovery for ProtectFile Business clients. ProtectFile Management Console is installed on a central computer, which is part of an organization’s IT management infrastructure. Security Overview There are a number of simple cryptographic terms mentioned throughout this manual which the reader is required to understand. This section is therefore intended as a brief overview of what these terms mean in the context of the ProtectFile product. In the field of cryptography, the term key refers to a value, which is used to encrypt data using an algorithm. There are many different types of keys and algorithms. The term algorithm refers to a defined mathematical calculation that is used to encrypt, decrypt, or verify data using a key. 2 © SafeNet, Inc. Chapter 2 Log On Chapter 2 Log On Invoking ProtectFile If, during installation, it was specified that ProtectFile should automatically start after rebooting the computer, then it will be placed in the Startup menu. To manually start ProtectFile, follow these steps: 1. From the Windows Start menu, select Programs or All Programs. 2. Select SafeNet > ProtectFile > ProtectFile. The ProtectFile login dialog displays. ProtectFile Log On ProtectFile Business supports three methods to authenticate a user at log on: Password ProtectFile/Windows Single Sign-on CSP Tokens The authentication method is set by the Administrator at the time of installation. The license code entered during the ProtectFile installation determines which edition of ProtectFile (Business or Premium) and authentication method is used. Refer to ProtectFile Administration Guide for details. Password Log On Enter your user password to log on and click OK. A correct login will minimize the ProtectFile dialog and place a key folder icon into the system tray, which can be used to gain access to the ProtectFile main menu screen. An unsuccessful login attempt will clear the password entry field and prompt for a new password. The login will allow for three unsuccessful attempts, after which the dialog will close and leave ProtectFile inactive. © SafeNet, Inc. 3 Chapter 2 Log On Password Retry Limit When ProtectFile is started, you are required to log on. ProtectFile discourages password guessing by increasing the time delay between unsuccessful log on attempts, and will deny access completely after three failed attempts. Logging on for the First Time When you start ProtectFile for the first time or you do not have a personal configuration for your current username, you are prompted to set a new user password. 1. Type a new user password. 2. Confirm the new password by typing it again. 3. Click OK. Password Rules By default, passwords are case-sensitive, and must be at least 10 alphanumeric characters. Non-alphanumeric characters are permitted, but they will not contribute towards the minimum password length. Valid Password Examples: ToBeOrNotToBe THIS4ANDTHAT 10Lettersx Invalid Password Examples: TooShort Less_Thn_10 NOTE Passwords contained in personal configurations created by ProtectFile prior to version 2.01.0 were not case-sensitive, and alphanumeric characters were ignored. The following passwords were identical in versions of ProtectFile prior to version 2.01.0: 4 ToBeOrNotToBe TOBEORNOTTOBE tObEoRnOtToBe to.be%or+not-to!be To be or not to be © SafeNet, Inc. Chapter 2 Log On ProtectFile/Windows Single Sign-on ProtectFile/Windows Single Sign-on is similar to the password authentication method as described above. The main difference is that ProtectFile authentication happens simultaneously with the Windows login. This has two advantages: The user authenticates only once. More importantly, this early authentication allows for encryption of data that may be required immediately after the Windows login and before the user is able to invoke ProtectFile, i.e., data required by auto-start applications (for example, Outlook mailbox). CSP Token Log On When authenticating to ProtectFile for the first time, the user must specify the keys on the token to be used. If there is more than one key pair on the card, ProtectFile may be configured to display a dialog to allow the user to select the required key pair. The key pair selected is stored by ProtectFile and subsequent authentication will use this selection. The user is then prompted to authenticate to the token (for example, with a PIN). The dialog displayed will depend on the type of security token used. © SafeNet, Inc. 5 Chapter 2 Log On Workstation Security To safeguard against unauthorized users gaining access to an unattended workstation, it is strongly recommended that some type of timed lock-out workstation functionality be implemented as a minimum precaution. This could include a password-protected screensaver feature or EntrustTM's Single Sign-on solution. The System Tray ProtectFile resides in the system tray while running. The system tray icon shows whether ProtectFile is enabled, disabled, or you have not logged in yet. If you have not logged on or you have disabled ProtectFile, then no encryption or decryption operations are performed. You can minimize ProtectFile to the system tray to prevent an unauthorized user from accessing the ProtectFile menu and modifying your personal configuration. If ProtectFile is minimized to the system tray, you must first restore it from the system tray to access menu commands. To restore ProtectFile from the system tray: 1. Click the ProtectFile icon in the system tray. 2. Type your User Password and click OK or press Enter. System Tray Status Icons ProtectFile is enabled, but no encrypted folders exist in your personal configuration. ProtectFile is enabled, and at least one encrypted folder exists in your personal configuration. ProtectFile is disabled. You are not logged on to ProtectFile. 6 © SafeNet, Inc. Chapter 3 Operation Chapter 3 Operation The Main Menu All ProtectFile features and settings are accessible from the main menu. After a successful login, if the main menu screen does not start automatically, it can be invoked by clicking on the ProtectFile icon (key on folder) in the Windows system tray. The ProtectFile GUI consists of: a menu bar, which allows for all ProtectFile operations a toolbar, which contains various shortcuts a status bar, which indicates the status of ProtectFile Figure 2: Menu and toolbar © SafeNet, Inc. 7 Chapter 3 Operation Menu Bar The menus available from the ProtectFile main menu bar are listed below. Under each menu, a description of the commands and dialog boxes available via the menu is given. A more detailed description of the commands and dialog boxes follows after this section. File Disable Log Off Allows user to disable/enable the encryption driver Allows user to exit the ProtectFile application Domain Mode FIPS Mode Allows user to enable Domain Mode Allows user to enable FIPS Mode Keyphrase Set New Password… Hash Keyphrase… Allows user to set a new password Allows user to see the key generated with a particular keyphrase Domain Add… View… Remove… Allows user to add a domain Allows user to view available domains Allows user to remove a domain Administration… Allows user to perform domain administration Register… Allows user to register a domain De-Register… Allows user to de-register a domain Share Domain… Allows user to share a domain Exclusion Add… View… Remove… Allows user to add an exclusion Allows user to view available exclusions Allows user to remove an exclusion Extension Add… View… Remove… Allows user to add an excluded extension Allows user to view excluded extensions Allows user to remove an excluded extension View Toolbar Log File… Allows user to hide/view the toolbar Allows user to view the log file of ProtectFile events About… Displays program information and version number details, and provides access to Policy Setting (Properties) dialog Help 8 © SafeNet, Inc. Chapter 3 Operation Logging Off To log off, select File > Log Off. A dialog informs the user of the ProtectFile shutdown, and prompts for confirmation to continue. Following a log off, ProtectFile will become inactive. Any data saved whilst ProtectFile is inactive will not be protected. The only way to be certain that data is protected by ProtectFile is to save and close all applications prior to logging out of ProtectFile. While ProtectFile is shut down, all files within domains will appear encrypted to all applications. Before disabling ProtectFile, make sure that all applications do not have any files open that are inside domains to prevent data corruption. Working with Domains Managing Domains A domain refers to a file or folder, which is protected by ProtectFile Business. The term, protected, as used in the context of ProtectFile, means that the subfolders and files within the domain are encrypted. Domains cannot be defined inside another domain. For example, if you have a domain C:\Folder\Subfolder defined, then ProtectFile will prevent you from defining a domain in C:\Folder or C:\Folder\Subfolder\SubSubFolder. Following the installation of ProtectFile, no domains exist in any personal configurations. Before ProtectFile can be effective, you must define one or more domains in your personal configuration. Domains may be defined in your personal configuration by adding a domain or registering a domain. By default, users do not have access rights to create or register a domain. This must be granted by the ProtectFile administrator. To create a new domain, you must use the Add Domain command described below. For example, if the E:\Secret Files folder has not been encrypted and you wish to encrypt the folder, you should use the Add Domain command. To access encrypted files and subfolders in a pre-existing domain, a user can use the Register Domain command to make the domain available in their personal configurations. For example, if your colleague would like access to the E:\Secret Files domain that you added, they would use the Register Domain command. © SafeNet, Inc. 9 Chapter 3 Operation Domains can be added or removed at any time, however, care must be taken when performing these actions since alterations take effect immediately. A user can be registered to a maximum of 50 domains. This limit also applies to any envelopes that the user has created and has been automatically registered to by ProtectFile. All applications should be closed before changing the ProtectFile configuration to prevent any problems. Prior to making any changes to a domain that is shared by other users, it is important to make sure that there are no files in use by an application or another user. Following a change, restart Windows to ensure data and system integrity. Before adding a new domain, the user should decide whether or not that domain will contain exclusions. An exclusion is a lower-level unsecured folder in a domain. Since the protection of ProtectFile is hierarchical and automatically extends to any folders contained in a domain, exclusions provide a means to specify areas that don’t require protection. Refer to the Managing Exclusions section for additional details. Figure 3: Example of exclusions ProtectFile also has the capacity to exclude certain types of files. By default ProtectFile always excludes executable and system files. The user also has the capacity to define other file types that will also be excluded from encryption. Refer to the Adding Excluded Extensions section for additional details. NOTE If exclusions are required, it is preferable to add them prior to adding the domain. It is not possible to define a domain that is a subfolder of an exclusion. NOTE Files that are deleted from a domain/envelope are moved (in encrypted form) to the Recycle Bin. Windows Vista installations only—ProtectFile does not allow the restoration of a previously deleted file if a file with the same name already exists in the domain/envelope. In other words, you cannot overwrite a file in a domain/envelope with a file from the Recycle Bin. If this is attempted, an error will occur. Instead, you must delete the destination file in the domain/envelope before restoring the file of the same name from the Recycle Bin. For other Windows versions, ProtectFile allows a file of the same name to be overwritten. 10 © SafeNet, Inc. Chapter 3 Operation Adding Domains NOTE It is very important to check that the required folder is correctly selected to prevent the inadvertent encryption of incorrect areas such as the entire hard disk. As a guideline, do not encrypt disk areas that contain operating system files. If there is a distinct need to encrypt the entire drive, including the operating system, please contact SafeNet Support for advice. Ensure that the folder that contains the ProtectFile application (typically C:\Program Files\SafeNet\ProtectFile) is not encrypted as this will lead to start-up problems. A user can be registered to a maximum of 50 domains. This limit also applies to any domains that the user has created and has been automatically registered to by ProtectFile. 1. From the main menu, select Domain > Add, or click the Add Domain icon on the toolbar. The Add Domain dialog displays. 2. Click Browse to display the Browse For Folder dialog showing the file system. The default folder shown will generally be the My Documents folder. 3. Select the folder you wish to add as a ProtectFile domain, and click OK. Verify that the Path Selected text box matches the folder that you want to protect. Note that any subfolders contained within the selected folder will also be secured. 4. Modify the remainder of this dialog as needed: FIPS Mode—If this option is selected, the user can create a domain in FIPS mode (i.e., using the FIPS-compliant CGX Cryptographic module). Domain Keyphrase—A domain keyphrase is a phrase which ProtectFile uses to generate a key which protects the domain. It is used to prevent unauthorized access to the domain for unauthorized users. The key phrase can be given to other users in order to give them access to this domain (refer to the section entitled Register a Domain). Following entry of the domain key phrase, the user is prompted to enter the administrator key phrase. Enter a keyphrase that is at least 10 characters and case-sensitive, then confirm the keyphrase in the Confirm Domain Keyphrase field. Access Control—This check box turns on the ProtectFile Access Control feature. Access Control prevents unauthorized users from viewing the contents of a domain. If this option is selected, then users who are not authenticated with ProtectFile will not be able to access any files within a domain (including files within excluded subfolders or files of the type that have been configured as excluded extensions). For example, if a domain has been added with the Access Control feature enabled, a user who is not registered to the domain will not be able to view the files and subfolders in the domain via Windows Explorer. © SafeNet, Inc. 11 Chapter 3 Operation Encryption Mode—This drop-down list allows the user to select the algorithm used for encryption. The default algorithm can be set by the system administrator. Refer to ProtectFile Administration Guide for additional details. NOTE If the FIPS Mode check box is selected, and the IDEA license has been installed, the IDEA algorithm is not available in the Encryption Mode drop-down list. If the IDEA algorithm is already selected, and then the FIPS Mode check box is selected, the following message displays: IDEA algorithm is not available in FIPS mode. 5. Click Advanced. The Data Encryption Key dialog displays. 6. Modify this dialog as needed to choose advanced domain keyphrase features: Random Key—If this option is selected, the key used to encrypt the data is generated randomly. (This option can be used if the FIPS Mode check box is selected on the Add Domain dialog.) Derive from key phrase—(If the FIPS Mode check box is selected on the Add Domain dialog, this option and the Key phrase for data encryption group controls are unavailable. See note below.) If this option is selected, the Key phrase for data encryption area of the dialog becomes active. Enter the Keyphrase which will be used by ProtectFile to generate the data encryption key (keyphrases must be at least 10 characters, and are casesensitive, then confirm the keyphrase in the Confirm Keyphrase field. NOTE If the FIPS Mode check box is not selected when first adding a domain, and the user selects the Derive from key phrase check box, and then selects the FIPS Mode option, the following message displays: FIPS Mode and Derive from key phrase are incompatible. To switch on FIPS Mode, click on Advanced button and switch off the Derive from key phrase radio button.. Legacy Domain—This check box is only active if the Key phrase for data encryption area of the dialog is used. Select the Legacy Domain option so that ProtectFile encrypts the domain according to the legacy method. Encrypt Existing Files—If this option is selected, ProtectFile encrypts any file that existed in the folder prior to adding it as a domain. 7. Click OK to close the Data Encryption Key dialog. 8. Click OK to close the Add Domain dialog. 12 © SafeNet, Inc. Chapter 3 Operation NOTE Do not use the Access Control feature for domains on a computer running ProtectFile that are to be shared. This feature works only for domains located on servers that do NOT run ProtectFile. Access Control only works for domains that do not have any exclusions defined on subfolders. If an exclusion is defined inside a domain with Access Control enabled, then Access Control will be disabled. If you are using version 3.02.00 or higher of ProtectFile Management Console or Client, and have chosen AES as your encryption algorithm for either the profiles or domains, then those systems running versions of the Client earlier than version 3.02.00 will not be able to read the encrypted data. It is recommended that while you have a mixed environment (Clients and Management Console of differing versions) that you do not use AES encryption for anything you wish to share with clients running earlier versions. The actual encryption key that is used to encrypt the domain is chosen at random by ProtectFile. This increases security, as it is no longer possible to choose “weak” key phrases. If an explicit encryption key phrase is required, it can be entered in the Data Encryption Key dialog which is accessible via the Advanced button. Refer to the ProtectFile Administration Guide for additional details. Removing Domains 1. From the main menu, select Domain > Remove, or click the Remove Domain icon on the toolbar. The Remove Domain dialog displays. 2. Select the domain to be removed and click OK. 3. Verify all encrypted files are closed and click Continue. 4. Enter the administrator password of this domain and click OK. The domain may only be removed if you know this password. The Decrypt Files check box is present only for domains which were created in an older version of ProtectFile, and should be selected if you wish to decrypt all files contained in the domain prior to its removal. 5. Continue removing domains as needed. When you are finished, restart Windows to maintain full data integrity. NOTE The newer style domains provide better recovery options. In cases where you want to de-register a user from a legacy domain without decrypting the legacy domain, you will need to clear this check box. Typically, you will have such a need when you want to prohibit a user from accessing a domain. In new style domains, the check box is not available so a decrypt is always associated with removal of a domain. If the domain is shared with other users, be careful not to use this function without making sure that files no longer need to be protected by ProtectFile. Also ensure that are no one is making use of the domain or has any open files. © SafeNet, Inc. 13 Chapter 3 Operation Registering a Domain To add an existing domain to your personal configuration, you must register it. Registering a domain allows you to access protected files on a Windows network file share, or view the contents of an encrypted CD-ROM created by another ProtectFile user. To register a domain you need its domain keyphrase. 1. From the main menu, select Domain > Register. The Register Domain dialog displays. 2. Click Browse, select the domain to register, and click OK. 3. Click Register. 4. Enter the domain key phrase when prompted. The domain is registered if the password is correct. Otherwise, it is not possible to access the domain. NOTE A user can be registered to a maximum of 50 domains. This limit also applies to any domains that the user has created and has been automatically registered to by ProtectFile. Viewing Registered Domains Viewing registered domains allows you to see which domains are currently available for transparent encryption. The status of each domain that is currently registered is also displayed. The View option is only available if there are domains to view in your personal configuration. 1. From the main menu, select Domain >View. 2. Click OK to return to the main menu. De-registering a Domain When a domain is de-registered, the user will no longer be able to decrypt data files in that domain. However, the user can re-register again to restore access. 1. From the main menu, select Domain > De-Register. 2. Select the desired domain from the list and click OK. 14 © SafeNet, Inc. Chapter 3 Operation Sharing a Domain This function allows a user to select the other users who are allowed to access the domain. 1. From the main menu, select Domain > Share Domain. 2. Select a domain from a list of available domains. 3. Select the users with whom you wish to share the selected domain. At this point, you will also be able to assign Domain Administration rights to the selected users if required. Refer to the Management Console User Guide for details. NOTE You will need Domain Administration rights to perform this function. This function is only available if the ProtectFile client is used in conjunction with the ProtectFile Management Console. The Management Console generates the necessary transport keys and coordinates the send of the domain information to the selected users. Administration of a Domain Administration of a domain allows you to change the settings and keyphrases of that domain. You may need to change the domain keyphrase if it becomes known to unauthorized users. 1. From the main menu, select Domain > Administration. 2. Choose the desired domain from the list. Enter the domain’s administration password. The Domain Administration dialog, which allows modification of the domain’s settings, displays. 3. To set a new domain keyphrase, select the Change Domain Keyphrase check box and enter and confirm the new keyphrase. 4. Verify that the Access Control check box is set appropriately (refer to the Access Control description on page 11). NOTE If a domain key phrase is changed, all existing domain users lose their right to use the domain and are unregistered automatically. © SafeNet, Inc. 15 Chapter 3 Operation Managing Exclusions An exclusion is a folder marked as being unprotected by ProtectFile, containing unencrypted files and sub-folders. NOTE Exclusions can be added and removed at any time. However, care must be taken when performing these actions since alterations take effect immediately. All applications should therefore be closed before making changes to the ProtectFile configuration in order to prevent any problems. Prior to making any changes to a domain/envelope that is shared by other users, it is important to make sure that there are no files in use by an application or another user. Following a change, restart Windows to ensure data and system integrity. A user can have a maximum of 50 exclusions in their personal configuration. Exclusions can be defined inside another exclusion. These are called nested exclusions. For example, if you have an exclusion C:\Folder\SubFolder defined, ProtectFile will allow you to define another exclusion in C:\Folder or in C:\Folder\SubFolder\SubSubFolder. The parent exclusion will take precedence over any child exclusions. This means that child exclusions can be removed without having any effect on files inside the child exclusion. Exclusions not belonging to an encrypted folder are called orphan exclusions. Since orphan exclusions have no effect on files, typically you will not create any orphan exclusion without the intention to create an encrypted folder associated with an orphan exclusion. Encrypted folders can not be created inside exclusions. Adding Exclusions Sub-folders of domains or envelopes can be excluded from the encryption process with the Add Exclusion command. This will take the selected sub-folder and add it to the list of exclusions in the personal configuration. An exclusion will remain active until it is removed. 1. From main menu, select the Exclusion > Add, or click the Add Exclusion icon on the toolbar. 2. Click Browse, select the folder to exclude, and click OK. If the folder you want to exclude is inside an encrypted folder and files are encrypted, make sure Decrypt Existing Files option is selected. 16 © SafeNet, Inc. Chapter 3 Operation If the folder you want to exclude is not inside an encrypted folder and files are not yet encrypted, make sure Decrypt Existing Files option is not selected. 3. If prompted, type the administration keyphrase of the encrypted folder containing the folder that you want to exclude and click OK. 4. Click Continue when the Cipher Operation displays. 5. Continue to add exclusions as needed, without re-booting your system. When you have added all exclusions, restart Windows to maintain full data integrity. NOTE When performing this action on a shared domain/envelope, make sure that files are not currently being used and no longer need to be protected by ProtectFile. The exclusion prevails over the definition of a domain/envelope. This means that it is not possible to define a domain/envelope that is a subfolder of an exclusion. Removing Exclusions When an exclusion is no longer required, it can be removed from the personal configuration. 1. From the main menu, select Exclusion > Remove, or click the Remove Exclusion icon on the toolbar. A list of all current exclusions displays. 2. Select the exclusion to remove and click OK. If the folder you want to remove from exclusion is inside an encrypted folder, make sure Encrypt Files option is selected. If the folder you want to remove from exclusion is not inside an encrypted folder, make sure Encrypt Files option is not selected. 3. Continue to remove exclusions as needed. NOTE The Encrypt Files check box should only be selected, if you are the owner of the parent domain/envelope, and you want to protect the currently excluded files as part of that domain/envelope. Do not use this facility without ensuring that no other user is accessing the domain/envelope. © SafeNet, Inc. 17 Chapter 3 Operation Viewing Exclusions 1. From the main menu, select Exclusion > View. The View Exclusion dialog displays. 2. Click OK to return to the main menu. Managing Excluded Extensions Files can be excluded from encryption by ProtectFile based on their file name extension. For example, if you want all files ending with .ZIP to be unprotected, you need to add a .ZIP excluded extension to your ProtectFile personal configuration. ProtectFile always excludes files with certain extensions from encryption. In general, this applies to any program files. The default file extensions always excluded are “.BAT,” “.COM,” “.DLL,” “.EXE,” “.PROF,” and “.SYS.” Additional extensions can be added to your personal configuration. Modifications to the excluded extension list are system-wide. This means that files specified in the excluded extension list are never encrypted in any domains. Special care must be taken, as frequent use of this feature may compromise data integrity when sharing domains with other users. The recommended course of action is to make a decision about which extensions will be excluded and add those excluded extensions immediately after installing ProtectFile. All applications should be closed before making changes to your ProtectFile personal configuration to prevent any data integrity problems. Prior to adding an excluded extension to your personal configuration, it is important to make sure that no files are in use by an application or another user. Following a modification, restarting Windows is strongly recommended in order to maintain data integrity. Adding Excluded Extensions Adding an excluded extension allows the user to define other file extensions and file names that will also be excluded from encryption. NOTE Special care must be taken when using this feature, as it affects all files which end with the excluded extension regardless of the domain/envelope they are stored in. Frequent use of this feature can compromise sharing domains/envelopes with other users and lead to administration problems for large organizations. It is recommended that an organization makes a one-time policy decision regarding excluded file extensions and applies this immediately after installing ProtectFile. A user can have a maximum of 50 excluded extensions in their personal configuration. 18 © SafeNet, Inc. Chapter 3 Operation 1. From the main menu, select Extension > Add, or click the Add Extension icon on the toolbar. 2. Unless you are the owner of all the domains/envelopes, do not select the Decrypt Files option, since this decision will affect all files on the system. 3. Enter the new extension to be excluded from encryption (for example, .CGX) and click OK. You may enter a three-character DOS-type extension or any combination up to 16 characters long. If an extension longer than three characters is defined, then the last characters of all file names are compared against the character string you enter. For example, if “Y.ABC” was specified, the following examples would all be excluded from ProtectFile protection: sadfy.abc y.abc 1234567y.abc In addition, you can choose to include the file extension separator character “.” Or not. If you choose not to include the separator character, a broader range of files may match the excluded extension given. For example, if you just type ZIP instead of .ZIP, then the exclusion will match files with names like file.BZIP and MYZIP (no actual extension). 4. If prompted, type the administration keyphrase of each encrypted folder in your personal configuration and click OK. 5. Click Continue when the Cipher Operation displays. 6. Continue to add excluded extensions as needed, without re-booting your system. When you are finished adding the excluded exclusions, restart Windows to maintain full data integrity. Removing Excluded Extensions 1. From the main menu, select Extension > Remove, or click the Remove Extension icon on the toolbar. 2. Select the Encrypt Files option if you want to encrypt all files with the extension being removed. 3. Select the extension to remove and click OK. 4. If prompted, type the administration keyphrase of each encrypted folder in your personal configuration and click OK. 5. Click Continue when the Cipher Operation displays. © SafeNet, Inc. 19 Chapter 3 Operation 6. Continue to remove excluded extensions as needed, without re-booting your system. When you are finished removing the excluded exclusions, restart Windows to maintain full data integrity. NOTE Extreme care must be taken to ensure that no users are accessing any files with the extension being removed. Viewing Current Excluded Extensions 1. From the main menu, select Extension > View. The View Excluded Extension dialog displays. 2. Click OK to return to the main menu. 20 © SafeNet, Inc. Chapter 4 Administration Chapter 4 Administration Administration Tasks Changing the User Password You can change your user password at any time via the main menu. 1. From the main menu, select Keyphrase > Set New Password. The New Password dialog displays. 2. Enter and confirm the new user password, and then click OK. Following correct entry, the new user password takes effect immediately. Hashing a Keyphrase The term, hashing, refers to a cryptographic operation, which can be used to derive a value from a specific input. The ProtectFile cipher keys are generated from the key phrase using a hashing algorithm. Each different key phrase generates a unique cipher key. At times, it may be necessary to know the actual cipher key value that corresponds to a particular key phrase (for example, to comply with local regulations on the use of ciphers, or to comply with a company policy). The Hash Keyphrase option is available from the main menu for such a requirement. To view the key derived from a keyphrase: 1. From the main menu, select Keyphrase > Hash Keyphrase. The Hash Keyphrase dialog displays. 2. Enter and confirm the particular keyphrase for which you want to derive the key. 3. Select the required algorithm the key will be used with. 4. Click Show. A string of hex digits will be displayed. This is the derived Key for the selected algorithm. Hyphens are inserted to assist you when reading and copying down this value, but do not form part of the key itself. © SafeNet, Inc. 21 Chapter 4 Administration NOTE The Show button is not enabled until you have entered correct and matching values as a key phrase. Cipher key values must be guarded as carefully as your key phrases since knowledge of these values can compromise your data. Recovering After Losing the User Password If you have forgotten your user password and are presented with a dialog requesting an Unlock Key, you will need to take the following actions: 1. Contact your ProtectFile Administrator and supply the Lock Code pair displayed (Lock Code 1, Lock Code 2). 2. Your ProtectFile Administrator will supply you with an Unlock Key. Enter the supplied Unlock Key. 3. If the Unlock Key is correct, you will be required to enter a new password, after which, you will be able to continue using ProtectFile as normal. NOTE If you are not asked to enter a new password and ProtectFile closes, the Unlock Key entered is incorrect. This could be due to a number of factors: The Unlock Key was entered incorrectly. The Unlock Codes you supplied to the ProtectFile Administrator were incorrect. The Unlock Key supplied by your ProtectFile Administrator was incorrect. Dealing With Lost User Passwords If you have forgotten your user password and you are not presented with a dialog requesting an Unlock Key, it may be possible to recover data, provided that one of the following conditions is met: The domain/envelope keyphrases are known. -orAn old configuration with your current user password was previously saved. In either case, contact your system administrator. Temporarily Disabling Protection To prevent unauthorized users from accessing your encrypted files while you are away from your computer, you can temporarily disable ProtectFile file decryption. From the main menu, select File > Disable. While ProtectFile is disabled: A check mark is shown next to the Disable option in the File menu. The text “(Disabled)”also appears in the status bar. 22 © SafeNet, Inc. Chapter 4 Administration The icon in the system tray will change to a key with a stop sign. When ProtectFile is disabled, your protected files are not readable, but they can be copied and transferred in their protected form. This feature is especially helpful when you need to transfer the files in an encrypted format (for example, when you backup the files). To re-enable ProtectFile, from the main menu, select File > Disable. The operation is reversed and all the “disabled” indicators are removed. NOTE This feature has been designed with great care to avoid loss of data. However, never forget that disabling ProtectFile influences access to all files located in the defined domains/envelopes. Therefore do not forget to re-enable ProtectFile immediately after you have completed the operation for which it was disabled. While ProtectFile is disabled, all files within domains will appear encrypted to all applications. Before disabling ProtectFile, make sure that all applications do not have any files open that are inside domains to prevent data corruption. Configuring the Screen The toolbar component of the main menu can be turned on or off via the View menu. To hide or display the toolbar from view, from the main menu, select View > Toolbar. Upgrading Your License There are two types of license numbers available: those without any time limitation for professional use those with 90 days time limitation for evaluation If your ProtectFile license is a trial (evaluation) license, upgrade to a full license by changing the license code. You can upgrade your license any time. 1. From the main menu, select Help > About ProtectFile. The About ProtectFile dialog displays. 2. Click the License button next to the License Number. 3. Enter the new license number into the fields provided and click OK. 4. Click OK again to close the window. NOTE To upgrade from one version to another (for example, BUSINESS PASSWORD to BUSINESS CSP), you must uninstall and reinstall ProtectFile with the new license number. Your personal configuration will not be affected. © SafeNet, Inc. 23 Chapter 4 Administration Restrictions Sleeping Domains/Envelopes During start-up, ProtectFile reads the tag file of all registered domains and/or envelopes. Sometimes this is not possible, for example, the CD with the domain/envelope is not inserted, or the server hosting a domain/envelope is not available. Such domains/envelopes are called “sleeping” domains/envelopes. They are marked as “asleep” in the View Domains or View Envelopes dialog. Typically, their existence is of no importance, as the corresponding files are not available. However, it may happen that a sleeping domain/envelope becomes available later on, for example, the CD is inserted, or the network server is restarted. In this case, ProtectFile offers the possibility of waking these domains/envelopes. In order to do so, click on the ProtectFile icon in the task bar. Sleeping domains/envelopes can have a limited number of operations performed on them. They may be de-registered or awakened. Refer to page 14 for information on how to de-register a domain/envelope. To awaken a domain or envelope: 1. Confirm that the domain or envelope is accessible by inserting the media or restoring the network connection where the domain/envelope is location. 2. Minimize ProtectFile to the system tray. 3. Click the ProtectFile system tray icon once. Nested Domains/Envelopes It is not possible to define a domain/envelope inside an existing domain/envelope. Backup/Restore ProtectFile Domains/Envelopes For Windows Vista only: Do not use the standard Vista Backup and Restore Center to backup and restore ProtectFile envelope.sys files, as encrypted files will be filtered out (skipped). Use an alternate backup/restore utility to avoid possible data corruption. NTFS Compression The NTFS compression attribute and the encryption are not compatible with one another. Compressed files should not be encrypted and encrypted files should therefore not be compressed in order to avoid file corruption. 24 © SafeNet, Inc. Chapter 4 Administration Compatibility Issues Dr. Solomon’s WinGuard for Windows 2000/XP When using Windows 2000/XP as an operating system, ProtectFile is compatible with Dr. Solomon’s WinGuard for Windows 2000/XP but requires special configuration. For complete details on how to configure ProtectFile to operate in conjunction with Dr. Solomon’s WinGuard, please contact SafeNet Support. © SafeNet, Inc. 25 Chapter 4 Administration THIS PAGE INTENTIONALLY LEFT BLANK 26 © SafeNet, Inc. Glossary Glossary Access Control A feature that is used to prevent unauthorized viewing of files within a domain. ADSI Active Directory Services Interface. AES (128, 192, 256 bit) Advanced Encryption Standard, established as a replacement to DES by the US Federal Information Processing Standard. API Application Programming Interface. Authentication The process of establishing your identity. AVS Anti-virus Software. Backing up The process of making a copy of important data files in case of computer failure. CA Certificate Authority. Challenge/Response The process of responding to a cryptographic challenge, usually a sequence of numbers. CSP Cryptographic Service Provider. Data Encryption Keyphrase A keyphrase which is entered during the domain creation process. This keyphrase is used to generate the DES or Triple DES cipher key used during encryption operations. Specifying a data encryption keyphrase allows you greater control over how domains are encrypted. Note that if a data encryption keyphrase is specified during domain creation, it will automatically become the domain administration keyphrase. You will need to specify a data encryption keyphrase when creating a domain when you want to record the cipher key to make encrypted file recovery possible after a system disk failure. DES or 2 Key Triple-DES Data Encryption Standard. First proposed as a U.S. Federal Information Processing Standard, and now the recognized industry encryption standard. (See also IDEA.) Domain © SafeNet, Inc. A directory including its sub-directories that are protected by ProtectFile Business. Each domain has a unique keyphrase assigned when it is created. 27 Glossary Domain Administration Keyphrase Used to allow administration of the domain. Only the creator of the domain should know the domain administration keyphrase. You will need the domain administration keyphrase of a domain to remove that domain, modify the settings of that domain, change the domain keyphrase of that domain, or add an exclusion inside that domain. 28 Domain Keyphrase Used to allow access to the domain for authorized users. You will need the domain keyphrase of a domain to register that domain. Domain Mode An operating mode of ProtectFile where a user can create and administer domains. (See also PKI Mode.) Encryption A reversible transformation of data using a key and mathematical algorithm, which prevents unauthorized persons from viewing the transformed data (cipher text) in its original form (plain text) without possessing the key. Envelope A directory including its sub-directories that are protected by ProtectFile Premium with a PKI key management scheme. It is like a PKI-enabled domain. Envelope Administrator The envelope administrator has the right to create or remove envelopes, allow or deny other users to access envelopes or to delegate these rights to other users for specific envelopes. Excluded Extensionas Files with certain specified file name extensions are always excluded from the protection of ProtectFile. There are five default excluded extensions: “.BAT,” “.COM,” “.DLL,” “.EXE,” and “.SYS.” Eleven more can be defined. Exclusion A directory (including its sub-directories) under a domain or envelope which is not included under the protection of ProtectFile. FAT File Allocation Table. A type of Windows File System. (See also NTFS.) GINA A Graphical Identification and Authentication dynamic-link library (DLL). The Windows sub-system that controls authentication. Hashing The transformation of data into a usually shorter fixed length value that uniquely represents the original string, and is difficult or impossible to reverse (i.e., it is difficult or impossible to find the data that produces a given hash value). IDEA International Data Encryption Algorithm. Symmetric encryption algorithm developed by ETH Zurich and Ascom AG owned by Ascom AG. © SafeNet, Inc. Glossary Keyphrase A string of characters that can represent a password, or can be used to generate a cryptographic key. ProtectFile defines a number of different keyphrase types. Each keyphrase type has a different purpose in securing encrypted files inside domains and ProtectFile features. All keyphrases entered must adhere to normal password rules. Refer to page 4 for details. (See Data Encryption Keyphrase, Domain Administration Keyphrase, Domain Keyphrase, Policy Keyphrase, and User Password.) LDAP Lightweight Directory Access Protocol. NTFS NT File System. A type of Windows file system. (See also FAT.) Orphan Exclusion An exclusion not contained within a domain. Personal Configuration A set of domains, exclusions, and excluded extensions protected under a private user password, which defines the location and type of protected files for a particular user. A personal configuration is usually unique to an individual. PKI Public Key Infrastructure. PKI Mode An operating mode of ProtectFile where a user can create and administer envelopes. (See also Domain Mode.) Policy A range of permissions that restrict the features of ProtectFile available to an unprivileged user. Policy Keyphrase The keyphrase used to view and modify policy settings. The system administrator uses policy settings to prevent users from accessing specific ProtectFile features. ProtectFile Administrator The ProtectFile administrator allows users to create and remove envelopes and domains. (Note that for Windows 2000/XP/2003, the user for this role must have system administrator rights.) ScrCtrl Utility A command line utility that is used to perform encrypted file backups. Shared Domain A domain where more than one user has access and knows the domain keyphrase (for example, on group directories). Sleeping Domain A domain that cannot be accessed. © SafeNet, Inc. 29 Glossary User Password Your User Password is set the first time ProtectFile starts. Each user should have a unique User Password to og on to ProtectFile. It is a text string that consists of arbitrary characters (case-sensitive), and is a minimum of 10 characters long. If the GINA authentication and Password Synchronization options were selected during the installation of ProtectFile, your User Password is always the same as your Windows Logon password. Windows Registry A database built into the Windows operating system where configuration information is stored. END OF DOCUMENT 30 © SafeNet, Inc.