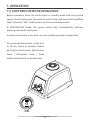
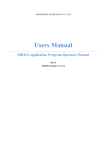
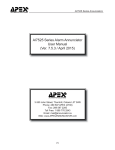
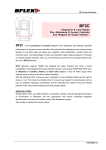
1
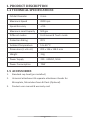
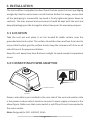
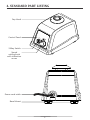
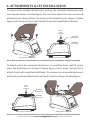
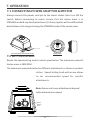
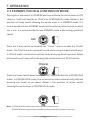
TABLEOFCONTENTS
1. Product Description.................................................................. 1
1.1 Introduction
1.2 Intended Use
1.3 Features
1.4 Technical Specifications
1.5 Accessories
2. Safety Precautions.................................................................... 3
3. Installation................................................................................4
3.1 Location
3.2 Connecting Power Adaptor
4. Standard Parts Listing................................................................5
5. User Interface and Display.........................................................6
6. Optional Attachments & its Installment.................................... 7
7. Operation................................................................................. 11
7.1 Connecting power adaptor
7.2 Setting Speed
7.3 Standby, Touch & Continuous mode
7.4 Touch mode operation
7.5 Continuous mode operation
8. Maintenance and cleaning....................................................... 15
9. Warranty Statement..................................................................16
10. Product Disposal..................................................................... 17
1.PRODUCTDESCRIPTION
1.1INTRODUCTION
Congratulations! You are using the essential Vortex Mixer. The product is
designed for your everyday laboratory mixing needs. The silent easy to use
vortex comes with unparallel reliability & safety. It has a variable speed setting
which allows low rpm start-up for gentle shaking and high speed mixing for
vigorous vortexing of samples.
1.2INTENDEDUSE
The Vortex Mixer is a general laboratory vortex mixer. It is indented for
application where vortexing of single or multiple tubes is required.
1.3FEATURES
1. Continuous & touch operation
2. Adjustable speed ranging upto 2800 rpm
3. Long life Brushless AC motor with ball bearing
4. Inbuilt counter balance for steady and safe operation
5. Orbital diameter of 4 mm
6. Broad range of Accessories (optional)
7. Robust construction for stable operation
8. Silent operation
1
1.PRODUCTDESCRIPTION
1.4TECHNICALSPECIFICATIONS
Orbital Diameter
4 mm
Maximum Speed
2800 rpm
Speed Accuracy
± 5%
Maximum Load Capacity
500 gm
Different modes
Continuous & Touch mode
Protection Rating
IP21
Ambient Temperature
5 to 40 °C
Dimensions (L x B x H)
205 x 136 x 138.5 mm
Weight
3 Kg
Power Supply
220 - 240VAC, 50Hz
Power Consumption
70W
1.5ACCESSORIES
1.
Standard cup head (pre installed)
2.
Universal attachment & separate attachment heads for
Microplate, Microtubes foam & Flask (Optional)
3.
Product user manual & warranty card
2
2.SAFETYPRECAUTIONS
1. Do not use the vortex mixer in hazardous atmosphere or with hazardous
material for which the unit is not designed.
2. Always use the vortex mixer on level & stable surface for best
performance and maximum safety.
3. Do not lift vortex mixer with the attachments, as every attachment
including the standard attachment (cup head) are designed to be pulled
up for interchanging.
4. Do not rotate or give full rotation to the attachments (cup head, universal
attachment, etc) attached to the modified shaft body.
5. Clean the unit with damp cloth using mild detergent only. Do not use
chemical cleaning agents.
6. If liquid spills on the unit, first disconnect unit from external power supply
and then clean the unit with a damp cloth.
7. Do not use the unit if it shows any sign of electrical or mechanical
damage.
8. Don’t use the accessories which are not recommended by manufacture,
it may affect the performance.
9. The instrument is designed to be used in the laboratory environment.
10. Do not fill microtubes, microplate or flask while they are attached with
vortex mixer, liquid spillage may harm the unit.
11. The maximum speed for each attachment is marked - do not run at higher
speed than those indicated.
3
3.INSTALLATION
The Vortex Mixer is supplied in a box. Open the box, open the inner packaging
and gently take the vortex mixer out of the box. Before 1st usage, ensure that
all the packaging is removed & cup head is firmly tightened (press down to
confirm). The user manual and accessories should be kept with the unit and
keep all packaging in safe storage for atleast two years for warranty purpose.
3.1LOCATION
Take the unit out and place it on the leveled & stable surface near the
grounded electrical outlet. The surface should be clean and free from dust to
ensure that the feet grip the surface firmly. Keep the clearance of 10 cm on all
side of the unit for proper ventilation.
Keep the unit away from heat & direct sunlight to avoid sample temperature
issues.
3.2CONNECTINGPOWERADAPTOR
ON
Power Cord
Power cord cable
Rear Side
Power cord cable is pre-installed to the rear side of the unit and another side
is the power cord pin which needs to connect to main supply as shown in the
above figure. Make sure that mains switch is not ON until cord is connected to
the mains socket.
Note: Designed for 220 - 240 VAC, 50 Hz
4
4.STANDARDPARTLISTING
Cup Head
Control Panel
To
u
ch
OF
F
ON
3 Way Switch
Speed
setting knob
with indication
arrow
Power cord cable
Base Mount
5
5.USERINTERFACE&DISPLAY
3
Touch
4
2
OFF
ON
No.
Name/Symbol
1
Power LED
2
Speed
3
4
Speed
1
Function
Power Led showing the status of vortex action.
Glowing - when vortex action is in process,
Not Glowing - No Vortex action
Speed setting knob to set different speed.
Rotate clockwise to increase & anticlockwise to
decrease speed value.
Max. Speed
Attachments position with reference to speed
Indication for
setting
knob for Max. allowed speed indication.
Specific Attachement
3 way switch
(Mode selection)
Rocker switch is use to select different mode in
vortex mixer. OFF (stand by), Continuous &
touch operation mode.
6
6.ATTACHMENTS&ITSINSTALLATION
Standard attachment cap is used for vortexing sample in individual tubes. The
vortex mixer can accommodate optional attachments. Optional attachment
include universal attachment which combining with other foam / rubber
attachments can be use for mixing samples in microplate, microtubes & flask.
Standard Attachment
Universal Attachment
The below additional foam attachments combining with universal
attachment can be use for mixing sample in microplate & microtubes
(1.5/2.0ml). First attach the universal attachment, place tubes in foam sheet
& then combine it with universal attachment.
Universal Attachment
Microtube Foam attachment
Note: The microtube foam attachment can be operated with maximum speed of microplate
indication is Product sticker with the fill not more than 75% of sample. Do not fill tubes while
they are in foam attachment, liquid spillage might harm the attachment or unit.
Universal Attachment
Microplate Foam attachment
Note: The Microplate foam attachment can be operated with maximum speed of Microplate
Indication in Product sticker with the fill not more than 75% of well of microplate. Do not fill
microplate while they are in foam attachment, liquid spillage might harm the attachment or
unit.
7
6.ATTACHMENTS&ITSINSTALLATION
The below additional rubber attachments combining with universal
attachment can be use for mixing sample in 250ml flask.
First always attach the universal attachment then place flask on the universal
attachment & tighten it with rubber attachment as shown in below figure.
Universal Attachment
Flexible Rubber Attachment
Make sure the flask is held in place firmly. By stretching the rubber
attachment and fixing it with universal attachment.
Note: The 250ml flask used with these rubber attachment can be operated with maximum
speed as indicated by knob marking. Care needs to be taken while attaching or filling the flask
with the sample to avoid liquid spillage, damage to user or unit.
8
6.ATTACHMENTS&ITSINSTALLATION
To remove the standard attachment, pull up the standard attachment with
one hand as shown in below figure. You can then attach the cup or universal
attachment as shown below. Center press the attachment as shown in below
figure until it snaps. Ensure that it attach firmly with modified shaft body.
Center
Press
to attach
Standard
Attachment
Modified
shaft body
Removing Standard Attachment
Attaching Standard Attachment
Note: Do not rotate universal attachment or any attachments attached to modified shaft body.
To attach, place the universal attachment on modified body shaft & center
press the attachment as shown in below figure until it snaps. Ensure that it
attach firmly with modified shaft body. To remove the universal attachment,
pull up the universal attachment with both hands as shown in below figure.
Center
Press
to attach
Universal
Attachment
Modified
shaft body
Attaching Universal Attachment
Removing Universal Attachment
Note: Do not rotate standard attachment or any attachments attached to modified shaft body.
9
6.ATTACHMENTS&ITSINSTALLATION
To attach the microtube or microplate foam attachment, first install the
universal attachment then place the foam attachment as shown in image
below. Ensure universal attachment is securely fixed.
Foam Attachment
Universal
attachment
Place the microplate or microtubes first in the foam attachment & then place
the foam attachment on the universal attachment attached to vortex mixer.
To avoid spillage of samples match the cut out in foam with plastic extension
on universal attachment.
To attach flask, first attach universal attachment then please flask on its
center. Fix one side of the rubber on the extended portion of universal
attachment holding flash. Press the center hole through the neck of flask.
Stretch the other end & lock if firmly on the other end of extension of
universal attachment.
Flask
Rubber
attachment
Universal
attachment
To
uc
To
h
uc
h
OFF
OFF
ON
ON
10
7.OPERATION
7.1CONNECTINGPOWERADAPTOR&SWITCH
Always connect the power cord pin to the mains socket then turn ON the
switch. Before connecting to mains, ensure that the vortex mixer is in
STANDBY mode & cup head (attachment) is firmly tighten with modified shaft
body. Below is the image showing the STANDBY mode of the vortex mixer.
OFF
Power cord cable
Rear Side
Connecting Power cord to Mains Socket
Standby mode
7.2SETTINGSPEED
Rotate the speed setting knob to select speed value. The maximum speed of
Vortex mixer is 2800 RPM.
The maximum speed indication for different attachments is shown in product
sticker. Speed Setting knob with arrow allows
to set recommended speed for specific
attachments.
Note: Ensure not to use attachments beyond
indicated maximum speed.
Speed
Speed
Setting
Knob
11
7.OPERATION
7.3STANDBY,TOUCH&CONTINUOUSMODE
Placing the 3 way switch in STANDBY position will keep the vortex mixer in OFF
state i.e. it will not operate as TOUCH or CONTINUOUS mode. Below is the
position of 3 way switch showing the vortex mixer is in STANDBY mode. It is
recommended to use STANDBY mode while replacing attachments or when
not in use. It is recommended to use STANDBY mode while setting operation
speed.
OFF
Press the 3 way switch up towards the “Touch ” side to enable the TOUCH
mode. The TOUCH mode is generally used while using standard attachment.
In TOUCH mode, vortex action will start only when cup head is pressed. Below
is the position of 3 way switch showing the vortex mixer is in TOUCH mode.
TOUCH
Press the 3 way switch down towards “ON” side to enable the CONTINUOUS
mode. In CONTINUOUS mode, the vortex action start automatically (without
pressing cup head) at set speed. Below is the position of rocker switch
showing the vortex mixer in CONTINUOUS mode.
ON
Note: 1) CONTINUOUS mode is generally used
with attachments.
2)STANDBY mode is generally used while setting parameters or when not in use.
12
7.OPERATION
7.4TOUCHMODEOPERATION
Before operating, check that the upper cup head is firmly tighten to the
modified shaft body. Set the require speed using knob in STANDBY mode &
select the “TOUCH” mode using 3 way switch. For touch mode operation,
gently press & hold the cup head using tube as long as you want to run.
Release to stop operation. Below is the images showing the operation in
touch mode.
Press Down
To
u
ch
OF
F
ON
TOUCH
13
7.OPERATION
7.5CONTINUOUSMODEOPERATION
Before operation, keep the vortex mixer in standby mode and set required
speed. Check attachment (you wish to use) is firmly tightened with modified
shaft. Select the “ON” mode to start continuous mode operation.
In CONTINUOUS mode, the vortex action start automatically (without
pressing cup head) at set speed.
In continuous mode, at any time, user can modify speed by rotating knob.
For universal attachment , make sure
to fill the liquid or samples before
placing the attachments (Microtubes
Foam / Microplate Foam / Flask
rubber attachment) on vortex mixer.
To
u
ch
OF
F
ON
ON
14
8.MAINTENANCE&CLEANING
1. The vortex mixer and its accessories should be cleaned regularly with a
moist cloth.
2. Ensure that while cleaning the unit is not plugged in.
3. The brushless AC motor in the vortex mixer requires no routine
maintenance. Any required service should be performed by the authorized,
qualified personnel only. Repairs performed by unauthorized personnel
may void the warranty.
4. Always keep the vortex mixer & its accessories in the safe storage & clean
periodically with moist cloth. After cleaning, ensure that all parts are dried.
5. Do not try to pull the vortex mixer with attached accessories.
6. Do not try to rotate the attachments attached to modified shaft body.
7. Do not use the vortex mixer & its accessories in direct sunlight or under
water.
15
9.WARRANTYSTATEMENT
This products is warranted to be free from defects in material and
workmanship for a period of two (2) years from date of purchase. Your
product will be duly repaired upon prompt notification in compliance with the
following conditions :
This warranty is valid only if the product is used for its intended purpose and
within the guidelines specified in this instruction manual. This warranty does
not cover damage caused by accident, neglect, misuse, improper service,
natural forces or other causes not arising from defects in original material or
workmanship. This warranty does not cover any incidental or consequential
damages, commercial loss or any other damages from the use of this product.
The warranty is invalidated by any non-factory modification, which will
immediately terminate all liabilities on us for the products or damages caused
by its use. The buyer and its customer shall be responsible for the product or
use of products as well as any supervision required for safety. If requested the
products must be returned to the distributor in well packed and insured
manner and all shipping charges must be paid.
Some states do not allow limitation on the length of implied warranties or the
exclusion or limitation of incidental or consequential damages. This warranty
gives you specific legal rights. This warranty is given expressly in lieu of all
other warranties, expressed or implied.
Products received without proper authorization will not be entertained. All
items returned for service should be sent postage prepaid in the original
packaging or other suitable carton, padded to avoid damage. We will not be
responsible for damage incurred by improper packaging.
All items returned for service should be set postage prepaid in the original
packaging or other suitable carton, added to avoid damage.
This warranty is valid only if the warranty is registered with the supplier within
30 days from the date of purchase.
16
10.PRODUCTDISPOSAL
In case the product is to be disposed of, the relevant legal regulations are to be
observed.
Information on the disposal of electrical and electronic devices in the
European Community
The disposal of electrical devices is regulated within the European
Community by national regulations based on EU Directive 2012/19/EU on
waste electrical and electronic equipment (WEEE). According to these
regulations, any devices supplied after 13.06.05 in the business to business
sphere, to which this product is assigned, may no longer be disposed off in
municipal or domestic waste. They are marked with the following symbol to
indicate this.
As disposal regulations within the EU may vary from country to country,
please contact your supplier if necessary.
17