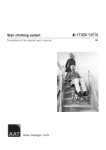
1
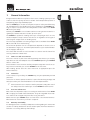
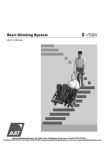
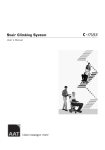
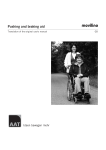
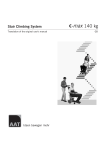
Stair Climbing System Translation of the original user's manual escalino 120 kg GB escalino CE-Declaration of conformity The company AAT Alber Antriebstechnik GmbH herewith declares that the products of the stair climbing system escalino were developed and manufactured in concordance with the current regulations of the European Union, EEC Guidelines 2007/47/EG and 2006/42/EG. This declaration becomes void if the above mentioned devices have been altered without the consent of AAT Alber Antriebstechnik GmbH. Signature of the manufacturer: Markus Alber Managing shareholder AAT Alber Antriebstechnik GmbH AAT Alber Antriebstechnik GmbH Postfach 10 05 60 · D-72426 Albstadt Tel. +49.74 31.12 95-0 · Fax +49.74 31.12 95-35 [email protected] · www.aat-online.de 2 escalino_g1201_gb_03_2010 The stair climbing system escalino has been successfully tested and certified according to the standard design for stair climbing vehicles ISO 7176-23 and DIN EN 12182 at the Technical University of Berlin, Berlin-Cert. escalino Table of contents CE Declaration of conformity . . . . . . . . . . . . Table of contents . . . . . . . . . . . . . . . . . 2 3 1 General information . . . . . . . . . . 1.1 How to use this user's manual 1.2 Instruction . . . . . . . . . 1.3 Care and maintenance . . . . 1.4 Warranty and liability. . . . . . . . . . . . . . . . . . . . . . . . . . . . . . . . . . . . . . . . . . . . . . . . . . . . . . . . . . . . 5 5 5 5 5 2 Description of the product . . . . . 2.1 Adequate use . . . . . . 2.2 Features of the escalino . 2.3 Technical data . . . . . . 2.4 Dimensioned sketch . . . 2.5 Standard scope of delivery 2.6 Optional accessories . . . . . . . . . . . . . . . . . . . . . . . . . . . . . . . . . . . . . . . . . . . . . . . . . . . . . . . . . . . . . . . . . . . . . . . . . . . . . . . . 6 6 7 8 9 10 10 3 Assembly. . . . . . . . . . . 3.1 Unfold the back part . 3.2 Attach the C-part plus 3.3 Arm rests . . . . . . 3.4 Functional check. . . . . . . . . . . . . . . . . . . . . . . . . . . seat to the climbing unit . . . . . . . . . . . . . . . . . . . . . . . . . . . . . . . . . . . . . . . 11 11 11 12 12 4 Safety instructions . . . . . . . . . . . . 4.1 Special information concerning the 4.2 Instruction . . . . . . . . . . . 4.3 Safety brakes . . . . . . . . . . 4.4 Lining of the climbing foot . . . . 4.5 Lifting capacity . . . . . . . . . 4.6 Care and maintenance . . . . . . 4.7 Condition of paths, walkways etc . 4.8 Charge of the batteries.. . . . . . 4.9 Climbing mechanism . . . . . . . 4.10 Transport . . . . . . . . . . . . . . . . . operation . . . . . . . . . . . . . . . . . . . . . . . . . . . . . . . . . . . . . . . . . . . . . . . . . . . . . . . . . . . . . . . . . . . . . . . . . . . . . . . . . . . . . . . . . 13 13 13 13 14 14 14 14 14 14 14 5 Operation . . . . . . . . . . . . 5.1 Maximum lifting capacity 5.2 Membrane keypad . . . . 5.3 Safety brakes . . . . . . 5.4 Lining of the climbing foot . . . . . . . . . . . . . . . . . . . . . . . . . 15 15 15 15 15 6 Instructions for operation . . . . . . . . . . . . . . . . 6.1 Membrane keypad . . . . . . . . . . . . . . . 6.2 UP/DOWN switch . . . . . . . . . . . . . . . 6.3 Climbers . . . . . . . . . . . . . . . . . . . 6.4 Safety brakes . . . . . . . . . . . . . . . . . 6.5 Transportation of a person with the escalino . . . 6.6 Operation on level ground . . . . . . . . . . . 6.7 Tilting the stair climbing system . . . . . . . . 6.8 Operation on slopes . . . . . . . . . . . . . . 6.9 Climbing upstairs . . . . . . . . . . . . . . . 6.10 Climbing downstairs . . . . . . . . . . . . . . 6.11 Laying the escalino on the stairs . . . . . . . . . 6.12 Transport . . . . . . . . . . . . . . . . . . . 6.13 Trouble shooting . . . . . . . . . . . . . . . . . . . . . . . . . . . . . . . . . . . . . . . . . . . . 16 16 16 17 18 19 20 20 21 22 25 27 28 28 7 Accessories. . . . . . . . . . . . . . . . . . . . . . . . . 7.1 Voltage converter for your vehicle . . . . . . . . . . 29 29 . . . . . . . . . . . . . . . . . . . . . . . . . . . . . . . . . . . . . . . . . . . . . . . . . . . . . . 3 escalino 8 Care, maintenance and recycling. . . . . . . 8.1 New user . . . . . . . . . . . . . 8.2 Charger . . . . . . . . . . . . . . 8.3 Sealed lead acid batteries . . . . . 8.4 Fuses . . . . . . . . . . . . . . . 8.5 Check brake lining . . . . . . . . . 8.6 Check the lining of the climbing foot 8.7 Cleaning. . . . . . . . . . . . . . . . . . . 8.8 Recycling . . . . . . . . . . . . . . . . . . . . . . . . . . . . . . . . . . . . . . . . . . . . . . . . . . . . . . . . . . 30 30 30 31 33 34 34 35 35 9 Warranty and liability . . . . . . . . . . . . . . . . . . . . 9.1 Warranty . . . . . . . . . . . . . . . . . . . . . 9.2 Liability . . . . . . . . . . . . . . . . . . . . . . 36 36 36 4 . . . . . . . . . . . . . . . . . . . . . . . . . . . escalino 1 General information Congratulations! With the acquisition of this stair climbing system you have a device that will quickly become a reliable and indispensable partner in transporting physically disabled people. With the escalino you are able to transport one person safely and effortlessly up- and downstairs; even winding stairs are no problem for the escalino. Driving on slopes is also possible. The safety brakes on both sides of the escalino ensure your safety. Naturally the escalino is also suitable to drive on level ground. The device is lightweight, flexible and does not take up much space. The escalino is capable of climbing stairs up to a step height of 21 cm. The minimum depth of step's surface must be 14 cm regardless of the type of stairs (regular straight stairs or winding stairs). The necessary step width concerning straight stairs is the width of the escalino an extra 10 cm for manoeuvring. The minimum platform size of u-shaped stairs depends on factors such as the attendant's height, etc. Your AAT representatives or your authorized dealer are happy to advise you. The sticker with the device's serial number is located on the left side of the housing. Read the number here. 1.1 How to use this user's manual The user’s manual is part of the delivery package and instruct you step by step about the safe and adequate use of the escalino. Operating the escalino takes a certain skill. Please read this user’s manual carefully and particularly take note of the safety instructions before you use the escalino for the first time. After reading, please store this user’s manual at an appropriate place for further reference. 1.2 Instruction In the interest of your safety the escalino may only be operated by trained personnel. Instruction on how to operate the device is part of the delivery package and takes place with your authorized dealer or an AAT representative. F 1.3 Please read this user’s manual carefully and particularly take note of the safety instructions before you use the escalino for the first time. Care and maintenance One of the most important aspect concerning the maintenance of the escalino is charging the sealed lead acid batteries. They are integrated into the device and must be charged every time after using the device. Other than that your escalino does not need much care and maintenance. More extensive instructions you find in chapter 8. 1.4 Warranty and Liability For damage that was caused by inadequate use disregarding this manual we assume no liability whatsoever. (Please read chapter 9 for more detailed information concerning warranty and liability). 5 escalino 2 Description of the product 2.1 Adequate use Please use the escalino exclusively for the transportation of physically disabled persons. Said persons should be able to sit properly without help, otherwise you should secure them with a safety belt. The latter is an accessory available at AAT Alber Antriebstechnik GmbH. In addition, the arms of the person to be transported should not protrude over the arm rests during the transportation process. F F F F F In the interest of your safety you may not use the stair climbing device escalino on escalators or moving belts! Transporting other kinds of loads is explicitly prohibited! Only authorized operators may use the escalino. Therefore, never leave the escalino unattended. Please do not use the escalino in rain, slippery and wet conditions, Driving on level ground snow or ice due to the following potential safety hazards, e.g. danger of slipping, restricted braking effect etc. Due to safety reasons the escalino may only be operated by trained personnel who are physically and intellectually capable to handle the device in all situations of operation. Mastering stairs Driving on slopes 6 escalino 2.2 Features of the escalino 1 = handle 2 = safety chip for the engine immobiliser 3 = up/down switch 4 = back rest (foldable) 5 = arm rest, swivelling 6 = C-part plus seat (removable) 7 = main wheel 8 = safety brake 9 = climber and climbing foot 10 = climbing unit 11 = membrane keypad 7 escalino 2.3 Technical data measurements height = 1357 mm height (folded) = 760 mm width without arm rests = 458 mm width with arm rests attached = 518 mm depth with the foot rest = 723 mm weight climbing frame = 28.2 kg, c-part plus seat = 4.0 kg, both arm rests = 1.5 kg, total weight = 33.7 kg maximum lifting capacity 120 kg batteries 2 x 12 V / 5 Ah (sealed) direct current motor 24 V / 200 W climbing speed approximately 12 steps / minute capacity with one battery charge 8 - 12 levels (approximately 120 - 180 steps), depending on the load maximum height of step 21 cm storing/operating temperature, device 0° C up to + 60° C / - 30° C up to + 50° C storing/operating temperature, batteries 0° C up to + 60° C / - 30° C up to + 50° C degree of protectio IP 54 (protected against dust and splash water allover) noise level the device's A weighted noise level lies typically below 70 dB (A) vibrations the weighted RMS value of acceleration the upper body is exposed to lies typically under 2.5m/s² 8 escalino 2.4 Dimensioned sketch 9 escalino 2.5 Standard scope of delivery 1 = charger including instructions 2 = arm rests 3 = climbing unit incl. back rest 4 = C-part plus the user's manual 2.6 Optional accessories 1 = adjustable foot rest 2 = voltage converter 3 = hip belt 4 = seat belt system incl. hip belt 10 escalino 3 Assembly With a few movements you can assemble the escalino by means of several fixtures and tightening knobs. Disassembly is just as easy. 3.1 Unfold the back part The back part can be unfolded and put in a vertical position by means of toothed wheels. You need to lock it in that position with tightening screws . F 3.2 Always make sure that the back part is securely fastened. Attach the C-part plus seat to the climbing unit Put the C-part plus seat onto the climbing frame; the locating bolts of the C-part fit into the corresponding holes in the frame. Fix the C-part tightly to the climbing frame with the two tightening knobs . F Always make sure that the C-part plus seat is securely fastened to the climbing frame. 11 escalino 3.3 Arm rests Insert the arm rests on both sides. F F 3.4 F F F F F Please make sure that the arm rests are completely inserted into their respective holding devices. Depending on the person's size the arm rests may be switched from right to left and vice versa allowing for a wider or narrower seat. Functional check Please check the safety brakes each time before using the device (see chapter 6.4 and 8.5)! Please also check the safety brakes' braking effect as described in chapter 6.4.1 and 6.4.1! Please check the device's electronic functions each time before using it (see chapter 6.9 and 6.10)! Regularly check whether the climbing feet's linings are still sufficient (see chapter 8.6) Make sure that the seal lead acid batteries are charged before you use the device! 12 escalino 4 F Safety instructions For a safe operation of the escalino it is important that you observe and adhere to all warning signs and instructions in this user’s manual as well as the warning signs and instructions on the device itself. 4.1 Special information concerning the operation: Due to safety reasons the stair climber escalino may not be used on escalators and moving walkways! 4.1.1 Environmental conditions, electro-magnetic compatibility: Electro-magnetic compatibility means that an electric device functions properly in its electro-magnetic environment without influencing other devices in the same environment. F F F Nevertheless, always check whether the device’s electronic functions work properly before each use. This is particularly important if there is an aerial mast nearby. Please note that the escalino may interfere with other electronic devices’ sensitive electro-magnetic fields (e.g. anti-theft systems in department stores). This may also happen if you connect other devices. Also make sure that the escalino is not operated in close proximity to medical devices with a high potential for danger and/or life-supporting functions as well as diagnostic devices. 4.1.2 Climate: To ensure proper functioning it is not advisable to expose the escalino to freezing conditions. Should this be unavoidable, always put the device in a non-freezing environment for at least one hour before using it. 4.2 Instruction: The escalino may only be operated by trained personnel. In addition, the operator should be capable of lifting 1/3 of his or her own weight. Minors are not allowed to use the escalino; exempt from the above are adolescents over 16 years of age who have been trained under supervision to operate the escalino. While using the escalino you should always wear good shoes that do not slip. 4.3 Safety brakes: Please check the safety brakes each time before using the escalino (see chapter 6.4 and 8.5). The safety brakes, particularly the knurled surface of the brake drums in the wheel rims, must be cleaned weekly or after contamination with spirit to ensure the optimum braking effect. F F F Never smoke during the cleaning of the device as well as keep it away from ignition source. Please consider the danger warning of the manufacturer previous cleaning the device with spirit. Never use suds or greasy cleaners. After cleaning the safety brakes must be checked as described in chapter 6.4. 13 escalino 4.4 Lining of the climbing foot: Please check regularly whether the linings of each climbing foot is still sufficient (see chapter 8.6). 4.5 Lifting capacity: The stated maximum lifting capacity of 120 kg may not be exceeded (see chapter 5.1). You may under no circumstances use the escalino to transport goods. 4.6 Care and maintenance: Please make sure that you charge the device after each use of the escalino. If the escalino is not in operation, please turn off the device. If the working elements of the device block, turn the escalino off immediately. F Repairs may be done by authorized dealers or the manufacturer only. Please exclusively use AAT Alber parts and accessories. Please note the extensive care and maintenance instructions in chapter 8. 4.7 Condition of paths, walkways etc.: Please make sure that the paths and walkways you use with the escalino are free of obstacles and not slippery. Avoid operation on damaged stair linings, snow, ice, etc. F The escalino may not be used in wet and rainy conditions. 4.8.1 Environmental conditions: Although the escalino has been tested for its electro-magnetic compatibility, you should still check its electronic functions before each use. This is particularly important if there is an aerial mast nearby. 4.8 Charge of the batteries: You should only use the escalino with fully charged batteries. You can check the batteries' capacity on the display of the membrane keypad. Should the batteries fall into the back-up range (red LED starts blinking) you will hear a signal recurring every 12 seconds. It takes about 8 to 10 times of charging and discharging the batteries before they reach their full capacity again. 4.9 Climbing mechanism: The climbing unit and the climbers are for the most part covered. Nevertheless, please pay attention that neither hands nor feet get into the rotating area during the climbing process. Always keep a safe distance. 4.10 Transport: Please transport the escalino as described in chapter 6.12. F F Always turn off the escalino for transportation! When you transport the device in vehicles, please secure it according to the relevant legal regulations in your country. 14 escalino 5 Operation 5.1 Maximum lifting capacity Please make sure that the maximum lifting capacity of 120 kg is not exceeded. 5.2 Membrane keypad With the membrane keypad you can turn the device on and off. Check the batteries' capacity and turn the single step mode on or off. 5.3 Safety brakes Before operating the escalino check the safety brakes every single time. Extensive instructions you find in chapter 6.4 and 8.5. 5.4 Lining of the climbing foot Please check regularly whether the lining on each climbing foot is still sufficient. Further instructions you find in chapter 8.6. 15 escalino 6 Instruction for operation Before we get to the actual instructions for operation, we would like to introduce the escalino's most important components to you. 6.1 6.1.1 Membrane keypad ON/OFF key The ON/OFF key on the membrane keypad is the power key to turn the escalino on or off. F 6.1.2 The escalino is equipped with a turn-off feature: if the device is on and has not been used for 5 minutes, the turn off feature switches the escalino off automatically. In such case you can only use the escalino again by pressing the ON/OFF key. Capacity of the batteries On the membrane keypad you can check the batteries' capacity . If the display highlights the green area, your batteries are fully charged. If the yellow area is highlighted your batteries are running low. At this point you should charge your batteries. If the display highlights the red area (LED is blinking), you hear a signal that recurs every 12 seconds. F 6.2 Once you hear the first signal, the batteries' capacity is sufficient for a maximum of 20 - 35, steps depending on the weight of the transported person. UP/DOWN switch This switch on the right handle activates the climbing mechanism up- or downstairs. F 6.2.1 Turn on the device as described in chapter 6.1.1 before you activate the UP/DOWN switch. Safety chip for the engine immobiliser The UP/DOWN switch only works if you put the safety chip for the engine immobiliser into its slot. Please make sure that the chip is properly set to ensure safe and continuous operation. If you do not put in the chip you can turn on the escalino, but you cannot drive with it. This feature makes sure that no unauthorized person uses the device. 16 escalino 6.2.2 Control light to indicate malfunction Potential malfunction is indicated by a light diode. In case of malfunction, turn the device first off and then on again. If there is still an indication of malfunction, charge the batteries in case of low battery charge. For all other cases of malfunction, please contact your authorized dealer. F Please press the UP/DOWN switch only after you turn the device on. Should you have neglected that the LED blinks 4 times. In such case, please turn the device off and then on again. LED is blinking 6.2.3 Identified malfunction 1x socket is defective 2x error, lifter plate (Fet) 3x error, lifter (relay) 4x UP/DOWN switch is defective 5x malfunction in the motor Single step mode Should you choose to turn off the single step mode manually you can do so by pressing the key on the membrane keypad. The yellow LED above the pictogram with the continuous arrow lights up as soon as you turn off the single step mode. F Every time you turn on the escalino, the single step mode is automatically activated. If you activate the ON/OFF key in that mode, the device will climb only one step at a time. The climbing system stops in the correct position. The climbing mechanism cannot unintentionally be activated. You can take your time to move the main wheels to the next step's edge. To continue climbing you simply release the UP/DOWN switch and then press it again. 6.3 Climbers The climbers (see picture) must be pulled in to topmost position by means of the UP/DOWN switch if you want to: • drive on level ground and on slopes • check the safety brakes • begin climbing upstairs or downstairs However, you need to fold out the climbers by activating the UP/DOWN switch, direction up, whenever a person takes a seat in the escalino, so the device is supported by the climbers (please also see chapter 6.5.1). 17 escalino 6.4 Safety brakes There are safety brakes located on the climbing frame on both sides (see picture to the right). F Please check the safety brakes each time before you use the escalino. You may check the brake effect either on top of the stairs or on level ground as described in chapter 6.4.1 and 6.4.2. 6.4.1 Test the required brake effect Pull in the climbers to their upmost position and tilt the escalino backwards until the back rest is in an almost horizontal position. (See picture to the right). If the escalino cannot be pushed forward by the handles in said position, but merely rolls backwards, then the required brake effect for the safe operation of the escalino is granted (see picture). F F Important: If the required brake effect is not guaranteed, you may, under no circumstances, use the escalino any more. Please contact your authorized AAT Alber dealer or the manufacturer immediately. Should the brake not kick in, you may under no circumstances use the device. Please contact your authorized dealer or an AAT representative immediately. 6.4.2 Test the required brake effect at the top edge of the stairs F Please make this test without a person sitting in the chair! Pull in the climbers to their upmost position and tilt the device backwards until the back rest is in an almost horizontal position. Drive forward to the first step's edge (without person). If you cannot push the device over the edge of the step, the required braking effect for a safe operation of the escalino is granted. F F Important: If the required brake effect is not guaranteed, you may, under no circumstances, use the escalino any more. Please contact your authorized AAT Alber dealer or the manufacturer immediately. Should the brake not kick in, you may under no circumstances use the device. Please contact your authorized dealer or an AAT representative immediately. 18 escalino 6.5 Transportation of a person with the escalino Please note that the escalino was developed to be operated by one person. Always use both hands when using the device. F F Only one person may be transported with the escalino! Please practise driving with the escalino on level ground, slopes and climbing up- and downstairs at first without a person sitting in the chair. Also make sure that while you practise using the escalino nobody is within close range of the potentially dangerous area underneath the device. We suggest that you practice climbing up- and downstairs with the single step mode activated (see chapter 6.2.3). F F Please do not exceed the maximum lifting capacity (see chapter 5). In the interest of you safety please always operate the escalino from behind, never sideways. When a person takes a seat on the escalino, please follow these instructions: 6.5.1 Secure stand of the escalino To avoid the escalino moving when a person takes a seat, you must fold out the climbers in such a way that they rest on the ground. Turn on the device and press the UP/DOWN switch direction UP until the climbers touch the floor. 6.5.2 Swivel out or remove the arm rests Sitting down can be facilitated by folding out the arm rests. If necessary you can remove the arm rests altogether. After the person to be transported has taken a seat you put the arm rests back into their original position. 19 escalino 6.6 Operation on level ground After the person has been properly seated, you may transport him or her effortlessly on level ground (see picture). Make sure that the climbers are pulled in entirely. F 6.7 You overcome a threshold by pulling the escalino backwards over it. Tilting the stair climbing system To drive on slopes or to climb stairs you must tilt the escalino, which can be done easily by means of the climbers. 1. Turn on the escalino by pressing the ON/OFF key. 2. Press the UP/DOWN switch, direction DOWN until the climbers lift the main wheels at least 1-2 cm off the floor (see picture). 3. Put your foot on the housing and tilt the escalino slightly toward you until you feel that the escalino is balanced. 4. The escalino is balanced if you feel neither pull nor push in the handles. 5. In order to drive on level ground, the climbers must be pulled in entirely. If you tilt the escalino further, or too much, the safety brakes engage and the escalino can't be moved forward any more. 20 escalino 6.8 Operation on slopes Tilt the escalino slightly backwards and pull in the climbers entirely. F 6.8.1 For safety reasons we recommend you to ask another person to assist when driving on a slope. Downhill Drive forward to the edge of the slope. In order to slow down you need to tilt the escalino a bit more, so that the safety brakes are activated. 6.8.2 Uphill Please drive backwards up a slope. In order to slow down you need to tilt the escalino a bit more, so that the safety brakes are activated. 21 escalino 6.9 F F F Climbing upstairs You may only be permitted to transport a person with the escalino, if you have been properly trained in the device’s operation. Please always practice climbing stairs without a person and by activating the single step mode. Please always check the safety brakes before each use (see chapter 6.4) The climbing process can be accomplished quickly and without problems if you adhere closely to the following instructions. A tip before you start: F Always pull the escalino a bit backwards during the entire climbing process, i.e. always keep the device under tension so that the wheels can touch down properly on the next step. 1. Turn the escalino on by pressing the ON/OFF key (see chapter 6.1.1). 2. Deactivate the single step mode if necessary (see chapter 6.2.3) 3. Pull in the climbers to their topmost position by pressing the UP/DOWN switch (see chapter 6.2). 4. Tilt the escalino slightly toward you (see chapter 6.7). 5. Drive backwards to the stairs and move up 2 - 3 steps . Now the escalino is in its initial position for climbing upstairs. F Make sure that both main wheels touch the lowest step . 22 escalino The climbing process takes place in two intervals. 6. F Pressing the UP/DOWN switch, direction "UP" to begin the climbing process by moving the climbers downward . Always keep the device under tension during the entire climbing process, i.e. always pull it slightly backward toward you. After the climbers reach the floor , they assume the load of the main wheels, while the main wheels and the frame are lifted at the same time. 23 escalino The first interval is finished when the main wheels touch down on the next higher step and resume the load of the climbers. The second interval begins by pulling in the climbers . It is finished when the climbers reach their topmost position. Because the escalino is always pulled slightly backward, it rolls automatically to the next step and reaches the initial position again - both main wheels touch the next step. Since the single step mode is activated each time before you turn on the escalino, the climbing process ends here. To resume climbing you need to press the UP/DOWN switch once again, direction "UP". At this point the climbing process repeats itself as described in point 6. 24 escalino 6.10 F F F Climbing downstairs You may only be permitted to transport a person with the escalino, if you have been properly trained in the device’s operation. Please always practice climbing stairs without a person and by activating the single step mode. Please always check the safety brakes before each use (see chapter 6.4 and 8.6) The climbing process can be accomplished quickly and without problems if you adhere closely to the following instructions. 1. Turn the escalino on by pressing the ON/OFF key (see chapter 6.1.1). 2. Deactivate the single step mode if necessary (see chapter 6.2.3) 3. Pull in the climbers to their topmost position by pressing the the UP/DOWN switch (see chapter 6.2). 4. Tilt the escalino slightly towards you (see chapter 6.7). 5. Drive the escalino forward to the edge of the stairs . The sensitive rolls of the safety brakes keep the escalino from rolling over the edge. 25 escalino 6. Press the UP/DOWN switch, direction "DOWN" and the descending process begins. The drive retracts the climbers downward and touch down on the next lower step. When the climbers reach the next lower step they assume the load of the main wheels, while those plus the climbing frame are lifted off the higher step and then moves downward, away from the operator. 26 escalino Now the main wheels and the climbing frame are moved forward - away from the operator. Afterwards the main wheels and the frame are lowered by retracting the climbers . This results in a small shift in load distribution, which you will feel at the handle by a slight pull forward. The main wheels rest now on the next step (see picture) and resume the load from the climbers, which are retracted further. Since the single step mode is activated every time you turn on the device, the climbers are pulled in entirely and then the descending process ends at this point. 7. Again push the escalino all the way to the edge of the step, i.e. until the sensitive rolls of the security brakes stop the escalino. To continue descending you need to press the UP/DOWN switch again, direction DOWN. At this point the climbing process repeats itself as described in point 6. 6.11 Laying the escalino on the stairs In an emergency the escalino may tilt backwards and lay down on the stairs. The safety brakes prevent the escalino from rolling down (see picture). 27 escalino 6.12 Transport To transport the escalino, please remove the C-part, and the arm rests as described in chapter 3.2. Then you activate the UP/DOWN switch, direction "DOWN", until the climbers touch the floor. At this point you can fold the escalino as described in chapter 3.1. F Please make sure that the tightening knobs are always tightened properly. The easiest way to carry the escalino is to stand behind the folded stair climber and lift it by the bars on both sides. F F F F 6.13 Note that the device weighs 28.2 kg! Always turn off the escalino for transportation! When transporting the escalino in a vehicle, always secure the device according to the legal rules and regulations. The sealed lead acid batteries used in the escalino are not considered dangerous according to the IATA special guidelines A67 and GGVS Rn-Nr. 2801 A, section 2, and admitted to air travel by DOT and IATA. Trouble shooting If there are problems using the escalino, please check the following trouble shooting chart and see whether you can fix them yourself. problem check and potential solution Is the charger connected to the escalino? If so, disconnect the charging cable. escalino cannot be turned on Is the battery pack empty? If so, charge the batteries. If there is still a problem turning on the escalino, please contact your dealer. escalino do not drive Is the safety chip for the engine immobiliser inserted? If so, please contact your dealer Batteries don't charge Please contact your dealer Potential malfunction is indicated by a light diode. 28 escalino 7 Accessories 7.1 Voltage converter for your vehicle We recommend the voltage converter for your vehicle, if you transport the stairclimber escalino in your vehicle. The AAT voltage converter is designed for a 12 V electrical system. This voltage converter transforms 12 V / 24 V direct current (D.C.) into 230 V alternating current (A.C.) The plug of the voltage converter is plugged into the cigarette lighter in your car or into the socket of the supply system. The automatic charger’s 230 V connector is plugged into the socket of the converter. 29 4 3 escalino 8 Care, maintenance and recycling To insure the escalino safe and proper functioning we recommend a safety check done on the device every two years, even though there might not be any outer damage or malfunction evident. F In the interest of your safety repairs of any kind may only be done by personnel authorized by AAT Alber Antriebstechnik GmbH. The device itself does not need any particular maintenance and except for an occasional cleaning. 8.1 New user If the device goes to a new user, we recommend a safety check. 8.2 Charger Please use exclusively AAT Alber Antriebstechnik GmbH charger to charge your batteries. 8.2.1 Automatic charger The charger does not need any particular maintenance. The scope of delivery includes the AAT Alber Antriebstechnik GmbH charger. Plug is inserted into the wall outlet and plug into the socket on the device or the battery pack. This automatic charger recharges your batteries 100%. As soon as the charging process is completed, it switches to a retaining mode, thus overcharging is impossible. F F F F F F F Before using the charger, please read and follow all instructions and warning notes included with the charger. Exclusively use the AAT charger to charge the batteries. Check the charger regularly and protect it from oils, grease, aggressive cleaning agents, thinners and/or damage by sharp edges, etc. Repairs and service check-ups may only be performed by AAT Alber Antriebstechnik GmbH or their authorized personnel. Please do not disassemble or modify the charger! Please make sure that the charger is not exposed to dampness or humidity while charging the batteries. Never touch the plug with moist hands! 30 escalino 8.2.2 Voltage converter for your vehicle The voltage converter does not need particular care or maintenance. Nevertheless, check your voltage converter regularly and protect it from oil, grease, aggressive cleaners, diluting agents and/or damage due to sharp edges, etc. F F F F Before using the voltage converter, please read and follow all instructions and warning notes included with the voltage converter. Exclusively use the AAT Alber Antriebstechnik GmbH voltage converter! Check the voltage converter regularly and protect it from oil, grease, aggressive cleaning agents, thinners and/or damage by sharp edges, etc. Repairs and service check-ups may only be performed by AAT Alber Antriebstechnik GmbH or their authorized personnel. 31 escalino 8.3 Sealed lead batteries The sealed lead 12 V / 5 Ah batteries are located within the device's housing should be recharged after each use. The batteries are subjects to a so-called self-discharge. Therefore, you should connect them to the charger whenever possible. Due to the fact that they automatically goes into charge retention as soon as they are fully charged, an overcharge is impossible. If your batteries does not possess their full capacity yet, the reason may be that new batteries reaches their full capacity only after several charging/discharging cycles. If fully charged batteries discharge more quickly as before, they are probably used up. In such case, please have your authorized dealer check and replace them, if necessary. These batteries are sealed, maintenance free, rechargeable and of top quality. They are considered as safe as dry cells and admitted for air travel according to DOT and IATA. F If the escalino is at a standstill for some time, please connect it to the charger to retain the charge. This does not damage the sealed lead acid batteries, on the contrary, it increases their durability. Please avoid a total discharge: The durability of sealed lead acid batteries depends primarily on the charge/discharge cycle. For instance, you may discharge them partially more than 750 times and use up the entire capacity more than 200 times, if you avoid a total discharge entirely. A total discharge does not only lead to a loss of the batteries’ capacity, but also shortens their durability. Thus, do avoid a total discharge, by recharging the batteries whenever possible! F F Charging your batteries is taking good care of them. Always charge your batteries with the AAT Alber Antriebstechnikg GmbH charger delivered with your escalino. This particular charger automatically turns off when the batteries are fully charged keeping them from being overcharged. If fully charged batteries run empty faster as usual, then they are probably used up. In such case please have them checked and, if nessesary, replaced by AAT Alber Antriebstechnik or its representative. Damaged batteries you can turn in at designated places for proper recycling. You may also return them to you authorized AAT representative. 32 escalino 8.3.1 F F F F 8.3.2 Charging the sealed lead batteries Before charging, please read and follow all instructions and warning notes included with the charger. Please always turn off the escalino before you charge the batteries! Exclusively use the AAT Alber Antriebstechnik GmbH charger! Never touch the plug with moist hands! Charging with the automatic charger 1. Plug in the connector of the automatic charger to the socket on the escalino. 2. Plug in the connector to the the wall outlet and the batteries are being charged. Signals of the charger charger LED orange batteries are being charged charger LED green batteries are fully charged, maintenance mode 8.3.3 Charging in a vehicle 1. Put the charger’s plug into the socket on the escalino (see chapter 8.3.2). 2. Then put the plug of the automatic charger into the 230 V socket of the voltage converter. 3. Put the 12 V connector into the cigarette lighter. 4. Turn on the voltage converter by pushing the switch and the batteries are being charged. 4 A control light (LED) on the charger and a beeper in the voltage converter allow the charging process to be monitored. Signals of the charger and the voltage converter charger LED orange batteries are being charged charger LED green batteries are charged, retaining of the charge voltage converter beeping 12 V supply is low 8.4 Fuses Within the housing there is a 30 A fuse. If this fuse must be exchanged please contact your authorized dealer. F Should your fuses burn out frequently, please contact AAT Alber Antriebstechnik GmbH or you authorized dealer. 33 3 escalino 8.5 Check brake lining Please check the thickness of the safety brakes’ lining regularly. The minimum thickness is 1 mm. In case the lining is thinner than 1 mm, the lining must be exchanged on both sides. Please contact AAT Alber Antriebstechnik GmbH or your authorized dealer. F Please check the safety brakes before each use of the escalino (see also chapter 4.3 and 6.4). The safety brakes, particularly the knurled surface of the brake drums in the wheel rims, must be cleaned weekly or after contamination with spirit to ensure the optimum braking effect. F F Never smoke during the cleaning of the device as well as keep it away from ignition source. Please consider the danger warning of the manufacturer previous cleaning the device with spirit. F Never use suds or greasy cleaners. After cleaning the safety brakes must be checked as described in chapter 6.4. 8.6 Check the lining of the climbing foot Please also check each climbing foot's lining on a regular basis. F If the lining is worn down to the indicated line or broken, again, exchange both climbing feet. 34 escalino 8.7 Cleaning To clean the seat, the back rest and the arm rests, please use light suds. All parts of the escalino - except the safety brakes (see chapter 8.5) and the knurled brake drums - can be cleaned with a moist cloth; please use regular, mild household cleaners. F F 8.8 For safety reasons, please do not use a high-pressure cleaning device! Please use regular mild household cleaners and make sure that no water can get into the escalino! Recycling Your escalino and its battery pack are long-lasting products. However, once they are old, you can return the components to AAT Alber Antriebstechnik GmbH or your authorized dealer for recycling. The law concerning electronic devices (ElektroG) and their recycling has been issued on March 24, 2005. According to the National Ministry of the Environment (BMU) concerning said law, the escalino is considered a means of transportation thus the ElektroG does not apply (see the guidelines of the European Parliament 2002/96/EG)). 35 escalino 9 Warranty and liability 9.1 Warranty AAT Alber Antriebstechnik GmbH grants a warranty of two years for all its products of type escalino including all its accessory parts (with the exception of the sealed lead acid batteries). The warranty begins at the date of purchase and covers failure of material and errors in manufacturing. For the sealed lead acid batteries, always assuming correct maintenance, AAT Alber Antriebstechnik GmbH grants a warranty of one year from the date of purchase. The warranty becomes void concerning defects or damage which are the result of the following: • damage due to excessive strain • damage due to improper handling • voilent damage • natural wear and tear such as brake linings, gliding strip, climbers • improper and insufficient maintenance • unauthorized constructional changes or inappropriate use of the device or its accessories • using the escalino exceeding its maximum lifting capacity • improper charging of the sealed lead acid batteries 9.2 Liability The manufacturer AAT Alber Antriebstechnik GmbH, is neither liable nor responsible for potential damage of the escalino in case of: • improper handling of the device. • repair, assembly or other work performed on the escalino by unauthorized persons. • operation not in accordance with this user’s manual. • extraneous parts added or connected to the escalino. • parts removed from the escalino. • operation exceeding the maximum lifting capacity. • operation of the escalino with insufficiently charged batteries. 36 escalino m 37 escalino 38 escalino 39 escalino AAT Alber Antriebstechnik GmbH Postfach 10 05 60 · D-72426 Albstadt Tel.: +49.74 31.12 95-0 · Fax.: +49.74 31.12 95-35 Email: [email protected] · www.aat-online.de