1
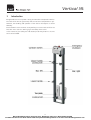
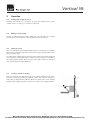
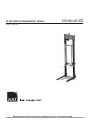
A versatile transportation device Vertical lift User´s manual Manual Handling Solutions 58, Paige Close, Watlington, Kings Lynn, Norfolk PE33 0TQ UK Tel 0044 1553 811977 Fax 0044 1553 811004 [email protected] www.manualhandlingsolutions.com Vertical lift CE-Declaration of conformity The creative B OHG herewith declares that the products, type vertical lift "James" coincide with the current regulations of the European Community in the field of machinery 89/392/EWG, appendix . CE 95. CE Signature of the manufacturer: Marco Bertiller Manager creative B OHG creative B OHG Weitfeldstrasse 40 88960 Uhldingen-Mühlhofen www.creative-b.de · [email protected] Noise and vibration level: The A-valued sound level is typically under 70 dB (A). Note of the manufacturer: AAT Alber Antriebstechnik GmbH Postfach 10 05 60 · D-72426 Albstadt Tel. +49.74 31.12 95-0 · Fax +49.74 31.12 95-35 www.aat-online.de · [email protected] 2 bda_vertikallift_d_06_11 Due to continuous development creative OHG reserves the right for technical and optical changes. Manual Handling Solutions 58, Paige Close, Watlington, Kings Lynn, Norfolk PE33 0TQ UK Tel 0044 1553 811977 Fax 0044 1553 811004 [email protected] www.manualhandlingsolutions.com Vertical lift Table of contents CE Declaration of conformity Noise and vibration level . . Note . . . . . . . . . . . Table of contents . . . . . . . . . . . . . 2 2 2 3 1 Introduction . . . . . . . . . . . . . . . . . . . . . . . . 4 2 Application . . . . . . . . . . . . . . . . . . . . . . . . . 5 3 Indication of potential dangers. . . . . . . . . . . . . . . . 3.1 Exemption of liability. . . . . . . . . . . . . . . . 6 7 4 Assembly/first operation . . . . . . . . . . . . . . . 4.1 Adjusting the device . . . . . . . . . . . . 4.2 Securing the vertical lift on the carrier device 4.3 Disconnecting the device . . . . . . . . . . . . . . . . . . . . . . . . . . 8 8 9 10 5 Operation . . . . . . . . . . . . . . 5.1 Parking with or without load . 5.2 Driving on level ground . . . . 5.3 Taking up a load . . . . . . . 5.4 Loading a vehicle or a shelf . . 5.5 Unloading a vehicle or a shelf. 5.6 Collapsible toe-plate . . . . . . . . . . . . . . . . . . . . . . . . . . . . . . . . . 11 11 11 11 11 12 12 6 Warranty . . . . . . . . . . . . . . . . . . . . . . . . . . 13 7 Care and maintenance . . . . . . . 7.1 General information . . . . 7.2 Changing the electrical fuses 7.3 Changing the batteries . . . 7.4 Tightening the chain . . . . . . . . . 14 14 14 14 14 8 Lead battteries . . . . . . . . . . . . . . . . . . . . . . . 8.1 General information . . . . . . . . . . . . . . . . 8.2 Charging the batteries . . . . . . . . . . . . . . . 15 15 15 . . . . . . . . . . . . . . . . . . . . . . . . . . . . . . . . . . . . . . . . . . . . . . . . . . . . . . . . . . . . . . . . . . . . . . . . . . . . . . . . . . . . . . . . . . . . . . . . . . . . . . . . . . . . . . . . . . . . . 3 . . . . . . . . . . . . . . . . . . . . . . . . . . . Manual Handling Solutions 58, Paige Close, Watlington, Kings Lynn, Norfolk PE33 0TQ UK Tel 0044 1553 811977 Fax 0044 1553 811004 [email protected] www.manualhandlingsolutions.com Vertical lift 1 Introduction Congratulations! You acquired a strong and versatile transportation device. The vertical lift will be a great help and soon become indispensible to you. However, the handling and operation of the vertical lift requires a certain dexterity. Please read this user’s manual closely before you use the vertical lift for the first time. Also note the warning signs and safety instructions. In the interest of your safety the indicated top load may under no circumstances be exceeded. 4 Manual Handling Solutions 58, Paige Close, Watlington, Kings Lynn, Norfolk PE33 0TQ UK Tel 0044 1553 811977 Fax 0044 1553 811004 [email protected] www.manualhandlingsolutions.com Vertical lift 2 Application The vertical lift is used to lift or lower movable loads inside as well as outdoors. Its primary use lies in loading and unloading vehicles and shelves. 5 Manual Handling Solutions 58, Paige Close, Watlington, Kings Lynn, Norfolk PE33 0TQ UK Tel 0044 1553 811977 Fax 0044 1553 811004 [email protected] www.manualhandlingsolutions.com Vertical lift 3 Potential dangers To ensure your safety it is indispensible that you note all warning signs and follow all safety instructions listed in this user’s manual. This also applies to all warning and instruction signs located on the vertical lift. § Before maintenance work push emercency shutdown, take charger off and remove fuses. § The vertical lift may only be operated by one trained person at a time. § While in use never put your hand underneath the toe plate. § Never stand or sit underneath the load. § Never touch the chain during operation. § Never exceed the permitted top load. § All loads must be secured with the safety strap. § Do not use the device in wet conditions such as rain, snow or in car washes, etc., also pay attention that the load does not leak water (e.g. dish washer or washing machine) which may cause the vertical lift to malfunction or stop working. § Wear safety boots. § If the driving elements block turn off the vertical lift immediately. It is prohibited to transport persons. § You may only operate the vertical lift in conjunction with the pertaining safety devices. § Turn off the vertical lift during breaks or when parking the device by using the emergency shutdown. § Repairs may only be done by the manufacturer or authorized dealers. § Only use original AAT parts. § Persons under age may not operate the vertical lift (with the exception of adolescents above 16 who have been instructed under supervision). § Make sure that the lead batteries are charged after each use of the device. 6 Manual Handling Solutions 58, Paige Close, Watlington, Kings Lynn, Norfolk PE33 0TQ UK Tel 0044 1553 811977 Fax 0044 1553 811004 [email protected] www.manualhandlingsolutions.com Vertical lift 3.1 Excemption of liability AAT Alber Antirebstechnik refuses any damage compensation or warranty of any kind if: § the product has been used for any other purpose than intended in the user’s manual. § the product has been modified in any way except for those specified in the user’s manual. § the product has been repaired by unauthorized personnel or none-original AAT spare parts have been used. § the operator continued using the product although obvious safety shortcomings were apparent. § the product was dropped or exposed to strong jolts. § The damage is the result of an exceeded top load or unprofessional handling such as: § twisted axes § warped frame § warped or twisted handles 7 Manual Handling Solutions 58, Paige Close, Watlington, Kings Lynn, Norfolk PE33 0TQ UK Tel 0044 1553 811977 Fax 0044 1553 811004 [email protected] www.manualhandlingsolutions.com Vertical lift 4 Assembly/first operation F Please make sure that you use the emergency shutoff switch when you hook up or remove the vertical lift from the carrier device. 4.1 Adjusting the device Due to allowances concerning the vertical lift as well as the stair climber or the sack trolley it might be necessary to adjust the vertical lift to your carrier device. This is the case when the toe plate of the vertical lift does not rest on the toe plate of the carrier device. In such case you need to move the vertical lift’s handles. In order to do this you need to remove the vertical lift from the carrier device and lean it safely on a wall. Use a hexagon socket screw key and loosen the handles’ screws so that you can easily move them. Hook the vertical lift into the carrier device and set the handles on the carrier’s horizontal bars. The two upper handles must lock . Mark the handles’ position on the columns with a pencil. Remove the vertical lift again and fix the handles with a screw in the marked position. Now check wether the vertical lift’s toe plate sits on the carrier device’s toe plate when the vertical lift is hooked in place on the carrier device. 8 Manual Handling Solutions 58, Paige Close, Watlington, Kings Lynn, Norfolk PE33 0TQ UK Tel 0044 1553 811977 Fax 0044 1553 811004 [email protected] www.manualhandlingsolutions.com Vertical lift 4.2 Securing the vertical lift on the carrier device In order to secure the vertical lift on the carrier device, please fold out the trolley’s or stair climber’s toe plate (if possible). However leave the vertical lift’s toe plate folded up. Loosen the upper handles’ locking bolts by pulling and turning them in a 90° angle. Now the handles are unlocked and hang down at an angle of 20°. Stand in front of the vertical lift and hold on to the right and left frame (the handles are on the other side). Lift it up until the handles are positioned right over the horizontal bars of the trolley or stair climber. Put your foot on the trolley’s or stair climber’s toe plate so that it cannot roll away. Now position the vertical lift’s frame side by side to the trolley’s or stair climber’s frame and slide it downward until the handles lock. Make sure that all four handles are securely locked in the carrier device’s horizontal bars . 9 Manual Handling Solutions 58, Paige Close, Watlington, Kings Lynn, Norfolk PE33 0TQ UK Tel 0044 1553 811977 Fax 0044 1553 811004 [email protected] www.manualhandlingsolutions.com Vertical lift 4.3 Removing the vertical lift To unhook the device you need to fold in the vertical lift’s toe plate. Loosen the locking bolts at the two upper handles by pulling and turning them. Now the handles are unlocked. Put your foot on the trolley’s or stair climber’s toe plate so it cannot roll away. Stand in front of the vertical lift and hold on to its right and left bar (the handles are on the other side). Lift the device until the handles come off the trolley’s or stair climber’s horizontal bars. Pull the vertical lift toward you and put it down. 10 Manual Handling Solutions 58, Paige Close, Watlington, Kings Lynn, Norfolk PE33 0TQ UK Tel 0044 1553 811977 Fax 0044 1553 811004 [email protected] www.manualhandlingsolutions.com Vertical lift 5 Operation 5.1 Parking with or without a load Handling the vertical lift is analogous to using any regular trolley or stair climber. There is nothing to consider in particular. 5.2 Driving on level ground To drive on level ground you need to make sure that the load is in its lowest possible position to keep the center of gravity as low as possible. 5.3 Taking up a load Push the load at the top somewhat away from you so that there is a gap between the floor and the load. Drive the toe plate under the load and secure it with the safety strap. You take up the load by putting your foot on the lowest cross bar of the trolley or on the motor housing of the stair climber (in the back and in the middle of the climbing mechanism). Then you pull at the grips and tilt the trolley or stair climber with the load toward you. 5.4 Loading a vehicle or shelves Drive as closely to the edge of the vehicle’s loading platform or the shelf. Loosen the safety strap. Push the up/down switch “up“ until the toe plate’s lower edge is approximately 10 mm above the shelf’s floor or the loading platform. Now simply push the load onto the shelf or the loading platform. 11 Manual Handling Solutions 58, Paige Close, Watlington, Kings Lynn, Norfolk PE33 0TQ UK Tel 0044 1553 811977 Fax 0044 1553 811004 [email protected] www.manualhandlingsolutions.com Vertical lift 5.5 Unloading a vehicle or a shelf Drive as close as possible to the vehicle’s loading platform or shelf. Push the up/down switch “up“ until the toe plate’s upper edge is approximately 10 mm underneath the loading platform or shelf. Now pull the load off the loading platform or shelf onto the vertical lift’s toe plate. Secure it with the safety strap. 5.6 Collapsible toe plate In its working position the toe plate is locked by bolts. Loosen the locking bolts at the toe plate’s two upper receiving blocks by pulling and turning them. Now the toe plate is unlocked. That way you can fold down the toe plate and fix it at a 90° angle. Turn the locking bolts and they relock. 12 Manual Handling Solutions 58, Paige Close, Watlington, Kings Lynn, Norfolk PE33 0TQ UK Tel 0044 1553 811977 Fax 0044 1553 811004 [email protected] www.manualhandlingsolutions.com Vertical lift 6 Warranty If the vertical lift has been operated appropriately AAT Alber Antriebstechnik GmbH grants a warranty on all parts of the device for one year from the date of purchase. However, to make use of the warranty you need to keep the original invoice of your vertical lift from your dealer. Exempt from the warranty are parts exposed to natural wear and tear (e.g.sliding rails). The warranty extinguishes if the device was not operated appropriately, the user’s manual, cleaning and maintenance instructions were not followed, the device was repaired by unauthorized peronnel, non-original spare parts were used, or the device was operated under unusual or inadmissable conditions according to the user’s manual. Any work done under warranty does not extend the warranty. For the lead batteries AAT Alber Antriebstechnik GmbH assumes a warranty of 6 months from the day of purchase provided that they have been maintained appropriately. 13 Manual Handling Solutions 58, Paige Close, Watlington, Kings Lynn, Norfolk PE33 0TQ UK Tel 0044 1553 811977 Fax 0044 1553 811004 [email protected] www.manualhandlingsolutions.com Vertical lift 7 Care and maintenance 7.1 General information Your vertical lift is low in maintenance and needs very little particular care. The lead gel batteries are maintenance-free, and there are no oiling points. You merely need to tighten the driving chain once in a while as described in 7.4. F Attention! Repairs or any other work may only be performed by authorized personnel. 7.2 Changing the electrical fuses There is an electrical fuse at the upper side of the housing. To change it you do not need to open the housing. F Defective fuses may not be fixed or bridged. Please replace them by fuses of the same Ampere power. 7.3 Changing the batteries Open the top part of the housing by loosening the screws located at the housing’s underside. Afterwards you disconnect the connectors and take out the batteries. If you put in the new batteries, please make sure the polarities are connected correctly. F Check the polarities: black = minus, red = plus. 7.4 Tightening the chain You need to tighten the chain at the very latest when you notice the chain flapping inside the bar while lowering or lifting a load. Depending on the frequency you use the device and the type of load this may be sooner than later. On top of the power unit’s housing there are two stoppers. Loosen them by means of a small slotted screwdriver. Through the drillings you can see two hexagon socket receivers. Take a hexagon socket screw key size 6 and tighten the screws clockwise. The chain should show sufficient tension. Torque! 14 Manual Handling Solutions 58, Paige Close, Watlington, Kings Lynn, Norfolk PE33 0TQ UK Tel 0044 1553 811977 Fax 0044 1553 811004 [email protected] www.manualhandlingsolutions.com Vertical lift 8 Charging the lead batteries 8.1 General information The two sealed lead gel batteries of your vertical lift (in short: batteries) are maintenance-free, rechargable and of top quality.Their durability depends considerably on the charging/discharging cycle, e.g.lead batteries have the capacity of considerably more than 1000 partial discharges and over 200 full discharges, if total discharges are avoided. A total discharge of lead batteries results not only in a lower capacity but reduces their durability considerably. Simply avoid a total discharge of your batteries. The lead batteries of your vertical lift should be charged after each partial discharge, i.e. after each use. Lead batteries do have a so-called self discharge. Therefore you should, whenever possible, connect the batteries to the AAT automatic charger. Due to its charging automatics the battery charger turns from the charging mode to a charge maintenance mode when the batteries are fully charged so that an overcharge is not possible. The batteries of your vertical lift can be charged or discharged in any kind of position. They are as safe as dry cells and admitted to air freight transportation by DOT and IATA. 8.2 Charging the lead batteries To charge the batteries you connect your vertical lift with the special charging cable to the AAT charger. F Please make sure that you charge or recharge your lead batteries each time after using the vertical lift. Your lead batteries can also be charged in your delivery vehicle by plugging the charging cable into the plug of the cigarette lighter. If you charge the batteries in your car you will attain a capacity of approximately 80%, while using your automatic charger you will reach 100% or the full capacity. F Please only use the special AAT automatic charger or the AAT charging cable for the car. The automatic charger turns from a charging mode to a maintenance mode when the lead batteries are fully charged so that overcharging is impossible. Never put away your vertical lift with empty batteries. Therefore, even during longer breaks such as holidays, weekends, vacations, etc. keep the vertical lift connected to the charger because of maintaing the battery charge. This does not harm the lead batteries, on the contrary, it increases their durablitity. 15 Manual Handling Solutions 58, Paige Close, Watlington, Kings Lynn, Norfolk PE33 0TQ UK Tel 0044 1553 811977 Fax 0044 1553 811004 [email protected] www.manualhandlingsolutions.com Vertical lift AAT Alber Antriebstechnik GmbH Postfach 10 05 60 · D-72426 Albstadt Tel. +49.74 31.12 95-0 · Fax +49.74 31.12 95-35 www.aat-online.de · [email protected] Manual Handling Solutions 58, Paige Close, Watlington, Kings Lynn, Norfolk PE33 0TQ UK Tel 0044 1553 811977 Fax 0044 1553 811004 [email protected] www.manualhandlingsolutions.com