1
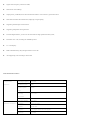
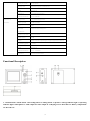
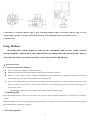
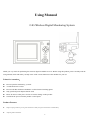
Using Manual 2.4G Wireless Digital Monitoring System Thank you very much for purchasing this wireless digital recordable receiver. Before using this product, please carefully read the using manual, which will make you fully aware of the various functions of the machine for your use. Points for Attention: Do not repair this machine by yourself. Avoid boiled water or dust. Do not wash this machine with thinner or other chemical washing agents. Only specified power adapter shall be used. Please do not use other power for fear of serious damage to this product. Switch off the power when the product is unoccupied. Product Features High accepting sensitivity, strong anti-interference ability and good transmission confidentiality. Adopting FSK modulation. 1 Signal carrier frequency 2.400-2.483 GHz; Data transfer rate 256Kbps; Output power≥ 16dbmW; barrier-free transmission distance on sea surface is greater than 300 m Data buffer and burst data transmission, displaying of signal quality; Supporting infrared night vision function. Supporting temperature sensing function. Powerful digital features, you can use microcontroller for high-performance RF system; Resolution 320 × 240; recording file 450MBT per hour 2.5 " TFT display Built-in lithium battery, fully charged machine can last 3H AVI Supporting video recording in AVI format Main Technical Parameters Comprehensive Operating frequency 2.40GHz parameters Modulation mode FSK Signal reception 200m range Operating -20℃/60℃ temperature Parameters of receiver Operating humidity 20%-80% Resolution VGA 320 X240 Standard NTSC/PAL Reception 2.4G digital audio and video signals Sensitivity ≤-85dbm 2 Frame per second 25-30 frames Memory card Maximum support 32GB SD card Power DC:5V 1A Dimension 105mmX72mmX27mm Lithium-Ion battery 3.7V 1300mAh Parameters of Image sensor 1/4"CMOS Image sensor transmitter Effective pixels CCIR:640X480 Lens 6mm Minimum 0.001Lux when taking F1.2 illumination Signal to noise ratio More than 48db Signal system CCIR Output Audio and video digital signal, support night vision function Transmitting power ≥16dbm Power DC:5V 1A Lithium-Ion battery 3.7V 750mAH Dimension 102mm×30mm×30mm Functional Description 1. On/Off button 2. Menu button 3. Recording button 4. Taking button 5. Speaker 6. Charge indicator light 7. Operating indicator light 8. Microphone 9. Audio output 10. Video output 11. USB plug seat 12. Reset hole 13. Battery compartment 14. SD card seat 3 1. Microphone 2. Infrared indicator light 3. Lens 4.Charging indicator light 5. Recording indicator light 6. Power indicator light 7.ON/OFF 8. Antenna 9. Recording button 10. Code matching button 11.USB 12.TF card seat 13. Speaker hole Using Method Recording files, please began to video in the transmitter and receiver online (System startup finished) a minute later; after quited from recording status and saved the file, must to wait a minute before record the next file, or else it may lead to file missing. Ⅰ. Switching ON/OFF 1. Connected to the power adapter Please use the power adapter provided by the factory. When using for the first time, please charge without stop for more than five hours. Please use power adapter with the original configuration by the manufacturer for charging, using power of different specification may cause harm to the machine and even human body. When inserting power adapter into the machine for charging, red indicator light turns on; when red indicator light continuously flashes, it indicates that the battery is fully charged; the machine can be charged during playing; and fully charged battery can last for about 3 hours. (Note: lithium batteries shall be used; the battery generally can not be replaced by that made of different material) 2. Switching ON Press and hold the power switch to the power-ON state, the green power indicator light turns on. Screen turns on in about 6 seconds. When the machine refuses to turn on while pressing ON button for several times, it may be because the power has run out, please insert dedicated power adaptor for charging. 3. Fast Resetting Mode 4 If the machine is halted due to suspension, please first press machine resetting button and press ON button for restarting. Ⅱ. Menu Operation 1. Press machine power ON/OFF button to start the machine press MENU button to enter the main menu, press ▲ or ▼ button respectively to enter Volume; Brightness; Contrast; TV Format; Temperature; Night Vision ; Sleep Time; PAIR;USB; Date and Time; and My File menus, press MENU button to enter the selected mode. 2. Code Matching Only after the transmitting end and the receiving end match code and are locked, communication is available. Methods of operation: ①Operation method of transmitting end: first press and hold code matching button at the transmitting end, then press power ON button at transmitting end to start the machine, release the code matching button in 5 seconds. ②Operation method of receiving end: first start the machine, then press Menu →▼→Pair →yes, after code matching is successful, receive and transmit to communicate. 3. Volume Adjustment Press MENU button; select Volume menu; press ► or ◄ button to adjust volume, press ◄ reduce value, press ► to increase volume. 4. Brightness Adjustment Press MENU button; press ▼ or ▲ button to select Brightness menu; press ► or ◄ button to increase or reduce brightness. 5. Adjustment of Contrast Gradient Press MENU button; press ▼ or ▲ button to select Contrast menu; press ► or ◄ button to increase or reduce the contrast gradient. 6. Selection of Standard Press MENU button: press ▼ or ▲ button to select TV Format menu; press ► or ◄ button to select PAL or NTSC standard. 7. Display of Ambient Temperature at Transmitting End Press MENU button: press ▼ or ▲ button to select Temperature menu; press ► or ◄ button to select OFF (not displaying temperature); ON (displaying temperature) 8. Switching ON/OFF of Night Vision Light at Transmitting End Press MENU button, press ▼ or ▲ button to select Night Vision; press ► or ◄ button to select OFF (switch off night vision function) NO (switch on night vision function) 9. Setting of Sleeping Time on Displaying Screen of Receiver Press MENU button, press ▼ or ▲ button to select Sleep Time menu; press ► or ◄ button respectively to set off for switching OFF; 1 minute; 3 minutes; 5 minutes; 10 minutes; 30 minutes. 10. Setting of Code Matching Press MENU button, press ▼ or ▲ button to select Pair menu; press ► or ◄ button respectively to set no for switching OFF, yes 5 setting code matching 11. USB Setting Press MENU button, press ▼ or ▲ button to select USB menu; press ► or ◄ button to select YES and NO, set USB port to connect or disconnect with PC machine. (Only when inserting SD card into receiver, this function is valid) 12. Time Setting Press MENU button, press ▼ or ▲ button to select Date and Time menu; then press ►, ◄ button or ▲,▼ button to respectively set day, month, year, hour and minute; (After setting time at the receiving end, press MODE button to transmit the set time state to the transmitting end to adjust time at transmitting end, thus making times at transmitting end and receiving end synchronized.) 13. Setting of Document Operation Press MENU button, press ▼ or ▲ button to select My File menu; press ▲ or ▼ button respectively to select document, press MENU button to read document or pause reading document; press ◄ button to return document, press ► button to delect document. 14. Press MODE button, there is icon for microphone on the screen which can transmit the received microphone signal to the transmitting end. At the same time the transmitting end stops transmitting sound. Press MODE button again, the microphone icon on the screen will disappear, thus recovering transmitting of sound from transmitting end to receiving end. Ⅲ. Recorded Document Insert SD card into the SD card seat, (TF card into TF seat at transmitting end), maximum support card of 32GB; the recorded document format is AVI, Resolution is 320×240, Insert SD card at receiving end (TF card at transmitting end), then press REC button to enter recording state; screen at the receiving end will display REC (the recording light at transmitting end will turn on). Then press REC button to exit the recording mode, 《To protect the stored material from damage, please use regular SD card and TF card, make sure to withdraw card after exiting recording state》 Ⅳ. The Video Signal Connected to Displayer First connect A/V wire to the displayer: insert the yellow and the white respectively into video and audio output ports of receiver, connect the other end to input port of the displayer, set the displayer at AV mode, the displaying screen will display the video signals. Ⅴ. USB Playback First insert SD card with recorded documents into SD card slot in the receiver, then enter the main menu to select USB menu, press ► or ◄ button respectively to set YES mode, make USB at connecting mode, connect the receiver to PC, 6 then on the PC will display removable disk. Click to browse the recorded documents. Random accessories: 1. Wireless recordable digital receiver 1 set 2. Power adapter (5V 1A) 1 piece 3. A/V output cable (the red inserting audio, the yellow inserting video) 1 piece 4. Earphone cord 1 piece 5. Digital transmitter 1 set 6. USB cable 2 piece 7. Manual 1 piece 8. Lithium battery 3.7V 1300mA 1 piece 7