1
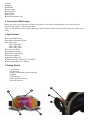
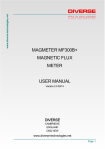
HIGH PERFORMANCE CAPTURE Thank you for purchasing your Samurai Goggles. To get the best from your new goggles, and to ensure you are able to operate them safely, it is essential that you read and understand this user manual. 1. Safety Guide Please read the safety guide before using the goggles. This information is for your safety, the protection of the device and connected devices . You will also find specific safety instructions in the following chapters of this user manual. This product is not a toy and should not be handled by infants or small children. Children cannot assess the dangers connected with electrical devices. Do not leave the packaging material lying around. Children might play with the plastic bags and risk suffocation. This device should only be opened and/or repaired by an expert, or a person who is qualified to do so. Only original spare parts may be used. This product must not be subjected to extreme heat or cold. Do not expose the product to intense sunlight, open fire or other heat sources. Working temperature -30c to +40c. These goggles may not be used when driving on public roads. Broken lenses should be replaced immediately to minimise the risk of injury. If the product is brought in from the cold to a warm area (e.g., during transport), condensation can occur within the unit. Let the goggles reach room temperature before using them. These goggles are not designed for commercial or industrial use. 2. Checking The Contents When unpacking your goggles please make sure all components are present and intact. If any components are missing or damaged please contact [email protected] immediately. Contents Goggles USB cable Power supply Carrying bag Nose guard User manual Tear offs (Offroad kit only) 3. Cleaning And Maintenance Always use a soft, dry, lint free cloth to clean the unit's exterior. If the device is extremely dirty you can use a soft cloth, dampened with water or a mild cleaning solution. Never use any abrasive or harsh cleaning agents (e.g. alcohol, petrol or thinners) as these could damage the controls or the casing. 4. Specifications 12/5 mpix CMOS sensor 142 degree wide angle HD lens AVI video format 1920 x 1080p 25fps 1440 x 1080p 30fps 1280 x 720p 50fps 15 mpix photo JPEG Integrated microphone Micro SD card upto 32GB Connection: USB 2.0 Operating voltage 3.6V USB power supply 110-240V AC - 5V/100mA Rechargeable battery 3.6V 750mAh 5. Getting Started 1 On/off switch 2 Camera lens 3 Battery compartment (cannot be opened) 4 Led light 5 USB connector 6 Reset (Reboot the device) 7 Micro SD card slot 5 2 1 6 7 4 3 6. Charging The Goggles Please charge the battery fully before using the goggles for the first time. To charge the battery use the supplied USB cable with the power supply, or a computer, and insert it into the USB socket on the goggles. When the goggles are charging the LED light will be illuminated. When charging for the first time, charge the battery for a minimum of 4 hours. It is advisable to let the battery go fully flat from time to time and then recharge it fully again for several hours. This refreshes the battery. 7. Inserting The Micro SD card (not included) The Goggles have no internal memory, and require a Micro SD card to record video and take pictures. For the best quality video it is recommended to use a fast card (minimum class 10). The maximum capacity card that can be used is 32GB. Insert the Micro SD card into the slot next to the USB Connector. The contacts should be facing the USB connector. Press the card down until it clicks in. To remove the Micro SD card, press the card down until you feel a click. The card will now eject itself. NOTE: Do not ship or transport the goggles with the SD card inserted as unintended operation of the on/off switch may result in the SD card becoming full. 8. Switching The Camera on/off To switch the camera on, press the on/off button for approximately 2 to 5 seconds. The blue LED in the top right hand corner of the goggles will come on and start blinking slowly. To switch the camera off, press the on/off button for approximately 5 to 7 seconds. The blue LED will switch off. 9. Recording video The recording will automatically start 2 seconds after the device has been switched on. The blue LED will blink slowly when recording. 10. Stop the recording To stop the recording, click the on/off button once. The blue LED will stop blinking and become permanent. The device is now in standby mode. NOTE: If the recording is not stopped, the file will automatically be saved to the Micro SD card after 10 minutes with a date and time stamp. 11. Taking Pictures Switch the camera on. Once the Blue LED has blinked once, press the on/off switch immediately. The blue LED will now stay lit, the device is now in picture mode. To take a picture press on/off button once. The blue LED light will switch off and on. The picture has been taken. 12. Viewing Videos And Pictures Switch the goggles off. Connect the goggles to your PC using the supplied USB cable. The SD card will pop up in your explorer as an external drive. You can now watch and modify the files. 13. Changing The Settings To change the video format connect the switched off goggles to your PC. Open the removable disk. Open the folder named 'DCIM'. Once in this folder right click your mouse and select 'New' and then 'Text Document'. Rename the new file 'SIZE' and then open it. Enter one of the following digits to change the video resolution. Then save and close the file 0 = 1920 x 1080p @ 25fps 1 = 1280 x 720p @ 50fps 2 = 1440 x 1080p @ 30fps NOTE: The default setting is 1440 x 1080p @ 30fps 14. Setting The Date And Time To add a timestamp to your photos and videos, connect the switched off goggles to your PC. Open the removable disk. Open the folder named 'DCIM'. Once in this folder right click your mouse and select 'New' and then 'Text Document'. Rename the new file 'TIME' and then open it. Enter the date and time in the following format: YEAR.MONTH.DAY HOUR:MINUTE:SECOND e.g: 2013.08.24 18:05:55 Then save and close the file. To eliminate the timestamp, you need to enter a date before the year 2013. e.g 2011.08.24 18:05:55 NOTE: In case your computer shows extensions of file types, rename the above mentioned files 'SIZE.TXT' and 'TIME.TXT' 15. Troubleshooting THE GOGGLES WILL NOT SWITCH ON: Make sure the battery is charged. Make sure the power supply is correctly connected when charging. THE GOGGLES 'FREEZE': Press and hold the on/off switch for approximately 10 seconds or until the LED light switches off. THE LED LIGHT BLINKS FAST AND THEN SWITCHES OFF: The SD card is not inserted, not correctly formatted or is damaged. Insert the card, or format the card on your PC, then reinsert. THE LED LIGHT FLASHES ONCE THEN SWITCHES OFF: The SD card is full. Connect the goggles to your PC. Save the files to your PC and then clear the SD card. THE LED LIGHTS UP FOR A FEW SECONDS AND THEN SWITCHES OFF: Recharge your battery 16. Disposal Electrical and electronic devices must never be deposed of in the regular household waste. Consumers are legally obligated and responsible for the proper disposal of electronic and electrical devices by returning them to collecting sites designated for the recycling of electrical and electronic equipment. For more information concerning disposal sites please contact your local authority or waste management company. Do not throw batteries or rechargeable batteries into household waste. Consumers are legally obligated to return used batteries, whether they contain harmful substances or not, to designated recycling areas, disposal sites, or stores where batteries can be bought. Make sure batteries are fully discharged before disposing. www.samuraigoggles.com