1
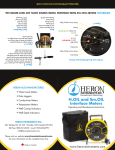
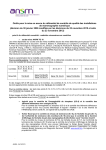
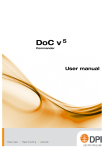
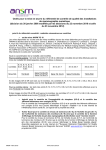
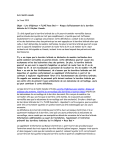
Made in Canada
www.heroninstruments.com
Please visit our website www.heroninstruments.com
for more information on the complete Heron line.
[email protected]
Toll Free: 800-331-2032 | Local: 905-628-4999
447 Moxley Rd. SS 106 | Dundas, ON Canada L9H 5E2
HERON INSTRUMENTS INC.
• Well Depth Indicators
• Well Casing Indicators
• Conductivity Meters
Water Tape and Skinny
Dipper Water Level Meters
• Temperature Meters
Operating and Maintenance Instructions
• Interface Meters
• Data Loggers
• Water Level Meters
HERON ALSO MANUFACTURES:
WLM Electronic Panel
Battery Box
Thumb Screws (Keep Tight)
Sensitivity Knob for
cascading water
Please note: this is not an on/off
switch. The water is the switch.
Signal LED
Test Button
Figure 2
To test entire system, hold the center pin on
the probe against the stud on the back of
the axle; touch the probe body against the
screw on the frame. The buzzer will sound if
the system is okay. Make sure sensitivity
dial is turned fully clockwise.
Figure 3
Unique hanger and tape protector
supports the meter on the casing and
protects the tape from sharp edges on
the well casing.
Buzzer
Figure 1
Thumb Screws (Keep Tight)
1405 WLM-EP
ItemPart Numbers
WLM Electronic Panel
Thumbscrews Set (2)
1405 WLM-EP
3250 TScrewsx2
Important: Ensure that the Panel retaining thumb screws (nuts) are tight before use.
Operating and Maintenance Instructions inside
Water Tape and Skinny Dipper Water Level Meter Instructions
General Care of Heron Water Level Meters (WLM)
Cleaning the Heron Water Level Meter (WLM)
Heron Instruments Water Level Meters are quality, robust units that will give
many years of reliable service if these recommendations are followed:
Always clean the meters after use in the field to maintain optimal performance
and extend the life of the unit.
•
•
The WLM may be cleaned with any mild household dishwashing detergent and
rinsed with water.
•
•
Avoid sharp edged casing, use the tape guide on the unit.
Take care to avoid the tape becoming entangled with other equipment in
boreholes or wells, use stilling pipes when possible.
Do not use the WLM as a guide to backfilling, bentonite sealing or sand
packing in wells. This type of material falls through the water column at a
much slower rate than the WLM probe and can result in a trapped probe
and tape.
Neatly rewind and clean the tape after each use.
Refer to: Cleaning the Heron Water Level Meter (WLM)
Warranty is conditional upon adherence to these guidelines
Equipment Check
Before taking the unit into the field, carry out these simple tests with the
sensitivity knob turned fully clockwise (see Figure 1), and make sure the two
panel retaining thumb screws (nuts) are tight.
The sensitivity knob is used to adjust the unit’s response to varying conductivities
to maintain a sharp distinctive signal. Turn the knob clockwise for low
conductivity (pure) water and anti-clockwise for high conductivity (dissolved
minerals) water.
Note: There is no on/off switch on the instrument, the water is the switch. The
WLM consumes no power when the probe is not in water.
To check the condition of the battery and circuit, press the TEST button. The
unit should sound and the INDICATOR light will come on. If the unit does not
respond, replace the battery and try again. NOTE: Accurate battery orientation
diagram inside of battery box. (See Figure 1)
To test the entire unit from the panel to the probe, short the probe across the
stand off screw and the pin on the axle as shown in figure 2, the unit should
sound as above.
Use in the Field
Reel the tape down the well carefully avoiding the edge of the casing. Hang the
WLM on the casing when possible and run the tape over the guide on the frame
leg to avoid cuts and nicks to the tape. Swivel the probe holder on the frame to
allow the tape free movement down the well. (See Figure 3)
When the unit sounds, carefully measure the depth to water indicated on the
tape from your reference point. Raise and lower the probe in and out of the
water to get a consistent result.
Note: The inverted triangle on the probe holder serves as a datum point
indicating “top of casing”. In wells that have cascading water that may
give false readings, reduce the sensitivity by turning the sensitivity knob
anti-clockwise.
Do not use abrasives, partially halogenated hydrocarbons or ketones to
clean the reel. If the electronic panel is removed first, the reel and tape can be
washed with a power washer.
Remove the panel retaining thumb screws (nuts) to release the panel. Take care
not to lose the thumb screws as the unit will not work without them.
For longer units with aluminium reel discs, the panel is connected to the tapes
with male and female push connectors.
Troubleshooting the Heron Water Level Meter (WLM)
Q. A. Q. A. No sound or light when the unit is tested.
Refer to Equipment Check and follow procedures. Change the battery.
Q. A. Still not sounding in water.
Adjust the sensitivity setting. If the unit still does not work
check all the connections inside the hub (inside the hub polarity is not an
issue as the current is AC).
Equipment checked, panel okay but probe not working.
Make sure both panel retaining thumb screws (nuts) are tight.
Contact Heron Instruments or your supplier if you cannot isolate the problem.
Warranty (3 years, probe 1 year)
Heron Instruments Inc. warrants to repair or replace any such defective
equipment or part (determined to our satisfaction to have a defect in
workmanship or original material) upon receipt and inspection of such defective
equipment to Heron Instruments Inc. with all shipping pre-paid by the user.
In no event shall Heron Instruments Inc. be liable for any direct, indirect
or consequential damages, abuse, acts of third parties (rental equipment),
environmental conditions or other expenses which may arise in connection with
such defective equipment.
This warranty shall not apply to damage of equipment caused by improper
installation, usage, storage, alteration or inadequate care.
Heron Warranty coverage does not extend to the following:
• Tape, bag or batteries used with the product
• Products used as rental equipment
• Products contaminated by materials which are known to be hazardous
and; as such, have rendered the unit unserviceable
• Parts failure due to neglect in cleaning or incorrect servicing
• Failure of parts caused by misuse
DO NOT use the WLM to measure the progress of back filling wells. The tape
and probe may become trapped in the backfill material.
For service information:
DO NOT allow the tape to “freewheel” down the well. It may become caught in
other equipment in the well.
•
visit www.heroninstruments.com under the CONTACT heading
•
email [email protected]
•
call 1-800-331-2032 or 905-628-4999
When rewinding the tape remove as much water and debris as possible from
the tape and the probe.
Warranty is conditional upon adherence to these guidelines.