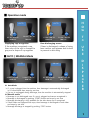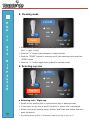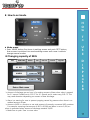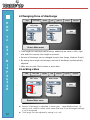
1
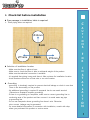
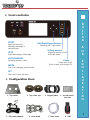
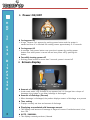
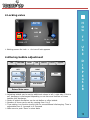
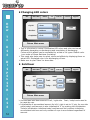
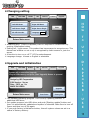
User Manual Reverse Tap Twin T A B L E O F C O N T E N T S Preparation Cautions -------------------------------------------------- 3 Name of each part---------------------------------------- 4 Cautions for installation---------------------------------- 5 Operation Checklist before use-------------------------------------- 6 Button and displays--------------------------------------- 7 How to use dispenser ------------------------------------ 8 Miscellaneous Cleaning -------------------------------------------------- 16 Errors handling-------------------------------------------- 17 Product specification------------------------------------- 2 19 Warning Power - Do not use damaged power plug and cord - Do not touch power plug by wet hands - Otherwise there might be risk by electrical shock and fire For installation - Make sure to close all valves before installation - Otherwise, high pressure in gas or beverage container may cause injury - Install product on horizontal and smooth floor Cleaning C A U T I O N S - Do not spray water directly on circuit for cleaning. Do not use benzene, thinner and Sodium Hypochlorite for cleaning - Otherwise there might be risk by electrical shock and fire . Miscellaneous - Do not disassemble, repair or alter this product at your discretion - If you need repair, make sure contact with service center Cautions Power management - Turn off power when lightning strikes or when this product is not used for a long time - If there occurs strange smell or smoke in the product, make sure to turn off power immediately and contact with service center Safety check - Electricity is not available. Adapter is too hot Electricity flows when product is running. Other abnormality or malfunction exist Make sure to turn off power switch and make contact with shop where you purchased this product, or service center 3 Front side N A M E S Mode set Button Confirm Stop Start Auto/Manual O F E A C H Adapter JACK Ad : USB-A Upgrade : USB-B Rear Side 7” monitor for AD (Advertisement) Outlet Power capacity selection switch Menu movement button P A R T LED Gripper plate Nozzle Cup sensor 4 Check list before installation Pipe passage in installation table is required Three piping holes are required C A U T I O N Ø40mm 6 cm Ø75mm 15cm S F Ø75mm Selection of installation location - Make sure that floor is plat and even Make sure to check that floor is able to withstand weight of the product Make sure that electrical connection is available It’s required that piping is easy and there is little moisture for installation location Avoid locations where lots of heat exist or too cold location. Grounding - grounding is absolutely required to prevent electrical leakage or shock in case that there is ant abnormality on the product - No additional grounding is required if receptacle has its own earth terminal (Otherwise a receptacle requires grounding) - If there is no grounding on receptacle, make sure to connect grounding line to conducting area of the product and then connect it to metal water tap pipe or grounding line - Do not use receptacle whose grounding line doesn’t exist. Otherwise micro current leakage may be generated. - For more detailed information in connection with installation, consult with shop where you purchased this product or service center O R I N S T A L L A T I O N 5 Beverage is not discharged Make sure to check KEG and CO2 gas valve before use If valve is locked, then beverage is not discharged. H Make sure to check residual beverage in KEG before use If beverage is insufficient, beverage is not discharged. C K Make sure to check residual CO2 before use If CO2 is insufficient, beverage is not discharged. I When lots of bubble is generated Make sure to check that valve and nozzle is cooled before use When this product is first installed, lots of bubble may be generated from nozzle and valve due to differences in temperature. Remove bubble in beverage pipe before using this product Bubble may be generated due to residual bubble in pipe Before using this product, make sure to remove leakage in connecting area of various pipes Leakage in pipe connection may generate bubble Make sure to fit flow rate by adjusting valve in beverage pipe Bubble may be generated due to rapid flow rate Use this product after temperature of beverage is cooled High temperature of beverage may cause bubble Use the product when beverage in KEG is sufficient If beverage is insufficient, bubble may be generated. When power is failed during running Wait till temperature of cooler is lowered sufficiently Turn off power and then turn it on again. C E L S T B E F O R E U S E 6 Front controller B U T T START O N Left/Right/Upper/Bottom Push this button to discharge beverage in manual mode Selecting left / right outlet A Setting amount STOP Stops discharging of beverage Adjusting amount of left and right outlet AUTO/MANUAL Power Switching Manual / Auto Power turn or off (Push it twice for turning OFF) MODE This is for changing several mode SET Push this to save set value. Configuration Item 1. Top cover 2. Top cover cap 3. Gripper plate 4. Ad LCD remote Controller 5. DC power adaptor 6. Hose band 7. Drain hose 8. USB N D C O N F I G U R A T I O N 7 Power ON/OFF H O W T O U S E Turning power On A logo ‘Reverse Tap’ appears by pushing power button and the system is started and then it is switched into waiting screen approximately in 10 seconds. Turning power Off A message ‘Push power button one more time’ appears by pushing power button once while power is turned off and turn power off by pushing this button Forcefully turning power off D I S P E Pushing power button for more than 3 seconds, power is turned off Screen display AUTO 0% 7.5 Sec / 467 CC 7800 CC N S E R 75% 5.7 Sec /356 CC 12500 CC 0% 7.5 Sec / 467 CC 7800 CC Amount of discharge (Image) Under usual status, only a shape of cup appears but it is changed into a shape of beverage rising image in cup when beverage is discharged. Amount of discharge (Percent) When beverage is discharged, the product displays amount of discharge as a percent Time setting Displays currently set time and amount of discharge Displaying accumulated sold beverage amount This displays sold amount of beverage in Keg and it warns if residual amount is less than 10% 8 AUTO / MANUAL This displays currently set Auto / Manual ■ Operation mode AUTO 5.7 Sec /356 CC 12500 CC 7.5 Sec / 467 CC 5.7 Sec /356 CC 12500 CC 7800 CC W 0% 5.7 Sec /356 CC 12500 CC 7800 CC Displaying cup recognition If the machine recognized a cup, then color of the cup is changed to grey and a shape of cup appears 7.5 Sec / 467 CC 75% 0% 0% H O AUTO 0% 7.5 Sec / 467 CC 7800 CC Beer discharging screen If beer is discharged, a shape of rising beer inside a cup appears and its level in percent is also rising ■ AUTO / MANUAL Mode AUTO 5.7 Sec /356 CC 12500 CC 0% 5.7 Sec /356 CC 12500 CC Manual 0% 0% 7.5 Sec / 467 CC 7800 CC 7.5 Sec / 467 CC 7800 CC 0% 5.7 Sec /356 CC 12500 CC 0% 7.5 Sec / 467 CC 7800 CC Auto Mode If a cup is plugged into the machine, then beverage is automatically discharged in 0.5 second and then stops by set time. If a cup is unplugged during discharge, then the machine is automatically stopped T O U S E D I S P E N S E R Manual mode Beverage is not discharged even if a cup is plugged and sensor recognized it Beverage is discharged by pushing ‘START’ button and stops by set time Beverage discharging is only available for the side where cup is recognized If both sides are equipped with cups, then beverage is discharged to both sides and stops by set time Beverage discharge is stopped by pushing ‘STOP’ button 9 Cleaning mode CLEAN H O ● LAR W MED ● 0% T O U S E CLEAN 4550 0% SML 7.5 Sec / 467 CC CC 7800 CC Select cup by pushing arrow key and push the start button (left -> right ->both) Push the “+” button then changed to cleaning Mode Push the “START” button to cleaning and If you want stop then push the D I S P E “STOP” button Push the “+’” button again then go back to standby mode Selecting cup size AUTO ● LAR N S E R MED ● 0% Cup size 4550 0% SML CC 7.5 Sec / 467 CC 7800 CC Selecting Left / Right cup Select cup by pushing left or right direction key in waiting screen If you select a cup, then a word [Cup size] in yellow color is displayed. Select cup size by pushing Large, Medium and Small size button and then 10 push Set button By pushing arrow symbol in downward, capacity of Keg is reset to ‘0’ How to set mode 5 AUTO H O ● SML W MED ● 0% 0% LAR T 7.5 Sec / 467 CC 5.7 Sec /356 CC 12500 CC 7800 O CC Mode menu Push ‘MODE’ button five times in waiting screen and push ‘SET’ button, then screen is switched into mode setting screen and a user is able to change several modes Changing capacity of KEG KEG RUN TIME 0.1 SEC Bubble 6 ▼ LED 25 ▼ ALARM 18,000 Less ▼ KEG Capacity 20,000 CC CUP Cnt Control Upgrade CC Save ▼ Return Main menu U S E D I S P E N S E R Amount of discharge per an hour is for setting amount of beer when valve is opened for 0.1 second. Default set is 6.25 CC for 0.1 second and it varies every 0.05 CC. This may need alteration depending on amount of beer discharge. Alarm is a warning for user to prevent popping caused by pressure when there is no residual amount of beer. Amount of KEG is a function to set total amount of currently connected KEG container For example, assuming that amount of KEG is 20,000 and alarm is set to 2,000, an alarm is generated when amount of discharge exceeds 18,000 Make sure to push ‘Save’ to store value 11 Changing time of discharge KEG H O RUN TIME W T O U S E Bubble LED CUP Cnt LEFT Value RIGHT Value Large Medium ▼ 4 ▼ SEC 8 ▼ SEC 8▼ 0▼ Control Upgrade ▼ Save 480 CC 300 CC Return Main menu Time length for discharge can be set by additional set value in left / right side and this is set by time length or amount. Amount of discharge can be changed by each size (Large, Medium, Small) D I S P E By setting time length of discharge, amount of discharge is automatically adjusted. Make sure to push ‘Save’ button to store data Locking valve KEG N S E R RUN TIME Bubble LED CUP Cnt LEFT Value RIGHT Value Lock Medium ▼ 4 ▼ SEC 8 ▼ SEC 8▼ 0▼ 300 CC Control Upgrade ▼ Save 480 CC Return Main menu 12 Amount of discharge is adjustable to three types: ‘Large/Medium/Small . By setting ‘Lock’, outlet is locked, which means that beer is not discharged although a cup is recognized. Time length can’t be adjusted by setting it to ‘Lock’ Locking valve 5 H O AUTO ● SML W MED ● 0% 0% LAR T O 7.5 Sec / 467 CC 5.7 Sec /356 CC 12500 CC 7800 CC U S E Waiting screen for Lock -> An icon of lock appears Altering bubble adjustment KEG RUN TIME Bubble LEFT LED CUP Cnt Control Upgrade RIGHT 2 ▼ 3 ▼ 0.3 ▼ 0.5 ▼ Pre Bubble Save After Bubble Return Main menu D I S P E N S E R Adjusting bubble can be set by additional values in left / right side. If this is set, beverage is discharged depending on set time and number of times besides this discharge. Order of bubble formation can be set before or after bubble Number of times can be set by ranging from 0 to 3 Time setting is a function to set time for one additional discharging. Time is adjustable from 0.1 second to 0.5 second Make sure to push ‘Save’ to store data 13 Changing LED colors KEG H O RUN TIME Bubble LED CUP Cnt Cup IN Green ▼ W Beer Run Rainbow ▼ T Completion Circle ▼ Control Upgrade Save O Return Main menu U S E D I S P E N S E R | U S E 14 This is a function to control illumination LED colors and color can be set differently depending on discharging and completion of discharging Colors and its effects can be expressed by a total of 14 types. Default color is an order of Green-Rainbow circulating. This mode also helps user to select colors and effects by displaying them on actual LED. Displayed color is for discharging of beer Make sure to push ‘Save’ to store data Sold beer KEG RUN TIME Bubble LED LEFT CUP Cnt Upgrade RIGHT 453 Clear Total : 443 Clear Today : 253 Clear Today : 253 Clear Total : Control Save Return Main menu Accumulated sold beer amount in left / right side. Total / today’s sale need to be reset by user Initialization of accumulated amount for left / right is set to ‘0’ only for one side while today’s sold amount is also initialized to ‘0’ by pushing left initialization. Today’s initialization initializes today’s sold amount only without initializing accumulated sold one and only number of cups is accumulated regardless of amount. Changing setting KEG RUN TIME Bubble LED CUP Cnt Left KEG Reset Right KEG Reset Left Sensor Single Right Sensor Single AD LCD Now On Language EN Control Upgrade H O Save W ▼ T Return Main menu O Initializing KEG. If KEG is replaced, then it’s required to initialize KEG by pushing initialization button Setting left / right sensor. This product has two sensors to recognize cup. This determines whether or not a cup is recognized by both sensors or just one sensor A function to turn on or off 7” LCD for advertisement Language change. Korean or English is selectable Upgrade and initialization KEG RUN TIME Bubble LED CUP Cnt Control Upgrade System will re-start after Upgrade. Plug-In USB memory and press [Start Upgrade] Button to preceed D I S P E N Design by JRP Corporation S/W Version : Vxx.xx Date : 2015. xx. Xx MADE IN KOREA Upgrade Return Main menu U S E Start Demo Factory Init This updates operating program. This is run by updating software in additional USB drive. Put update program into USB driver and push [Starting update] button and then it is automatically updated and system is rebooted. Make sure to turn off Power and then turn of On again. If you push factory initialization button, then all system values are set to a status of factory delivery. S E R | U S E 15 How to clean the product C L E A N I N G Auxiliary parts for dispenser Clean them by water and neutral detergent Clean beverage pipes or replace them regularly (once every 6 month) How to disassemble the product for cleaning Grab top cover by both hands and unplug it by lifting it up. Grab gripper plate by hand and lift it up for unplugging Unplug nozzle by rotating it counter-clockwise How to clean beverage pipes Fill washing container with clean water and connect it with head Open Co2 gas valve Put a cup to dispenser and let beverage be discharged Repeat the above action until clean water is discharged Lock CO2 gas valve and remove CO2 in washing container Separate head from washing container and put it into clean water Reference If the product is not used for a long time, drain all beverage inside pipes and wash them using water and dry it. Cautions Do not spray water on the product directly. Do not clean it with benzene, thinner, Sodium Hypochlorite, alcohol and acetone. Otherwise there might be risk caused by fire or electric shock Do not use coarse surface of substance such as brush, loofah and coarse cloths for cleaning dispenser Make sure to turn power switch off and then turn it on after cleaning. Otherwise there might be risk caused by fire or electric shock 16 Symptom Beverage is not discharged Lots of bubble are created Bubble is too scarce Checks Treatment Is power switch off? Turn power switch On Is adapter power unplugged? Plug adapter power again Is KEG valve locked? Open valve of KEG Is CO2 gas valve locked? Open CO2 gas valve Is flow rate regulator locked? Open flow rate regulator Is head connected? Connect head to KEG Is there beverage in KEG? Replace it with a KEG including beverage Is coil in cooler frozen Request A/S Is a cup well recognized? Make sure to check operational status for cup recognition sensor Is beverage pipe is broken? Or isn’t it isolated from heat? Replace pipe and keep it isolated from hear Is pipe connected to sol valve leaked? Make sure to check fastening of clamp for pipe connection Is nozzle temperature high? Make sure to keep nozzle temperature under proper level Is beer KEG significantly swaying during transportation? Make sure to stabilize it for an hour before use Is pressure of CO2 too low? Adjust the pressure under proper level (30 ~ 55PSI) Is flow rate regulation correct? Adjust flow rate regulator to proper level Is gas leaked from head? Make sure to check head and then re-connect it Is CO2 gas pressure too low? Make sure to check gauge and adjust it under proper level Is flow rare regulation incorrect? Adjust flow rate regulator under proper level E R R O R H A N D L I N G 17 Symptom E Beverage is not cool R R O R H A N D L I N G 18 Checks Is cooler properly operated? Make sure to check power of cooler Is cooling water insufficient? Refill cooling water up to a level where coil is soaked Is agitating motor malfunctioned? Request A/S Is temperature of KEG high? There is a strange smell on beverage Treatment Keep KEG under a chilled area Is pipe connection checked? Replace pipes with new pipes once every 6 month Is pipe cleaned? Wash it regularly Is KEG well preserved? Replace KEG before use Is a cup clean? Use a clean cup The machine is not operated although the button is pushed Button may not be operated if it is touched by wet hands, cleaned by damp cloth, which means that button sensing part is abnormal due to moisture. Make sure to remove moisture on button. Screen of LCD monitor is abnormal Is abnormality still persistent although power is turned off and turned on again? Request A/S Main LCD touching is not operated Is abnormality still persistent although power is turned off and turned on again? Request A/S Default Setting Value Default setting value are as below Parameter Default Setting Min Max Remark Small Cup On Time 5.8 0 99 sec Medium Cup On Time 7.5 0 99 sec Large Cup On Time 11.3 0 99 sec Bubble Count 0 -3 +3 Bubble Generation Time 0 0 0.9 sec Total Cups 0 0 50000 Total sales amount / EA Daily Cup 0 0 5000 Daily sales amount / EA Flow Count 0 0 1000000 impeller sign count LED Mode 0 0 11 LED Mode OLED Contrast Value 5 0 255 OLED brightness , 0~7 step Cup Sense Mode 1 0 1 Cup sensor method Capacity Unit 6.25 0 100 Discharged rate, / cc Alarm Capacity 18000 0 50000 Alarm value / cc Product specification Model name Single Twin Weight of main body 1.5Kg 9Kg Horizontal (mm) 238mm 350mm Vertical (mm) 300mm 375mm Height (mm) 92mm 140mm Rated voltage DC 24V /1.5A DC 24 / 2.5A Model FS1V01T PP2V01 Product dimension P R O D U C T S P E C I F I C A T I O N Photographs Design and product specifications may be changed for quality improvement without notification Auxiliary products may vary depending on each model. If you want to purchase additional auxiliary parts, consult with shop where you purchased this product 19 Company Information Reversetap HQ [email protected] Tel. +82-2-6298-4110 JRP Corporation Co.,Ltd #1002 96, Gamasan-ro, Geumcheon-gu, Seoul. Korea www.reversetap.kr Customer Center