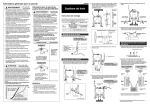
1
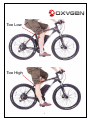
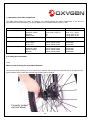
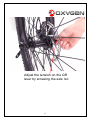
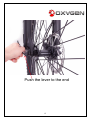
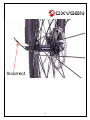
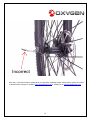
User Manual Oxygen Electric Bicycle PLEASE READ ME FIRST Oxygen E-mate – Table of Contents Page number 1. Introduction 1 2. About Oxygen E-mate and its design 4 3. The first ride 4 3.1 Preparation of bicycle for riding 4 3.2 Safety checks before first ride 6 3.3 Legal requirements 7 3.4 Your own safety 7 4. Carrying luggage on your bike 7 5. Battery charging and care 8 5.1 Battery charging 8 5.2 Battery care and maintenance 8 5.3 How to achieve a maximum range and performance 8 6. Regular use and basic checks of the bike’s components 10 6.1 Lubrication of the bike components 10 6.2 Fitting the front wheel 10 2 1. Introduction Dear Customer, Thank you for choosing the Oxygen Electric Bicycle, – smart move ;-) We hope that trips on your new Oxygen Bicycle will bring you a lot of fun and you will be fully satisfied with our product. Also, please don’t forget that by using an electric bike you support an eco-friendly form of transport and contribute to saving our environment. If you have any comments about this product, or suggestions how we could improve it, please do not hesitate to contact us. At Oxygen, we aim for 100% customer satisfaction and we carefully read all comments and suggestions regarding our products. To ensure that your trips with Oxygen are not only enjoyable but also safe, please do spare a few minutes to read this manual. If you need any additional information then please contacts us Oxygen Electric Bicycles Ltd Unit 3F Goldthorpe Industrial Estate Commercial Road Goldthorpe Rotherham S63 9BL Tele 01709 886677 [email protected] [email protected] 3 2. About Oxygen E-mate and its design Oxygen E-mate electric bicycle is a two-wheeled bicycle designed for commuting, long distance cycling, or short trips around the town. It is suitable to use on public roads as well as off road pathways. Oxygen’s unique frame geometry, called SCT (Sport City Touring), combines three riding positions in one frame, allowing the cyclist to choose the most optimal and ergonomic one, depending on the cyclist’s power performance as well as health condition. This makes the Oxygen E-mate very comfortable and efficient on long distances. Please note that the bike is NOT suitable to be used in extreme conditions such as jumping or extreme downhill tracks. Also, the bicycle frame is NOT designed for: Extreme Cross Country XC, Dual DS, 4X Four Cross, Free Ride FR, and Downhill DH The maximum allowable payload for the bicycle is: 120kg for the cyclist 15kg for the luggage located on the rear rack 3. The First Ride This chapter explains how to set up your bicycle before the first ride, including riding position, safety checks, and legal requirements. 3.1 Preparing the bicycle before the first ride It is very important that your bike is set up properly before going on the first ride. At Oxygen, we care about the comfort of our customers and therefore we see the proper set up of your bicycle as a priority. Set up of the seat (saddle) height on your bicycle: It is important that your bike seat (saddle) is at the correct height to ensure that your bike ride is comfortable, healthy for your knees and you don’t have to put too much energy into pedalling. The points and pictures below should be helpful to set up the correct position: A. Please place your bike against the wall. B. Seating on the bike, hold the brake lever and put your heel on the pedal. Your leg should be almost straight and your knee should be bent just a little. 4 Too Low Too High 5 Good height While adjusting the seat height, please note that each seat post has a safety marking on the seat pillar – the seat should never be set up above the safety marks. 3.2 Safety checks before the first ride 3.2.1 Check the tyres pressure The recommended tyre pressures for Oxygen bicycles should be set between 35-60psi. It is best if the pressure is set near the higher limit, above 55psi, as this reduces the likelihood of getting the puncture. The tyres should not be pumped above the maximum recommended pressure – doing otherwise would affect your comfort of riding and increase a risk of rim damage and tyre explosion. Please note that keeping the bike in the bright sun may also increase the pressure in the tyres and therefore it is recommended to keep a pressure at a slightly lower level during hot summer days. 3.2.2 Charge the battery for the first time Before the first use, the battery should be fully charged. The full charging cycle is completed once the green light on the charger comes on. The red light on the charger means that the charging is in process – please do not disconnect the battery before the green light is on. 3.2.3 Check the handle bar and stem assembly. Before your first ride, please make sure that all the stem and handle bar assembly bolts have been securely tighten up. In order to check it, you will need to move the handle bars up and down, and then from left to right. All Oxygen bikes, sold by authorised dealers, are always checked and tested before being sold to an individual customer. However, the company cannot always guarantee that these procedures have been 6 completed, particularly in the case of online sales. It is therefore crucial to check all the components yourself before the first ride. 3.2.4 Check your brakes Before your first ride it is crucial to familiarise yourself with the braking system and make sure that both brakes are in fully working condition. Please remember that the RIGHT HAND LEVER operates the front brake and the LEFT HAND LEVER operates the rear brake. It is always best to use both brakes at the same time. When you cycle in wet conditions, please remember that the braking performance may be poorer than while cycling on a dry surface. Always include extra braking distance during wet conditions. You should never ride your bike with none or even only one working brake. Both brakes must be in fully working order at all times. 3.2.5 Importance of keeping seat posts suspension cover All Oxygen bikes are equipped with suspension seat posts. The moving parts of the post are covered with a rubber protection. You should always check the condition of the rubber and make sure it is fitted tightly. It is particularly important when carrying a child on the rear racks saddle to make sure that the child will not put fingers in the post. 3.3 Legal requirements It is important that the bicycle is equipped with all necessary safety components such as a bell and a legal lighting system. Please remember to use the full lighting system when cycling in dark conditions. We do not recommend using flashing lighting systems – using such systems on public roads is not allowed by the EU law. In most countries, white colour is used for the front light and red colour for the rear one. Please note that using green colour for the front light is not allowed by the EU law and should never be installed on a bicycle’s handlebar in any of the EU countries. 3.4 Your own safety RULE no.1 We recommend that you always use a helmet when cycling, regardless of the time or distance of your ride. RULE no.2 Please never cycle under the influence of alcohol or drugs, as this significantly increases a risk of an accident, serious injury or even death. 3.5 Carrying luggage on your bike 3.5.1 Attaching your luggage It is important to make sure that the luggage is attached securely and doesn’t exceed the maximum recommended limit. Please make sure you only use appropriate pannier sets for your luggage needs. Each pannier should be attached securely to the carrier’s railings. 3.5.2 Maximum allowable luggage Total luggage weight should not exceed 15kgs, including panniers sets. The weight of the luggage should be placed equally on both sides, with a maximum of 7.5kgs on each side of the carrier. 3.5.3 Warnings regarding carrying luggage It is important that the luggage weight is placed equally on both sides of the rack without significant differences in weight on any side. Please do not overload the rear carrier with more than the maximum allowable weight. Please do not attach a child seat to the standard rear rack supplied – you should use a specifically designed carrier instead Please do not modify the carrier rack, as this may have an effect onyour safety. 7 Fasteners on the rear carrier should be properly fitted and regularly checked. The carrier bolds should be tightened with 2.5nm torque. The luggage carrier supplied with the bike is not designed to pull a trailer. Please do not pull a trailer with this luggage carrier. Carrying the maximum luggage allowed may have an effect on the bike’s steering and braking performance. Please make sure there are no loose straps coming out of the panniers, as they could get caught by rotating spokes in the wheel. Please make sure that the luggage fitted on the carrier does not obstruct the visibility of the lights fitted to the carrier. 4. Battery care and charging process 4.1 Battery charging It is important to follow these few steps before the first charge. Firstly, the battery must be fully charged before the first use. In order to charge the battery, you will first need to plug the battery’s round plug into the battery’s socket. Once it’s done, you can plug the charger’s main plug to the electricity socket. It is important that it is done in this specific order as connecting the charger’s main plug first may cause a short circuit. The charging cycle is competed once the green light appears on the charger. The red light on means that the battery is still in the charging process and it should not be disconnected from the charger until the green light appears. 4.2 Battery care and maintenance Once the battery has been fully discharged, it is always best to charge it on the same day, but not earlier than approx 10-20 minutes after your bike ride as the battery needs some time to cool off. If you are planning not to use your bike for a longer period of time, it is very important that you charge the battery before. Batteries stored for longer period of time should be charged for approx 2 hours every 2 months neglecting this will result in the battery loosing its voltage and gradual damage to the battery. IMPORTANT: Never open the battery case - the battery case should only be open by an authorised service centre appointed by Oxygen Bicycles. Unlawful breach of this rule will automatically invalidate the battery warranty. Opening the battery case by unauthorised individuals may cause a serious injury or even death. Oxygen Bicycles is not responsible for any accidents and damages caused by unlawful battery maintenance. 4.3 How to achieve the maximum battery performance and range The range and performance of your battery depends on a number of different factors, such as: A. Tyres pressure – it is best to keep the tyres pressure in the region of 55-60 PSI. Too low pressure will result in a higher rolling resistance; a higher pressure (within recommended limit), you will feel less rolling resistance and the bike will be easier to ride. B. Luggage weight – usually the lighter luggage, the better the range and performance. C. Pedal assist – the more effort you put into pedalling, the longer distance you can cycle with the electric assist on There are also other factors, independent of how the bike is being used. The range quoted in technical specification is based on the assumption that the cyclist’s weight is no more than 80kg, and the cycles in a relatively flat area. The range can be lower for cyclists of over 80kgs, as well as for cycling in hilly or mountain areas. Temperature is another factor that can influence the range, with the best performance achieved in temperatures between 20 and 25C, and lower range during cold winter days. 8 6. Regular use and bike maintenance Any bicycle that is regularly used will require regular routine maintenance. To ensure the maximum safety on your bike, we strongly recommend carrying a routine maintenance checks described in the paragraph 3.2 before each ride. Additionally, the following checks should be done approx once a month: - Spokes – These should be checked after the first 300 miles (approx 500km) from buying your bike, and then every 500 miles (800km) to make sure that the spokes are not loose. Brake pads – The condition of brake pads should be checked after every 500 miles. The life time of brake pads may vary significantly and last as long as 5000 miles or as little as 250 miles, depending on the conditions the bike is being used in. Generally, if used a lot in rain and muddy conditions, the pads will last less than if used mainly in dry conditions. Also, they are more likely to wear out quicker if used in hilly or mountains areas, compared to flat areas, where less braking is applied. For full manual on how to set up the http://www.bengalperformance.com.tw/download.html Bengal Performance brakes, please go to: For full manual on how to set up the V-brakes, please go to: http://techdocs.shimano.com/media/techdocs/content/cycle/SI/BrakeSystem/BR-M431-M421/8DV0A-BRM431 M421-EN v1 m56577569830604303.pdf - - Running gears – Running gears should be checked and adjusted if clicking noise can be heard while changing the gears Tyres condition – You should never ride the bike with worn out tyres, as they are more likely to get a puncture and put you at the a risk of an accident Chain – Chain should be cleaned and lubricated occasionally as it makes it last longer. Please make sure that you only use lubricants sold by professional bike shops. Never use motor oil or grease to lubricate your chain. Rims Condition – If using V-brake type brakes, it is important to check the condition of the rims occasionally. With regular usage, rims wear out over time and their wall thickness is reducing – a very worn out rim may explode under a high tyre pressure and cause an accident, serious injury or even death. It is always best to ask a professional bike shop to check the rims condition for you – usually bike shops offer such advice for free. Torque recommendations Rear axle nuts Seat pillar clamp nut/bolt Brake cable anchor bolt Brake centre bolt M6: Gear shifter nuts V brake caliper nuts Rear carrier nuts Mudguard bracket nuts 33N.m 5-8N.m 5N.m 11N.m 4N.m 10N.m 8N.m 8N.m Other nuts torque depends on the size: M4 2.5-4N.m M5 4-6N.m M6 6-7.5N.m Warning: All mechanical components on the bike will get some wear and tear over time, depending on the type of the component and the material used. Any cracks, scratches, or colour changes, may indicate that the component has worn out and should be replaced. You should not try and fix any electrical components by yourself. 9 7. Lubrication of the bike components The table below shows how often, on average, you should lubricate the bike’s components. If you are not experienced in bike maintenance, you should always use a professional bike service for this. Frequency Weekly Monthly Every six months Annually Component Lubricant How to lubricate Chain Derailleur wheels Derailleur Brake levers Brake callipers Chain Lube or light oil Chain Lube or light oil Oil Oil Oil Brush on or o squirt Brush on or o squirt 2 drops from oil can 2 drops from oil can 2 drops from oil can Freewheel Brake cables Shift levers Pedals Derailleur cables Wheel bearings Headset Oil Lithium Lithium Lithium Lithium Lithium Lithium 2 squirts from oil can Disassemble Disassemble Disassemble Disassemble Disassemble Disassemble based based based based based based grease grease grease grease grease grease 6.3 Fitting the front wheel The front wheel requires occasional checks to make sure it is securely and tightly fitted in the forks and is not too loose. What to look at during the front wheel fitment? The lever should be tighten up properly to the end of its travel. If you feel that the lever is too soft during locking, you need to hold the locking nut on the other end of the axle and turn the lever around to set up as required. The pictures below show correct and incorrect way of fitting the front wheel. Correctly locked up front wheel 10 Adjust the tension on the QR lever by screwing the axle nut 11 Push the lever to the end 12 Incorrect 13 Incorrect Dear User, if this manual hasn’t answered all your questions regarding Oxygen electric bikes, please do contact us directly either through our website www.oxygenbicycles.com or emailing us at [email protected] 14