1
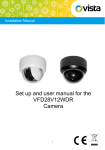
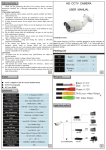
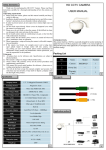
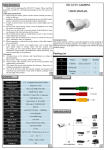
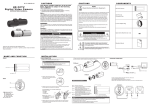
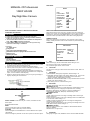
MANUAL Of Professional
MAIN MENU:
MENU
1080P HD-SDI
Day/Night Box Camera
READ THIS MANUAL CAREFULLY BEFORE ITSTALING AND
OPERATING THIS PRODUCT
CAUTIONS:
1. Please don’t touch the sensor and lens with your hand.
2. Please don’t install the camera in following unstable conditions
shake, rain, too hot, too cold etc.
3. The recommended conditions of the installation are temperature
from -10℃ to 50℃ and moisture under 85%.
4. Please kindly contact your sales person in case you have any
questions on assembly or installation.
1. Features:
·1/3” CMOS Sensor
·2 Mega Pixels
·Video Output: HD 1080P@30fps/25fps
·3D-NR/Smart NR/Sense-up/Digital Zoom Functions etc.
·CS Mount Joint
·650nm Optical Filter
Features & Attachment:
ELC
OFF
OFF
EXTERN
MIDDLE
OFF
MENU ADJUSTMENT:
Press Menu button to enter main menu, and then main menu options will
display on the screen. Use the UP/DOWN Button to move cursor to different
menu options, and use the LEFT/RIGHT Button to set or adjust the menu
parameter. Please press Menu Button to EXIT after finishing adjustment.
SUBMENU OPTION:
Some menu options have its submenus, if the right side of menu option
display., please press Menu button to enter submenu for parameter settings.
SUB-MENU:
EXPOSURE
BRIGHTNESS
SHUTTER
SENS-UP
AGC
IiiiiiIiiiiiI 10
AUTO
X2
IiiiiiIiiiiiI 10
RETURN
2. Attachment:
·One User Manual
·Tools & Installation Screws
Assembly Installation:
1. Firstly, find a suitable position to install the bracket of the camera, install
the bracket on the ceiling or walling by screws..
2. Fixed the box cameras on the bracket with manually twisting.
3. Input the power to the power connector indicated in the drawing. Check
the input voltage according to the camera label.
4. Connect the BNC outputting SDI signal indicated in the drawing to
DVR or other SDI converter equipment. Another BNC is an analog video
output, used for installation video adjusting.
5. Adjust the camera direction and lens until you can get a good image of
target by adjusting the camera bracket.
Menu Function Introduction:
UP
LEFT
IRIS
FOCUS ADJ
EXPOSURE
BACKLIGHT
DAY&NIGHT
COLOR
DNR
IMAGE
MOTION
SYSTEM
EXIT
RIGHT
DOWN
ENTRY OF MENU: Press Menu Key for 1 second, and release to enter
Menu Option.
BUTTON INSTRUCTION:
MENU:
Function: Press Menu button to enter Main MENU.
Menu button is also an Enter Key to enter submenu.
UP/DOWN:
Function: Navigate UP or DOWN button to choose different menu options.
LEFT/RIGHT:
Function: Change the parameter of main menu options or submenu options.
MAIN MENU OPTIONS FUNCTION
1.
IRIS
Select the lens type, ELC/ALC selectable. Default setting is “ELC”.
ELC: Eletronic Light Control, for Manual Iris lens.
ALC: Automatic Light Control, for DC Iris lens
2.
FOCUS ADJ
This function is to help you make cameras focus well of all area. When it is
activated,
3.
EXPOSURE
1) BRIGHTNESS: Setting output brightness. Default setting is 10.
2) SHUTTER: Selecting shutter mode: AUTO / Manual / FLIK and it is also
adjustable from 1/25-1/50000. It is adjustable from X2-X30 under
Sense-up condition. Default setting is “AUTO”.
3) SENSE-UP: OFF/X2/X4/X8/X16/X32. It is only available under the AUTO
shutter mode. Default setting is “X2”.
4) AGC: Setting from 0 to 10. Default setting is 10.
4.
BACKLIGHT
Backlight compensation: OFF / HLC / BLC / WDR
●SUBMENU OF HLC:
LEVEL: Setting the sensitivity of compensation area. Default setting is “10”.
COLOR: Setting the color of high light compensation area, including
BLK(black) / WHT(white) / YEL(yellow) / CYN(cyan) / GRN(Green) /
MAG(magenta) / RED(red) / BLU(blue). Default setting is “BLK”.
●SUBMENU OF BLC:
BLC OSD:
H-POS: setting the position of the range of backlight area to left and right.
Default setting is “8”.
V-POS: setting the position of the range of backlight area in the ZONE NUM
to up and down. Default setting is “7”.
H-SIZE: increase and decrease the size of the range of backlight area
horizontally. Default setting is “3”.
V-SIZE: increase and decrease the size of the range of backlight area in the
ZONE NUM vertically. Default setting is “3”.
●SUBMENU OF WDR
WEIGHT: Setting the effect, LOW / MIDDLE / HIGH selectable Default
setting is “MIDDLE”.
RETURN: return to upper menu.
5.
DAY&NIGHT
Setting day and night mode, EXTERN / AUTO / COLOR / B&W selectable.
EXTERN: select this when the color is controlled by CDS sensor.
AUTO: camera will automatically show color image in high lux and
black/white image in low lux.
COLOR: only displayed color image.
B&W: only displayed black/white image.
●SUBMENU OF EXTERN DAY & NIGHT
DAY & NIGHT
ANTI-SAT
IiiiiiIiiiiiI 7
LOW
EXTERN S/N
IiiiiiIiiiiiI 11
AGC THRES
AGC MARGIN IiiiiiIiiiiiI 8
LOW
DELAY
RETURN
6.
COLOR
1) AWB: Setting the white balance mode: AUTO / AUTOext / PRESET /
MANUAL selectable.
2) COLOR GAIN: Setting the thickness of color, from 0~20. Default setting
is “10”.
●SUBMENU OF MANUAL WHITE BALANCE:
1) C-TEMP: Setting the color temperature of surveillance area, 3000K /
5000K / 8000K selectable.
2) R-GAIN: Setting red gain from 0~20. Default setting is “10”.
3) B-GAIN: Setting blue gain from 0~20. Default setting is “10”.
7.
DNR
Digital noise reduction setting, LOW / MIDDLE / HIGH selectable. Default
setting is “MIDDLE”.
8.
IMAGE
1) SHARPNESS: setting the sharpness, it is adjustment from 0-10. Default
setting is 5.
2) GAMMA: setting the output GAMMA characteristic, 0.45/0.55/0.65/0.75
selectable. Default setting is “0.55”
3) MIRROR: setting mirror function, ON / OFF selectable. Default setting is
“OFF”.
4) FLIP: setting flip function, ON / OFF selectable. Default setting is “OFF”.
5) D-ZOOM: setting digital zooming function, it is selectable from 1X~16X.
Default setting is “1X”.
6) ACE: setting adaptive contrast enhancement in outputting analog signal.
OFF / LOW / MIDDLE / HIGH selectable. Default setting is “OFF”.
7) DEFOG: setting fog penetrating function, OFF / LOW / MIDDLE / HIGH
selectable. Default setting is “OFF”.
8) SHADING: setting shading compensation when using wide angle lens.
OFF / ON selectable. Default setting is “OFF”.
9) PRIVACY: setting private protection area, OFF / ON selectable. If turn the
PRIVACY function ON, then could enter the submenu to set. Press ZONE
NUM to set the privacy protection areas, 0-15 areas are selectable in
“BOX” mode, 0-7 areas are selectable in “POLYGON” mode..
ZONE DISP: turn the ZONE DISP function ON, then privacy protection
area will display in screen.
H-POS(POS-X): setting the position of the range that you selected in
the ZONE NUM to left and right. Selectable range from 0~60.
V-POS(POS-Y): setting the position of the range that you selected in
the ZONE NUM to up and down. Selectable range from 0~40.
H-SIZE: increase and decrease the size of the range that you selected
in the ZONE NUM horizontally. Selectable range from 0~60.
V-SIZE: increase and decrease the size of the range that you selected
in the ZONE NUM vertically. Selectable range from 0~40.
Y-LEVEL: setting the luminance level of privacy area. It’s selectable
from 0~20, default setting is “10”.
CB LEVEL: setting the blue thickness in privacy area. It’s selectable
from 0~20, default setting is “10”.
CR LEVEL: setting the red thickness in privacy area. It’s selectable
from 0~20, default setting is “10”.
TRANS: setting the transparency of privacy area. 0 / 1 / 2 / 3
selectable, default setting is “3”.
RETURN: return to upper menu.
10) RETURN: return to upper menu
9.
MOTION
Motion detection setting, OFF / ON selectable
1) DET WINDOW: setting the area of motion detection.
WINDOW USE: choosing motion detection area, 0 / 1 / 2 / 3 selectable.
WINDOW ZONE: Press right of left button to active this function when
display “ON”. Then motion detection will work in this area you choose in
“WINDOW USE”.
DET H-POS: setting the position of the range in the motion detection area
to left and right.
DET V-POS: setting the position of the range of motion detection area to
up and down.
DET H-SIZE: increase and decrease the size of the range of motion
detection horizontally.
DET V-SIZE: increase and decrease the size of the range of motion
detection horizontally.
2) SENSITIVITY: setting the sensitivity of motion detection, it is selectable
from 0-10. Default setting is “5”.
3) MOTION OSD: Press right or left button to active this function when
display “ON”. Then you can see red box in the screen to remind of motion
objects.
4) TEXT ALARM: Press right or left button to active this function when
display “ON”. Then you can see “MOTION” in the screen to remind of
motion objects.
5) SIGNAL OUTPUT: Press right or left button to active this function when
display “ON”.
6) RETURN: return to upper menu
10. SYSTEM
1) COM.: Selecting setting camera ID display.
●SUBMENU OF COM.
COM.:
BAUDRATE: setting the baud rate of this camera.
RETURN: return to upper menu.
2) IMAGE RANGE: setting image range, FULL / CROP / USER selectable
3) COLOR SPACE: HD-CbCr / YUV / SD-CbCr
4) FRAME RATE: setting output SDI signal resolutions, 1080-30p / 720-30p
/ 720-60p.
5) FREQ: Press right and left to choose signal system, 50HZ / 60HZ
selectable. 50HZ for PAL,60HZ for NTSC.
6) COLOR BAR.: setting “ON” to active this function, then you will see many
bar of different colours in the screen. If set “OFF”, COLOR BAR will be
closed.
7) CVBS: setting the output signal system, PAL / NTSC selectable.
8) LANGUAGE: setting the language of OSD menu, ENG / CHN / JPN /
KOR / RUS / ITA / DUT / DEU / FRE selectable.
9) CAM TITLE: setting the ID of this camera, it is 8-bit ID made of A-Z or
0~9. Default setting is “00000000”. Press up and down to choose
character, left and right to choose the position of character, Press enter to
return to the upper menu.
10) RESET: continuously press OSD button to let all settings back to factory
default, except “FRAME RATE” ”FREQ” “LANGUAGE”.
11) RETURN: return to upper menu.
11. EXIT
Exit the OSD menu.
SPECIFICATIONS:
Solution
1/3” Mega Pixel Sensor
Signal System
PAL / NTSC
Sync System
Internal Sync
Effective Pixels
2.0 Mega Pixels
PAL: 1920X1080P 25FPS
Horizontal Resolution
NTSC: 1920X1080P 30FPS
Support (WDR / 3D DNR / Sense-up / Digtial
OSD Menu
Zoom …etc functions)
Video Output
HD-SDI (SMTPE 292M) / CVBS: 1.0Vp-p 75ohm
S/N Ratio
More than 50Db
White Balance
Auto Tracking White Balance
Shutter Speed
1/25-1/50000
Infrared Lamps
650nm
Minimum Illumination
0 Lux (Leds ON)
Lens Joint
CS Mount
Working Temperature
-10~50
Storage Temperature
-20~60
Power Requirement
DC 12V Max Power Consumption Less than
1.5W(When Leds ON)