1
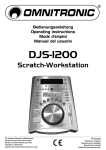
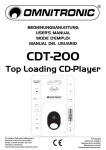
Bedienungsanleitung
Operating instructions
Mode d'emploi
Manual del usuario
Manuale d'instruzione
DJS-1100
Scratch-Workstation
© COPYRIGHT
Nachdruck verboten!
All rights reserved!
Réproduction interdite!
Prohibida toda reproducción!
Riproduzione vietata!
Für weiteren Gebrauch aufbewahren!
Keep this manual for further needs!
Gardez ces instructions pour des utilisations ultérieurs!
Guarde este manual para posteriores usos.
Tenere il manuale per utlizazioni ulteriori!
1
2
OMNITRONIC
1 2 3 4 5 6 7 8 9 0
EFFECT
CUE
ELAPSED
TOTAL REMAIN
CUE
AUTO
SINGLE
LOOP
RELOOP
T
M
S
PITCH
F
3
22
23
4
24
_
_
5
_
25
6
26
7
27
8
28
9
10
11
/
_
12
29
seamless loop
30
13
14
15 16 17 18 19
20
21
30
R
L
31
32
VOLUME
33
34
1 2 3 4 5 6 7 8 9 0
EFFECT
CUE
35
36
ELAPSED
37
TOTAL REMAIN
CUE
38
AUTO
SINGLE
LOOP
RELOOP
T
M
S
F
PITCH
MULTI-LANGUAGE-INSTRUCTIONS
Inhaltsverzeichnis/Table of contents
Sommaire/Contenido/Indice
1. EINFÜHRUNG ............................................................................................................................................... 7
2. SICHERHEITSHINWEISE ............................................................................................................................. 7
3. BESTIMMUNGSGEMÄSSE VERWENDUNG .............................................................................................. 8
4. GERÄTEBESCHREIBUNG ........................................................................................................................... 9
4.1 Features ................................................................................................................................................... 9
4.2 Vorderseite ............................................................................................................................................. 10
4.3 Rückseite................................................................................................................................................ 13
5. INSTALLATION........................................................................................................................................... 14
6. BEDIENUNGSHINWEISE ........................................................................................................................... 14
6.1 Inbetriebnahme....................................................................................................................................... 14
6.2 CD Slot In ............................................................................................................................................... 14
6.3 LCD-Display ........................................................................................................................................... 14
6.4 Play/Pause ............................................................................................................................................. 15
6.5 Titelauswahl über die Track-Tasten ....................................................................................................... 15
6.6 Einstellung der Wiedergabegeschwindigkeit.......................................................................................... 15
6.7 Cueing .................................................................................................................................................... 16
6.8 Vinyl Cue-Funktion ................................................................................................................................. 17
6.9 Sequenzwiederholung (Loop-Funktion) ................................................................................................. 17
6.10 Sampler-Modus .................................................................................................................................... 17
6.11 Effekte .................................................................................................................................................. 18
6.12 Faderstart ............................................................................................................................................. 19
6.13 Ende der Benutzung............................................................................................................................. 19
7. VORSICHTSMASSNAHMEN...................................................................................................................... 19
8. REINIGUNG UND WARTUNG .................................................................................................................... 20
9. TECHNISCHE DATEN ................................................................................................................................ 20
1. INTRODUCTION.......................................................................................................................................... 21
2. SAFETY INSTRUCTIONS........................................................................................................................... 21
3. OPERATING DETERMINATIONS .............................................................................................................. 22
4. DESCRIPTION............................................................................................................................................. 23
4.1 Features ................................................................................................................................................. 23
4.2 Frontpanel .............................................................................................................................................. 24
4.3 Rearpanel ............................................................................................................................................... 27
5. INSTALLATION........................................................................................................................................... 28
6. OPERATION................................................................................................................................................ 28
6.1 Setup ...................................................................................................................................................... 28
6.2 CD Slot In ............................................................................................................................................... 28
6.3 LCD-display ............................................................................................................................................ 28
6.4 Play/Pause ............................................................................................................................................. 29
6.5 Selecting a track via the Track-buttons .................................................................................................. 29
6.6 Adjusting the playback-speed ................................................................................................................ 29
6.7 Cueing .................................................................................................................................................... 29
6.8 Vinyl Cue-function .................................................................................................................................. 30
6.9 Memorizing a sequence (Loop-function) ................................................................................................ 30
6.10 Sampler-mode ...................................................................................................................................... 31
6.11 Effects................................................................................................................................................... 31
6.12 Faderstart ............................................................................................................................................. 32
6.13 End of operation ................................................................................................................................... 33
7. PRECAUTIONS ........................................................................................................................................... 33
8. CLEANING AND MAINTENANCE.............................................................................................................. 33
9. TECHNICAL SPECIFICATIONS ................................................................................................................. 34
1. INTRODUCTION.......................................................................................................................................... 35
2. INSTRUCTIONS DE SÉCURITÉ................................................................................................................. 35
3. EMPLOI SELON LES PRÉSCRIPTIONS ................................................................................................... 36
4. DESCRIPTION............................................................................................................................................. 37
4.1 Features ................................................................................................................................................. 37
4.2 Face avant.............................................................................................................................................. 38
5. INSTALLATION........................................................................................................................................... 42
6. INSTRUCTIONS D’UTILISATION............................................................................................................... 42
6.1 Mise en service....................................................................................................................................... 42
6.2 CD Slot In ............................................................................................................................................... 42
6.3 Affichage LCD ........................................................................................................................................ 43
6.4 Play/Pause ............................................................................................................................................. 43
6.5 Sélection des plages par les touches Track........................................................................................... 43
6.6 Réglage de la vitesse de lecture ............................................................................................................ 44
6.7 Cueing .................................................................................................................................................... 44
6.8 Fonction Vinyl Cue ................................................................................................................................. 45
6.9 Répétition d’une séquence (Fonction Loop) .......................................................................................... 45
6.10 Mode de Sampler ................................................................................................................................. 45
6.11 Effets .................................................................................................................................................... 46
6.12 Faderstart ............................................................................................................................................. 47
6.13 Fin d'utilisation...................................................................................................................................... 48
7. PRECAUTIONS ........................................................................................................................................... 48
8. NETTOYAGE ET MAINTENANCE ............................................................................................................. 48
9. CARACTÉRISTIQUES TECHNIQUES ....................................................................................................... 49
1. INTRODUCCIÓN ......................................................................................................................................... 50
2. INSTRUCCIONES DE SEGURIDAD........................................................................................................... 50
3. INSTRUCCIONES DE MANEJO................................................................................................................. 51
4. DESCRIPCIÓN DEL APARATO ................................................................................................................. 52
4.1. Features ................................................................................................................................................ 52
4.2 Panel frontal ........................................................................................................................................... 53
5. INSTALACIÓN............................................................................................................................................. 57
6. MANEJO ...................................................................................................................................................... 57
6.1 Puesta en marcha .................................................................................................................................. 57
6.2 CD Slot In ............................................................................................................................................... 57
6.3 Pantalla LCD .......................................................................................................................................... 57
6.4 Lectura/Pausa ........................................................................................................................................ 58
6.5. Selección de una canción mediante las teclas Track ........................................................................... 58
6.6 Ajuste de la velocidad de lectura............................................................................................................ 58
6.7 Escucha.................................................................................................................................................. 59
6.8 Función Vinyl Cue .................................................................................................................................. 59
6.9 Memorizar una secuencia (función Loop) .............................................................................................. 60
6.10 Modo de sampler.................................................................................................................................. 60
6.11 Efectos.................................................................................................................................................. 61
6.11 Faderstart ............................................................................................................................................. 62
6.12 Final del manejo ................................................................................................................................... 62
7. PRECAUCIONES ........................................................................................................................................ 62
8. LIMPIEZA Y MANTENIMIENTO ................................................................................................................. 63
9. ESPECIFICACIONES TÉCNICAS .............................................................................................................. 63
Italiano
1. INTRODUZIONE.......................................................................................................................................... 64
2. NORME DI SICUREZZA.............................................................................................................................. 64
3. UTILIZZO CONFORME DELL‘APPARECCHIO......................................................................................... 65
4. DESCRIZIONE DELL‘APPARECCHIO ...................................................................................................... 66
4.1 Caratteristiche ........................................................................................................................................ 66
4.2 Lato frontale............................................................................................................................................ 67
4.3 Retro....................................................................................................................................................... 70
5. ISTALLAZIONE ........................................................................................................................................... 71
6. INDICAZIONI PER L‘USO........................................................................................................................... 71
6.1 Messa in funzione................................................................................................................................... 71
6.2 CD Slot In ............................................................................................................................................... 71
6.3 LCD-Display ........................................................................................................................................... 71
6.4 Play/Pause ............................................................................................................................................. 72
6.5 Selezione del titolo attraverso i tasti Track............................................................................................. 72
6.6 Regolazione della velocità di esecuzione............................................................................................... 72
6.7 Cueing .................................................................................................................................................... 73
6.8 Funzione Vinyl Cue ................................................................................................................................ 73
6.9 Ripetizione delle sequenze (funzione Loop) .......................................................................................... 74
6.10 Modalità „Sampler“ ............................................................................................................................... 74
6.11 Effetti .................................................................................................................................................... 75
6.12 Faderstart ............................................................................................................................................. 76
6.13 Fine dell‘utilizzo .................................................................................................................................... 76
7. MISURE PRECAUZIONALI ........................................................................................................................ 76
8. PULIZIA E MANUTENZIONE...................................................................................................................... 77
9. CARATTERISTICHE TECNICHE................................................................................................................ 77
Vorsicht Laserstrahlung!
Dieses Gerät enthält eine Laserdiode
sicheren Betrieb zu gewährleisten,
entfernt werden, noch darf versucht
Geräteinneren zu verschaffen.
Im Geräteinneren befinden sich keine
arbeiten nur durch qualifiziertes Fach-
der Klasse 1. Um einen
dürfen weder Abdeckungen
werden, sich Zugang zum
zu wartenden Teile. Wartungspersonal.
OPERATING INSTRUCTIONS
DJS-1100
SCRATCH-WORKSTATION
CAUTION!
Keep this device away from rain and moisture!
Unplug mains lead before opening the housing!
For your own safety, please read this user manual carefully
before you initial start-up.
All persons involved in the installation, operation and maintenance of this device have to:
- be qualilfied
- follow the instructions of this manual
1. INTRODUCTION
Thank you for having chosen a OMNITRONIC DJS-1100 Scratch-Workstation. You have acquired a reliable
and powerful device. If you follow the instructions given in this manual, we can assure you that you will enjoy
this device for many years.
Unpack your OMNITRONIC DJS-1100.
Please make sure that there are no obvious transport damages. Should you notice any damages on the A/C
connection cable or on the casing, do not take the device into operation and immediately consult your local
dealer.
2. SAFETY INSTRUCTIONS
CAUTION!
Be careful with your operations. With a dangerous voltage you can suffer a dangerous
electric shock when touching the wires!
This device has left our premises in absolutely perfect condition. In order to maintain this condition and to
ensure a safe operation, it is absolutely necessary for the user to follow the safety instructions and warning
notes written in this user manual.
Important:
Damages caused by the disregard of this user manual are not subject to warranty. The dealer will
not accept liability for any resulting defects or problems.
21
Always plug in the power plug least. Make sure that the power-switch is set to OFF position before you
connect the device to the mains.
Keep away from heaters and other heating sources!
If the device has been exposed to drastic temperature fluctuation (e.g. after transportation), do not switch it
on immediately. The arising condensation water might damage your device. Leave the device switched off
until it has reached room temperature.
Never put any liquids on the device or close to it. Should any liquid enter the device nevertheless, disconnect
from mains immediately. Please let the device be checked by a qualified service technician before you
operate it again. Any damages caused by liquids having entered the device are not subject to warranty!
This device falls under protection-class II and features a protective insulation.
Never let the power-cord come into contact with other cables! Handle the power-cord and all connections
with the mains with particular caution!
Make sure that the available voltage is not higher than stated on the AC voltage selector.
Make sure that the power-cord is never crimped or damaged by sharp edges. Check the device and the
power-cord from time to time.
Always disconnect from the mains, when the device is not in use or before cleaning it. Only handle the
power-cord by the plug. Never pull out the plug by tugging the power-cord.
Make sure that the volume control of the headphones is set to "min" position before the device is switched
on.
CAUTION: Turn the amplifier on last and off first!
Please note that damages caused by manual modifications on the device or unauthorized operation by
unqualified persons are not subject to warranty.
Keep away children and amateurs!
CAUTION: High volumes can cause hearing damage!
There are no serviceable parts inside the device. Maintenance and service operations are only to be carried
out by authorized dealers.
3. OPERATING DETERMINATIONS
This device is a professional CD-player for playing CDs. This product is allowed to be operated with an
alternating current of 115/230 V, 50/60 Hz and was designed for indoor use only.
Do not shake the device. Avoid brute force when installing or operating the device.
When choosing the installation-spot, please make sure that the device is not exposed to extreme heat,
moisture or dust. There should not be any cables lying around. You endanger your own and the safety of
others!
Do not operate the device in extremely hot (more than 30° C) or extremely cold (less than 5° C)
surroundings. Keep away from direct insulation (particularly in cars) and heaters.
Operate the device only after having familiarized with its functions. Do not permit operation by persons not
qualified for operating the device. Most damages are the result of unprofessional operation!
Never use solvents or aggressive detergents in order to clean the device! Rather use a soft and damp cloth.
22
Please use the original packaging if the device is to be transported.
Never remove the serial barcode from the device as this would make the guarantee void.
If this device will be operated in any way different to the one described in this manual, the product may suffer
damages and the guarantee becomes void. Furthermore, any other operation may lead to dangers like shortcircuit, burns, electric shock, etc.
4. DESCRIPTION
4.1 Features
The ultimate Scratch-Workstation
Realtime-scratch-function without delay and time limit • World novelty Vinyl Cue-function for searching Cuepoints like with a turntable • The Vinyl Cue-function disables the frame-function of the CD-player • Different
DSP-sound-effects like brake, reverse, motor off, flanger/phaser, echo and auto pan with adjustable
parameters • All sound-effects can be combined with one another (e.g. scratch and echo and flanger or
reverse and echo and then brake...) • All adjusted effect-parameters can be memorized and recalled from up
to 128 CDs • Sampler-unit with 3 x 7 seconds sampler-time, adjustable sample-pitch and sample-volume •
All adjusted sample-parameters can be memorized and recalled from up to 128 CDs • Three cue-point
hotkeys, which can be recalled from up to 128 CDs • Seamless loop-function and reloop-function • 10second anti-shock-function • Faderstart-function • Speed-control range adjustable to +/- 8 %, +/- 12 % or +/16 % • Track-buttons for selecting the track • Additional +10-button • Front-loading CD-slot for fast and easy
CD-exchange • Headphones-output with volume control • Digital output via RCA • Interactive search-wheel
and scratch-wheel • Height and depth like a turntable
23
4.2 Frontpanel
1
2
OMNITRONIC
1 2 3 4 5 6 7 8 9 0
EFFECT
CUE
ELAPSED
TOTAL REMAIN
CUE
AUTO
SINGLE
LOOP
RELOOP
T
M
S
PITCH
F
3
22
23
4
24
_
_
5
_
25
6
26
7
27
8
28
9
10
11
/
_
12
29
seamless loop
30
13
14
15 16 17 18 19
20
21
1. DISPLAY
LCD-display for displaying the different modes and functions. Please refer to the explanations under 6.3
LCD-display.
2. STOP/EJECT BUTTON
Via the Stop/Eject-button, you can stop and eject the CD. Please refer to the explanations under 6.2 CD Slot In.
24
3. SEARCH-WHEEL
Via the Search-wheel, you can quickly scan forwards and backwards. Turn the Search-wheel to the right in
order to scan forwards and turn it to the right in order to scan backwards. The further you turn the Searchwheel the higher the scanning-speed. In the pause-mode, the current frame is repeated as soon as you turn
the Search-wheel.
4. TRACK-BUTTONS
Via the Track-buttons, you can select the desired track. Please refer to the explanations under 6.5 Selecting
a track via the Track-buttons.
5. BANK/CUE-BUTTONS
You can memorize a Cue-point and a sample on every Bank/Cue-button. The memorized Cue-button or the
sample (press Sampler-button first) can be recalled via the respective Bank/Cue-button.
6. MEMORY/RECALL-BUTTON
With this button, you can memorize the current Cue-point, the current sample or the sample-parameter via
one of the three Bank/Cue-buttons. Press the Memory/Recall-button (LED on) and the desired Bank/Cuebutton. Please refer to the explanations under 6.7 Cueing and 6.10 Sampler-mode.
You can memorize up to 3 Cue-points and samples with sample-parameters of different titels and recall them
via the respective Bank/Cue-button.
Please note that the maximum sample-length is 7 seconds.
In the Effect-mode, you can memorize the adjusted effect parameters by adjusting the parameter and
pressing the Memory/Recall-button.
You can recall all memorized Cue-points, samples and effect-parameters from up to 128 CDs by switching
the CD-player on, pressing the Memory/Recall-button (LED on) and inserting the respective CD.
7. SAMPLER-BUTTON
By pressing the Sampler-button (Sampler LED on), you can recall a sample you memorized on one of the
Bank/Cue-buttons before.
The memorized samples of a CD remain in the memory until you switch off the CD-player or overrite the
samples.
You can recall all memorized Cue-points, samples and effect-parameters from up to 128 CDs by switching
the CD-player on, pressing the Memory/Recall-button (LED on) and inserting the respective CD.
Please refer to the explanations under 6.10 Sampler-mode.
8. LOOP IN/REALTIME CUE-BUTTON
By pressing the In-button, you can memorize the Cue-point. Furthermore, you can program the In-button of a
sequence which will be repeated then.
Please refer to the explanations under 6.9 Memorizing a sequence (Loop-function)and 6.8 Vinyl Cuefunction.
9. LOOP OUT-BUTTON
By pressing the Out-button, you can memorize the Loop Out-button. The player will repeat the memorized
sequence until you press the Out-button once more.
10. RELOOP-BUTTON
Via the RELOOP-button, you can call up a memorized sequence once more.
11. CUE-BUTTON
Pause-mode:
In the pause-mode, you can cue by pressing and holding the Cue-button. As soon as you let the Cue-button
loose, the player returns to the track-start or the Cue-point.
Playback-mode:
If you press the Cue-button during playback, the player returns to the track-start or the Cue-point and goes
into Pause-mode.
On the Cue-button, yoiu can memorize the fourth Cue-point.
Please refer to the explanations under 6.7 Cueing.
12. PLAY/PAUSE-BUTTON
With the Play/Pause-button, you can start the playback and stop it again. Please refer to the explanations
under 6.4 Play/Pause.
25
13. SCRATCH/VINYL CUE-BUTTON
With the Scratch-button, you can activate the Scratch-function. Please refer to the explanations under6.8
Vinyl Cue-function and 6.11 Effects.
14. FLANGER-BUTTON
With the Flanger-button, you can activate the Flanger-effect. Please refer to the explanations under 6.11
Effects.
15. PAN-BUTTON
With the Pan-button, you can activate the Pan-effect. Please refer to the explanations under 6.11 Effects.
16. SCRATCH-WHEEL
Playback-mode:
Via the Scratch-wheel, you can temporarily adjust the playback-speed by +/- 16 %.
Pause-mode:
In the pause-mode, the current frame is repeated as soon as you turn the Scratch-wheel.
Via the Scratch-wheel, you can slowly search within a title forwards and backwards. In this way, you can
easily find a Cue-point for example.Turn the Scratch-wheel to the right in order to search forwards and turn it
to the right in order to search backwards. The faster you turn the Scratch -wheel the higher the searchingspeed.
If you press the Scratch-button, you can activate the VINYL CUE-function. This function disables the framefunction of the CD-player and you can search for the Cue-point as with a turntable.
In the Sampler-mode and Effect-mode, you can adjust the parameter settings after pressing the DSP
Parameter-button.
17. CD LED
This LED is illuminated when a CD is inserted in the CD Slot In and the player is ready for use.
18. HOLD-BUTTON
With the Hold-button, you can hold the settings of the effect-parameters and sample-parameters. Please
refer to the explanations under 6.11 Effects.
19. ECHO-BUTTON
With the Echo-button, you can activate the Echo-effect. Please refer to the explanations under 6.11 Effects.
20. REVERSE-BUTTON
With the Reverse-button, you can activate the Reverse-function. Please refer to the explanations under 6.11
Effects.
21. BRAKE-BUTTON
With the Brake-button, you can activate the Brake-effect and the Motor Off-effect. Please refer to the
explanations under 6.11 Effects.
22. TIME-BUTTON
The display can be switched from track remain time (Remain) to total remain time (total remain) or track
playback time (Elapsed).
23. SINGLE-BUTTON
For choosing single playback or continous play. By pressing this button once, the display shows „SINGLE“.
The current track is then played once and the player goes into Pause-mode at the next track-start.
24. AUTO CUE-BUTTON
With the Auto Cue-button, you can activate the Auto Cue-function. Please refer to the explanations under 6.7
Cueing.
25. DSP PARAMETER-BUTTON
With the DSP Parameter-button, you can adjust the effect-parameters, the sample-speed and the samplevolume via the Scratch-wheel. Please refer to 6.11 Effects.
26. PITCH CONTROL-BUTTON
With this button, you can switch the speed-adjustment via the pitchfader off (LED off). Please refer to 6.6
Adjusting the playback-speed.
26
27. 8/12/16 %-BUTTON
With this button, you can select the speed-adjusting range between +/- 8 % (LED green), +/- 12 % (LED
yellow) or +/- 16 % (LED red). Please refer to 6.6 Adjusting the playback-speed.
28. PITCH BEND-BUTTONS
With the Pitch Bend-buttons, you can adjust the playback-speed temporarily by +/- 16 %. Please refer to 6.6
Adjusting the playback-speed.
If you press and hold the Pitch Bend - button, the playback speed decreases down to 0. This effect is
comparable with the Motor Off-effect.
29. PITCHFADER
You can adjust the desired speed with the Pitchfader. The display shows the current percentage.
30. CD SLOT IN
Insert the disc here. If a CD is inserted and the CD-player is ready for operation, the CD LED is shining.
Please refer to the explanations under 6.2 CD Slot In.
4.3 Rearpanel
R
L
31
32
VOLUME
33
34
35
36
37
38
31. AUDIO OUT-SOCKETS
The music-signal of these sockets is analogue. Connect the output to the respective input of your mixer.
32. FADERSTART-SOCKET
Via the Faderstart-socket, the CD-player can be remotely controlled. If you are using a mixer with Faderstartfunction connect the player with the Control Out-socket. Please note that these sockets must never be
connected with any voltage. Please refer to the explanations under 6.12 Faderstart.
33. DIGITAL OUT-SOCKET
The music-signal of this socket is digital. Connect the output to the respective input of a digital amplifier for
example.
34. HEADPHONES SOCKET
With this socket, you can connect headphones with an impedance between 8 Ohms and 600 Ohms.
35. VOLUME-CONTROL
With the Volume-control, you can adjust the headphones volume.
36. VOLTAGE SELECTOR
Make sure that the indication corresponds to the available voltage.
37. AC CONNECTION
Plug the power supply cable in here.
38. POWER SWITCH
Press this button to start operation.
27
5. INSTALLATION
Install the CD-player on a plane surface.
Make sure that the inclination angle will not exceed 15°, as the CD cannot be read correctly otherwise.
Connect the CD-player with the RCA-cable to your mixer via the Audio Out-sockets. Make sure that the
right/left occupation (plug-colour red/white) is the same at both devices.
CAUTION: Make sure that the CD-player is switched off (power-switch in outer position) before you connect
it to the mains in order to avoid damages on your loudspeakers.
Make sure that the indication on the Voltage-selector corresponds to the available voltage in order to avoid
severe damages.
Connect your CD-player with the mains.
CAUTION: Turn the amplifier on last and off first!
6. OPERATION
6.1 Setup
Switch the CD-player on via the Power-switch.
When the device is on and the tray has no disc, "NO DISC" appears on the display.
6.2 CD Slot In
Insert your CD in the CD Slot In. Make sure that you only hold the CD with 2 fingers on the edge. Avoid
touching the inside area of the CD.
You can recall all memorized Cue-points, samples and effect-parameters from up to 128 CDs after switching
the CD-player off. Therefore, you have to switch the CD-player on, press the Memory/Recall-button (LED on)
and insert the respective CD. The CD source code is read and the Cue-points, samples and effectparameters memorized before will be loaded from the memory. The display shows "Recall" until the loading
process is finished.
The CD LED is illuminated when a CD is inserted in the CD Slot In and the player is ready for use.
6.3 LCD-display
If the CD is improperly positioned,"ERR" or "NO DISC" appears on the display.
If the CD is properly positioned, the CD-player reads the CD.
The player jumps to the first track and is in the Pause-mode (Pause-symbol flashes). Please note that the
player automatically jumps to the section where the music starts.
Next to "T" the track number is displayed. The track remain time is displayed in M (MIN), S (SEC) and F
(FRAME).
1 2 3 4 5 6 7 8 9 0
EFFECT
CUE
ELAPSED
TOTAL REMAIN
CUE
AUTO
SINGLE
LOOP
RELOOP
T
M
S
F
PITCH
By using the Time-button, the time-indication can be switched from track remain time (Remain) to total
remain time (Total Remain) to track playback time (Elapsed).
28
Above the time-indication, 10 bars are displayed showing the remaining track-time visually. The shorter the
track remain time becomes, the less bars are displayed. 15 seconds before the track-end, the bars in the
display start flashing.
By pressing the Single-button, the CD-player is put into Single-mode and the display shows "SINGLE".
The indication "0.0" means that the playback-speed has not been changed. If you adjust the playback-speed
via the Pitchfader (Pitch-LED of the selected speed is flashing), the respective percentage is indicated in the
display.
6.4 Play/Pause
In the Pause-mode the the time-indication in the display stands still and the Pause-symbol flashes. The
playback of the first track can be started by pressing the Play/Pause button. In the Playback-mode, the timeindication in the display is running and the Play-symbol shines permanently.
If you wish to interrupt the playback, press the Play/Pause-button and the laser stops at the position where
you stopped.
If you wish to stop the playback, press the Stop/Eject-button. The display shows the total number of track
and the total playback time.
6.5 Selecting a track via the Track-buttons
You can select the desired track via the Track-buttons.
In order to play a track from the beginning, press the Track-buttons until the desired track number is
displayed. If you hold the respective Track-button, the CD-player will run through the track numbers until you
let the button loose.
«-button:
If you press the «-button once, playback starts at the beginning of the previous track. If a track is already
played back, you can start the current track from the beginning.
»-button:
If you press the »-button once, the playback starts at the beginning of the next track, if you press it twice the
following track, etc.
Please note that the CD-player calls the track up in the mode you pressed the Track-button. If the CD-player
is in the Play-mode at track 1 for example and you press the »-button, the player jumps to track 2 and
immediately starts playback.
6.6 Adjusting the playback-speed
Possibility 1:
Via the Pitchfader, you can adjust the playback-speed by up to +/-16 %.
Put the CD-player into playback-mode. Press the Pitch Control-button in order to activate the Pitchfader
(LED on).
Select the speed-adjustment range by pressing the 8/12/16%-button: +/- 8 % (LED green), +/- 12 % (LED
yellow) or +/- 16 % (LED red).
Adjust the playback-speed via the Pitchfader (Pitch-LED of the respective speed is on).
Possibility 2:
Via the Pitch Bend-buttons you can adjust the playback-speed temporarily.
Put the CD-player into playback-mode. Press the desired Pitch Bend-button. After letting the Pitch Bendbutton loose, the player automatically returns to the original playback-speed.
Motor Off-effect:
The Motor Off-effect equals the slow stopping of the turntable, if the motor is switched off. This effect is
activated via the Pitch Bend - button. If you hold the Pitch Bend - button, the playback-speeds decreases
down to 0. If the CD has "stopped", you can re-activate playback by releasing the Pitch Bend - button.
6.7 Cueing
Auto-Cue function:
After switching on and after pressing the Track-buttons, the player automatically jumps to the section where
the music starts. This function enable to minimize the transitions between two tracks.
If the Auto Cue-function is disabled, a time interval remains between two tracks until the music starts. If the
Auto Cue-function is activated (the display shows "Auto Cue"), the music starts immediately.
29
Back-Cue function:
If you press the Cue-button during playback, the player returns to the track-start or Cue-point (In-button) and
goes into Pause-mode. Please note that this function is only available within one track.
Memorizing the Cue-point:
Possibility 1:
The player is in Playback-mode.
Press the In-button and the Cue-point is memorized. The Cue-indicator shortly flashes.
As soon as you press the Cue-button, the player returns the Cue-point and goes into Pause-mode.
Possibility 2:
The player is in Playback-mode.
Press the Play/Pause-button and the player goes into Pause-mode.
Select the Cue-point via the Scratch-wheel. The display shows the selected starting-point (e.g. 3:42 22).
Press the In-button and the Cue-point is memorized. The Cue-indicator shortly flashes.
As soon as you press the Cue-button, the player returns the Cue-point and goes into Pause-mode.
Possibility 3:
The player is in Pause-mode or in Playback-mode.
Press the Track-button to select the desired track. The Cue-indicator shortly flashes and the Cue-point is set
to the track-start.
Memorizing several Cue-points:
With the DJS-1100, you can memorize up to 4 different Cue-points of different tracks and recall them via the
Bank/Cue-button or the Cue-button, respectively.
Press the Memory/Recall-button (LED on) and the desired Bank/Cue-button in order to memorize the current
Cue-point on the Bank/Cue-button.
By pressing the respective Bank/Cue-button, you can recall the Cue-points memorized via the
Memory/Recall-button. The last memorized Cue-point can be recalled by pressing the Cue-button.
The memorized Cue-points can be overritten at any time. Please note that the Cue-points can only be
deleted by switching the CD-player off an on again.
You can recall all memorized Cue-points from up to 128 CDs after switching the CD-player off. Therefore,
you have to switch the CD-player on, press the Memory/Recall-button (LED on) and insert the respective
CD. The display shows "Recall" until the loading process is finished.
6.8 Vinyl Cue-function
The DJS-1100 features a Vinyl Cue-function for searching Cue-points like with a turntable.
Realtime programming of the Cue-points or Loop-points, respectively:
The player is in Playback-mode.
Press the Play/Pause-button and the player goes into Pause-mode.
Press the Scratch-button in order to disable the frame-function of the CD-player. The CD-player is now in the
Realtime Cue-mode. Select the Cue-point by turning the Scratch-wheel forwards and backwards. Repeated
turning forwards of the Scratch-wheel produces a playback resembling the playback-speed via the
Play/Pause-button. Press the In-button in order to memorize the Cue-point.
6.9 Memorizing a sequence (Loop-function)
With the Loop-function, you can repeat a programmable sequence. Please note that you can only recall this
sequence within one track. If you also wish to insert in other tracks, you need to memorize the sequence as
sample on one of the Bank/Cue-buttons.
Memorizing the Loop-points:
Possibility 1:
The player is in Playback-mode.
If the In-button is pressed in the playback-mode, the CD keeps running and the A-point (starting-point) is
marked. By pressing the Out-button, the B-point (end-point) of the sequence is marked.
The player repeats the sequence between A-point and B-point until you press the Out-button once more.
30
Possibility 2:
The player is in Playback-mode.
Press the Play/Pause-button and the player goes into Pause-mode.
Select the A-point (starting-point) via the Scratch-wheel. The display shows the selected A-point (e.g. 3:42
22). Press the In-button and the selected A-point is marked.
Select the B-point (end-point) via the Scratch-wheel. The display shows the selected B-point (e.g. 3:51 11).
Press the Out-button and the selected B-point is marked.
The player repeats the sequence between A-point and B-point until you press the Out-button once more.
You can repeat the sequence once more if you press the Reloop-button.
6.10 Sampler-mode
Set the Loop In-point and Loop Out-point like described above. If a sample is to be memorized on a
Bank/Cue-button, only the first 7 seconds will be memorized.
Memorizing several samples:
With the DJS-1100, you can memorize up to 3 different samples of different tracks and recall them via the
Bank/Cue-button.
Press the Memory/Recall-button (LED on) and the desired Bank/Cue-button in order to memorize the current
sample on the Bank/Cue-button.
The memorized samples can be overwritten at any time. Please note that the samples can only be deleted
by switching the CD-player off an on again.
You can recall all memorized samples from up to 128 CDs after switching the CD-player off. Therefore, you
have to switch the CD-player on, press the Memory/Recall-button (LED on) and insert the respective CD.
The display shows "Recall" until the loading process is finished.
Playback of memorized samples:
By pressing the Sampler-button (LED on) and the respective Bank/Cue-button, you can recall the samples
memorized via the Memory/Recall-button. The sample will be repeated until you press the Sampler-button
again (LED off).
The memorized samples can be played back at any time. If the Sampler-button is pressed duruing the
playback of the CD, the sample mixes with the CD-playback. If the Sampler-button is pressed in the Pausemode, the sample alone is being played back. The sample playback-speed can temporarily be adjusted via
the Pitch Bend-buttons.
Adjusting and memorizing the sample-pitch and sample-volume
The sample-pitch and the sample-volume can individually be adjusted and memorized for every sample.
Press the Sampler-button (LED on) and the respective Bank/Cue-button in order to recall the sample.
Press the Hold-button (LED on) in order to hold the parameter-adjustments. If you do not press the Holdbutton, the adjustments are only temporary and the CD-player returns to the memorized settings.
Press the DSP Parameter-button and the display shows SP 1000. This means that the sample-pitch is set to
0 %. By turning the Scratch-wheel, you can adjust the sample-pitch to SP 2000 (maximum pitch-adjustment)
to SP 0000 (minimum pitch-adjustment).
Press the DSP Parameter-button again and the display shows SV 1000. This means that the sample-volume
is set to 100 %. By turning the Scratch-wheel, you can adjust the sample-volume down to SV 0000
(minimum sample-volume).
These temporary settings remain until you switch off the CD-player.
If you wish to memorize these settings with the sample, press the Memory/Recall-button (LED on) and hold it
for one second. In this way, the adjusted parameters can be recalled via the Recall-function.
Using temporary samples
The temporary samples on the Bank/Cue-buttons remain in the buffer memory if you change the CD without
switching the CD-player off. Please note that these samples are only temporarily available and cannot be
memorized on the new CD. This means, that such temporary samples will be deleted from the buffer
memory when you will switch off the CD-player. However, the original samples can be recalled from the
respective CD using the Recall-function.
6.11 Effects
The different effects can be activated via the respective Effect-button. If the effect is activated, the respective
LED is on.
31
The effect-parameters can be adjusted via the DSP Parameter-button and the Scratch-wheel.
Press the Hold-button (LED on) in order to hold the parameter-adjustments. If you do not press the Holdbutton, the adjustments are only temporary and the CD-player returns to the memorized settings.
If you wish to memorize these settings press the Memory/Recall-button (LED on) and hold it for one second.
In this way, the adjusted parameters can be recalled via the Recall-function.
You can recall all memorized effect-parameters from up to 128 CDs after switching the CD-player off.
Therefore, you have to switch the CD-player on, press the Memory/Recall-button (LED on) and insert the
respective CD. The display shows "Recall" until the loading process is finished.
Scratch-function:
The scratch-function resembles the scratching with a turntable. By turning the Scratch-wheel forwards and
backwards, different scratching-effects can be produced. If you turn the Scratch-wheel continuously
forwards, the playback resembles the playback-speed via the Play/Pause-button.
Flanger-effect:
When choosing the Flanger-effect, the effect of a jet engine is added to the original sound. The Flanger-time
(PT) modifies the sound of the flanger-effect and can be adjusted between 10 and 9990 ms.
The Flanger-rate (PR) modifies the depth of the flanger-effect and can be adjusted between 10 and 1000.
Pan-effect:
When choosing the Pan-effect, the sound is cyclically directed to the left and right side. The Pan-time (PT)
modifies the changing speed and can be adjusted between 10 and 9990 ms.
Echo-effect:
When choosing the Echo-effect, an echo is added to the original sound. The Echo-time (PT) modifies the
repeating frequency and size of the echo and can be adjusted between 0 and 1000 ms.
The Echo-rate (PR) modifies the feedback of the echo-effect and can be adjusted between 10 and 1000.
Reverse-function:
The unlimited reverse play can be activated via the Reverse-function. The playback-direction can be
changed as often as you like by pressing the Reverse-button. The Reverse-time (PT) modifies the playbackspeed and can be adjusted between 0 and 2000 as pitch change from -100 % to +100 %. Please note that
the modified playback-speed cannot be memorized.
Brake-effect:
The Brake-effect-effect equals the immediate stop/brake and starting of the track of the turntable, if the
Start/Stop-button is pressed. The Brake-time (PT) modifies the braking and starting speed of the track and
can be adjusted between 10 and 9990 ms. The ideal value for the Brake-effect lies between 600 and 800
ms.
Motor Off-effect:
The Motor Off-effect equals the slow stopping of the turntable, if the motor is switched off. The Motor Off-time
(PT) modifies the stopping and starting speed of the track and can be adjusted between 10 and 9990 ms.
The ideal value for the Motor Off-effect lies between 6000 and 9990 ms.
Overview over the effect-parameters:
Effects
Flanger
Pan
Echo
Reverse
Brake
Motor Off
Parameter PT
Adjustable value
Default value
10 - 9990 ms
1000 ms
10 - 9990 ms
1000 ms
0 - 1000 ms
500 ms
0 - 2000 ms
1000 ms
10 - 9990 ms
1000 ms
10 - 9990 ms
1000 ms
Parameter PR
Adjustable value
Default value
0 - 1000
500
0 - 1000
500
6.12 Faderstart
With the DJS-1100, you have the possibility to start the CD-player directly from the mixer. Make sure that the
Faderstart-socket is connected with the respective socket on the mixer. Additionally, the Audio Out-sockets
have to be connected with the Line-input sockets of your mixer. Please note that the Faderstart-function only
32
works with the appropriate mixers. Insert the CD and select the desired track (Pause-mode). Start playback
from your mixer.
Please note that the Faderstart-function is a Cue-point Faderstart-function. This means that the CD-player
starts playback after activating the respective channel of the mixer and goes into Pause-mode and returns to
the Cue-point after activating the channel again.
Prerequisites for the Faderstart-operation:
The mixer has to be connected via a 3.5 mm mono jack with the CD-player. For starting the playback, the
jack's positive pin (tip) is to be connected with the audio mass via a short impulse. For pausing the playback,
the jack's negative pin (sleeve) is to be connected with the audio mass via a short impulse. The mixer has to
be equipped with a switch, button or fader that will connect the tip with the audio mass for starting the
playback and the sleeve for pausing the playback when the respective channel is activated.
6.13 End of operation
Before you switch off the device, please make sure that no CD remains in the player. All memorized Cuepoints, samples and effect-parameters are stored inside the CD-player and can be also be recalled after
switching the CD-player off.
7. PRECAUTIONS
This CD player cannot be compared to conventional Hifi CD players. This player is much more rugged in
order to withstand the strenous road use and consistent transports of mobile discotheques.
Should you have further problems, please refer to the chart below.
The adjustments of the Pitchfader change the FM frequencies. Should the display repeatedly show "ERR"
adjust the frequencies.
Have the connections correctly been carried out?
Is your amplifier and your mixer properly adjusted?
Have you kept to all instructions given in this manual?
SYMPTOMS
POSSIBLE CAUSES
Device does not react when swit- Connection to mains disrupted.
ching on.
Player does not start operation
CD is badly positioned or dirty
No sound
Does not read the program
Pop noise
Faderstart does not work
SOLUTION
Check
AC
plug
and
AC
connection.
Reposition CD with label atop or
clean with a dry and soft cloth.
Check the mixer and amplifier Possibly exchange connections.
connections
The player is in normal playback Press the Play/Pause-button and
mode
re-program
Mixer or amplifier connections Check cable and jack quality
inapropriate
Missing Audio Out-connection
Connect the Audio Out-sockets
with the Line-input sockets of your
mixer
8. CLEANING AND MAINTENANCE
DANGER TO LIFE!
Disconnect from mains before starting maintenance operation!
We recommend a frequent cleaning of the device. Please use a soft lint-free and moistened cloth. Never use
alcohol or solvents!
33
There are no servicable parts inside the device. Maintenance and service operations are only to be carried
out by authorized dealers.
Should you need any spare parts, please use genuine parts.
If the power supply cable of this device becomes damaged, it has to be replaced by a special power supply
cable available at your dealer.
Should you have further questions, please contact your dealer.
9. TECHNICAL SPECIFICATIONS
Power supply:
Power consumption:
Type:
Available disc:
Quantisation:
Sampler frequency:
Pitch adjustment:
Distortion:
S/N-ratio:
Channel seperation:
Frequency range:
Audio output:
Output level:
Digital ouput:
Dimensions (WxTxH):
Weight:
115/230 V AC, 50/60 Hz
14 W
Slot-drive Compact Disc Player
Standard CDs 12 cm
16 Bit
44.1 kHz
+/- 8 %, +/- 12 %, +/- 16 %
0.03 %
>75 dB
>75 dB
20 - 20,000 Hz; +/- 1 dB
unbalanced via RCA
2 Vrms
unbalanced via RCA
354 x 250 x 98 mm
2.9 kg
Please note: Every information is subject to change without prior notice. 02/01 ©
34