1
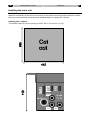
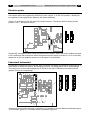
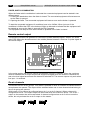
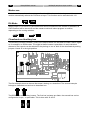
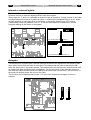
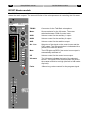
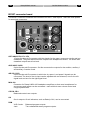
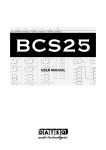
BCS25
GEBRUIKSAANWIJZING
USER MANUAL
GEBRAUCHSANWEISUNG
MODE D’EMPLOI
EN
Dateq BCS25 Manual
Safety instructions
3
Safety instructions
1
All safety instructions, warnings and operating instructions must be read first.
2
All warnings on the equipment must be heeded.
3
The operating instructions must be followed.
4
Keep the operating instructions for future reference.
5
The equipment may never be used in the immediate vicinity of water; make sure that water
and damp cannot get into the equipment.
6
The equipment may only be installed or fitted in accordance with the manufacturers
recommendations.
7
The equipment must be installed or fitted such that good ventilation is not obstructed in any
way.
8
The equipment may never be installed in the immediate vicinity of sources of heat, such as
parts of heating units, boilers, and other equipment which generates heat (including
amplifiers).
9
Connect the equipment to a power supply of the correct voltage, using only the cables
recommended by the manufacturer, as specified in the operating instructions and/or shown
on the connection side of the equipment.
10
The equipment may only be connected to a legally approved earthed mains power supply.
11
The power cable or power cord must be positioned such that it cannot be walked on in
normal use, and objects which might damage the cable or cord cannot be placed on it or
against it. Special attention must be paid to the point at which the cable is attached to the
equipment and where the cable is connected to the power supply.
12
Ensure that foreign objects and liquids cannot get into the equipment.
13
The equipment must be cleaned using the method recommended by the manufacturer.
14
If the equipment is not being used for a prolonged period, the power cable or power cord
should be disconnected from the power supply.
15
In all cases where there is a risk, following an incident, that the equipment could be unsafe,
such as:
·
if the power cable or power cord has been damaged
·
if foreign objects or liquids (including water) have entered the equipment
·
if the equipment has suffered a fall or the casing has been damaged
·
if a change in the performance of the equipment is noticed
it must be checked by appropriately qualified technical staff.
16
The user may not carry out any work on the equipment other than that specified in the
operating instructions.
4
Dateq BCS25 manual
Introduction
EN
Introduction
The BCS 25 is specifically designed for applications requiring a full-featured mixing console while being
restricted by dimensional and/or financial limits. Post-production rooms, OB vans, on-location transmission
studios and secondary studios are only a few of the possible uses for the BCS 25.
The BCS 25 frame is supplied with 8 input channels (optional with or without equalizer), the build in power
supply and an extensive mastersection with LED PPM's.
Input modules
The universal BCS25(E) input channel features 3 inputs (line 1, line 2 and mic), a gaincontrol, a 3-band
equaliser (option: without) and a balance control. The input signal can be routed to two stereo mix-busses
with the audition and program select buttons. This enables the engineer to set up two different output mixes
or to use the console for two different jobs running simultaneously.
The auxiliary 1 is pre-fader and has a volumecontrol on the module. The auxiliary 2 bus sends the signal
directly to the master section, the signal may be selected pre or post fader.
The cue button enables pre-fade listening of the input source. A fader/button start feature is standard (fader
or button function is set by an internal jumper). The 100 mm fader is not in the audio signal path but only
controls the VCA; this prevents any signal distortion and increases reliability.
Telephone hybrid
There is also a special telephone channel available with integrated analogue telephone hybrid. This channel
can also be used as a remote for an external hybrid. The ON/OFF buttons can be used for the remote
control for the external hybrid.
The BCS26(E) is equipped with an intelligent electronic circuit to generate a mix-minus signal (Dateq’s
unique TDM2). This makes it possible to have more than one hybrid in the mixer.
BCS27 Master module
The master section is extremely well equipped. It has a 40-segment LED VU-meter with peak hold function
that can be linked to PGM out or each of the other sources. In addition the BCS27 has a master fader for
PGM out, an adjustable headphone output for monitoring any signal, level controls for other outputs such as
aux, audition, etc.
Any signal can be selected to the monitor outputs (control room or headphone) by means of the switching
matrix.
The dedicated guest and the presenter outputs have a very practical feature. The engineer is able to send a
different signal mix - than the actual PGM - to each of those two outputs. This enables him/her to perform
simple timesaving 'post-production-during-transmission' type of operations!
Communication between engineer, guest and presenter is completely handled by the console, offering
numerous possibilities. The most interesting one is the ability to rout the communication signal to the PGM
output. This option has been specifically implemented for live on-location (OB) transmissions: it presents a
direct and easy communication channel with the studio engineer while news and commercials are broadcast
from the home base studio!
Product support
If you have any questions concerning the BCS25, its accessories or other products, please
contact:
Dateq Audio Technologies B.V.
De Paal 37
NL-1351 JG Almere
The Netherlands
Telephone: +31 36 54 72 222
Fax:
+31 36 53 17 776
E-mail:
[email protected]
Internet:
www.dateq.nl
EN
Dateq BCS25 manual
Installation
5
Installing the mixer unit
The BCS25 is supplied as standard without a cabinet or connector cables. It is possible to make
cables for connecting to the Sub-D connectors of the various input and output modules in-house.
Only use connectors with metal cans and shielded cables for optimal HF-rejection.
Installing into a cabinet
The BCS25 frame fits into an opening of 445 x 395 x 110 mm (W x H x D).
6
Dateq BCS25 manual
BCS25(E) dual line/ microphone input module
EN
BCS25(E) dual line/ microphone input module
The BCS25(E) input module is available with or without 3 band equaliser. The module can handle
up to 3 different signals: 2 stereo line and a mono microphone. Line input 1 and the microphone
input of this module are electronically balanced. Line input 2 is unbalanced but can be turned into
a balanced input by use of an extra pushon balanced line-input module. The microphone input is
equipped with phantom power which can be switched off.
Line 1/ Line 2
Input selector. When the switch is pushed (green LED is
lighted) line 2 is selected.
Mic
Input selector. When the switch is pushed (green LED is
lighted) the microphone input is selected, regardless of the
inputselector for line 1 or line 2.
Overload
The LED in the mic-switch lights up red when the signal
level anywhere in the module is too high and distortion can
occur (the limit is 6dB under cliplevel).
Gain
Volume pre-setting. Range: -46dB to +12dB
High
High-tone control (BCS25E only).
Shelving: ± 12dB @ 12kHz.
Mid
Mid-tone control (BCS25E only).
Bell-curve: ± 12dB @ 1.3kHz.
Low
Low-tone control (BCS25E only).
Shelving: ± 12dB @ 60Hz.
AUD/ PGM
Bus-routing switches. When a switch is pushed (yellow LED
is lighted) the signal will be routed to the selected output.
AUX
Volume control for AUX1-level. The AUX1-bus is pre-fader.
BAL
Balance-control. The signal is placed at the desired position
in the stereo image.
CUE
Pre-fader listening. The LED lights up green when the
CUE- function is activated. With an internal jumper the
master-cue function can be (dis-)activated.
ON
On-off switch. It is possible to select faderstart, buttonstart
or a combination of both with an internal jumper. The yellow
LED is lighted when the channel is on.
Fader
100mm long volume control. Depending on a jumpersetting the signal on the AUX2-bus is pre- or post-fader.
Dateq BCS25 manual
EN
BCS25(E) dual line/ microphone input module
7
BCS25(E) connector board
DB25-F connector
All connections are made on this connector. The function of the various pins can be
found in the table.
BCS25(E) Audio and Control Input / Output (Sub-D 25-pins female)
Pin
1
14
2
15
3
16
4
17
5
18
6
19
7
20
8
21
9
22
10
23
11
24
12
25
13
*:
Function
Channel on lamp (15V/ 1W max.) (Line 1)
Common external on lamp/ external CUE (Line 1)
External CUE (Line 1)
External mute
Remote Start; 15V/ 10mA (Line 1)
GND/ Common external mute
Remote Stop; 15V/ 10 mA (Line 1)
Line 2 Audio left -*
Line 2 Audio right -*
Line 2 Audio left +*
Line 2 Audio right +*
Audio GND
Audio GND
Microphone Audio Microphone Audio +
Audio GND
Audio GND
Line 2 Audio left +
Line 2 Audio right +
Line 1 Audio left Line 1 Audio right Line 1 Audio left +
Line 1 Audio right +
Audio GND
Frame GND
Type
Out
D-GND
In
In
Out
GND
Out
In*
In*
In*
In*
A-GND
A-GND
In
In
A-GND
A-GND
In
In
In
In
In
In
A-GND
Frame
These inputs are available when the optional balanced input module, or the RIAAcorrection amplifier are inserted. The line 2 unbalanced inputs are to be discarded.
When a RIAA-correction amplifier is mounted use pins 6 and 18 for the signal. Pins 5 and
17 are internally connected to the ground.
8
Dateq BCS25 manual
BCS25(E) dual line/ microphone input module
EN
Phantom power
Non-dynamically microphones usually need an external power supply for its built in pre-amplifier.
If this power has to be supplied by the BCS25, place jumper J1 in the ‘ON’ position. +48Vdc will
be supplied to both signal wires related to the cables shielding.
Jumper J1 is situated on the left side of the bussconnector. The factory default setting for this
jumper is ‘OFF’. See picture below:
Dynamically microphones don’t need a phantom power supply. When the correct cables are used
it will not damage the microphone when the phantom power supply is turned on. So it is not really
dangerous to turn the phantom power on for all types of microphones.
Faderstart/ buttonstart
The BCS25(E) module is able to remote start connected equipment by faderstart, buttonstart or a
combination of these two options. By changing jumpers you easily select one of these settings.
The jumpers for remote start settings can be found at the main PCB above the bussconnector
(jumper J8 and J9, see drawing).
Fig. 1
Fig. 2
Fig. 3
Jumpers J8 and J9 select the type of operation. It is possible to choose between faderstart (figure
1), buttonstart (figure 2) or the fader-switch combinaton (figure 3).
EN
Dateq BCS25 manual
BCS25(E) dual line/ microphone input module
9
FADER, SWITCH COMBINATION
When the fader-switch combination is selected the connected equipment can be started in two
different ways:
1. Pushing the startbutton when the fader is closed. The connected equipment will start as soon
as the fader is opened.
2. Opening the fader. The connected equipment will start as soon as the button is pressed
To start the connected equipment 2 conditions have to be fulfilled. When just one of the
conditions is fulfilled the LED in the button will light up dimmed to indicate that the equipment will
be started as soon as the fader is opened/ the ON is pressed.
The equipment will stop as soon as the button is pressed or the fader is closed.
Remote control output
The BCS25(E) module can generate a continues or pulsed start/stop signal. Jumper J13 at the
main PCB (above the bussconnector in the middle) selects between a continue- or pulse signal at
the remote output.
Fig. 4
Fig. 5
In the pulse position the remote outputs will generate a pulse of 100msec. When the continues
mode is selected the on-output will provide a high level signal when the channel is switched on
and a low level signal as soon as the channel is switched off. The remote outputs only work when
line input 1 is selected.
On-air channels
The BCS25 has two on-air groups. This makes it possible to drive an indicator to indicate that the
microphones are opened. The output will be activated when one or more channels that belong to
the on-air group are opened.
With jumper J12 a channel is configured as on-air 1 or on-air 2 channel. When a channel is
configured as on-air 1 the studio output will be muted when the channel is active. The on-air 1
output on the master also will be activated. A channel configured as on-air 2 will not mute the
studio, but only activate the on-air 2 output on the master.
10
Dateq BCS25 manual
BCS25(E) dual line/ microphone input module
EN
Master-cue
Each channel can activate the master-cue function. When the cue-button is pressed the master
module automatically selects the CUE-bus as input. This function can be activated with J10.
DJ-Mode
In a self-support configuration the control room has to be muted when the microphone is opened.
The announcer has to use a headphone, so that acoustical feedback is impossible.
When jumper J11 is set to DJ, the control room will be muted when the channel is activated, all
CUE-functions will be turned off and the master module will select program or audition,
depending on the routing switches.
Cleanfeeds en Auxiliary bus
The BCS25(E) module contains 2 (mono) bus outputs which can be used to create a return signal
to, for example, an ISDN codec. The signal at these busses is post-fader. At each individual
channel of the console can be selected if they belong to one or both of the cleanfeeds by setting
jumpers J4…J7 in the right position.
In the example below the signal of this channel is send to cleanfeed bus 1 only.
Beside the cleanfeeds the BCS25(E) module has 2 auxiliary busses. The first auxiliary is always
pre-fader. Auxiliary 2 can be switched between pre- and postfader by jumper J2 and J3.
EN
Dateq BCS25 manual
BCS26(E) telephone input module
11
BCS26(E) telephone input module
The BCS26(E) telephone input module is available with or without 2 band equaliser. The module
is equipped with a built-in analogue telephone hybrid. Telephone lines can be directly connected
to this channel. Besides the built in hybrid an external hybrid or talk-show system can be
connected. In that case, the BCS26(E) channel operates as remote control only.
On/Off
Switches the (external) hybrid on or off. The green LED will
light up at an incoming ringer signal.
Overload
The LED in the off-switch lights up red when the signal level
anywhere in the module is too high and distortion can occur
(the limit is 6dB under cliplevel).
Gain
Volume pre-setting. Range: -15dB to +6dB
R-bal
Compensation for the resistive part of the line-impedance.
High
High-tone control (BCS26E only).
Shelving: ± 12dB @ 3.5kHz.
Low
Low-tone control (BCS26E only).
Shelving: ± 12dB @ 600Hz.
AUD/ PGM
Bus-routing switches. When a switch is pushed (yellow LED
is lighted) the signal will be routed to the selected output.
AUX
Volume control for AUX1-level. The AUX1-bus is pre-fader.
BAL
Balance-control. The signal is placed at the desired position
in the stereo image.
CUE
Pre-fader listening. The LED lights up green when the CUEfunction is activated. With an internal jumper the master-cue
function can be (dis-)activated.
ON
On-off switch. It is possible to select faderstart, buttonstart
or a combination of both with an internal jumper. The yellow
LED is lighted when the channel is on.
Fader
100mm long volume control. Depending on a jumper-setting
the signal on the AUX2-bus is pre,- or post-fader.
Dateq BCS25 manual
12
BCS26(E) telephone input module
EN
BCS26(E) connector board
DB25-F connector
All connections are made on this connector. The function of the various pins can be
found in the table.
BCS26(E) Audio and Control Input / Output (Sub-D 25-pins female)
Pin
1
14
2
15
3
16
4
17
5
18
6
19
7
20
8
21
9
22
10
23
11
24
12
25
13
Function
Phone: A (telephone line)
Phone: B (telephone line)
Line: A (telephone line)
Line: B (telephone line)
Off-hook (On); 15V/ 10 mA
GND
Ring; 15V/ 10 mA
Remote hybrid out; Optocoupler output +
Common Remote hybrid on; Optocoupler output +
Receive audio +
Receive audio Audio GND
Audio GND
Send audio +
Send audio Audio GND
Frame GND
Type
Out
Out
In
In
Out
GND
Out
Out
GND
Out
In
In
A-GND
A-GND
Out
Out
A-GND
Frame
EN
Dateq BCS25 manual
BCS26(E) telephone input module
13
Faderstart/ buttonstart
The BCS26(E) module is able to remote start connected equipment by faderstart, buttonstart or a
combination of these two options. By changing jumpers you easily select one of these settings.
The jumpers for remote start settings can be found at the main PCB above the bussconnector
(jumper J8 and J9, see drawing).
Fig. 6
Fig. 7
Fig. 8
Jumpers J8 and J9 select the type of operation. It is possible to choose between faderstart (figure
6), buttonstart (figure 7) or the fader-switch combinaton (figure 8).
On-air channels
The BCS25 has two on-air groups. This makes it possible to drive an indicator when the
microphones are opened. The output will be activated when one or more channels that belong to
the on-air group are opened.
With jumper J12 a channel is configured as on-air 1 or on-air 2 channel. When a channel is
configured as on-air 1 the studio output will be muted when the channel is active. The on-air 1
output on the master also will be activated. A channel configured as on-air 2 will not mute the
studio, but only activate the on-air 2 output on the master.
14
Dateq BCS25 manual
BCS26(E) telephone input module
EN
Master-cue
Each channel can activate the master-cue function. When the cue-button is pressed the master
module automatically selects the CUE-bus as input. This function can be activated with J10.
DJ-Mode
When jumper J11 is set to DJ, the control room will be muted when the channel is activated, all
CUE-functions will be turned off and the master module will select program or audition,
depending on the routing switches.
Cleanfeeds en Auxiliary bus
The BCS26(E) module contains 2 (mono) bus outputs which can be used to create a return signal
to, for example, an ISDN codec. The signal at these busses is post-fader. At each individual
channel of the console can be selected if they belong to one or both of the cleanfeeds by setting
jumpers J4 and J5 in the right position.
The first example shows a channel that doesn’t belong to a cleanfeed. The second example
belongs to cleanfeed one and not to cleanfeed two.
The BCS25 had two auxiliary busses. The first bus is always pre-fader; the second bus can be
configured to be pre,- or post fader. This is done with J2 ad J3.
EN
Dateq BCS25 manual
BCS26(E) telephone input module
15
Internal or external hybrid
The BCS26(E) module handles incoming telephone calls over the built-in hybrid, but is also able
to remote control an external (digital) hybrid or talk show system.
With jumper J6, J7 and J1 it’s possible to select the type of operation. Jumper J6 and J7 are used
to switch between the internal or external hybrid, J1 switches the bandpass filter on or off. When
a hybrid with built in band pass filter is connected J1 should be placed in the OFF position.
(The drawing below only shows J1 and J7. J6 can be found above the transformer; see the
autogain drawing at the bottom of this page).
Fig. 9: Internal hybrid, bandpass filter on
Fig. 10: External hybrid, bandpass filter off
Autogain
The BCS26(E) is equipped with a special feature that reduces the signal from the hybrid by 6dB
when audio is sent from the mixer to the hybrid. This means that the caller is dimmed by 6dB
when the announcer in the studio speaks. This feature improves the side tone reduction with 6dB,
so creating the best possible speech intelligibility. The consequence of this auto-gain feature is
that when the caller and announcer are talking at the same time (“double talk”), the announcer in
the studio will slightly drown the voice of the caller.
This function can be disabled with jumper J13. In the first example the autogain function is
enabled.
16
Dateq BCS25 manual
BCS26(E) telephone input module
EN
TDM²
The hybrid automatically gets the correct N-1 return from the CUE, PGM or AUD bus. This is the
so-called Triple Dynamic Mix-Minus system, shortened to TDM2. Since the BCS26 generates the
N-1 signal itself, separate cleanfeeds are not necessary. The number of BCS26 modules which
can be used at the same time is therefore theoretically unlimited. In practice, the number of
telephone lines which can be used at the same time is limited by the quality of the telephone
hybrids being used.
If AUD is selected as well as PGM, the return from the PGM bus has priority over the return from
the AUD bus.
CUE has the highest priority when the channel is off. As soon as CUE is selected on a BCS26
module, the hybrid gets the return from the CUE bus.
EN
Dateq BCS25 manual
BCS27 Master module
17
BCS27 Master-module
The BCS27 master-module has a microprocessor that handles the audio-matrix. This matrix
routes the audio outputs. The second function of the microprocessor is controlling the VU-meter.
TB-MIC
Connector for the Talk-Back microphone.
Meter
Source selector for the VU-meter. The meter
switches between PGM of control room.
AUX1
Volume control for the auxiliary 1 output.
AUX2
Volume control for the auxiliary 2 output.
AUD
Volume control for the audition output.
Air...Cue
Selection of the signal on the control room and the
CUE output. The active selection is indicated with a
yellow LED under the button.
Mute
The LED lights up RED if the control room output is
automatically switched off.
CR
Volume control for the control room output.
VU-meter
The VU-meter indicates the level of the selected
source. The upper LED’s will blink when the level in
the master module is too high (the limit is 6dB under
clip level).
Fader
100mm long volume control for the program signal.
18
Dateq BCS25 manual
BCS27 Master module
EN
PGM/TBK
Source selector for the guest output. Switches between program
and talkback.
GST
Volume control for the guest headphone output.
ANN
Volume control for the announcer headphone output.
STUD
Volume control for the studio output.
AIR...CR
Source selector for the studio, announcer and guest outputs.
CUE
Volume control for the CUE (headphone) output.
PGM...ALL
Talk buttons. These buttons enable the talkback function to the
selected source. The ALL button talks to Guest, announcer,
CUE and CF when this function is enabled.
CUE
Headphones output.
Special functions
· The studio output can be toggled to follow the program signal or the selection
indicated on the source selector. Toggle between these functions by pressing
the AIR and the CR button simultaneously.
By default the studio output will follow the program signal.
· It is possible to enable or disable the ‘talk to program’ function. This is done by
simultaneously pressing the AIR and talk-to-program buttons. When the talk to
program function is activated the control room will be muted.
By default this function is disabled.
· The guest output can be used as an external communication channel for
example to a second studio. This function can be enabled by simultaneously
pressing the AIR and talk-to-guest buttons. The guest output will be muted.
The only signal on the guest output is the talk-signal.
By default this function is disabled.
· It is possible to enable or disable the ‘talk to cleanfeed’ function. This is done
by simultaneously pressing the AIR and talk-to-cue buttons. When the talk-tocue button is pressed the talkback signal will be routed to the cue and the
cleanfeed buss.
By default this function is disabled.
· The DJ-mode has three settings. These settings can be selected by pressing
the AIR and PGM simultaneously.
1. The master automatically switches to PGM or AUD, depending on the
selected buss on the microphone input,
2. The master automatically switches to AIR,
3. DJ-mode disabled. The source will not change.
EN
Dateq BCS25 manual
BCS27 Master module
19
BCS27 connector board
The BCS27 connector board has the connectors for the in,- and outputs. There are three spares
for extra jack-connectors.
GST/ ANN/ STD/ CF1/ CF2
15-pins female sub-D connector with the signals for the guest, announcer, studio and two
cleanfeeds. The guest and announcer outputs have headphones drivers. The studio and
cleanfeed outputs are at line-level.
AUD/ AUX1/ AUX2
9-pins female sub-D connector. On this connector the outputs for the audition, auxiliary 1
and auxiliary 2 can be found.
AIR/ SP1/ SP2
9-pins female sub-D connector to which the air, spare 1 and spare 2 signals can be
connected. The level of the air-input can be adjusted with two trimmers; one for the left
signal level and one for the right signal level.
MCA-100
Connector for Dateq’s MCA-100 headphone amplifiers so that more headphones for
announcers and guests can be connected - each with their own volume control and
cough/ speak button.
CR-R & CR-L
Balanced control room outputs.
OA
On-air outputs. On-air indicators, such as Dateq’s OA1, can be connected.
PGM
XLR-3 male:
Jack:
Balanced program outputs.
Two unbalanced stereo program outputs.
20
Dateq BCS25 manual
BCS27 Master module
BCS25 GST/ ANN/ STD/ CF1/ CF2 (DB15-F connector)
Pin
1
9
2
10
3
11
4
12
5
13
6
14
7
15
8
Function
Announcer headphone right out
Audio GND
Announcer headphone left out
Audio GND
Guest headphone right out
Audio GND
Guest headphone left out
Audio GND
Studio right
Audio GND
Studio left
Audio GND
Cleanfeed 2
Audio GND
Cleanfeed 1
Type
Out
A-GND
Out
A-GND
Out
A-GND
Out
A-GND
Out
A-GND
Out
A-GND
Out
A-GND
Out
BCS25 AUD/ AUX1/ AUX2 (DB9-F connector)
Pin
1
6
2
7
3
8
4
9
5
Function
Audition right
Audio GND
Audition left
Aux 1 right
Audio GND
Aux 1 left
Aux 2 right
Audio GND
Aux 2 left
Type
Out
A-GND
Out
Out
A-GND
Out
Out
A-GND
Out
BCS25 AIR/ SP1/ SP2 (DB9-F connector)
Pin
1
6
2
7
3
8
4
9
5
Function
Air right
Audio GND
Air left
Spare 2 right
Audio GND
Spare 2 left
Spare 1 right
Audio GND
Spare 1 left
Type
In
A-GND
In
In
A-GND
In
In
A-GND
In
EN
Dateq BCS25 manual
EN
BCS27 Master module
21
BCS25 MCA-100 (DIN 6p 270º female)
Pin
1
2
3
4
5
6
Function
Stereo 1 Left
(default: Announcer Left)
Stereo 1 Right
(default: Announcer Right)
GND combined for audio and power supply
Stereo 1 Left
(default: Guest 1 Left)
Stereo 1 Right
(default: Guest 1 Right)
+12V DC (do not connect when an external supply is being used)
Type
Out
Out
A-GND
Out
Out
POWER
BCS25 control room (2x TRS Jack 3p) BCS25 On-air (2x TRS Jack 3p)
Pin
Tip
Ring
Sleeve
Function
Audio +
Audio Audio GND
Type
Out
Out
A-GND
BCS25 Program (2x XLR 3p male)
Pin
1
2
3
Function
Audio GND
Audio +
Audio -
Type
A-GND
Out
Out
Pin
Tip
Ring
Sleeve
Function
On-air 2 (15V/ 10mA)
On-air 1 (15V/ 10mA)
GND
BCS25 Program (2x TRS Jack 3p)
Pin
Tip
Ring
Sleeve
Function
Program left
Program right
Audio GND
Type
Out
Out
A-GND
Type
Out
Out
GND
22
Dateq BCS25 manual
BCS27 Master module
EN
Talkback functions
AUTOGAIN
The talkback input has an autogain function. The amplification can be adjusted with JP2. When
‘low’ is selected the autogain range is 10dB. When ‘high’ is selected the range is 30dB. When
jumper JP2 isn’t placed an external microphone source can be connected to the EXT.MIC
connector.
EN
Dateq BCS25 manual
Technical specifications
Technical specifications
INPUTS
MIC...................................... electronically balanced, 300 Ohm (nominal)
level............................ -54...-16dBm
noise........................... <-127dB
gain ............................ -46...+12dB
LINE 1 ................................. electronically balanced, 20 kOhm (nominal)
level............................ -12...+20dBm/ 0dBm nominal
noise........................... <-80dB
gain ............................ -46...+12dB
LINE 2 ................................. unbalanced, 24 kOhm (nominal)
level............................ -18...+20dBm / -6dBm nominal
noise........................... <-80dB
gain ............................ -46...+12dB
AUX1
source ........................ pre-fader
level............................ variable
AUX2
source ........................ pre or post fader
level............................ fixed
HYBRID/TELOS
HYBRID
gain ........................... -15...+6dB
R-balans..................... externally adjustable
C-balans..................... internally adjustable
TDM² .......................... Triple Dynamical Mix Minus
Trans-hybrid loss........ <-30dB @ 300...3kHz
TELOS ................................ electronically balanced, >20 kOhm
send ........................... balanced, 0dBm @ 600 Ohm
noise........................... <-80dB
MASTER/MONITOR INPUTS/ OUTPUTS
AIR ...................................... unbalanced, 12 kOhm (nominal)
level............................ -14...+6dB pre-trimmer
SPARE1, SPARE 2 ............. unbalanced, 22 kOhm (nominal)
level............................ 0dB
PGM .................................... electronically balanced and unbalanced
level............................ +6dBm @ 600 Ohm/ 0dBm @ 600 Ohm
AUD ................................... unbalanced, variable
level............................ 0dBm @ 600 Ohm
AUX1, AUX2........................ unbalanced, variable
level............................ 0dBm @ 600 Ohm
CR ....................................... electronically balanced, variable
level............................ 0dBm @ 600 Ohm
23
Dateq BCS25 manual
24
Technical specifications
ANN, GUEST1, GUEST2 .... stereo headphone, variable
level............................ 2x 0.5 W @ 4 Ohm
STUDIO............................... unbalanced, variable
level............................ 0dBm @ 600 Ohm
CLEANFEED1, 2................. unbalanced
level............................ 0dBm @ 600 Ohm
LOW CUT FILTERS
MIC ................................... 6dB/octave
-3dB point................... 80 Hz, fixed
LINE ................................... 6dB/octave
-3dB point................... 10 Hz, fixed
EQUALIZER ('E' version only)
MIC/LINE
HIGH .......................... +/-12dB @ 12 kHz, shelving
MID ............................ +/-12dB @ 1.3 kHz, bell
LOW ........................... +/-12dB @ 60 Hz, shelving
TEL
HIGH .......................... +/- 12dB @ 3.5 kHz, shelving
LOW ........................... +/- 12dB @ 600 Hz, shelving
GENERAL
Frequency response
Mic to master.............. 80 Hz - 30 kHz, +0/-0.5dB
rest to master ............ 20 Hz - 30 kHz, +0/-0.5dB
THD + IM .................... 0.05 % nominal
Crosstalk L <> R......... <-73dB @ 1 kHz
Crosstalk 1 <> 2 ......... <-80dB @ 1 kHz
Noise .......................... <-100dB (inputs OFF)
<-80dB (inputs ON)
Overload indication..... 6dB below clip level
Clip level..................... +20dB
METER
type/range .................. Peak-Hold/-40...+6dB
barlength .................... 40-LEDs
INPUT CONTROL I/O
ON Lamp-output......... 15Vdc, 100mA (line 1 only)
CUE button input........ 50 kOhm, normally open (line 1 only)
Remote outputs.......... solid-state driver, 15Vdc, 10 mA
ON-AIR lamp output ... solid-state driver, 15Vdc, 10 mA
SUPPLY
Supply voltage............ 90 to 260 Vac/ 50...60 Hz/ 30 Watt
GENERAL
Dimensions................. 445 x 395 x 110 mm (W x H x D)
Weight........................ 7.9 kg (nett.)
EN
VERKLARING VAN OVEREENSTEMMING
DECLARATION OF CONFORMITY
acc.to art.10.1 EMC directive 89/336/EEC
acc.to art.10.1 EMC directive 89/336/EEC
Wij,
We,
DATEQ Audio Technologies b.v.
de Paal 37,
1351 JG ALMERE,
Nederland
DATEQ Audio Technologies B.V.
de Paal 37
1351 JG ALMERE
THE NETHERLANDS
verklaren, uitsluitend op onze verantwoordelijkheid, dat dit produkt
hereby declare, exclusively to our responsibility, that this product
Type: BCS25
Type: BCS25
Serienummers: 76-XXXX
Serialnrs.: 76-XXXX
waarop deze verklaring betrekking heeft, in overeenstemming is met de
volgende geharmoniseerde Europese normen
to which this declaration applies, is in accordance with the following
harmonized European norms
EN 50081-1 en EN 50082-1
EN 50081-1 and EN 50082-1
Volgens de bepalingen van de EMC-richtlijn 89/336/EEG, gewijzigd door de
richtlijn 91/263/EEG, 92/31/EEG en 93/68/EEG.
According to the regulations of the EMC-directive 89/336/EEG, amended by
directive 91/263/EEG, 92/31/EEG and 93/68/EEG.
EN 60065
EN 60065
Volgens de bepalingen van IEC 65: 1985 + A1: 1987 + A2: 1989 + A3: 1992,
mod. Ratificatie: 1993-07-06
According to the regulations of IEC 65: 1985 + A1: 1987 + A2: 1989 + A3:
1992, mod. Ratification: 1993-07-06
Almere, 5 februari 1999
Almere, Februari 5th 2001
J.H. Kloppenburg, managing
director
stamp:
signature:
stempel:
J.H. Kloppenburg, Directeur
handtekening:
woonplaats / city / Wohnort / place:
d
m
-
handtekening / signature / Unterschrift
d
-
m
-
aankoopdatum / purchase date / Kaufdatum / date d'achat:
-
aankoopdatum / purchase date / Kaufdatum / date d'achat:
model / Geräte Typ / produit:
GARANTIE / GUARANTEE
bewaren met de aankoop-/kassa-bon
keep this with original invoice/cash
behalten mit der Originalrechnung
conserver avec la facture originale
serienummer / serial # / Seriennummer / no. de série:
woonplaats / city / Wohnort / place:
serienr / serial # / Seriennr. / no. de série:
model / Geräte Typ / produit:
land / country / Land / pays:
postcode / zip code / PLZ:
adres / adress / Adresse / adresse:
koper / buyer / Käufer / acheteur:
postcode / zip code / PLZ:
adres / adress / Adresse / adresse:
dealer / dealer / Vertragshändler / concessionnaire:
inzenden naar DATEQ
mail this to DATEQ
einschicken nach DATEQ
envoyer à DATEQ
GARANTIE / GUARANTEE
GARANTEE CONDITIONS: DATEQ guarantees this product to be free of defects
in materials and workmanship at the time of its original purchase for the period of 12
months. If during this period of guarantee the product proves defective due to
improper materials or workmanship, DATEQ will repair or this product or its
defective parts on the condetions explained hereafter. 1. The guarantee will be
granted only if the correctly filled out guarantee card is presented together with the
original invoice/cash ticket issued to the consumer by the retailer. DATEQ reserves
the right to refuse guarantee service if this information or the products serial
number has been removed or changed after the original purchase of the product. 2.
This guarantee covers none of the following: (a) periodic check-ups, maintenance,
repair or replacements of parts due to normal wear and tear, (b) home service
transport costs and other costs and risks of transport relating directly or indirectly to
theguarantee of this product, (c) damage to this product resulting from abuse and
misuse, including but not limited to the failure to use this product for its normal
purposes or in accordance with DATEQ's instructions on the proper use and
maintenance of this product and the installation or the use of this product in a
manner inconsistent with the technical or safety standards in force in the country
where the product is used, repairs done by non-authorised service stations,
accidents, acts of God, or any cause beyond thecontrol of DATEQ, including but not
limited to lightning, water, fire, public disturbances and improper ventilation.
GARANTIE BEPALINGEN: DATEQ garandeert dat dit produkt vrij is van defecten
in materialen en/of contructie gedurende 12 maanden na aankoop. Indien
gedurende deze periode het produkt defecten vertoont tengevolge van
ondeugdelijke materialen en/of constructie zal DATEQ zonder berekening van
kosten voor arbeidsloon of onderdelen het produkt repareren volgens de
voorwaarden zoals hierna uiteen zijn gezet. 1. Garantie wordt verleend uitsluitend
op vertoon van de garantiekaart tezamen met de originele, door de dealer
afgegeven factuur/kassabon. DATEQ behoudt zich het recht voor garantie af te
wijzen indien de hierboven genoemde gegevens of het serienummer van het
produkt zijn verwijderd of veranderd na de oorspronkelijke aankoop. 2. Deze
garantie dekt niet: (a) periodieke controles, onderhoud en reparatie of vervanging
van onderdelen door normale slijtage, (b) kosten en risico van transport alsmede
voorrijkosten, direct of indirect verband houdende met de garantie van dit produkt,
(c) schade aan dit product ten gevolge van mistbruik of verkeerd gebruik met
inbegrip van maar niet beperkt tot abnormaal gebruik niet in overeenstemming met
de DATEQ instructies over juist gebruik en onderhoud van het produkt en het
installeren of gebruiken van dit produkt in tegenstrijd met de technische of
veiligheidsnormen zoals die van kricht zijn in het land waar het produkt wordt
gebruikt, reparaties uitgevoerd door niet erkende service stations, ongevallen
force majeur, of welke oorzaak dan ook buiten de macht van DATEQ, met inbegrip
van maar niet beperkt tot bliksem, water, vuur, publieke oproer en ondeugdelijke
ventilatie.
CONDITIONS DE GARANTIE:DATEQ garantit que ce produit est exempt de
défaut de matière et de fabrication existant lors de l'acquisition originale par le client
pour un délai d'un an. Si ce produit s'avère défectueux pendant la période de
garantie en raison de matière ou de fabrication incorrecte, DATEQ prendra en
charge le produit ou à défaut DATEQ sous les conditions exposées ci-après. 1. La
garantie sera seulement assurée si la facture origiale et la carte de garantie
remises au consommateur par le distributeur sont présentées. DATEQ se réserve
le droit de refuser sa garantie si tout ou partie de ces mentions ou le numero de
série de l'appareil a été ou modifié après l'acquisition originale du produit par le
client chez le distribiteur. 2. Cette garantie ne couvre aucun des points suivants: (a)
les contrôles périodiquies, l'entretien, la réparation et le remplacement de pièces
par suite d'usure normale; (b) les frais et les risques de transport directs ou indirects
à la mise en oeuvre de la garantie de ce produit; (c) l'endommagement dui produit
résultant d'abus et de mauvais usage, en particulier mais non de façon exclusieve à
la négligence ou faute l'utilisateur, et l'installation ou l'utilisation de ce produit en
contradiction avec les standards techniques ou de sécurité en vigueur dans le pays
où le produit est utilisé, reparations faites par les réparateurs non agréés;
d'accidents de cas de force majeure ou de toute autre cause hors du contrôle de
DATEQ, en particulier mas non de façon exclusieve à la foudre, l'inondation,
l'incendie, les troubles publics, des piles qui ont coulé, une mauvaise ventilation.
GARANTIE BEDINGUNGEN: DATEQ gewährleistet für die Garantiezeit daß dieses
Gerät ab dem Zeitpunkt des Ersterwerbs keine Material und Verarbeitungsfehler
aufweist. Die Garantiezeit beträgt 12 Monate. Sollten sich während der Garantiezeit
Mängel des Gerätes herausstellen, die auf Material- oder Verarbeitungsfehlern
beruhen, wird gemäß den nachstehenden Bedingungen DATEQ ohne Berechnung der
Arbeits- und Materialkosten das Gerät oder seine schadhaften Teile reparieren. 1.
Garantieleistungen werden nur erbracht, wenn die Garantiekarte zusammen mit der
Originalrechnung bzw. dem Kassenbeleg, die der Händler dem Verbraucher ausgestellt
hat, vorgelegt wird. DATEQ behält sich das Recht vor, Garantieleistungen abzulehnen,
wenn nach dem Ersterwerb des Gerätes durch den Verbraucher oder den Händler diese
Angaben oder das Seriennummer entfernt oder geändert worden sind. 2. Diese
Garantie deckt keinen der folgenden Punkte: (a) regelmäßige Inspektionen, Wartung
bzw. Reparatur oder Austausch von Teilen bedingt duch normalen Verschleiß; (b)
Transport-, Fahrtkosten und -risiken, die unmittelbar oder mittelbar mit dieser
Gerätegarantie zusammenhängen; (c) Schäden an diesem Gerät, die verursacht
worden sind durch: Mißbrach und Fehlgebrauch, insbesondere Gebrauch dieses
Gerätes für andere als seinen normalen Zweck bzw. unter Nichtbeachtung der DATEQ
Bedienungs- und Wartungsanleitungen, und den Anschluß oder Gebrauch dieses
Gerätes in einer den in dem Land, in dem das Gerät bebraucht wird, geltenden
technischen oder sicherheitstechnischen Anforderungen nicht entsprechenden Weise;
Reparaturen duch nicht autorisierte Werkstätten; Unfälle, höhere Gewalt oder andere
von DATEQ nicht zu verantwordende Ursachen, insbesondere Blitzschlag, Wasser,
Feuer, Störungen der öffentlichen Ordnung und unzureichende Belüftung.
DATEQ B.V.
De paal 37
1351 JG ALMERE
The Netherlands / Niederlande / Pays Bas
postzegel
stamp
timbre
briefmarke