1
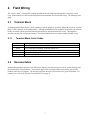
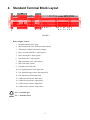
DC Variable Speed Drive Panel Installation, Operation & Maintenance Instruction Manual Bulletin #: CC-IOM-0103-D Manufacturers of Quality Pumps, Controls and Systems ENGINEERED PUMP OPERATIONS 2883 Brighton Henrietta Townline Road Rochester, New York, 14623 Telephone (585) 292-8000 Fax (585) 424-5619 www.pulsa.com [email protected] Pulsafeeder Factory Service Policy Should you experience a problem with your Cruise Control™ variable speed control panel, first consult the troubleshooting guide in your operation and maintenance manual. If the problem is not covered or cannot be solved, please contact your local Pulsafeeder Sales Representative, or our Technical Services Department for further assistance. Trained technicians are available to diagnose your problem and arrange a solution. Solutions may include purchase of replacement parts or returning the unit to the factory for inspection and repair. All returns require a Return Authorization number to be issued by Pulsafeeder. Parts purchased to correct a warranty issue may be credited after an examination of original parts by Pulsafeeder. Warranty parts returned as defective which test good will be sent back freight collect. No credit will be issued on any replacement electronic parts. Any modifications or out-of-warranty repairs will be subject to bench fees and costs associated with replacement parts. Factory Testing Your Cruise Control™ variable speed control panel was factory tested in accordance with Pulsafeeder testing standards. These include, but are not limited to, performance of the DC SCR drive, operation of all panel lamps and switches, and verification of all input and output functions. Some functions of the system may require adjustment or calibration once the unit is installed. Notice Information and specifications in this document are subject to change without notice. Copyright ©2003 Pulsafeeder, Inc. All rights reserved. Information in this document is subject to change without notice. No part of this publication may be reproduced, stored in a retrieval system or transmitted in any form or any means electronic or mechanical, including photocopying and recording for any purpose other than the purchaser’s personal use without the written permission of Pulsafeeder, Inc. Pulsafeeder Cruise Control™ is a registered trademark of Pulsafeeder, Inc. ii Table of Contents 1. SINGLE PAGE START-UP ...................................................................................................................... 1 2. FIELD WIRING ...................................................................................................................................... 2 2.1 Terminal Block ........................................................................................................................ 2 2.2 Documentation ........................................................................................................................ 2 3. CRUISE CONTROL™ TYPICAL INTERNAL PANEL LAYOUT ........................................................................ 3 3.1 Cruise Control™ typical components.................................................................................... 3 4. STANDARD TERMINAL BLOCK LAYOUT .................................................................................................. 4 5. PANEL EXTERNAL CONTROLS ............................................................................................................... 5 6. FIELD WIRING ...................................................................................................................................... 7 6.1 Power and Motor ..................................................................................................................... 7 6.2 External Signals ...................................................................................................................... 7 7. DRIVE SPECIFICATIONS ........................................................................................................................ 9 7.1 General:.................................................................................................................................... 9 7.2 DC-SCR Drive: ......................................................................................................................... 9 7.3 Signal Inputs: .......................................................................................................................... 9 7.4 Signal Outputs......................................................................................................................... 9 8. DC DRIVE CONFIGURATION .................................................................................................................. 10 8.1 Jumpers ................................................................................................................................... 10 8.2 Potentiometer Descriptions ................................................................................................... 10 8.3 Drive Speed Calibration ......................................................................................................... 11 8.4 Control Technique Focus 3™ F3N2C Control Board ........................................................... 12 9. DIGITAL PANEL METERS ....................................................................................................................... 13 9.1 Jumper Programming............................................................................................................. 13 9.2 Meter Functional Programming............................................................................................. 13 10. ELAPSED TIME METERS........................................................................................................................ 15 11. INTERFACE WITH PULSAMATIC CONTROLLERS ..................................................................................... 16 12. INTERFACE WITH ELMA CONTROLLERS ................................................................................................ 17 13. ADDITIONAL INFORMATION.................................................................................................................... 18 iii Conventions: A warning defines a condition that could cause damage to both the equipment and the personnel operating it. Pay close attention to any warning. Notes are general information meant to make operating the equipment easier. Safety Considerations: 1. Disconnect power to control panel and related equipment during installation, maintenance, and repairs. 2. Wire and ground this control panel and all related equipment in accordance with all local and national electrical codes. 3. Read and understand all related instructions and documentation before attempting to install or maintain this equipment 4. Observe all special instructions, notes, and cautions. 5. Act with care and exercise good common sense and judgment during all installation, adjustment, and maintenance procedures. 6. Be sure the equipment enclosure is securely closed during operation to prevent accidents and unauthorized access. 7. Remember that operation of this control panel may cause movement or rotation of other system components. Performing certain adjustment procedures may require that the attached chemical pump be running and therefore dispensing liquid into a system. Be aware of the consequences of your actions. 8. Ensure that all safety and work procedures and standards that are applicable to your company and facility are followed during the installation, maintenance, and operation of this equipment. Installation, maintenance, and repair of your Cruise Control™ variable speed control panel should be performed or supervised by a certified electrician in accordance with the host facility’s site safety standards. Serious injury to equipment and/or personnel can result from improper installation or operation of this equipment. iv 1. Single Page Start-Up Although the Cruise Control™ is factory set to your specifications, it is always good practice to verify jumper settings to insure nothing was removed, changed, or damaged during shipping or installation. Once a visual inspection is complete, connections can be made. Refer to Section 4 for terminal block layout. Ensure that all electrical wiring meets applicable local and national electrical codes as well as appropriate facility standards. Motor and Control Connections 1. Verify that jumper JP8 on the DC SCR drive for motor armature voltage is set properly to match the motor nameplate data (LO = 90VDC, HI = 180VDC). 2. Connect the motor armature, ground, and shunt wires (where applicable) to the proper [black] terminal blocks. 3. Connect tachometer (optional) to the proper [orange] terminal blocks. 4. Verify that Jumper JP4 on the drive is set for tachometer feedback if applicable. 5. Verify that Jumper JP3 on the drive is positioned properly for the tachometer feedback range. 6. Connect a two-wire dry contact drive start input (or the optional 24VDC or 120VAC drive run input) to the proper [yellow] terminal blocks. Note that 24VDC and 120VAC signals are polarity sensitive. 7. Connect external 4-20mA speed reference [blue terminal blocks]. 8. Connect the drive status output [green terminal blocks]. 9. Connect any other additional optional inputs and outputs. Pre-Sets 10. Verify that the "Drive Start" selector switch is in the "OFF" position and that the "Drive Speed" selector switch is in the "LOCAL" position. The speed potentiometer should be in the full counter-clockwise position. 11. Verify that Jumper JP11 on the drive is set for the proper system input voltage. Power Connections 12. Connect power to the main disconnect, or if a disconnect was not specified, to the terminal blocks located in the upper right corner. For a single phase system, only the hot wire is connected to the disconnect. The neutral and ground wires are connected to terminal blocks. 13. Turn on disconnect power and verify power is present in the panel. A "Power On" pilot light may be included as an option. Testing 14. Verify that it is safe to run the pump within the system, or that the pump is properly isolated from the system. Remember that diaphragm metering pumps should not be run against closed valves on either side (suction and discharge) of the piping system. 15. Put the "DRIVE RUN" selector switch into the "ON" position and slowly turn the speed potentiometer clockwise until the motor runs. Perform other testing and adjustment as required. 1 2. Field Wiring The Cruise Control™ is designed to simplify installation for both single and multiple drive enclosures. In all cases, field terminals are color-coded and separated from terminals used for internal wiring. The following notes apply: 2.1 Terminal Block A standard terminal block layout is used regardless of which options are specified, making the layout of Terminal Block 1 (TB1) identical for all configurations. Although terminal blocks for all options are present, only terminal blocks associated with the specified and included options are incorporated into the circuit. This simplifies assembly and provides a consistent interface. The terminal blocks are color-coded to further simplify wiring 2.1.1 Terminal Block Color Codes Black Red Green Yellow Blue Orange 2.2 Motor Power Connection (Armature and Field) External Fault Detection Options (Hi Temp, etc.) Drive Status (Drive Running, In Remote Mode, etc.) Drive Start Input Analog or Low Voltage I/O (Drive speed reference, Chemalarm™ Probe, etc.) Tachometer feedback connection Documentation Standard documentation practices were followed to simplify cross referencing between the system drawings and the terminal block wiring numbers. The first three digits of the four digit number represent the page and line numbers where the wire appears. The last digit represents the order of occurrence on a given line number. For example, wire 1281 is the first wire located on line 28 on page #1. 2 3. Cruise Control™ Typical Internal Panel Layout 3.1 Cruise Control™ typical components Refer to Figure 1, below 1. Non-fused disconnect and incoming power terminal blocks. 2. Circuit breakers (main, drive, components, etc.) 3. Control or Isolation Transformer (if needed) 4. Control system relays (drive start, fault, etc.) 5. DC Drive (with armature contactor if needed) 6. Terminal block (internal and field terminations) 7. Signal isolator (for 4-20mA incoming speed signal) 1 3 2 5 4 6 7 FIGURE 1 3 4. Standard Terminal Block Layout 4 8 9 6 7 2 1 3 FIGURE 2 Refer to figure 2, above: 1. Internal terminal blocks (gray) 2. Motor armature & motor field connections (black) 3. Tachometer feedback connections (orange) 4. Drive in remote mode N.O. output (green) 5. Drive running N.O. output (green) 6. System fault N.O. output (green) 7. High temperature N.O. output (green) 8. Drive start input (yellow) 9. External system fault (red) 10. N.C. high temperature fault input (red) 11. N.O. high discharge pressure fault input (red) 12. N.O. leak detected fault input (red) 13. 4-20mA speed reference input (blue) 14. 4-20mA speed reference output (blue) 15. 4-20mA stroke reference input (blue) 16. 4-20mA stroke reference output (blue) N.O. = normally open N.C. = normally closed 4 5 1 1 1 1 0 1 2 3 1 1 1 4 6 5 5. Panel External Controls The following information is for reference on intended operation. Please consult with the Project Engineer for any changes or procedures specific to your installation. Note that your panel may contain options or changes to satisfy certain specifications that are not described here. • Motor Start Hand/Off/Auto Position Selector Switch: When this selector switch is in the Hand position, the pump motor will start based on the Start/Stop selector switch. See below for Start/Stop selector switch operation. If no Start/Stop selector switch is included, the pump motor will run in the Hand position as long as no fault condition exists. During normal operation if a fault occurs or a motor overload is detected, the motor will stop and will restart once the fault is cleared. The motor will continue to run as long as this switch remains in the Hand position. When this selector switch is in the Off position, the pump motor will stop, whether from the Auto or Hand position. No condition will start this motor unless this selector switch is moved to another position. When this selector switch is in the Auto position, the pump motor will run when directed from the main control system or PLC. The PLC signal will trigger an internal relay in the panel, when necessary, to activate the pump. The pump will continue to operate until the PLC removes this signal or a fault condition occurs. • Start/Stop 2 Position Selector Switch: When this selector switch is in the Start position, the pump motor will start as long as there is no fault condition or motor overload. During normal operation if a fault occurs or a motor overload is detected, the motor will stop, and will restart once the fault is cleared. The motor will continue to run as long as this switch remains in the Start position. When this selector switch is in the Stop position, the pump motor will stop, whether from the Auto or Hand position. No condition will start this motor unless this selector switch is moved to another position. • Pump Running Red Pilot Light Illuminates when the pump is signaled to run and stays on while the pump is activated. If the light turns off, the pump has stopped. If a fault condition occurs, the pump running light will turn off and re-illuminate once the fault condition is cleared and the pump is signaled to run. • Pump Stopped Green Pilot Light Illuminates when the pump is not signaled to run and stays on while the pump is off. If the light turns off, the pump has started! A fault condition will have no effect on this light's operation. • System Fault Amber Pilot Light Illuminates when the system experiences a fault condition. This will also cause the fault relay to latch, and the pump will stop. The fault light will not go off until the fault condition is removed and the Fault Reset pushbutton is depressed. • Diaphragm Leak Amber Pilot Light Illuminates when the system experiences a diaphragm leak condition. This will also cause the appropriate relay to latch, and the pump will stop. This light will not go off until the fault condition is removed and the Fault Reset pushbutton is depressed. This fault will also signal the System Fault light. 5 • Motor High Temp Fault Amber Pilot Light Illuminates when the motor experiences a thermal overload or high temperature condition. This will also cause the appropriate relay to latch, and the pump will stop. This light will not go off until the fault condition is removed and the Fault Reset pushbutton is depressed. This fault will also signal the System Fault light. • High Discharge Pressure Amber Pilot Light Illuminates when the system experiences a high discharge pressure condition. This will also cause the appropriate relay to latch, and the pump will stop. This light will not go off until the fault condition is removed and the Fault Reset pushbutton is depressed. This fault will also signal the System Fault light. • Fault Reset Black Pushbutton, Momentary This button resets the System Fault and any other fault conditions. See above section on System Fault. Note that the fault reset pushbutton will function only if the fault condition has been corrected. • Power On White Pilot Light This light will illuminate when the system has 120-volt control power. If this light is not on, the system is not powered and the controls will not operate predictably. Check the system disconnect, if available, or the main power into the panel. If the system has main power above 120VAC, check the fusing at the transformer as well. 6 6. Field Wiring Do not touch any of the components or wires located in the panel without first removing power to this panel. Any of these wires may have voltage connected to them. 6.1 Power and Motor Main power into this system is supplied in the upper right corner inside the panel. This system is powered with 120 or 220 volt AC power, single phase. All power lines are terminated at the disconnect or terminal block located in the upper right-most corner of the enclosure. Common voltage and the ground wire are terminated where indicated. Incoming power wiring should not exceed 12 AWG. Motor power from this system is provided along the bottom of the enclosure at the main terminal blocks. Positive motor voltage is on terminal 2261 and negative motor voltage is on terminal 2271. These lines should not exceed 14 AWG wires. Shunt wires may also be connected in some applications. If a shunt-wound motor is used, connect the positive shunt wire to 2241, and the negative shunt wire to 2251. 6.2 External Signals All external signals will be terminated on the main terminal block located at the bottom of the enclosure. 6.2.1 Inputs (Yellow Terminal Blocks) • Remote start input, Dry Contact The Remote Start input will be a normally open (NO) contact closure from the main panel. Two wires should be provided. Upon closure of the remote contact, the pump will operate. 120 volts will be present at 1291, and 1321 will be the signal to run the pump. A short circuit between these wires will cause the pump to run continuously in the Auto mode. These wires should not exceed 14 AWG. • Remote start input, Powered The Remote Start input will be a 24VDC or 115VAC signal from the main panel. Both the + (line) and the common (neutral) signal will need to be provided. Positive/line will connect at terminal 1431, and common/neutral will connect at terminal 1432. These wires should not exceed 14 AWG. 6.2.2 • Outputs (Green Terminal Blocks) Motor running output The Motor Running output will be a normally open contact signal to the main panel. The common signal will connect to terminal 1261, and active signal will connect at terminal 1262. These wires should not exceed 14 AWG wires. 7 • System fault output The System Fault output will be a normally open contact signal to the main panel. The common signal will connect to terminal 1341, and active signal will connect at terminal 1342. These wires should not exceed 14 AWG wires. • Local/Remote status output The System in Remote output will be a normally open contact signal to the main panel. This contact will close when the Cruise Control is ready to accept a run signal from the main panel. The common signal will connect to terminal 1361, and active signal will connect at terminal 1362. These wires should not exceed 14 AWG wires. 6.2.3 Analog Signals Inputs & Outputs (Blue Terminal Blocks) • Analog signal control inputs The Analog input signal will be a 4-20mA signal from the main panel to control the speed of the pump motor. The Cruise Control panel will be configured to run at 0% of full speed at a 4mA signal, and at 100% of full speed at a 20mA signal. These two wires should be a shielded twisted pair from the main panel to the Cruise Control, and the wires should not exceed 18AWG. The positive analog input should be connected to terminal 220W, and the negative signal to 220B. • Analog signal feedback outputs The Analog output signal will be an isolated 4-20mA signal from the Cruise Control to the main panel reflecting the current speed of the pump motor. The Cruise Control panel will be configured to output 4mA at 0% of full speed, and 20mA at 100% of full speed. These two wires should be a shielded twisted pair from the main panel to the Cruise Control, and the wires should not exceed 18AWG. The positive analog input should be connected to terminal 234W, and the negative signal to 234B. 6.2.4 Additional Terminal Blocks Along with the above listed connections, the main terminal block has various other wire terminations for the normal system operation. Please consult the main wiring documentation for indication of the other wire designations. 8 7. Drive Specifications The Cruise Control™ comes standard with a Control Techniques Focus 3™ DC Drive. The panel documentation includes the complete User Manual from Control Techniques. Included below are general specifications for this DC drive and control panel system. These specifications are applicable only to the Focus 3™ drive, if your panel has been specified with an alternate DC SCR drive, please refer to the appropriate manufacturer’s literature supplied with your panel system. 7.1 General: Control Panel Degree of Protection: 7.2 DC-SCR Drive: Input Voltage: HP Range: Armature Voltage Range: Speed Regulation (95% load change): Tachometer Voltage @ maximum speed: Overload Capacity: Maximum Speed: Minimum Speed: IR Compensation: Current Limit: Acceleration/Deceleration: 7.3 120VAC / 240VAC +/- 10% 1/4 to 1 HP @ 120VAC, 1/2 to 2 HP @ 240VAC 90VDC or 180VDC Armature feedback: 1% max. speed Tach feedback: 0.5% max. speed Low Range - 6.5 to 17.4 VDC High Range - 60 to 160 VDC 150% of max. rating for 1 minute 80-120% of rated speed 0-20% of rated voltage 0-20% of rated voltage 0-150% of selected range 0.3 - 20 seconds (linear) Signal Inputs: Drive Start Input: Motor Thermal Fault: High Discharge Pressure Fault: PULSAlarm Diaphragm Leak Fault: Chemalarm Diaphragm Leak Fault: Analog Inputs: 7.4 Enclosure and disconnect - NEMA 4X Percent Speed/Stroke Meter - IP65 Remote dry contact, close to run [standard] Remote 120VAC input, energize to run [option] Remote 24VDC input, energize to run [option] N.C. input, opens under fault condition N.O. input, closes under fault condition N.O. input, closes under fault condition External probe, 24VDC from Chemalarm™ circuit 4-20mA 50Ω impedance Signal Outputs System Fault: Drive Running Status: Drive in Remote: Analog Outputs: N.O. closes under fault condition 5A @ 240 VAC maximum N.O. closes when running, 5A @ 240 VAC maximum N.O. closes when "Drive Start" is in remote 3A @ 120 VAC, 1.5A @ 230 VAC maximum Percent Speed/Stoke meters only: 4-20mA, 500Ω, short circuit protection 9 8. DC Drive Configuration The Control Techniques DC Drive is properly configured for your application during assembly. The following information is for reference only. Some panels may be supplied with an alternate drive to conform to the user’s specification. If your panel is so equipped, please refer to the appropriate manufacturer’s literature for this information. 8.1 Jumpers Description Jumper Position Input Voltage JP11 A-E and B-D (120 VAC) or A-C and B-C (240 VAC) Speed Feedback Selector JP4 ARM (Armature) or TACH (Tachometer) Armature Voltage Level JP8 LOW (90 VDC) or HI (180 VDC) Current Feedback Range JP9 No Jumper (2.6A) A (5.5A) B (7.5A) Tachometer Feedback Range JP3 LOW (6.5-17.4 VDC) or HI (60-160 VDC) (Note: feedback range is based on tachometer output at maximum motor speed) 8.2 Potentiometer Descriptions 1. Acceleration Time (ACCEL) and Deceleration Time (DECEL). Adjust the ACCEL and DECEL potentiometers clockwise to increase the linear acceleration and deceleration times (.3-30 seconds). 2. Maximum Speed (MAX. SPEED) and Minimum Speed (MIN. SPEED). These potentiometers adjust the maximum speed (70-120% of motor base speed) and minimum speed (0-30% of maximum speed setting) at which the motor will run. 3. Speed Loop Offset (OFFSET SPEED). This potentiometer is used to zero out any offsets in the speed loop amplifier. With the door mounted speed potentiometer and drive minimum speed potentiometer (MIN. SPEED) set to zero, adjust the OFFSET SPEED potentiometer so any remaining motor rotation is eliminated. 4. Speed Signal Follower Gain (SPEED REF. GAIN). The Speed Signal Follower Gain should be adjusted so the motor is at its rated voltage/speed when the door-mounted potentiometer is at its full clockwise position. 5. Signal Follower Zero Bias (ZERO BIAS). The Signal Follower Zero Bias potentiometer should be adjusted so the motor is at zero speed when the minimum current reference input signal (4mA) is applied. 6. Current Signal Follower Gain (CURRENT REF GAIN). The Current Signal Follower Gain should be adjusted so the motor is at its rated voltage/speed when the maximum current reference input signal (20mA) is applied. 7. Internal Resistance Compensation (IR COMP). The IR compensation potentiometer is used to overcome the motor’s natural tendency to slow down as the load increases. If the motor slows down excessively as it is loaded, adjust the IR COMP potentiometer clockwise. The speed of the motor will oscillate or ‘hunt’ if the IR COMP potentiometer is adjusted too far clockwise. If this pulsing occurs, adjust the IR COMP potentiometer counterclockwise until the motor speed stabilizes. Refer to Control Techniques Focus 3™ User Guide page 20 for additional information. 10 8.3 Drive Speed Calibration See drive layout, Figure 3, on following page. Requirements and Warnings: • • • • • Pump will operate during testing System must be open to allow flow, or pump must be disconnected from system Must be safe to operate pump Field wiring should be verified Applicable safety precautions should be followed Use the following sequence to calibrate the drive. It is assumed that maximum speed will be either 90V or 180V as applicable. Users may choose to set minimum speed to 0, or may choose a higher value such as 10-15% to prevent the motor from lugging or operating erratically. Calibrate local mode first: 1. Maximum speed a. Set local speed pot to MAXIMUM b. Use “MAX SPEED” pot to adjust maximum speed 2. Minimum speed a. Set local speed pot to MINIMUM b. Use “OFFSET SPEED” pot to adjust minimum speed 3. Check adjustment at both ends of the range and re-adjust as necessary Calibrate remote mode second: 1. Minimum speed a. Send MINIMUM (4 mA) signal b. Use “ZERO BIAS” pot to adjust minimum speed 2. Maximum speed a. Send MAXIMUM (20 mA) signal b. Use “CURRENT REF GAIN” pot to adjust maximum speed 4. Check adjustment at both ends of the range and re-adjust as necessary 11 8.4 Control Technique Focus 3™ F3N2C Control Board Jumper and Potentiometer Positions DECEL ACCEL JP9 OFFSET SPEED MIN SPEED MAX SPEED IR COMP ZERO BIAS CURRENT REF. GAIN JP4 JP3 JP8 SPEED REF. GAIN JP11 FIGURE 3 12 9. Digital Panel Meters The Speed and Stroke Length Meters are configured and programmed for your application during assembly. The following information is for reference only. 9.1 Jumper Programming The input and output modules are designed to cover several ranges. For proper operation, the jumpers should be set as follows: Percent Speed Meter Jumper Programming Description Desired Range Slot Number Position 0-200 Volts 1 6-3 4-20mA 5 Up, Down, Up Slot Number Position DC Current Input Module (5100532) 1 5-6 Optional DC Analog Output Module (5100560) 5 Up, Down, Up DC Voltage Input Module (5100530) Optional DC Analog Output Module (5100560) Percent Stroke Meter Jumper Programming Description 9.2 Meter Functional Programming For proper operation, the speed meter must be configured for operation at the input range selected by jumpers above and programmed for the specific application. 9.2.1 Input Range Selection 1. Press and hold the S and ▲ keys simultaneously and switch on the unit. The display shows PAS. The display will show 0 two seconds after the keys are released. 2. Press the ▲ key until 66 is displayed. 3. Press the S key and the display will show SEL. 4. Press the S key to enter range selection mode. The display will show the current range code (a number between 0 and 12). 5. Use the ▲ or ▼ keys to select the range code shown in the table. 6. Press S to accept the new range code and return to RUN mode. 13 9.2.2 Functional Programming 1. Press and hold the S key; then press the ▼ key. Release both immediately when display shows PAS. 2. If the password is not 0 (zero), use the ▲ or ▼ keys to select the proper password. Press S to enter and move to the next parameter. All meters are shipped with the password set to 0 (zero). 3. At each parameter, the display will show the parameters for two seconds, then display the value associated with the given parameter. Use the ▲ and ▼ keys to modify the value and press S to move to the next parameter. If no changes are required, press S to retain the current value and move to the next parameter. 4. Set the Input Range (HiE, LOE) and Display Range (Hi, LO) and press S until END is displayed. 5. The system automatically returns to the run mode. 9.2.3 Percent Speed Meter Programming Value Tables Description Input range selection Decimal Point Location High limit for electrical input range* Low limit for electrical input range Display value corresponding to HiE Display value corresponding to LOE Display - dP HiE LOE Hi LO Value 4 111.1 90.0 (90 VDC armature) 180.0 (180 VDC armature) 0.0 100.0 0.0 *HiE is set at tachometer voltage at maximum motor speed if tachometer feedback is used. 9.2.4 Percent Stroke Meter Programming Values Description Input range selection Decimal Point Location High limit for electrical input range Low limit for electrical input range Display value corresponding to HiE Display value corresponding to LO Display - dP HiE LOE Hi LO Value 4 111.1 20.0 4.0 100.0 0.0 14 10. Elapsed Time Meters The Elapsed Time Meters are configured and programmed for your application during assembly. The following information is for reference only: • Elapsed Timer Setup The setup switches for this elapsed timer are located at the bottom of the meter inside the enclosure. Switch number 1 is located on the side under the reset button, and switch number 2 is located on the other side. • Time-range Switch (2) Set this switch towards the terminal block (back of device) for 0.1 hour resolution. The displayed range will be from 0.0h to 999999.9h. Default setting is 0.0h to 3999d23.9h. (Note, h=hours, d=days). • Key-protect Switch (1) Set this switch towards the terminal block (back of device) to prevent the front reset button from resetting the counter. • Replacement Components The part number from Omron™ to order for a replacement battery for this meter is Y92S-36. • Note Please remove all control wiring before replacing or servicing the battery or any components within these meters. 15 11. Interface with PULSAmatic controllers FIGURE 4 16 12. Interface with ELMA controllers (optional) FIGURE 5 Pulsafeeder standard ELMA interface drawing: FIGURE 6 17 13. Additional Information See the spreadsheet and drawing package included with your Cruise Control for complete panel bill of materials and wiring information. 18 19 Engineered Pump Operations 2 8 8 3 B r i g h t o n - H e n r i e t t a T o wn l i n e R o a d Rochester, NY 14623 Telephone (585) 292-8000 Fax (585) 424-5619 [email protected] h t t p : / / w w w. p u l s a . c o m Doc # Date Rev # 20 CC-IOM-0103 05-2003 D