1
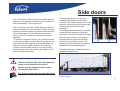
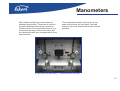
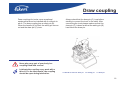
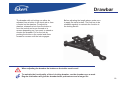
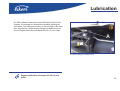
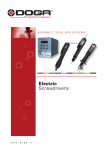
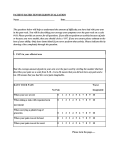
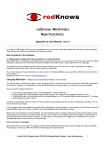
User manual
1
Contents
Safety precautions
3
Lift axle
21
Side doors
5
Support poles for sawtimber
22
Rear doors
6
Floor types
22
Ekeri load restraint system
7
ATP certificate
23
EkeLoad
8
Other equipment
23
EkeBandup
10
Maintenance
24
EkeHeat
10
Front wall ladder
11
Sales network
28
EkeGuard
12
Spare parts
30
Lashing bars in walls
13
Service network
32
Inner lights
13
Lift- and lower controls
14
Appendix 1: Follow-up form
37
Manometers, axle pressure
15
Appendix 2: Warranty note (separate)
Draw coupling
16
Appendix 3: Service book
38
Drawbar
17
Appendix 4: Electrical connections
43
Electrical plugs, ABS-brake plug
and air couplings for trailer
19
Lubrication
20
Ver. 1.4.2
2012
2
Safety precautions
For safe and effective use of your trailer or box
body, please read and follow the safety
precautions.
DOORS
• Always keep the side and rear doors secured with
the doorcatch when they are open.
• Do not drive with open doors or tail lift down.
• Always have the semi-trailer connected to the fifth
wheel when using the side-doors.
FASTENING OF GOODS
• Never fasten the straps at 90 degree angle to the
walls since this can damage the lashing bar (in
wall/doors). We recommend wrapping the strap as a
‘U’ around the cargo to avoid pulling the bar out of the
wall
AIR SUSPENSION
• Always keep the controls for lift and lower in driving
position when driving.
CONNECTING AND DISCONNECTING A TRAILER
• Disonnecting: Connect the parking brake first.
Then disconnect the ABS- and electrical cables first,
then the air hose and finally the drawbar or Kingpin.
• Connecting: Always connect the drawbar or
Kingpin first, then the air hose and finally the
electrical- and ABS-cables.
• Always keep the parking brake engaged when
connecting or disconnecting the trailer.
• Remember to wind down the semi-trailer legs
before Kingpin is released and raise when semitrailer is connected.
• Check that nobody/nothing is under the trailer when
using the lift axle.
Lights
• Do not load too close to the inner lights, when the
lights are on. Never cover the lights with an
intermediate wall if you intend to keep the lights
burning for a long period of time.
3
Welcome
First of all we wish to thank you for choosing Ekeri!
We hope this delivery will be the beginning of a long relationship between us.
Before you start to use your Ekeri box or trailer, please read this manual.
Symbols:
Contains the most important points in the chapter. It is
important to take special note of these.
Hints and tips that makes everyday use easier and more
efficient.
A movie is included. Click on the icon to start the movie.
Some of the details in this manual cover optional equipment, that may or may not be on your box body or trailer. Your Ekeri
box body or trailer may also be equipped with some other optional equipment that´s not mentioned in this manual. In this
case, read the instructions enclosed with the special equipment. Optional equipment can for example be tail lift, fridge
units, heaters and so on.
4
Side doors
The side doors on Ekeri boxes are divided into two
sections, front and rear sections with 3+3 doors on
short boxes and 5+5 on long boxes.
The doors open from the middle. Open one door at
a time and fasten it to the next door. When a whole
section is opened it has to be secured with the door
catch which can be found inside the last door of
each section. The doors are closed by doing the
opposite.
To close the first pair of doors, put gentle pressure
on the second door to push it into its guides, do the
same with the following pair of doors and then it is
easy to close the single mid door. To be able to
operate the side doors properly on a semi-trailer,
the trailer has to be connected to the tractor unit´s
or to the dolly’s fifth wheel
On longer boxes there is always a
midpole (D) between the two door
sections. The midpole comes off in one
piece by first pulling out the locking pin,
and then gently pulling the pole
outwards.
The midpole should always be put back
in place before starting to close the
side doors. On some models The lower
part of the pole can be removed by
opening the two locks and carefully
pulling it out and lifting it away. The
upper part of the pole can be drawn to
the side of the box while loading.
The side doors are lockable with keys
delivered inside the box.
Hold the midpole with one hand when the
locks on the midpole are opened!
Always put the midpole in place when
closing the side doors.
See how to close and open the side doors.
A, B, C = Side door locks
(Click to enlarge)
D = Midpole
5
Rear doors
The rear doors have either single or
double lock handles. To open the rear
doors always start by opening the right
hand door first.
When the doors are open always make sure they
are secured with the door catch, which can be
found on the side under the box or with the rubber
catch on the side on FNA/FRC. The rear doors can
be locked with a padlock on the right hand door.
To open doors with double locks, both
lock handles have to be opened at the
same time, and when closing the doors,
both locks have to be closed at the
same time.
The lock handles have to be put back in
place before the rear doors are turned
against the side, otherwise they might
cause damages to the sides.
Always close the lock handles before
turning the rear doors to the sides!
Always secure the doors with the door
catch!
The rear doors can be locked with a
padlock.
See how to open and close the rear doors.
A = Rear door locks
(Click to enlarge)
B = Fastening for padlock
C = hooks
6
Ekeri load restraint
system
All Ekeri box bodies are delivered with Ekeri’s patented load restraint
system as standard. Inside the box there is a load restraint rail (D), let
into the floor on both sides. The fastening straps (B) are fitted into the
rail by putting one of the cylinders (A) into the end of the
strap/fastener. There are openings in the rails approximately each
meter, where the fastening strap can be let down into the rail. Ekeri’s
load restraint system makes it easy to secure the load in exactly the
right place.
Pic 1. A = Cylinder
B = Strap
C = Fastener
Ekeri Surrmax is an optional equipment, which can be used to
secure full width loads that cover the fastening rail.
Always use Ekeri original fastening straps,
cylinders and fasteners for maximum
safety.
See how the Ekeri fastening system works
Pic 2. D = Fastening rail E = Surrmax
7
EkeLoad
The EkeLoad system (optional)
developed by Ekeri permits flexible
loading on two levels.
The EkeLoad system consists of
bars located on the walls and side
doors as well as bearing beams.
The recessed bars are completely
flush with the wall structure to
prevent the cargo from being rubbed
and damaged during transport.
Special poles are also available to
enable side loading on two levels.
When the EkeLoad beams are not in
use, they can easily be removed or
stowed under the roof.
Always use Ekeri original accessories.
8
EkeLoad
9
EkeBandup
EkeBandUp (optional) fastens the straps to the roof
when loading from the side. The EkeBand Up keeps
the straps at a 90° angle under the roof to facilitate
maximum loading space.
The EkeHeat heater is optional equipment for
boxbodies and trailers. Hot air from the heater
enters the upper part of the front wall, and flows
over the load through the loadspace. The heating is
efficient and distributes the heated air evenly over
the loadspace.
When the air has cooled , it returns below the load
back to the heater.
EkeHeat is mounted in an compact box on the
front of the boxbody or trailer.
EkeHeat
Remember to check the automatic fuses for heater´s
regularly.
Do not put flammable objects near the heater outlet.
10
Front wall ladder
With the practical ladder you can easily
reach the fridge unit for maintenance work.
The ladder can simply be folded out and
retracted in the front corner profile.
Opening: Open the lock (A), hold the
handle (B) and push the ladder first
upwards, then pull outwards. (see movie).
Closing: Hold the handle and push in the
upper part of the ladder under the upper
cover. Then lift the ladder over the lower
edge, and when in position, press down.
Then close the lock.
Detailed instructions for use of
the ladder.
(Click to enlarge)
Don´t use excessive force when
opening/closing the ladder!
The Ekeri ladder reduces wind resistance and
weight. Fold in the ladder when it´s not in use.
Also read the manual for the fridge unit.
11
EkeGuard
EkeGuard – Safety with the push of a
button!
With the EkeGuard (optional) it´s easy to
lock or unlock all doors on the
trailer/boxbody with the push of a button. At
the same time, an alarm will be activated for
added protection. If somebody manages to
open the door, even with the locks engaged,
the alarm will be set of.
To lock the boxbody or the trailer, push the
”lock” button. To unlock, simply press the
”unlock” button.
EkeGuard is also available with the extra
feature of a GPS-positioning system. With
this feature, the exact position of the
vehicle is sent as an SMS to your mobile
phone. When you get the coordinates as
an SMS, go to www.ekeri.fi/pos and enter
them to see the vehicle position on a
map.
It´s also possible to switch on and off
interior lights, engage/disengage locks
and alarm through SMS.
For more information about the
EkeGuard system, please see the
separate instructions enclosed with your
trailer.
EkeGuard protects the load and the equipment.
12
Lashing bars in walls
Ekeri boxes can also be equipped with lashing bars in
walls/doors (optional equipment). These can be used in
combination with straps to fasten lighter goods against
one or several walls.
It is not recommended to fasten the straps at a 90 degree
angle against the walls as this can damage the lashing
bar. We recommend fitting the straps as a ‘U’ around the
cargo to avoid pulling the bar out of the wall.
All Ekeri boxes have inner lights. On truck bodies the
lighths are switched on in the truck cab. All trailers are
prepared with wiring to the electrical connection so
that the operator can install a button for activating the
interior lighting in the truck cab.
Inner lights
A
Usually there is also a switch, which enables interior
lighting with power from the parking lights. This is
either a separate switch on the chassis or inside the
box for lift and lowering of air suspension
A = Inner light switch
13
Lift- and lower controls
All Ekeri trailers have lift and lower valves for the air
suspension. On semi-trailers there is one control and
on drawbar trailers two.
When the control(s) point downwards, the trailer is
set in driving position. This should always be the
case when driving.
The control has to be moved to the left or right
depending on desired movement.
The control has five positions (see picture). If moved
to the left, the trailer lowers and stops at a factory
pre-set position. If moved to the right, the trailer rises
to a factory pre-set position.
If the trailer is required to stop in a position other than
the pre-set, move the control to stop.
The lift and lowering valves are normally placed on
the left side of the trailer in an aluminium box. If
there are two controls, the left one (A) controls the
front and the right one controls the rear (B).
The controls must always point downwards
(driving position) when driving.
The left control is for the front, and the
right is for the rear.
The box also contains an air outlet that can
be used with the supplied air hose for
cleaning the fastening rails.
C
A
A = Lift-/lower control for front
C = Air outlet
B
B = Lift-/lower control for rear
14
Manometers
Ekeri trailers usually have manometers as
standard (see picture). These can be found in
the same aluminium box as the controls for
lift/lower valves. On a semi-trailer there is one
manometer showing load on rear axles, and
on a draw bar trailer two, showing load on front
and rear axles.
1
1 = Axle pressure for front axle(s)
The manometer closest to the rear is for rear
axles and the other for front axles. The load
shown is not exact, and should only be used as
guideline.
2
2 = Axle pressure for rear axle(s)
15
Draw coupling
Draw couplings for trucks come as optional
equipment and can be installed with or without air
servo. The draw coupling has a safety pin (B).
When the handle (A) is lifted, the safety pin comes
out and the draw pin (C) rises.
Always check that the draw pin (C) is up before
starting to connect the truck to the trailer. After
connecting the truck please make sure that the
draw pin (C) is down and that the safety pin (B)
has locked the draw pin.
Never place any part of your body in a
coupling fitted with a servo!
Lubricate the coupling every week with a
thin oil. For the best results, the coupling
should be open during lubrication.
A = Handle to raise the draw pin
B = Safety pin
C = Draw pin
16
Drawbar
The drawbar on Ekeri trailers is either bolted or
extendable with air locking device. The bolted drawbar
can be extended by loosening the bolts on top of the
drawbar and moving the front part to desired position.
After adjusting the bar replace the bolts, and tighten with
correct force (see below).
All bolts on the drawbar including bolts for fitting drawbar
to chassis have to be regularly checked and thightened
when necessary. The drawbar eye is either 40 mm, 50
mm or 57 mm in diameter. The truck must have a draw
coupling the same diameter as the trailer’s drawbar-eye.
All drawbars can be raised or lowered with the crank,
which is fitted on the left side in the front of the trailer.
Remember to tighten the bolts after initial few days of use.
Tightening force (dry): A = 195 Nm
B = 125 Nm
C = 600 – 650 Nm
17
Drawbar
The drawbar with air locking can either be
adjusted from a button in the truck cab or from
a control on the drawbar. To adjust the
drawbar, release the lock from the button or
from the control and move forward or in
reverse depending on if you want to extend or
shorten the drawbar. Put on the lock by
pushing the button or the control and move
forward or reverse until the lock engages.
Before adjusting the length always make sure
to apply the trailer brakes. The lock has to be
released regularly to maintain the function in
the locking device.
When adjusting the drawbar the brakes on the trailer must be set!
To maintain the functionality of the air locking drawbar, run the drawbar once a week.
Regular lubrication will give the drawbar better performance and a longer life.
18
When the drawbar or Kingpin has been connected, the following
couplings must be connected in the following order:
1. Air couplings (Duo-Matic)
2. Electrical connectors and plugs
3. ABS-brake plug
Electrical plugs
ABS-brake plug
Air couplings
Always engage the parking brake before connecting or
disconnecting the trailer!
When disconnecting the trailer, first apply the
parking brake. Then disconnect the ABS-brake
plug and electrical plug. After that the Air
couplings, and finally the drawbar or Kingpin. This
is a safety precaution to prevent the trailer from
moving while connecting or disconnecting.
If the truck does not have ABS , the ABS-plug can
be fitted on a holder on the drawbar. For semitrailers it is important to always wind down the
support legs before disconnecting the Kingpin. The
support legs must be wound up after the Kingpin
has been connected.
Remember to connect and disconnect the couplings in correct order!
Always wind down the support legs before disconnecting the Kingpin.
On trailers with EBS brakes, the EBS plug should always be connected
to the truck regardless if the truck is equipped with EBS or ABS.
Fit the ABS-brake plug on the holder if it´s not in use.
19
Lubrication
On Ekeri drawbar trailers there are lubrication tubes on the
chassis, for example to lubricate the turntable steering on
front axles. The tubing comes out on the left side of the front
axle construction, where grease fittings for vaseline can be
found. Regular lubrication increases the life of your trailer.
A = Grease fittings on an Ekeri trailer
Regular lubrication increases the life of your
trailer.
20
Lift axle
On drawbar trailers with liftaxle
(optional equipment) the lift axle is
controlled from a button in the truck
cab. When the axle is up make sure
the load capacity of the other axles is
not exceeded.
Regular use of the lift axle (once a
week) is necessary to maintain the
function of the lifting components.
When the axle is lifted/lowered make
sure nobody/nothing is under the
trailer. On some trailers the control is
fitted on the trailer chassis.
When the lift axle is up, the load capacity of the other axles must not
be exceeded!
Check that nobody is under the trailer when operating the lift axle.
For optimal function the lift axle must be used once a week.
21
Support poles
for sawtimber
For transporting sawtimber Ekeri have developed
special support poles (optional equipment), with a foot
that fits into the Ekeri load restraint rail.
In some specially ordered boxes there are also holes in
the middle of the floor. Poles, with the foot turned
upwards can be fitted here.
All new Ekeri units have a sticker on the inside wall that shows
floor type and highest permitted fork lift axle pressure. Always be
sure to check that the fork lift axle pressure does not exceed the
maximum permitted fork lift axle pressure when loading and
unloading.
Floor types
Floor types and highest
permitted fork lift axle
pressure:
E1: 5500 kg
E3: 8000 kg
Always ensure that the the fork lift axle pressure does not exceed
maximum permitted fork lift axle pressure!
F1: 5500 kg
F3: 8000 kg
TH3: 8000 kg
Only use original Ekeri spare parts and accessories!
22
ATP certificate
For all Ekeri-boxes / boxtrailers ordered as
FNA- or FRC we can apply for an ATPcertificate. This is a certificate that confirms
that the body fulfills the ATP-FRC or ATP-FNA
requirements.
One of the conditions for this is that the trailer
or body is equipped with a fridge unit with large
enough capacity. If a company other than Ekeri
mounts the fridge unit make sure that it is
properly tested before taking it into service.
Other equipment
If your Ekeri product is equipped with heater, tail
lift, fridge unit, you will find separate operating
manuals for this equipment.
Remember to always use Ekeri original accessories.
23
Maintenance
Every Ekeri box body and trailer is built to the highest
quality. To make sure your trailer or box body is working
properly, please carry out the following proceedures:
First drive:
•Before a new Ekeri-trailer is taken onto the road, the tyre
pressures must always be checked before the trailer is
loaded for the first time. On twin-mounted tyres, be aware
that there are two valves opposite to each other in the outer
wheel. Check the pressure in both tyres!
• Before starting to use your new Ekeri trailer check that the
wheel nuts are tightened. Check the wheel nuts regularly and
tighten when needed
• On trailers fitted with a heater it is important to regularly
check that the automatic fuses are in correct position. Battery
charge for the Heater’s batteries will not work if the fuses are
blown. In cold weather this can damage the batteries.
Every week:
• Regular use of the lift axle (once a week) is
necessary to maintain the function of the lifting
components.
• Check regularly that all lights are working and that
the light covers are not damaged or cracked. A nonworking light(bulb) must be fixed/changed
immediately, as a working light(bulb) keeps moisture
away from inside the light.
• Check the coupling boxes regularly for damage.
• When changing a bulb , spray the bulb holder with
some vaseline grease (HHS 2000) to keep moisture
away.
First 1000 km:
• Wash the box and the frame with low water pressure during
the first weeks, as it takes time for the paint to harden.
• The detergents used for cleaning must have a pH-value
between 5-8, otherwise the aluminium parts can be
damaged. This applies for every wash!
• Tighten nuts and bolts on turntable steering, drawbar
fittings, wheel nuts, axles (according to axle handbook). For
tightening of axles and suspension, see axle manufacturer’s
hand book. Check these fittings regularly and tighten when
needed!
24
Maintenance
Every month:
• Check the cables and connectors of the drawbar.
Immediately repair cracked and damaged
cables/hoses.
• Check the plugs and couplings on the drawbar.
• When changing the couplings and electrical plugs,
spray with vaseline grease (HHS 2000) to prevent
moisture ingress.
• On trailers with a heater fitted it is important to
regularly check that the automatic fuses are in correct
position. The batteries will not charge if the fuses are
blown. In cold weather this can damage the batteries.
General:
Every year:
• Open up all lights and spray the bulb holders with
vaseline grease (HHS 2000) or similar.
• For the Ekeri Roca roof interior light, use bulb type
24V-21W BA 15 s , for example Philips type 13498 or
Osram type 7511.
Chassis
• The chassis welds and bolt fastenings should
be checked regularly.
• Regularly check all rubber bushes and tighten
if needed!
• Regularly check fittings for shock absorbers
and air bellows and thighten when needed! !
• Heavy loads should be avoided in severe
cold!
• Empty the air tanks regularly.
Lubrication
• Regularly check and lubricate all grease
fittings on the trailer and all grease points
advised by the axle manufacturer
• In order to keep the side doors functioning,
the side door mechanism should be lubricated
regularly with vaseline.
• If the trailer is equipped with central lubrication
points (see ”Lubrication” in this handbook), fill
the reservoir regularly.
25
Maintenance
Other maintenance
Read maintenance and service manuals for
other equipment, such as tail lifts or heaters,
which have separate manuals.
For maintenance on axles follow instructions
given by axle manufacturer (hand book)
The following cleaning methods are recommended for vehicle
safety markings:
§ Wash with sponge, cloth or soft brush using water and detergent. The
cleaner must be non-abrasive, without strong solvents and with a pHvalue between 3 and 11.
§ Automatic truck/car wash or standard high-pressure hand spray.
§ Maximum pressure-1200 PSI/ 80 bar.
§ Maximum water/wash solution temperature-140°F/ 60°C
§ Minimum of 12 inches/ 30cm distance of cleaning jet(s) from markings.
§ Cleaning wand or jets to be at no greater angle than 45° degrees from
perpendicular to the marking surface
§ When using metal brighteners, follow manufacturer’s
recommendations for dilution.
§ Thoroughly rinse from markings after soaking vehicle.
Remember to always use original Ekeri spare parts and service!
26
Thank you!
Thank you for reading this user manual!
For more information or other questions, please contact us!
Ab Ekeri Oy
Kållbyvägen 1276
FIN 68800 Kållby
www.ekeri.fi
27
Sales network
Country
Area
Contact person
Phone
Fax
Finland
(+358)
Ab Ekeri Oy
Stefan Fagerström
040-5621111
06-7887412
Finland
(+358)
Ekeri Center Helsinki
Kuopio
Lasse Kangasniemi
Matti Valkama
040-5444752
0400-692538
09-2787638
017-3622248
Sweden
(+46)
OF Ekeri Ab
www.ofekeri.se
0433-726 00
0433-711 83
Southern Sweden
Claes Olsson
Bo Olsson
Håkan Magnusson
070-62 71005
070-62 71052
070-36 72610
0433-711 83
Northern Sweden
Stefan Fagerström
+358-40-5621111
+358-6-7887412
Norway
(+47)
Ekeri Norge AS
Hunnselvveien 10
2830 Raufoss
Björn Evensen
Erik Fagerholm
61159850
61159850
61159860
61159860
Denmark
(+45)
Lastas A/S
Energivej 35
8722 Hedensted
Anders K Larsen
75890022
22281516
75890887
Iceland
(+354)
Stilling h.f.
Skeifan 11
108 Reykjavik
Isleifur Erlingsson
520 8028
520 8010
(Country code)
28
Sales network
Country
Area
Contact person
Phone
Fax
Holland
Netherlands
(+31)
Burg fabriek van
wegtransportmiddelen B.V
Katwijkerlaan 75
5641 PD Pijnacker
Jan Bunk
015-3694340
015-3693385
Great Britain
(+44)
Burntwood Services Ltd.
24 Canterbury Way
Chelmsford Essex CM1 2XN
Robert Wise
07966-203640
07966-203640
Germany
(+49)
Mevissen Nutzfahrzeuge
Johannesstrabe 20
52525 Waldfeucht - Haaren
www.mevissen.de
Horst Mevissen
02452 7067
02452 87440
Russia
Ekeri Center Helsinki
Pitkäsentie 23
01200 Vantaa
Viktor Pakki
+358 41 51 30257
(Country code)
29
Spare parts
Country
Service point
Contact person
Phone
Fax
Finland
(+358)
Ekeri Center
Kållbyvägen 1276
68800 Kållby
Barbro Molander
06-7887475
06-7887479
Sweden
(+46)
OF Ekeri Ab
Ulvaryds industriområde
Box 11
S-285 21 Markaryd
0433-71183
Arne Persson
0433-72600
0433-72601
070-6672601
Norway
(+47)
Ekeri Norge AS
Hunnselevveien 10
2830 Raufoss
Trond Lundsten
61159850
61159860
Iceland
(+354)
Stilling h.f.
Skeifan 11
108 Reykjavik
Garðar Skarphéðinsson
520 8028
824 8028
52080021
Holland
(+31)
Burg fabriek van
wegtransportmiddelen B.V.
Katwijkerlaan 75
2641 PD Pijnacker
Jan Bunk
015-3694340
015-3693385
England
(+44)
Colliers Truck Builders Ltd.
Unit 15, Blackwater Trading Estate
The Causeway, Maldon, Essex
Mick Gill
1621 843109
1621 843047
(Country code)
30
Spare parts
Country
Service point
Contact person
Phone
Fax
141 336 3371
141 336 3821
2452 87440
(Country code)
Scotland
(+44)
Colin Hutton Coachworks Ltd.
40 Stronend Street
Glasgow G22 6AR
Germany
(+49)
Mevissen Nutzfahrzeug GmbH
Johannesstrabe 20
52525 Waldfeucht - Haaren
www.mevissen.de
Horst Mevissen
245 7067
Russia
Rustruck
Puschkin, St. Petersburg
Viktor Pakki
+358 41 51
30257
31
Service network
Country
Service point
Contact person
Phone
Fax
Finland
(+358)
Ekeri Center
Kållbyvägen 1276
68800 Kållby
Håkan Sundqvist
Ronny Käcko
06-7887471
06-7887472
06-7887479
06-7887479
Finland
(+358)
Suomen Kuljetuslaite
Hakkilankaari 4
01380 Vanda
Veijo Varonen
010-6503112
040-7247831
010-6503155
010-6503190
Finland
(+358)
Kuorma-Autoasennus JM Oy
Hakalahdentie 13
70460 Kuopio
Hannu Pekkarinen
Jouko Penttinen
Mikko Salolahti
017-3644333
017-3644350
Finland
(+358)
Perävaunu Ky Vuola
Voivalantie 28
20780 Kaarina
Jarmo Vuola
020-7118830
0400-530305
020-7118831
Finland
(+358)
AH Kaross
Larvvägen 18
66590 Vassor
Alf Hellman
Kennet Hellman
06-3464239
06-3464205
Finland
(+358)
Toplift
Hopeatie
54100 Joutseno
Pekka Ravattainen
Janne Ikäheimonen
05-6100500
05-6100559
Finland
(+358)
Asennustyö M. Ahlqvist Oy
Vahdontie 163
21290 Rusko
020-749 8220
040-082 7936
020-749 8221
(Country code)
Carrier 24 h.
32
Service network
Country
Service point
Contact person
Phone
Fax
Finland
(+358)
Cargofix Oy
Halmekuja 2
01360 Vanda
Oksa Janne
045-1371877
Finland
(+358)
Korihuolto Moksi
Juvantasku 7
02920 Esbo
Korjaamo
020-7209898
020-7209899
Finland
(+358)
Wetteri Power Oy
Poikkimaantie 31
90400 Uleåborg
Vaihde
Oulu
Kajaani
Rovaniemi
Kuusamo
Kemi
020-778870
0400-890868
0400-680102
0400-690888
0400-685089
0400-392555
020-7788796
Sweden
(+46)
Båstab Ab
Flintvägen 4
26941 Östra Karup
Kennet Forsell
0431-74720
0431-74095
Sweden
(+46)
Umeå Nya Bromsservice
Stackvägen 4
90137 Umeå
Janne Samuelsson
090-144433
090-148260
Sweden
(+46)
Björn Johansson Karosseri Ab
Fallvindsgatan 4
65221 Karlstad
Björn Johansson
054-851535
054-851535
(Country code)
33
Service network
Country
Service point
Contact person
Phone
Fax
Sweden
(+46)
AO Lastbilsverkstad
Pikullavägen 1
702 27 Örebro
Anders Söderberg
Martin Melchert
019-270751
019-272130
Sweden
(+46)
Lastbilsteknik Ab
Planerargatan 5
781 70 Borlänge
Anders Svensson
0243-217900
0243-16648
Sweden
(+46)
Lastvagnsteknik i Göteborg Ab
Transportgatan 7
422 46 Hisings Backa
Peter Lappalainen
031-582228
031-581816
Sweden
(+46)
STS Sydhamnens
Trailerservice
Kabelvägen 9
553 02 Jönköping
Lennart Emilsson
036-314999
036-314998
Sweden
(+46)
STS Sydhamnens
Trailerservice
Pjältvägen 3
616 34 Åby/Norrköping
Mats Pettersson
011-166311
011-166401
Sweden
(+46)
Sandströms Center Ab
Trehögsgatan 11
213 76 Malmö
Semir Berhamovic
040-221120
040-221121
Sweden
(+46)
Sandströms Center Ab
Västbergavägen 14-16
126 30 Hägersten
Johan Sandström
08-7114916
08-6211230
(Country code)
34
Service network
Country
Service point
Contact person
Phone
Fax
Sweden
(+46)
Sandströms Center Ab
Ektjärnsvägen 2
975 91 Luleå
Fredrik Stråmo
0920-253040
0920-253041
Sweden
(+46)
Sandströms Center Ab
Avestagatan 61
163 53 Spånga
Lennart Forsell
08-6210928
Sweden
(+46)
Släp & Kaross Ab
Paketgatan 12
784 72 Borlänge
Lars Nises
0243-17210
0243-17211
Sweden
(+46)
Örestads Trailer &
Skåpservice
Ö-Hindbyvägen 4
213 74 Malmö
Bert Guldstrand
040-212846
040-212847
Sweden
(+46)
Karosseriteknik i Göteborg Ab
Tagnevägen 4
422 59 Hisings Backa
Jan Börjesson
031-7424844
031-527108
Sweden
(+46)
Berner & co Tunga fordon
Fyrvallavägen 4
831 43 Östersund
Mats Albertsson
063-574 784
063-574 719
Sweden
(+46)
Skandinaviska Lastvagnar
Torbornavägen 17
253 68 Helsingborg
Sven-Ingvar
Bengtsson
042-292060
042-294410
(Country code)
35
Service network
Country
Service point
Contact person
Phone
Fax
Norway
(+47)
Ekeri Norge AS
Hunnselvveien 10
2830 Raufoss
Trond Lundsten
611-59850
611-59860
Norway
(+47)
T.K Mek AS
6240 Örskog
Kåre Mathiesen
70270778
70270267
Norway
(+47)
Bjerlands Lakk og Karosseri
Postboks 19
4652 Överbö
Ole Gunnar Bjerland
38139636
38139636
Great Britain
England
(+44)
Colliers Truck Builders
Limited
Unit 15, Blackwater Trading
Estate
The Causeway, Maldon, Essex
Mick Gill
01621 843109
01621 843047
Scotland
(+44)
Colin Hutton Coachworks LTD
40 Stronend Street
Glasgow G22 6AR
www.colinhutton.com
0141-336-3371
0141-336-3821
Holland
Netherlands
(+31)
Burg fabriek van
wegtransportmiddelen B.V.
Katwijkerlaan 75
2641 PD Pinjacker
015-3694340
015-3693385
(Country code)
Jan Bunk
36
Appendix 1.
Follow-up form
We aim to continually develop our products and service to support our customer’s needs. After you have used your
Ekeri product for about 2 months, we ask you to take a few minutes to complete our follow-up form, and faxing it to us,
or send by post.
Our fax number is: +358-(0)6-788 74 12.
Thank you!
FILL OUT THE FOLLOW-UP FORM AND SEND IT TO EKERI BY FAX OR MAIL – CLICK HERE
(CD-version only)
37
Service book
Date
Maintenance
Done by
38
Service book
Date
Maintenance
Done by
39
Service book
Date
Maintenance
Done by
40
Service book
Date
Maintenance
Done by
41
Service book
Date
Maintenance
Done by
42
Electrical
connections
43