1
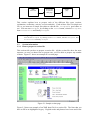
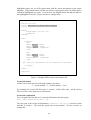
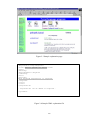
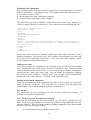
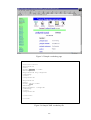
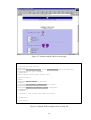
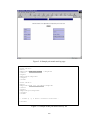
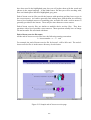
Appendix K: User Manual User Manual for the CALL courseware development Template 261 CONTENTS CHAPTER 1 INTRODUCTION ……………………………………………………………. 1.1 Introduction ……………………………………………………………………………... 1.2 Who are the users ……………………………………………………………………….. 1.3 What this manual provides ……………………………………………………………… 1.4 Courseware organisation ………………………………………………………………... 1 1 1 1 2 CHAPTER 2 Creating lessons ………………………………………………………………. 2.1 How to install a blank language learning course ……………………………………….. 2.2 How to create a language lesson ………………………………………………………... 2.3 Section information ……………………………………………………………………... 2.3.1 How to prepare a section file …………………………………………………... 2.3.2 How to generate a section web page …………………………………………… 2.3.3 Checking a section web page …………………………………………………... 2.4 Explanation information ………………………………………………………………… 2.4.1 How to prepare an explanation file …………………………………………….. 2.4.2 How to generate an explanation web page ……………………………………... 2.4.3 Checking a explanation web page ……………………………………………… 2.5 Vocabulary information ………………………………………………………………… 2.5.1 How to prepare a vocabulary file ………………………………………………. 2.5.2 How to generate a vocabulary web page ……………………………………….. 2.5.3 Checking a vocabulary page …………………………………………………… 2.6 Multiple choice activity information ……………………………………………………. 2.6.1 How to prepare a multiple choice activity file …………………………………. 2.6.2 How to generate a multiple choice activity web page ………………………….. 2.6.3 Checking a multiple choice activity page ……………………………………… 2.7 Pair match activity information …………………………………………………………. 2.7.1 How to prepare a pair match activity file ………………………………………. 2.7.2 How to generate a pair match activity web page ………………………………. 2.7.3 Checking a pair match activity page …………………………………………… 2.8 End-of-lesson exercise information …………………………………………………….. 2.8.1 How to prepare an end-of-lesson exercise file …………………………………. 2.8.2 How to generate an end-of-lesson web page …………………………………… 2.8.3 Checking an end-of-lesson page ……………………………………………….. 2.9 Image information ………………………………………………………………………. 2.10 Sound information ………………………………………………………………………. 3 3 3 4 4 6 7 7 7 9 10 10 10 12 13 13 13 17 17 17 13 20 20 20 20 23 23 24 24 CHAPTER 3 Creating other courseware pages …………………………………………… 3.1 Introduction ……………………………………………………………………………... 3.2 Alphabet information …………………………………………………………………… 3.2.1 How to prepare an alphabet file ………………………………………………... 3.2.2 How to generate an alphabet web page ………………………………………… 3.2.3 Checking an alphabet page ……………………………………………………... 3.3 Dictionary information ………………………………………………………………….. 3.3.1 How to prepare a dictionary file ………………………………………………... 3.3.2 How to generate a dictionary web page ………………………………………... 3.3.3 Checking a dictionary page …………………………………………………….. 3.4 Culture information ……………………………………………………………………... 3.3.1 How to prepare a culture file …………………………………………………… 3.3.2 How to generate a culture web page …………………………………………… 3.3.3 Checking a culture page ………………………………………………………... 3.5 Language learning information …………………………………………………………. 3.3.1 How to prepare a language learning file ……………………………………….. 3.3.2 How to generate a language web page …………………………………………. 3.3.3 Checking a language page ……………………………………………………… 3.6 How to change the format of a page ……………………………………………………. 26 26 26 26 27 27 27 27 28 29 29 29 30 30 30 30 31 33 33 262 Chapter 1 1. Introduction This manual shows you how to use the CALL (Computer Assisted Language Learning) template. It tells you how to install the template on your own computer and how to edit and prepare the courseware to create a language learning program for the language you wish to teach. This manual has not been written with technical experts in mind – it is aimed at potential users who are not assumed to have much technical knowledge (although, a basic understanding of computers is required e.g. what a file is). 1.1 What the system provides The system provides a CALL template, which can be used to develop a language learning program for a given language1. The system provides 12 sample lessons, which in turn have 3 sections each. Each section has a conversation file as well as an explanation, vocabulary and an activity file. You (the user) will enter your target language information into the system and run a simple program to convert that information into a web page. The system aims to make the creation of language learning courseware for your target language a lot easier than if you had to start from scratch. You do not have to develop all the lessons at once - you can work on them one lesson at a time. The system is flexible, for example you can initially create lessons with just the text of each lesson and then add the images and sound files as they become available. The system does not assume that you are a computer expert and that you know anything about programming. It does not even assume that you know how to write a web page. It only assumes that you can use the keyboard and the mouse. It helps to have some knowledge of moving files around the system, but this is explained in the text, so don’t worry if you have not done this before. 1.2 Who are the users The users are people who want to be able to develop CALL applications for a given language, but who may not have any technical or language teaching experience. The system was developed with Endangered Languages in mind, but it can be used for other languages also. 1.3 What this manual provides This manual provides an introduction to the CALL template and how to use it. It shows you how to create your own courseware from scratch. It tells you the steps to follow to edit the text files with your own language data and also how to add image and sound files to the system. The steps you will usually follow to create a web page explained in detail in the rest of this manual, but just to give you a brief overview, they are listed here for reference. 1. 2. 3. 4. Find the file you wish to edit Open the file and add/change the information Save the file Generate the web page for the file using a system program 1 The language must have an alphabet that can be written with Unicode – if the language uses letters of the English alphabet or another Unicode type alphabet, there should be no problems. 263 5. Check that the web page is what you expected 6. Repeat from step 1 if more changes are required. 1.4 Courseware organisation The courseware consists of the following directories: • 12 lesson directories • an alphabet directory • a dictionary directory • a grammar revision directory • a general directory with common system files • an image directory with images provided by the system • a scan directory for the culturally specific images • a tools directory with internal system tools • an xsl directory with internal system tools Don’t be put off by the apparently large number of directories that exist. You will not use all the directories (some of them are just internal system directories). The directories you will work with are: • L01 – L12 (the lesson directories) • alphabet (the alphabet directory) • dict (the dictionary directory) • lessions (the sound directory) • scans (the cultural image directory) The structure of each of these directories will be explained in turn. You can go to a particular section at any stage during the development of the courseware – you do not have to follow the manual in a particular order, although it might be easier to do so the first time you use the system. 264 Chapter 2 Creating lessons The first thing you will need to do is to install the CALL template in a new directory on your own computer. The next section explains how to do this. 2.1 How to install a blank language learning course 1. Open the CD and find the lang directory 2. Open the lang directory and copy the lang_eng directory to a directory on your own machine 3. Rename lang_eng to the name of the target language (e.g. irish) You have now installed a blank language learning template You will now be able to prepare the courseware for your target language. The instructions for preparing the language lessons and the other parts of the system (e.g. the alphabet) are described in the following pages. Feel free to go the part that you are most interested in. 2.2 How to create a language lesson A lesson directory is made up of 4 directories: • source • html • generate • driver The source directory is where all the files with the text of the lessons are stored. The generated html files are in the html directory. The generate directory contains the programs to convert the source files into html files. The driver directory contains internal files that are used by the system. When you are using the system, you will only edit files in the source directories. A language lesson is made up of 3 sections, an explanation, a vocabulary list for the lesson and an end-of-lesson exercise. All the files for a given lesson are stored in the source directory. Each filename will start with the number of the lesson (e.g. l02 for lesson 2). Each lesson source directory contains the following files: • 3 section files (e.g. l02s1.xml for section 1 of lesson 2) • 3 grammar explanation files (e.g. l02g3.xml for grammar explanations of section 3 of lesson 2) • 3 vocabulary files (e.g. l02v2.xml for vocabulary file for section 2 of lesson 2) • 3 activity files (e.g. l02a1.xml for activity file for section 1 of lesson 2) • 1 exercise file (e.g. l02e.xml for end-of-lesson exercise for lesson 2) • 1 title file (e.g. title2.xml for the title file of lesson 2) The general process is to edit the file you wish to change, generate the web page and then check to see if it’s correct. Figure 2.1 shows how a HTML (web) page is generated from an XML source file. 265 XML source file System file to generate html page HTML page Figure 2.1 Converting an XML source file into a web page This section explains how to prepare each of the different files types (section, explanation, vocabulary, activity, exercise and title). Each of these files is a simple text file, so you must use a simple text editor to edit the file. wordpad is good editor to use. You can start wordpad by clicking on the Start button, selection Programs, then Accessories and finally wordpad. Note: 2.3 2.3.1 Using wordpad You can start wordpad by clicking on the Start button, selection Programs, then Accessories and finally wordpad. Section information How to prepare a section file This section tells you how to prepare a section file. All the section files have the same structure, so once you know how to prepare one, you’ll be able to prepare any number of them. Figure 2.1 shows an example of a section page. Figure 2.1 Sample section page Figure 2.2 shows an example of an XML data file for a section file. The lines that you have to fill in are highlighted in grey. English words and phrases have been used in the 266 highlighted parts, but you will replace them with the words and phrases in the target language. In the blank source file that you will be working with, there are blank spaces instead of highlighted grey parts. You can leave the English words and phrases that are not highlighted as they are, you do not have to change them. <!-- ?xml version="1.0"? --> <section id ="1"> <title> The title in the target language </title> <theme> <english>Hi, how are you? </english> </theme> <text> <content> <p1> <who> Speaker </who> <what> Phrase </what> <english>Hello </english> </p1> <p2> <who> Speaker </who> <what> Phrase </what> <english>Hello </english> </p2> … <p1> and <p2> information can be repeated as required … </content> </text> </section> Figure 2.2 Sample XML section conversation file Section file names All the section files have the following naming convention: l + lesson number + s + section number + .xml For example, the section file for lesson 2, section 1 will be l02s1.xml. All the section files are in the source directory of each lesson. Section file explanation You can ignore the first line, as it’s internal information for the system (<!-- ?xml version="1.0"? -->). The next part is the section id information. <section id ="1"> tells the system that this is section 1. This tells the system the section number. You do not have to change this. 267 Next is the title information. Each section has its own title. You should put the title of the section in the target language here. For example, if this were a French learning course, you might put “Bonjour” as the title. <title> Bonjour </title> Note: XML tags In xml files, all tags (e.g. <title>) must have a closing tag (e.g. </title>). The closing tag is almost the same as the opening tag, except that it has a leading slash (/). Then there is the theme information. This tells the learner what this section is about. You can leave this unchanged. Next is the text part of the file. This is where the conversation of the section is written. The text is made up of a content part. This content part is made up of: • which speaker, usually person 1 (<p1>) or person 2 (<p2>) • who (the name of the speaker <who>) • what (what the person says <what>) • a translation in English (<english>) There is no limit to the number of conversation phrases, but for now, it is best to stick with the phrases provided by the system. Suppose that you wanted to fill in the information for a French learning system. The result would look something like this: <p1> <who>Pierre </who> <what>Salut </what> <english>Hello </english> </p1> You should fill in all the highlighted areas (which are actually blank in the real file). You should then save the file, with its original name. You have now prepared one section conversation file! Note: Saving a file from wordpad To save a file from wordpad, select File, then Save. This will save the file with the new information. All the section files have the exact same structure – the only thing that varies is the contents. You will now be able to prepare all the section conversations in the courseware. 2.3.2 How to generate a section web page Now that the section file has been prepared, you will want to generate the web page. To do this, you should run (or execute) the section file in the generate directory. This will put the resulting section file(s) into the html directory. Here are the steps to follow: 268 1. Go to the generate directory for the current lesson 2. Double click on the file called “section.bat” 3. This will automatically put the section web pages into the html directory. 2.3.3 Checking a section web page You can check that the web page has successfully been generated as follows: 1. Go to the html directory for the current lesson 2. Each section file name is made up of the information: • lesson number (e.g. l01 for lesson 01) • s for section • a number (either 1, 2 or 3) to indicate which section • a (for all) • optionally a “t” for the translation version of the page • _eng (to indicate that the courseware is being taught through English) • .html (as the web page file extension) For example, l01s2a_eng.html is the section page for section 2 of lesson 1. 3. Double click on the section file that you wish to check 4. You should be able to see the web page with your target language information If there is something that you want to change, you can simply edit the section conversation file again (see “How to prepare a section file”) and repeat the process. 2.4 2.4.1 Explanation information How to prepare an explanation page This section tells you how to prepare an explanation file. All the explanation files have the same structure, so once you know how to prepare one, you’ll be able to prepare any number of them. A sample of an explanation page is shown in figure 2.3. Figure 2.4 shows an example of an XML explanation file. The lines that you have to fill in are highlighted in grey. English words and phrases have been used in the highlighted parts, but you will replace them with the words and phrases in the target language. In the blank source file that you will be working with, there are blank spaces instead of highlighted grey parts. You can leave the English words and phrases that are not highlighted as they are, you do not have to change them. However, if an explanation is not required for your language, you can delete the explanation. You can also add a new item if required. This will be explained further on in this section. Explanation file names All the explanation files have the following naming convention: L + lesson number + g + section number + .xml For example, the explanation file for lesson 2, section 1 will be l02g1.xml. All the explanation files are in the source directory of each lesson. 269 Figure 2.3 Sample explanation page <grammar> <explanation lang="english"> <item> Word or phrase for hello</item> <text> <meaning> <english>Hello</english> </meaning> <full> <english> More detailed explanation if required. </english> </full> </text> </explanation> … explanations can be added as required … </grammar> Figure 2.4 Sample XML explanation file 270 Explanation file explanation The explanation file is made up of several explanations. Each explanation is contained within <explanation> </explanation> tags. Each explanation has the following items: • the item to explain (<item>) • the meaning of the item (<meaning><english>) • an optional full explanation (<full><english>) The item which you want to explain is written between the <item> tags. Suppose you wished to explain “Bonjour” to the learner. The result would look something like this: <explanation lang="english"> <item>Salut </item> <text> <meaning> <english>Hello</english> </meaning> <full> <english> Salut is an informal way of saying hello in French. Bonjour is more formal. There are also different words for saying hello depending on the time of day. </english> </full> </text> </explanation> Some items will only need a meaning explanation, while others will need a more detailed explanation. You can leave the <full><english> section blank if you only want to provide a brief explanation to the learner. You can use the <full><english> section for providing more information to the user. Adding a new entry If you need to add a new explanation, you can simply copy all of the text from another entry, including the start <explanation> and end </explanation> tags. Paste the copied text into the desired location in the file. You can now change the item by changing the text between the <item> and </item> tags. You can change the meaning by changing the text between the <english> </english> tags. You can add a fuller explanation by putting text in the <full><english> </english></full> part of the entry. Deleting an unwanted explanation If there is an explanation in the explanation file that you do not need, you can simply delete all that part of the file. You must take care to delete from the starting tag (<explanation>) up to and including the end tag (</explanation>). Save the file You should then save the explanation file once you have made all the changes. It should be saved with its original name. 2.4.2 How to generate an explanation web page Now that the explanation file has been prepared, you will want to generate the web page. To do this, you should run (or execute) the grammar and grammarAll files in the generate directory. This will put the resulting grammar explanation file(s) into the html directory. Here are the steps to follow: 1. Go to the generate directory for the current lesson 271 2 3 4 5 Double click on the file called “grammar.bat” This will automatically put the individual grammar explanation web pages into the html directory. Double click on the file called “grammarAll.bat” This will automatically put the combined grammar explanation page into the html directory. 2.4.3 Checking an explanation web page You can check that the web page has successfully been generated as follows: 1. Go to the html directory for the current lesson 2. Each explanation file name is made up of the information: • lesson number (e.g. l01 for lesson 01) • g for grammar explanation • a number (either 1, 2 or 3 to indicate which section or 0 to indicate the combined explanation for the lesson) • a (for all) • _eng (to indicate that the courseware is being taught through English) • .html (as the web page file extension) For example, l01g2a_eng.html is the explanation page for section 2 of lesson 1. 3. Double click on the explanation file that you wish to check 4. You should be able to see the web page with your target language information If there is something that you want to change, you can simply edit the explanation file again (see “How to prepare an explanation file”) and repeat the process. 2.5 2.5.1 Vocabulary information How to prepare a vocabulary page This section tells you how to prepare a vocabulary file. All the vocabulary files have the same structure, so once you know how to prepare one, you’ll be able to prepare any number of them. Figure 2.5 shows a sample vocabulary page. Figure 2.6 shows an example of an XML vocabulary file. The lines that you have to fill in are highlighted in grey. English words and phrases have been used in the highlighted parts, but you will replace them with the words and phrases in the target language. In the blank source file that you will be working with, there are blank spaces instead of highlighted grey parts. You can leave the English words and phrases that are not highlighted as they are if you need to explain that word or phrase in the target language. However, if a vocabulary item is not required for your language, you can delete the entry. You can also add a new item if required. This will be explained further on in this section. Vocabulary file names All the vocabulary files have the following naming convention: l + lesson number + v + section number + .xml For example, the vocabulary file for lesson 2, section 1 will be l02v1.xml. All the vocabulary files are in the source directory of each lesson. 272 Figure 2.5 Sample vocabulary page <vocab> <vsection id="1"> <explanation> <text> <item> Bonjour </item> <meaning> <english>Good day</english> </meaning> </text> </explanation> <explanation> <text> <item> Salut</item> <meaning> <english>Hello </english> </meaning> </text> </explanation> </vsection> </vocab> Figure 2.6 Sample XML vocabulary file 273 Vocabulary file explanation The vocabulary file is made up of several words and phrases. Each vocabulary item is contained within <explanation> </explanation> tags. Each vocabulary item has the following items: • the item to explain (<item>) • the meaning of the item (<meaning><english>) The item which you want to explain is written between the <item> tags. The vocabulary item just contains the meaning of the item, it does not contain an explanation of it – this information goes in the explanation file. The purpose of the vocabulary file is to provide a quick checklist to the user of the new vocabulary encountered in the section. The vocabulary entry for “Salut” would look something like this: <explanation lang="english"> <text> <item>Salut </item> <text> <meaning> <english>Hello</english> </meaning> </text> </explanation> Adding a new entry If you need to add a new vocabulary item, you can simply copy all of the text from another entry, including the start <explanation> and end </explanation> tags. Paste the copied text into the desired location in the file. You can now change the item by changing the text between the <item> and </item> tags. You can change the meaning by changing the text between the <english> </english> tags. Deleting an unwanted vocabulary item The words and phrases suggested in the vocabulary files are just suggestions. You can delete an item if it is not relevant to your language. To do this you must delete the entry from the vocabulary file. You must take care to delete from the starting tag (<explanation>) up to and including the end tag (</explanation>). Save the file You should then save the explanation file once you have made all the changes. It should be saved with its original name. 2.5.2 How to generate a vocabulary web page Now that the vocabulary file has been prepared, you will want to generate the web page. To do this, you should run (or execute) the vocab and vocabAll files in the generate directory. This will put the resulting vocabulary file(s) into the html directory. Here are the steps to follow: 1. Go to the generate directory for the current lesson 2. Double click on the file called “vocab.bat” 3. This will automatically put the individual vocabulary web pages into the html directory. 4. Double click on the file called “vocabAll.bat” 5. This will automatically put the combined vocabulary page into the html directory. 274 2.5.3 Checking a vocabulary web page You can check that the web page has successfully been generated as follows: 1. Go to the html directory for the current lesson 2. Each explanation file name is made up of the information: • lesson number (e.g. l01 for lesson 01) • v for vocabulary • a number (either 1, 2 or 3 to indicate which section or 0 to indicate the combined explanation for the lesson) • a (for all) • _eng (to indicate that the courseware is being taught through English) • .html (as the web page file extension) For example, l01v2a_eng.html is the vocabulary page for section 2 of lesson 1. 3. Double click on the vocabulary file that you wish to check 4. You should be able to see the web page with your target language information If there is something that you want to change, you can simply edit the vocabulary file again (see “How to prepare a vocabulary file”) and repeat the process. 2.6 Multiple choice activity information 2.6.1 How to prepare a multiple choice activity page This section tells you how to prepare a multiple choice activity file. All the multiple choice activity files have the same structure, so once you know how to prepare one, you’ll be able to prepare any number of them. Figure 2.7 shows a sample multiple choice activity page. Figure 2.8 shows an example of a multiple choice activity file. The lines that you have to fill in are highlighted in grey. English words and phrases have been used in the highlighted parts, but you will replace them with the words and phrases in the target language. In the blank source file that you will be working with, there are blank spaces instead of highlighted grey parts. Multiple choice activity files provide the learners with questions and a selection of answers. The learners have to select the correct answer from the options. There may be more than one correct answer. There is also the possibility to provide the learner with feedback. One suggestion for the initial version of the courseware is to use the feedback to provide a translation of the question (if it is appropriate). Later versions can focus more on providing better feedback. Multiple choice activity files are a little bit more complex than other file types. They do however, follow a similar convention, so don’t worry if it looks a bit more confusing that the other file types. 275 Figure 2.7 Sample multiple choice activity page <questions> <question-record id="0"> <question> <english>How would you say "Good Morning"?</english> <image>hello-vt.gif </image> </question> <must-select-all>0</must-select-all> <answer id="0"> <text> <english>Answer 0 here </english> </text> <correct>1if correct, otherwise 0</correct> <feedback> <english>Feedback to answer 0 here</english> </feedback> </answer> … answers 1 and 2 have the same structure … </question> </questions> Figure 2.8 Sample XML multiple choice activity file 276 Multiple choice activity file names All the multiple choice activity files have the following naming convention: l + lesson number + a + section number + .xml For example, the multiple choice activity file for lesson 2, section 1 will be l02a1.xml. All the multiple choice activity files are in the source directory of each lesson. Generally, there are two multiple choice activity files in each lesson, one for section 1 and the other for section 2. Multiple choice activity file explanation The multiple choice activity file is made up 3 questions. Most questions have 3 answers, of which more than one may be correct. Each question is made up of a <question> and two or three <answer> sections. Each question record has the following information: • id (the number of the question, either 1, 2, or 3) • the question which may either be in English or the target language • an image file related to the question Each answer record has the following information: • the text of the answer, which may either be in English or the target language • an indication if it is the correct answer or not (<correct>1</correct> means that the answer is correct, otherwise it is incorrect) • a feedback section to provide some feedback/information to the learner Figure 2.9 shows a sample of a multiple choice activity file. It is a good idea to put the correct answer(s) at the start of the answers, just to make it easier to remember where they are. The questions and answers are displayed in random order, so don’t worry that the correct answer(s) will always appear first. There is no fixed format for the questions. One suggestion is to put the answer in English if the question is in the target language or visa versa. Examples 1 and 2 provide two possible options. There are other possible options also. Example 1: Question: Answer 0: Answer 1: Answer 2: What is the meaning of: “Comment vous appellez vous?”? What is your name (formal)? (Correct) What is your name (informal) (Incorrect) How are you? (Incorrect) Example 2: Question: Answer 0: Answer 1: Answer 2: How do you say “What is your name?” Comment vous appellez vous? (Correct) Comment t’appelle tu? (Correct) Comment allez vous? (Incorrect) 277 Suppose we wanted to put the first example into our multiple choice activity file. The result would look something like this: <question-record id="0"> <question> <english>What is the meaning of: " Comment vous allez vous"?</english> <image>hello-vt.gif </image> </question> <must-select-all>0</must-select-all> <answer id="0"> <text> <english>What is your name (formal)? </english> </text> <correct>1</correct> <feedback> <english>Comment vous allez vous?</english> </feedback> </answer> <answer id="1"> <text> <english>What is your name (informal)? </english> </text> <correct>0</correct> <feedback> <english>Comment t’appelle tu? </english> </feedback> </answer> <answer id="2"> <text> <english>How are you? </english> </text> <correct>0</correct> <feedback> <english>Comment allez vous? </english> </feedback> </answer> </question-record> Figure 2.9 Sample XML data file for multiple choice activity file Adding a new entry In the current implementation, there is a limit of 3 questions in the multiple choice activity. Deleting an unwanted question If you want to remove a question, you simply have to remove all the text of a question including the start <question-record> and end </question record> tags. However, as each multiple choice activity generally has only 3 questions, reducing it to two might make it a bit too easy of the learner (and we wouldn’t want that, now would we). Save the file You should then save the multiple choice activity file once you have made all the changes. It should be saved with its original name. 278 2.6.2 How to generate a multiple choice activity web page Now that the multiple choice activity file has been prepared, you will want to generate the web page. To do this, you should run (or execute) the activitySelect file in the generate directory. This will put the resulting multiple choice activity file(s) into the html directory. Here are the steps to follow: 1. Go to the generate directory for the current lesson 2. Double click on the file called “activitySelect.bat” 3. This will automatically put the individual multiple choice activity web pages into the html directory. 2.6.3 Checking a multiple choice activity web page You can check that the web page has successfully been generated as follows: 1. Go to the html directory for the current lesson 2. Each multiple choice activity file name is made up of the information: • lesson number (e.g. l01 for lesson 01) • a for activity • a number (usually 1, 2 to indicate section 1 or 2) • a (for all) • _eng (to indicate that the courseware is being taught through English) • .html (as the web page file extension) For example, l01a2a_eng.html is the multiple choice activity page for section 2 of lesson 1. 3. Double click on the multiple choice activity file that you wish to check 4. You should be able to see the web page with your target language information If there is something that you want to change, you can simply edit the multiple choice activity file again (see “How to prepare a multiple choice activity file”) and repeat the process. 2.7 Pair match activity information 2.7.1 How to prepare a pair match activity page This section tells you how to prepare a pair match activity file. All the pair match activity files have the same structure, so once you know how to prepare one, you’ll be able to prepare any number of them. Figure 2.10 shows a sample pair match activity page. Figure 2.11 shows an example of a pair match activity file. The lines that you have to fill in are highlighted in grey. English words and phrases have been used in the highlighted parts, but you will replace them with the words and phrases in the target language. In the blank source file that you will be working with, there are blank spaces instead of highlighted grey parts. Pair match activity files provide the learners with a list of words on the right hand side of the page which must be paired with their matching words or phrases on the left hand side of the page. 279 Figure 2.10 Sample pair match activity page <words> <item id="0"> <left> <english> Word for I here </english> </left> <right> <english>I</english> </right> </item> <item id="1"> <left> <english> Word for you here</english> </left> <right> <english>you</english> </right> </item> …. Items 2, 3, 4 have a similar structure … </words> Figure 2.11 Sample XML pair match activity file 280 Pair match activity file names All the pair match activity files have the following naming convention: l + lesson number + a + section number + .xml For example, the pair match activity file for lesson 2, section 3 will be l02a3.xml. All the pair match activity files are in the source directory of each lesson. Generally, the pair match activity is used for section 3 of each lesson. Pair match activity file explanation The pair match activity file is made up 5 items. information: • left hand side word or phrase • right hand side word or phrase Each item has the following Figure 5.6 shows a sample of a pair match activity file. The words or phrases on the left hand side will always appear in the same order, but the order of the words or phrases on the right hand side will vary. It is recommended that you do not mix words and phrases from the target language with English (e.g. put all the English words and phrases on one side and all the target language matches on the other side). This is to minimise learner confusion, especially at the ab initio stage. An example for a French language pair match activity, might look something like this: <words> <item id="0"> <left> <english>je </english> </left> <right> <english>I</english> </right> </item> <item id="1"> <left> <english> Tu/vous</english> </left> <right> <english>you</english> </right> </item> </words> Adding a new entry In the current implementation, there is a limit of 5 words or phrases in the pair match activity. 281 Deleting an unwanted pair-match If you want to remove a pair match item, you simply have to remove all the text of an item including the start <item> and end </item > tags. However, as each pair match activity generally has 5 questions, reducing it might make it a bit too easy of the learner. Save the file You should then save the pair match activity file once you have made all the changes. It should be saved with its original name. 2.7.2 How to generate a pair match activity web page Now that the pair match activity file has been prepared, you will want to generate the web page. To do this, you should run (or execute) the activityMatch file in the generate directory. This will put the resulting pair match activity file(s) into the html directory. Here are the steps to follow: 1. Go to the generate directory for the current lesson 2. Double click on the file called “activityMatch.bat” 3. This will automatically put the individual pair match activity web pages into the html directory. 2.7.3 Checking a pair match activity web page You can check that the web page has successfully been generated as follows: 1. Go to the html directory for the current lesson 2. Each pair match activity file name is made up of the information: • lesson number (e.g. l01 for lesson 01) • a for activity • a number (usually 3 to indicate section 3) • a (for all) • _eng (to indicate that the courseware is being taught through English) • .html (as the web page file extension) For example, l01a3a_eng.html is the pair match activity page for section 3 of lesson 1. 3. Double click on the pair match activity file that you wish to check 4. You should be able to see the web page with your target language information If there is something that you want to change, you can simply edit the pair match activity file again (see “How to prepare a pair match activity file”) and repeat the process. 2.8 2.8.1 End-of-lesson exercise information How to prepare an end-of-lesson exercise page This section tells you how to prepare an end-of-lesson exercise file. All the end-oflesson exercise files have the same structure, so once you know how to prepare one, you’ll be able to prepare any number of them. Figure 2.12 shows a sample of an endof-lesson exercise page. Figure 2.13 shows an example of an end of lesson exercise file. The lines that you have to fill in are highlighted in grey. English words and phrases 282 have been used in the highlighted parts, but you will replace them with the words and phrases in the target language. In the blank source file that you will be working with, there are blank spaces instead of highlighted grey parts. End-of-lesson exercise files provide the learners with questions and they have to type in the correct answer. As learners generally find writing more difficult than just selecting from a list of multiple answers or matching pairs, an audio file with a correct answer is generally provided to the learner. There may be more than one correct answer. End-of-lesson exercise files are similar to multiple choice activity files. They have questions with a list of possible correct answers. Most questions usually have an image file and an audio file associated with them. End-of-lesson exercise file names All the end-of-lesson exercise files have the following naming convention: l + lesson number + e + 1 + .xml For example, the end-of-lesson exercise file for lesson 2, will be l02e.xml. The end-oflesson exercise files is in the source directory of each lesson. Figure 2.12 Sample end-of-lesson exercise page 283 <questions> <question-record id="0"> <question> <english>What would your response be to "yehyek tunal"?</english> <sound>L01a102.mp3</sound> <image>hello-vt.gif </image> </question> <must-select-all>0</must-select-all> <answer id="0"> <text> <english>yehyek tunal</english> </text> <correct>1</correct> <feedback> <english>Hello</english> </feedback> </answer> … other answers will have the same structure …. </question-record> </questions> Figure 2.13 Sample XML end-of-lesson exercise file End-of-lesson exercise file explanation The end-of-lesson file is made up 3 questions. Most questions have 3 answers, of which more than one may be correct. Each question is made up of a <question > and two or three <answer> sections. Each question record has the following information: • id (the number of the question, either 1, 2, or 3) • the question which may either be in English or the target language • an audio file with a correct answer • an image file related to the question Each answer record has a possible correct answer. A sample for a French language end-of-lesson exercise might be as follows: <question-record id="0"> <question> <english>What would your response be to "Bonjour "?</english> <sound> bonjour.mpg </sound> <image>hello-vt.gif </image> </question> <must-select-all>0</must-select-all> 284 <answer id="0"> <text> <english>Bonjour </english> </text> </answer> <answer id="1"> <text> <english>Salut </english> </text> </answer> </question-record> </questions> Adding a new entry In the current implementation, there is a limit of 3 questions in the end-of-lesson exercise. Deleting an unwanted question If you want to remove a question, you simply have to remove all the text of the question including the start <question-record> and end </question-record> tags. However, as each endo-of-lesson exercise generally has only 3 questions, reducing it might make it a bit too easy of the learner. Save the file You should then save the end-of-lesson exercise file once you have made all the changes. It should be saved with its original name. 2.8.2 How to generate an end-of-lesson exercise web page Once the end-of-lesson exercise file has been prepared, you will be able generate the web page. To do this, you should run (or execute) the exercise file in the generate directory. This will put the resulting end-of-lesson exercise file into the html directory. Here are the steps to follow: 1. Go to the generate directory for the current lesson 2. Double click on the file called “exercise.bat” 3. This will automatically put the end-of-lesson exercise web pages into the html directory. 2.8.3 Checking an end-of-lesson exercise web page You can check that the web page has successfully been generated as follows: 1. Go to the html directory for the current lesson 2. The end-of-lesson exercise file name is made up of the information: • lesson number (e.g. l01 for lesson 01) • e for exercise • a number (usually 0 for the entire lesson) • a (for all) • _eng (to indicate that the courseware is being taught through English) • .html (as the web page file extension) 285 For example, l01e0a_eng.html is the end-of-lesson exercise page for lesson 1. 3. Double click on the end-of-lesson exercise file that you wish to check 4. You should be able to see the web page with your target language information If there is something that you want to change, you can simply edit the end-of-lesson exercise file again (see “How to prepare an end-of-lesson exercise file”) and repeat the process. 2.9 Image information All the scanned image files are stored in the scans directory. There will be 3 files for each lesson, one for each section. Files are stored in .gif format. Scanned image file names All the scanned image files have the following naming convention: L + lesson number + a + section number + .gif For example, the scanned image file for lesson 2, section 1 will be L02a1.gif. Adding scanned image files to the system If you want to add a scanned image file to the system, it must be correctly named according to the convention outlined above. 2.10 Sound information All the sound files are stored in the lessions directory. Within this directory, there is a separate directory for each lesson, as well as a directory for the dictionary entries and general audio files. For example, L01 contains all the sound files for lesson 1. Sound files are stored in mp3 format. wav format is another option, although the files tend to be much larger than the corresponding mp3 files. Each lesson directory contains the follow files: • the sound files for each section conversation • an individual sound file for each phrase of each conversation within the lesson • possible extra sound files for edited answers to end-of-lesson questions Sound file names All the sound files for the full conversions have the following naming convention: L + lesson number + a + 1 + .mp3 For example, the sound file for lesson 2, section 1 will be L2a2.mp3. All the sound files for the phrase of the conversions have the following naming convention: L + lesson number + a + 1 + phrase number + .mp3 For example, the sound file for phrase 3 of lesson 2, section 1 will be L02a103.mp3. 286 Some lesson may have extra edited sound files for the audio answers to the end-oflesson exercise. These files have the following naming convention: L + lesson number + a + 1 + phrase number + letter + .mp3 For example, the edited sound file for phrase 3 of lesson 2, section 1 will be L02a103a.mp3. Adding sound files to the system If you want to add a sound file to the system, it must be placed in the correct subdirectory in the lessions directory. The file must also be correctly named. How to change a language lesson You can change the contents of a lesson by adding or removing conversation elements from the section file and modifying the explanation, vocabulary and activity files appropriately. How to add a new lesson The process of adding a new lesson is not a trivial one and should not be attempted until you have some experience with the system. It is probably easier to create a whole new course, instead of just one lesson. You can add a new lesson to the system by copying an already existing lesson and renaming it (e.g. copy lesson 12 (L12) and rename it to lesson 13 (L13)). You will then modify the contents of each file to reflect the new lesson content. You will also have to modify the sidebar file in the general directory – see the Reference Manual for more details. How to delete a lesson Deleting a lesson is easier than adding a lesson, but it should still be attempted with caution. You will have to modify the sidebar file in the general directory – see the Reference Manual for more details. 287 Chapter 3 3.1 Introduction This chapter explains how to prepare the other elements of the courseware, namely: • the alphabet page • the dictionary • the culture page It also explains how to add language learning tips and discusses the issues involved in changing the format of a page. 3.2 Alphabet information 3.2.1 How to prepare the alphabet page This section tells you how to prepare the alphabet file. The alphabet file is in the source directory of the alphabet directory. It is called lettera.xml. Figure 3.1 shows an example of an alphabet file. <letter> <character>a</character> <example>word beginning with a </example> <meaning> <english>Meaning </english> </meaning> </letter> <letter> <character>b</character> <example>word beginning with b</example> <meaning> <english>Meaning</english> </meaning> <note> <english>Often confused with v </english> </note> </letter> Figure 3.1 Sample alphabet file The lines that you fill in are highlighted in grey. You will replace these highlighted areas with the appropriate information in English and the target language. The source file that you will be working with has blanks instead of the highlighted parts. The entry for the letter v might look something like this: <letter> <character>v</character> <example> vin</example> <meaning> <english>wine </english> </meaning> </letter> You will fill in an entry for each letter in the alphabet. 288 Remove a letter You can remove sample entries by deleting all the text from the starting <letter> tag to the end </letter> tag. You will also have to remove the entry from the driver file for alphabet. This file is in the driver directory – see the Reference Manual for more details. Add a letter You can add a new letter by copying the information for another letter and changing the text accordingly. You will have to add an entry in the driver file for alphabet. This file is in the driver directory – see the Reference Manual for more details. 3.2.2 How to generate the alphabet web page When the alphabet file has been prepared, you will be able generate the web page. To do this, you should run (or execute) the alphabet file in the generate directory. This will put the resulting alphabet file into the html directory. Here are the steps to follow: 4. Go to the generate directory for the alphabet directory 5. Double click on the file called “alphabet.bat” 6. This will automatically put the alphabet web page into the html directory. 3.2.3 Checking the alphabet web page You can check that the web page has successfully been generated as follows: 1. Go to the html directory for the alphabet 2. The alphabet file name is alphabet_eng.html 3. Double click on the alphabet file 4. You should be able to see the web page with your target language information If there is something that you want to change, you can simply edit the alphabet file again (see “How to prepare the alphabet page”) and repeat the process. 3.3 Dictionary information 3.3.1 How to prepare the dictionary This section shows how to prepare the dictionary information. The dictionary entries for each letter are stored in the source directory under the dictionary directory. There is a separate XML file for each letter in the alphabet of the target language. Figure 3.2 shows an example of a dictionary file. The areas to be filled in are highlighted in grey (although they are actually blank in the real file). To add a new word to the dictionary, simply copy the information for an already existing word, including both starting (<word>) and ending (</word>) tags and change the information. Each letter in the alphabet will have its own XML file, which will be the letter of the alphabet with a .xml extension. For example, the dictionary entry for “dix” will be in the d.xml file. 289 <word> <base>word in target language </base> <wordm> <pron>pronunciation</pron> <meaning> <english>English meaning</english> </meaning> <grammar_info> <type>noun, verb etc </type> <category>semantic category</category> </grammar_info> <link> </link> <audio>word name</audio> </wordm> </word> Figure 3.2 Sample dictionary file The sample entry for “dix” would be: <word> <base>dix </base> <wordm> <pron>dees </pron> <meaning> <english>ten </english> </meaning> <grammar_info> <type>noun </type> <category>number </category> </grammar_info> <link> </link> <audio>dix</audio> </wordm> </word> 3.3.2 How to generate the dictionary web pages When the dictionary files have been prepared, you will be able generate the web pages. To do this, you should run (or execute) the dict file in the generate directory. This will put the resulting dictionary files into the html directory. Note that the dict command produces several web pages, including a wordlist, a basic dictionary and a full dictionary. Here are the steps to follow: 1. Go to the generate directory for the dict directory 2. Double click on the file called “dict.bat” 3. This will automatically put the dictionary web pages into the html directory. 290 3.3.3 Checking the dictionary web pages You can check that the web page has successfully been generated as follows: 1. Go to the html directory for the dictionary 2. The dictionary file names all begin with dict_ 3. Double click on a dictionary file 4. You should be able to see the web page with your target language information If there is something that you want to change, you can simply edit the dictionary files again (see “How to prepare the dictionary pages”) and repeat the process. 3.4 Culture information 3.4.1 How to prepare the culture page This section shows how to prepare the culture information. The culture information is stored in the culture1.xml file in the general directory. There is no limit to the number of entries in the file. Figure 3.4 shows an example of a culture file. The areas to be filled in are highlighted in grey (although they are actually blank in the real file). <text> <subtext lang="0" tid="1"> <name>name </name> <stitle> Title </stitle> <stext> <main> Text information </main> </stext> </subtext> <subtext lang="0" tid="2"> <name>name </name> <stitle> Title </stitle> <stext> <main> Text information </main> </stext> </subtext> </text> Figure 3.4 Sample culture file 291 The <subtext> tag contains a “lang” element (which you can ingore) and a “tid” element. The “tid” element is the number of the element. Make sure that each entry in your file has a different “tid”. The <name> is an internal for the entry. For example, If you are talking about people, you might use the word “people”. Make sure that it’s a single word, with no spaces. Next is the <stitle> which is the title of the information. The text part of the information is written between the <main> and </main> tags. A sample entry for the culture file is shown below: <subtext lang="0" tid="1"> <name>where</name> <stitle> Places that speak French </stitle> <stext> <main> French is spoken in Europe (France, Belgium), Africa (many countries, especially in West Africa), several island in the Caribbean and around the Pacific. </main> </stext> </subtext> 3.4.2 How to generate the culture web page When the culture file has been prepared, you will be able generate the web pages. To do this, you should run (or execute) the culture file in the generate directory. This will put the resulting culture file into the html directory. Here are the steps to follow: 1. 2. 3. Go to the generate directory in the general directory Double click on the file called “culture.bat” This will automatically put the culture web page into the html directory. 3.4.3 Checking the culture web page You can check that the web page has successfully been generated as follows: 1. Go to the html directory for the general directory 2. The culture file is called culture_eng.html 3. Double click on a culture file 4. You should be able to see the web page with your target language information If there is something that you want to change, you can simply edit the culture file again (see “How to prepare the culture page”) and repeat the process. 3.5 Language learning tips 3.5.1 How to add language learning tips This section shows how to add language learning tips. The language learning tips are stored in the tip.xml file in the general directory. Each tip is grouped by type, subtype and group within subtype. Figure 3.5 shows an extract from the language learning tips file. 292 To add a language learning tip, first determine what type, subtype and group it belongs to (you can add your own type, subtype and group if required). Copy an already defined tip and change the tip information accordingly. <type> <title>Direct</title> <showtitle> <english>Direct</english> </showtitle> <subtype> <title>memory</title> <group> <name>mentalimage</name> <showtitle> <english>Creating mental images</english> </showtitle> <info id="1"> <english> Group words together based on type, topic or similar grouping. Example: you can group together all the words to do with food. </english> </info> </group> </subtype> </type> Figure 3.5 Sample learning tip 3.5.2 How to generate the language learning tips web page When the language learning tips file has been prepared, you will be able generate the web pages. To do this, you should run (or execute) the tips file in the generate directory. This will put the resulting tips file into the html directory. Here are the steps to follow: 5. Go to the generate directory in the general directory 6. Double click on the file called “tip.bat” 7. This will automatically put the language learning tips web page into the html directory. 3.5.3 Checking the language learning tips web page You can check that the web page has successfully been generated as follows: 8. Go to the html directory for the general directory 9. The language learning tips file is called tips_eng.html 10. Double click on a tips file 11. You should be able to see the web page with your target language information 293 If there is something that you want to change, you can simply edit the language learning tips file again (see “How to prepare the language learning tips page”) and repeat the process. 3.6 How to change the format of a page Changing the format of a page is not as straightforward as changing the contents of a page. The format information is stored in the XSL files. To be able to change these files you need to have an understanding of XSL files. The Reference Manual contains technical information about these files. It is recommended that you do not attempt to change the XSL files without XSL knowledge. Once you have made the changes, you will have to regenerate all the files of that type in the system. 294