1
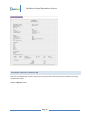
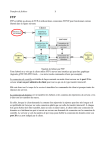
BIRCHSTREET CAPITAL EXPENDITURE PROJECTS USER MANUAL October 2010 BirchStreet Systems, Inc. 3737 Birch Street, Newport Beach, CA 92660 http://www.birchstreetsystems.com TABLE OF CONTENTS WELCOME TO THE BIRCHSTREET CAPITAL EXPENDITURES HELP GUIDE ..................................... 1 System Overview ................................................................................................................................................... 1 Capital Expenditure Projects vs. eProcurement ..................................................................................................... 2 Projects Module Workflow .................................................................................................................................... 3 SECTION I .................................................................................................................................................... 3 Creating a Project Requisition ................................................................................................................................ 4 Submitting a Project Requisition for Approval ....................................................................................................... 5 Budgeted Projects.................................................................................................................................................. 7 Viewing an Imported Project ............................................................................................................................... 10 Making Changes to Submitted Project Requisitions ............................................................................................. 11 Reviewing Project Requisition Details .................................................................................................................. 12 Approving a Project Requisition........................................................................................................................... 13 Project Requisition Statuses ................................................................................................................................ 14 Reviewing Active Projects .................................................................................................................................... 15 Reviewing Project Budget and Spend Details ....................................................................................................... 16 Using Project Tab Filters ...................................................................................................................................... 17 Project Statuses ................................................................................................................................................... 18 Cancelling/Modifying Projects ............................................................................................................................. 18 SECTION II ................................................................................................................................................. 19 Creating Purchase Orders .................................................................................................................................... 19 Types of Purchase Orders .................................................................................................................................... 30 Change Orders ..................................................................................................................................................... 34 BirchStreet Capital Expenditure Projects RECEIVING PROJECT ORDERS .............................................................................................................. 31 PROCESSING PROJECT INVOICES ........................................................................................................ 35 Reviewing Scanned Invoice Information .............................................................................................................. 36 Matching to the Scanned Invoice ......................................................................................................................... 39 Retainage ............................................................................................................................................................ 42 Lien Wavers ......................................................................................................................................................... 42 Reviewing Invoices During Approvals .................................................................................................................. 43 APPROVING INVOICES ............................................................................................................................ 43 TRANSMITTING INVOICES ....................................................................................................................... 46 LEARN MORE ............................................................................................................................................ 47 BirchStreet Capital Expenditure Projects WELCOME TO THE BIRCHSTREET CAPITAL EXPENDITURES HELP GUIDE This BirchStreet Capital Expenditure Projects help guide should be used as a reference tool with regards to Capital Expenditure projects, and is not intended to serve as a complete and thorough training of the BirchStreet system. For a detailed help guide on how to use the BirchStreet system, please refer to the Help link within your BirchStreet marketplace. This Capital Expenditure Projects help guide can be used as a supplement to the BirchStreet E-Procurement help guide for monthly expense procurement. This help guide is intended to provide you with assistance in your use of the Capital Expenditure Projects eProcurement Web Application, designed by BirchStreet Systems, Inc. For further information or assistance, please email our Customer Support team at [email protected] or call us at (949) 567-7030. SYSTEM OVERVIEW The system allows a Project Manager to comprehensively monitor projects from one location. LOGO PANEL Spanning horizontally across the top of the window, the Logo Panel displays the person logged in, the property you are logged in to, and the option to hide/display the menu. A link to the on-line Help is also located here. Page 1 BirchStreet Capital Expenditure Projects NAVIGATION LIST The Navigation List, known as the Main Menu is a vertical column on the left. It is used to open various maintenance screens and is expandable. It can be hidden or made visible using the Hide Menu checkbox in the Logo Panel. FRONT PAGE SUMMARY Below the Logo Panel are the Search All Catalogs, In Box and the Shopping Cart. TABS Just below the Front Page Summary are a series of tabs. These are used to separate segments of the marketplace to have everything quickly at hand. ACTION BUTTONS Each tab contains action buttons that perform various functions, open an entry window, or display additional information. SHORTCUTS There are certain field shortcuts used throughout the system. For example, if you want to save data entry time while typing in a date field, you can enter a “+5” and tab off the field. The system will automatically calculate and enter the date 5 days from the current date. Report filters will allow you to enter what are known as “token values” for date fields used as search criteria. For example, entering “@TODAY” in any given date field will run the report based on documents generated, received, approved, etc on today’s date, regardless of when you run the report. CAPITAL EXPENDITURE PROJECTS VS. EPROCUREMENT Capital Expenditures are purchases and expenses incurred that will be treated as capital expenses for accounting purposes. These expenses are not regularly recurring or monthly operating expenses and are generally associated Page 2 BirchStreet Capital Expenditure Projects with, but not necessarily exclusively so, large purchases for the property, such as equipment, furniture, property improvement, and can be both planned and budgeted or emergency replacement or repairs. “eProcurement” is the term used to describe a system whereby the entire purchasing cycle is conducted on‐line through the Internet in a uniform, consolidated way. eProcurement creates the entire purchasing cycle as a paperless, electronic process, including the routing, approving and payment of invoices. PROJECTS MODULE WORKFLOW The Birchstreet Projects process will bring e-procurement functionality to the capital expenditure purchases. A project is initially created in BirchStreet as a Requisition and the approval of funds for the project is handled electronically using BirchStreet’s electronic workflow routing. All purchases for a project will be made through a purchase order in BirchStreet which can be electronically routed, faxed or emailed to the vendors associated with the project. For Projects not normally handled via purchase order (permits, city fees, etc.) these will be entered in BirchStreet by a confirming PO. As work is completed and product is delivered, the Project Manager will enter this information through the PO Receiving function. All invoices will be routed electronically, tied automatically to the property, the project and the PO using the information from the Invoice. The BirchStreet eProcurement system makes purchasing and invoice processing a completely paperless and automated system. SECTION I The first step in the Projects system is to create the Project. Projects that are budgeted for at the beginning of the year be created using an upload process and will remain in a “pending” status. When a project is ready to be submitted to the approvals process it is created using the Create New Projects functionality accessed via a button on the Projects Tab OR using the New button on the Projects Requisition screen in the menu on the left side. A project cannot be purchased against or invoiced for until it has been approved as part of the business process. Starting in the property that the project is for, the Project Manager will create a new project which includes the total budget request, the type of project, the budget period (current year/next year), and if known, line items which will be converted into purchase orders when the project is approved. The Project Manager can attach documents and notes as required to provide detailed information to the approver including images, documents, spreadsheets, etc. The project is also assigned a priority used in evaluating budgeted or planned projects. All emergency Projects are auto assigned a value of 1 for highest priority. Page 3 BirchStreet Capital Expenditure Projects CREATING A PROJECT REQUISITION This process will take you through initiating a request for approval of project funds in BirchStreet which will eventually lead to the creation of an Active Project and a Requisition. Once the project is created, the Requisition will no longer be used as it’s only purpose is for initiating Project creation. ESTIMATING YOUR BUDGET You will need to estimate your budget ahead of time, then using BirchStreet, request approval for the entire amount you will need including purchases, applicable freight, taxes and any other miscellaneous project costs. If you do not request approval for the entire amount, a BirchStreet Change Order (or Amended CRF) will be required before the invoices can be paid. Change Orders will be covered in a later topic. To begin the process, start on the “Projects” Tab and use the “Create Project” button to launch the “Capital Project Requisition” screen. Once the screen loads, the following fields are critical to complete: Project Manager - The Project Manager identifier can be located using the lookup icon to the right of the field. Project Type – The Project Type defaults to the Manager’s home department which is the one used most frequently. This value should be confirmed for each project though, and changed to reflect the purpose of the project if necessary. Priority - The Priority field defaults to 2, but can be raised to 1 to denote projects that should have priority if funds are limited. Page 4 BirchStreet Capital Expenditure Projects Project Start Date - The Project Start Date directly updates the Budget Date and denotes when the Project’s budget will be impacted. IF the Budget Date only is entered, it will not automatically add a Project Start Date so you should start by entering the Projecgt Start Date. Project Budgeted Amount - Use the “Project Budgeted Amt” field to enter the amount of money for this project that you are requesting authorization for. NOTE: Enter the associated “Project Number” only if the project was previously budgeted. Use the “Attach” button to attach any supporting documents, images, or specs to the Project Requisition and/or the ”Notes” button to include any additional information for the Project Manager during approvals. SUBMITTING A PROJECT REQUISITION FOR APPROVAL Once the project request contains sufficient information, the Project Manager can submit the request using the “Submit” button on the screen. The project is then auto routed to the appropriate approver based on routing rules and criteria established in BirchStreet by the customer. Page 5 BirchStreet Capital Expenditure Projects Note: Clicking the Save button only saves the work for a future date and time, but you must click the “Submit” button when you are ready to forward the project for approval. If you do choose to use “Save”, return to the “Requisition” Tab and click the “refresh/reload icon” to take any further actions prior to Submitting the Project REQ. Submitting a Project for approval in BirchStreet is analogous to requesting for a loan app or authorization of funds, so you will not be able to change it once it's been submitted. Modifications can be made while the Project is still in the New status, but once it has been submitted only notes and attachments may be added or adjusted. If you need additional items after the Project has been submitted, you can always create PO’s later and link them to the approved Project either when initially creating them, or by using the “Header Update” button on the “PO” Tab. If you reload the Project, you will see the status change to “Approval Pending” with a date and time stamp. Page 6 BirchStreet Capital Expenditure Projects NOTE: If you do Save a Project instead of Submit it, and have already closed the screen, you can use the “Menu” on the left side of the screen using the following steps to locate it again: Select the “Capital Project Requisition” Screen Select the “Vertical” radio button at the top of the screen to show the menu on the left and select the REQ number. Tip: Use the Requisition Summary or Requisition Detail reports to monitor pending projects. See the “Running Reports” section later in this guide. BUDGETED PROJECTS Certain users may upoad all budgeted projects at the start of a year to plan them over a course of time. These are projects for which the budgets have already been defined at some previous point in time. It is important to note that importing budgeted projects will not be active initially and therefore the funds have not been authorized in Page 7 BirchStreet Capital Expenditure Projects BirchStreet yet. These projects will be imported in a “Budgeted’ status then and funds for the project will be requested through the Project Creation process. Note that the Product Template used in this upload process must be provided to you by your BirchStreet Project Manager. Columns A-F (Scroll to the Right for Columns G-I) Uncheck the “Hide Menu” Option at the top of the screen to unveil a hidden menu on the left-hand side of the page. Click on “Procurement” and then “Projects”. Click “Projects” once more to open the following screen. Click the “Import” link on the left-hand side of the screen. Page 8 BirchStreet Capital Expenditure Projects When the Import screen opens, click “Upload File” and then “Browse”. Select the .csv “Project Import Template” and then click “Submit”. Place checkmarks in the pending boxes (if necessary) and then click “Validate and Submit”. If the import was Page 9 BirchStreet Capital Expenditure Projects successful, the following “Processing” Message will appear : “Validation and importation was successful”. Imported projects begin in a “Budgeted” status, immediately available for viewing following a successful import. Note: A user cannot create purchase orders or invoices that reference a project that is not active. VIEWING AN IMPORTED PROJECT Imported projects are available on the left-hand side of the Projects screen (Procurement – Projects – Projects) as shown below. Clicking on a project will automatically populate the screen with the existing project details. At this point, if the budgeted amount of the project has changed, the Project Manager can make the modification here. Page 10 BirchStreet Capital Expenditure Projects As a reminder, the funds for the project have not yet been requested through BirchStreet. At this point, the PM needs to use the "Create Project" button discussed earlier on Page 7, with the purpose of requesting the funds for this budgeted project be authorized. Only then will the “budgeted project” become an “active project” in BirchStreet. MAKING CHANGES TO SUBMITTED PROJECT REQUISITIONS Onc a project has been submitted for approvals, the Project Manager will not be able to make changes other than add Notes or Attachments. If it is necessary to change budget information like the budgeted amount or project start dates once submitted, or if the project requisition is denied for any reason, the Project Manager can change the status of the project requisition back to “new”. To make changes to a project requisition with a status of “Approval Pending” or “Approval Denied”, select it from the list and then click the “Update to New” button. Note: Once the requisition has been changed back to the “new” status, it can be found by changing the filter to view “My New REQs”. At this point, any changes can be made and the project requisition resubmitted. Page 11 BirchStreet Capital Expenditure Projects Note: If you add more notes and attachments after a project requisition has been submitted to an approver, you should notify them via phone or email. The system will not alert them of the new additions to the requisition. REVIEWING PROJECT REQUISITION DETAILS Project requisitions can be viewed on the REQ tab from the front page and will remain with a status of ”Approval Pending” until the approver has approved it. Once the request is approved, the project is auto assigned a project number and any items created on the line item tab of the request are converted to Purchase Orders which can then be submitted. If you already know you are going to approve the project, you can click the “Approve” button. However, if you want to review the details included with the project first, take the following steps. Use the “Print/View/Edit” button to review project details including any line items that will be converted to PO’s upon approval. You can add additional Notes, Attachments, Print the Project Requisition or Close if no futher action is required. Page 12 BirchStreet Capital Expenditure Projects APPROVING A PROJECT REQUISITION Once you’ve completed your review of the project, and any line items that may have been included, you’re ready to approve the Project. Click the “Approve” button. Page 13 BirchStreet Capital Expenditure Projects Click “OK” to the confirmation. The Project REQ will drop out of the “Pending Approval” filter. You can always find them from the “Approved” filter on the “Approval” Tab for future reference. PROJECT REQUISITION STATUSES A BirchStreet Project Requisition will change during the process of requesting funding for a project. The following will provide a brief description of each status and what triggers the status change. “Budgeted” – This is the status automatically given to Project Requisitions uploaded using the Import feature covered in the next section. Project Requisitions in this status can only be found on the “Projects” Screen. In order to request funds for a budgeted project, the Project Manager must create a Project Requisition using the “Create Project” button on the “Projects” Tab. “New” – This is the status automatically given to Project Requisitions created but not submitted. If a Project Page 14 BirchStreet Capital Expenditure Projects Requisition is created but not submitted, it can later be submitted using the “Projects” Screen. “Approval Pending” – This is the status used to indentify a Project Requisition being reviewed by one or more Approvers. “Approval Denied” – This status occurs if an Approver uses the “Disapprove” button on the “Approvals” Tab. If a Project Requisition is disapproved, the “Update to New” button on the “REQ” Tab can be used to manually change the status of the Project Requisition back to “new”. With the Project Requisition in a “new” status, changes can be made and the request be resubmitted back through the approvals process. “Document Generated” – This is the final status of a Project Requisition and indicates the requests for funds has been approved. A “Project Code” column on the “REQ” Tab will provide the identifying number of the corresponding new Project available on the “Projects” Tab. REVIEWING ACTIVE PROJECTS Once a project is approved, the project requisition will be changed to a status of “document generated”. Nothing further needs to be done with the project requisition, but it can be found for reference by changing the filter to “My Completed REQ’s”. There will also be a new Project listed on the Project Manager’s “Project” Tab under the “My Active Projects” filter. The status of the new Project will be “Active”. Page 15 BirchStreet Capital Expenditure Projects Use the “Print w/Details” button to show a view of the Project along with any associated purchase orders. These numbers can be useful when looking for the PO’s on the “PO” Tab that were created as a result of this project. Note: Attachments and Notes can be also added to the Project or viewed at any time using the buttons at the top of the “Print w/Details” screen. REVIEWING PROJECT BUDGET AND SPEND DETAILS You can quickly view the Budgeted, Contracted, Change Order, and Invoice amounts all from the “Projects” Tab, or you can use the “Edit” link to see these same details. Page 16 BirchStreet Capital Expenditure Projects The “Project Budgeted Amount” column reflects the amount entered when the Project REQ was initially created by the Project Manager. The “Contracted Amount” column represents PO’s that have been Accepted by the supplier. The “Change Order Amount” column represents PO’s that have been designated as “Change Orders” and have been Accepted by the supplier. Change Order PO’s are PO’s for a Project that has exceeded the “Project Budgeted Amount” and generally are required to go through approvals. The “Invoiced Amount” column represents invoices that have been sent to BirchStreet via the Invoice feed and are linked to a Project PO. Once the Invoices are approved and go to an “Invoice Complete Status”, this amount will be updated. USING PROJECT TAB FILTERS It is important to note that the “Project” Tab spans all companies so you will see projects from other companies as well as your own. You can always refer to the “Property Name” column on the “Project Tab” to see in which company the Project was created. The “Project Tab” filter is designed to show you only information you need to see. Use them to display projects based on the following criteria: “My Active Projects” – This is the default filter and designed to show Projects you have created, from all companies, with a status of “Active”. “All My Projects” – This filter will display all Projects you have created, from all companies, regardless of status. “This Property’s Active Projects” – This filter will display all projects created for the selected property, with a status of “Active”. Page 17 BirchStreet Capital Expenditure Projects “All This Property’s Projects” – This filter will display all projects created for the selected property, regardless of status. “All Active Projects” – This filter will display all projects from all companies, with a status of “Active”. “All Projects” – This filter will display all projects from all companies, with all statuses. PROJECT STATUSES A BirchStreet Project will progress through various statuses during the project lifecycle. The following will provide a brief description of each status and what triggers the status change. “Active” – This is the status automatically given to a Project created through the Project Requisition approval process. Once a Project is in the “Active” status, changes cannot be made to the Project Requisition. If for some reason a project needs to be cancelled while in the “Active” status, it can be cancelled on the “Projects” screen covered in the next section. “Complete” – This status lets Accounting and Management no that no further work or cost is contemplated on this project. “Closed” - CANCELLING/MODIFYING PROJECTS A Project can be cancelled or modified by using the “Edit” link on the “Projects” Tab. Once the “Projects” Screen opens, use the “Project Status” drop down from “Active” to “Cancelled”. Page 18 BirchStreet Capital Expenditure Projects Note: You can also change the Project Manager, Priority, and Project Start/End Dates here as well. Once the changes are made, click “Save”. SECTION II CREATING PURCHASE ORDERS Purchase orders can be created after a project has been approved and created. This process will describe the steps required to create a purchase order including describing the types of vendors and suppliers that can exist in BirchStreet and the differences between them. Note: If the next steps are simply to mark an already incurred expense, you can use the “Confirming PO” checkbox on the PO Header screen before submitting the PO. This will allow you to track receipt of the goods for invoice purposes later. CREATING ORDERS FOR SUPPLIERS ON THE FLY OR NON-CATALOG SUPPLIERS Suppliers on the Fly are suppliers unique to the property. They are usually local vendors not available to other properties and usually do not maintain product or service information in BirchStreet. Suppliers on the Fly and their products or services can be added at anytime, but they must be added before you can create orders for them. Non-Catalog Suppliers are suppliers that are already be in the system and may be available to other properties. The primary difference is that Non-Catalog Suppliers do not provide catalog content in BirchStreet. You do not Page 19 BirchStreet Capital Expenditure Projects need to create Non-Catalog Suppliers but you will need to add their products or services. The next steps will show how to manually create the Supplier on the Fly, as well as add line items for products, services, or contracts. Get started by clicking the “Create Non-Catalog Item” button on the “Catalog” tab. Search for and select the Supplier. If they are available, click the “Select” button. If they are not available, use the “Add New Supplier” button instead. The system will then prompt you to search for the supplier again but this time by fax number, just in case they are in the system under a different name (or if the name was misspelled. Page 20 BirchStreet Capital Expenditure Projects If after searching by fax number the supplier still is not found, you will need to complete the form as shown below: Note: If the supplier or service provider doesn’t have a fax machine, select “Email” from the “Transmission Method” field and entire their email address. If they do not have an email address either, enter your email address. Once an order is created, you will receive an email alert with the Purchase Order which can be discarded if not needed for reference. Once finished entering the required information, click the “Save” button. You will see the supplier available on the search screen to select: Page 21 BirchStreet Capital Expenditure Projects Once the supplier is selected, it will appear above the grid as shown below. Proceed to free form the details in then click the “Create PO” button. Add the appropriate information as described below: “Subject” – While not required, this can be an important field to help you quickly locate your Purchase Order based on a relevant project subject like “Lobby Renovations”. “Required Delivery Date” – This date should denote when you need the items or services by. “Purchase Type” – This is a selection food and for purposes of Capital Expenditure Projects, “General” should be selected. “Ship to Location” – This is set up for your property in advance, however if the address needs to be changed or an additional location required, contact Jacki Strange or Cathy Jennings with Archon Corporate. “Billing Address”- The default “Billing Address” will be the Archon Corporate Office in Irvine or Memphis. “Department” – This field is used to indicate the type of project this is. The project type is determined by the Project itself; however, when creating a Purchase Order, the system will default to the users default Department Page 22 BirchStreet Capital Expenditure Projects which is typically FFE or EMC. Thus, when creating a purchase order, be sure to enter the Department/Project Type that the purchase order is associated to. If you don’t remember what the choices are, click on the magnifying glass next to the entry field to see a list of all departments/Project Types. “GL Account” – This field is the Dummy GL account to be used for all Capital Project expenses. Enter “11400”or if you’re not sure of the account number, again, click on the lookup icon and a list of GL accounts that you have access to will be displayed. “Project” – This is a critical field that may even be required prior to proceeding. This is the field that will reference the Project created as part of the approval for project funding request. It is also how the system will know to track orders spent against the “Contracted amt” field on the “Project” Tab. You can check the “Confirming PO” Checkbox if the PO does not need to be faxed or emailed to the supplier. If the “Confirming PO” Checkbox is flagged, the order will not go to the supplier but a PO will be created which receiving can be done. Note: Because the project budget has been approved, no approval is required on individual purchase orders provided they do not exceed the amount of the budget. If the Project Manager determines additional funding is necessary, the Project Manager can create a separate purchase order and mark that PO as a change order which must be routed for approval to make funds available for submission and payment. If the Project Budget has Page 23 BirchStreet Capital Expenditure Projects already been exceeded, the PO will automatically be set as a Change Order. These will be discussed in a later topic. Click “OK” once done and you will see a PO in a “New” status on the “PO” Tab for you to Submit. Note: If you need to make any changes, you can use the “Header Update” button to change the header details just completed, or the “Print/View/Edit” button to change quantities. The last step in creating a PO is to click the “Submit” button. This will either send the PO off to the supplier. If the “Confirming PO” checkbox was checked when creating the PO, the order will not actually go to the supplier. CREATING PURCHASE ORDERS FOR PUNCHOUT SUPPLIERS Punchout Suppliers are different than Suppliers on the Fly and Non-Catalog Suppliers because they have an integration with BirchStreet. The integration allows you to click a logo’d link on the “Catalog” Tab. The link will direct you to the supplier’s website, but it loads within the BirchStreet interface. All real time product and pricing information will be maintained on the supplier’s site, accessible through the integrated link. In order to create an order for a Punchout supplier, you’ll start by selecting the logo of the punchout supplier on the Catalog tab. Perform all usual shopping on their linked website and then check out. The checkout process will result in a copy of the purchase order on the Purchase Order Tab where you can add the necessary project information. Click the Punchout Supplier’s logo as shown below: Page 24 BirchStreet Capital Expenditure Projects The website will load within the BirchStreet application where you can proceed to do your normal shopping. Each punchout supplier’s website is designed differently. Either browse through a list of products, search by item, or use Order Guides or Lists created within the website. Page 25 BirchStreet Capital Expenditure Projects Once your shopping is completed, you’ll be redirected to the “PO” Tab in BirchStreet where you’ll see the PO in a “New” Status. Page 26 BirchStreet Capital Expenditure Projects Use the “Header Update” button to add the appropriate information including “Subject” if applicable, “GL Account” and link the PO to a Project as shown at the bottom. If you do not have the GL account or Project code as shown below, you can use the lookup icon to browse through a list. Note: Tax and Freight may not be returned on a Punchout PO so you may need to add this information as well. Click “Save” once completed. When returned to the “PO” tab, be sure and click “Submit” to submit your order to the supplier. Note: You are not able to make changes to a Punchout supplier PO’s order quantities once it has been brought back into BSS and submitted. If you need to change the quantity or other information before it has been submitted back to the vendor/supplier, you will need to delete the PO and create new one. Page 27 BirchStreet Capital Expenditure Projects CREATING PURCHASE ORDERS FOR CATALOG SUPPLIERS Adopted or Catalog supplier’s provide catalog content for you by logging in to BirchStreet and uploading products. In order to create a purchase order for these suppliers, locate the supplier and/or products the “Search All Catalogs” feature. In the Search All Catalogs section, select the type of search you want to perform from the drop-down list. Enter the text corresponding to the selection and click Go to perform the search. The search results will be listed below. Products: Enables you to perform a search on products. You can only see items to which you have access. The search uses the: Item # (Supplier SKU) Product Name (Item Description) Description (Long Description) Item Keywords Manufacturer Name Manufacturer Part Number Categories: Searches categories by name in order to locate items. Quickly brings you to the category level you want to click on to view products without walking down all the levels. My Supplier: Searches the company name and keywords for suppliers available in the property. You may view all products for a specific supplier, see their address and contact information, click on the link to send an email or click on the Add New Supplier button to add a SOTF (Supplier-on-the-fly), if granted access. My recent Suppliers: Searches the company name and keywords for all suppliers who have recently been added to the marketplace. Example of Product Search Enter the Product number or description and Click Go. Once you see the items you need, enter the quantity you would like to purchase and Tab off to select the product. Page 28 BirchStreet Capital Expenditure Projects Click the “Create PO” button to start the PO process. Use the screen shown below to add the appropriate information including “Subject” if applicable, the dummy “GL Account” provided for your property, and link the PO to a Project as shown at the bottom. If you do not have the “GL Account” or Project code as shown below, you can use the lookup icon to browse through a list. Page 29 BirchStreet Capital Expenditure Projects Click “OK” once done and you will see a PO in a “New” status on the “PO” tab for you to “Submit”. Note: If you need to make any changes, you can use the “Header Update” button to change the details just completed, or the “Print/View/Edit” button to change quantities. TYPES OF PURCHASE ORDERS There are two primary types of PO’s in the Capital Expenditure Projects app. REGULAR PURCHASE ORDERS The first one is a Regular Purchase Order. The purpose is to generate an order within BirchStreet against a project that can be sent to the supplier in advance. Examples might include anything from ordering furniture, renovation supplies, or other products for which will you can order in advance of the need, and for which an Invoice will need to be paid. Regular Purchase Orders can be created for Suppliers on the Fly, Non-Catalog Suppliers, Punchout Suppliers, and Adopted Suppliers. When creating a Regular Purchase Order, the “Confirming PO” checkbox should NOT be checked. Once you click the “Submit” button on the “PO” Tab on a Regular Purchase Order, the order totals will be reflected in the “Contracted Amt” field on the “Projects” Tab. Page 30 BirchStreet Capital Expenditure Projects CONFIRMING PURCHASE ORDERS The second type of PO is a Confirming Purchase Order. The purpose is also to generate an order within BirchStreet against a project, but a Confirming Purchase Order will not go to the supplier. Examples include after the fact orders to track project services or contracts already incurred, for which an Invoice will need to be paid. Confirming Purchase Orders can be created for Suppliers on the Fly , Non-Catalog Suppliers, and Punchout Suppliers. Just click the “Confirming PO” checkbox when creating the Purchase Order and click “OK” to the message which tells you the Confirming PO will not go to the supplier. Once you click the “Submit” button on the “PO” Tab on a Confirming Purchase Order, the order totals will be reflected in the “Contracted Amt” field on the “Projects” Tab Note: You can’t create a Confirming PO for a Punchout Supplier unless you create a Supplier on the Fly version of the supplier. This may typically be necessary for special order items not listed on the Punchout Supplier’s integrated site. SECTION III RECEIVING PROJECT ORDERS The following process must be taken when the products you ordered have been received or the services completed. By completing these steps as soon as the products ordered arrive at the property or the work is performed, you will ensure shipment accuracy as well as prompt payment submission to your suppliers. Page 31 BirchStreet Capital Expenditure Projects Locate the “Receiving” screen either by using the “Receive” button on the “PO” Tab or the “Receiving” Menu option on the left. Select the PO from the list on the left, using the Search filters and text box if necessary. Once the PO details appear on the right, enter the “Received Date” on the “PO Header – Receiving” Tab. If all the items have been received, click the “Receive Accept All” checkbox at the top of the grid. This will automatically populate the “Acpt’d Qty” and “Invoiced Price” fields. Note: If there are any discrepancies such as partial deliveries, uncheck the box at the beginning of the line and modify the details in the grid accordingly. Use “CXL Remaining Qty” box if some or all of the item will never be Page 32 BirchStreet Capital Expenditure Projects delivered and not backordered. Use the “Edit” link to note Invoice Price discrepancies or Substitute products. Tracking the goods or services delivered accurately is critical to the Invoice process. If items or services did not all get delivered, note what did or did not come in accordingly in the grid to save time later. When finished, click “Update”. Special Note: A contract/order can be partially received to facilitate percentage of complete payments. Use the percentage of completion for the amount received where 30% is shown as .30 etc. This can facilitate progress payments based on a percentage of the total contract. It is important to note here that the UOM selected must be set up in the system to allow fractional quantities. For a more complicated example, if you need to pay a percentage that is not an even number (let’s say $2,000 of a $10,700 contract) just divide 2,000/10,700. Rounded up this is .19 so you would enter this value in the “Acpt’d Qty” box in the Receiving grid. Click on the “Receiving Record” button and you will notice at the top where it says “PO Status”, it says “partially received” next to it. You will also notice the “Receiving Record” number. Page 33 BirchStreet Capital Expenditure Projects SECTION IV CHANGE ORDERS Change Orders should be created if items or services are needed above and beyond the original Budgeted Amount of the Project. To create a Change Order PO, follow the same process described above for the necessary supplier type. On the “Header Update” screen, there will be a checkbox called “Projects Change Order” which will flag this PO as a Change Order. Page 34 BirchStreet Capital Expenditure Projects Once you save this change and submit the order, it will go through the approval process for new projects since it was created for an amount which exceeds the project budget. PROCESSING PROJECT INVOICES Invoices will be scanned and sent to BirchStreet daily. When these invoices come in, the system will match them to a Property, then a Project, then a PO. This process is mandatory in getting the invoice paid by facilitating complete matching of the invoice to a PO, if one is available. These PO’s enter the BirchStreet system as New Project Invoices and will be available on the AP Invoice tab for the Capital Administrator to process. If the invoices haven’t been matched to a project, a Project Management team member will be notified via a report and will be required to edit the invoice to add the Project and PO identification information. Page 35 BirchStreet Capital Expenditure Projects REVIEWING SCANNED INVOICE INFORMATION Get started by clicking on the “AP” tab and changing the filter to “New – Project Invoices”. All Invoices awaiting action will be listed in the “New” status. Click the “Edit” link next to the Invoice to bring up the AP Invoice screen to determine if Receiving was done, view the Project Order and the scanned invoice for comparison. Then add the lines from the Scanned Invoice on to the BirchStreet Invoice. Start by clicking the lookup Icon next to the “PO Reference #” field and search for the corresponding PO. When it appears select it. As shown below, the PO status should either display “Partially Received” or “Receiving Complete”. Page 36 BirchStreet Capital Expenditure Projects Note: If the PO does not show either of these statuses, please ensure the Receiving is done on the “Receiving” screen and then return to the next steps. Next, confirm exactly what was on the Purchase Order and what has been Received to Date. Click the “PO Print w/Details” button. This will show the PO details in the middle, and the “Receiving History Section” at the bottom. The “Receiving History Section” reflects any items received, cancelled, or outstanding. After reviewing the Order and Receiving History, take a look at the Invoice that was sent using “View PDF”. Page 37 BirchStreet Capital Expenditure Projects Page 38 BirchStreet Capital Expenditure Projects The image of the invoice that was scanned in will be displayed in PDF format. If everything looks fine, and the “Invoice Grand Total” from the “AP Invoice” screen matches the “Grand Total” on the scanned invoice, the next step is to add the detail information from the Scanned Invoice to the “Detail” Tab. MATCHING TO THE SCANNED INVOICE Use the “Edit” link on the Detail Tab next to the existing row to modify the default line item to match what is on the scanned invoice. If there is more than one line item, use the “Add Row” button to add more lines. Once the “Detail” section appears, select the “GL Account” from the lookup Icon as well as the “PO Number”. Enter the “Item #”, “Item Description”, “Invoice Price Amount”, and “Tax Amount” if available. You can release retainage for a particular invoice using the look up list next to the “Invoice to Release Retainage For” field and then entering an amount in the “Release Retainage Amount” field. Once an Invoice is selected, a field will appear that shows how much available money is left to release. The amount entered will directly impact the “Unreleased Retainage Balance” field on the Invoice Tab once the Invoice has been approved. Page 39 BirchStreet Capital Expenditure Projects Once completed, click “OK” and proceed with this process to enter each line item from the Scanned Invoice Once you click “OK” to the detail section after each item you’ll see each one loaded in the grid. Return to the “Invoice” tab and confirm the “Difference” field reflects a zero balance. If it doesn’t, confirm the Page 40 BirchStreet Capital Expenditure Projects information entered on the “Details” tab. Once the “Difference” field reflects a zero balance, click the “Submit” button. The Invoice will be routed to the appropriate approvers, and the Invoice status will show as “Approval Pending”. Page 41 BirchStreet Capital Expenditure Projects RETAINAGE The BirchStreet system allows you to account for Retainage, the amount you don’t want to pay right now because you may be waiting for something from the vendor. ADDING NEW RETAINAGE BirchStreet needs to know if you’re holding back retainage on this invoice. The “New Retainage Amount” field is designed to hold the amount you’re retaining from this invoice. If this invoice is $7,577.50 and you’re withholding $100, the $100 will be on hold and will not be paid to the vendor until it is released on a subsequent invoice. HANDLING REBILLED RETAINAGE If you have a $7,577.50 bill from the vendor and withhold $100, but next week the supplier re-bills and sends you another invoice for that $100 retainage and you’re not ready to pay it yet, you can enter this amount in the “Rebilled Retainage Amount” field. This is not considered a new charge because the supplier is billing you for something they already billed you for previously. There is no GL distribution that occurs when entering an amount in this field. You will still, however, need to add a Line item on the Detail Tab but for a zero dollar amount. UNRELEASED RETAINAGE The “Unreleased Retainage Balance” field will simply show you how much retainage has not been released yet, but the information will not be displayed until after the Invoice has been approved. This amount is calculated by the system and represents retainage from this invoice that has not yet been released for payment. RELEASED RETAINAGE The “Release Retainage Total” field is calculated by the system and contains the total amount of retainage of other invoices being released on this invoice, as entered in the “Invoice to Release Retainage For” and “Release Retainage Amount” fields on the Detail Tab. LIEN WAVERS You will need to review each invoice to determine if the Lien Waver document was part of the invoice scan or not. This can be found using the “View PDF” button. If the Lien Waver is available, ucheck the “Lien Waver Pending” checkbox. If not, leave it checked. If a Lien Waver is not required for this invoice, it can also be unchecked for this reason. Page 42 BirchStreet Capital Expenditure Projects REVIEWING INVOICES D URING APPROVALS Once an invoice has been submitted, the status will become “Approval Pending” and can be viewed on the “AP Invoice” tab by using the “Approval pending – Project Invoices” filter. To see who the Invoice went to for approval, use the “Approval Details” button. The status of the Invoice approvals can be monitored and will update as each person approves it. APPROVING INVOICES Invoices will be routed to each approver according to property workflows, and will appear on the “Approvals” tab in an “Awaiting Approval” status. Note: You will see Invoices to approve for other properties if you have multi-property access and are an approver Page 43 BirchStreet Capital Expenditure Projects for that property. If you receive the following prompt, just click OK. The invoice can be reviewed using the “Print/View/Edit” button. Page 44 BirchStreet Capital Expenditure Projects If any further editing needs to be done after reviewing the Invoice, the Approver can use the “Edit” link next to the Invoice. This will open the “AP Invoice” screen where further changes can be made if necessary. The Scanned invoice documentation, and PO details with Receiving History will be available for the Approver as well. Page 45 BirchStreet Capital Expenditure Projects If no changes need to be made to the Invoice, click the “Approve” button (or Disapprove if necessary). Invoices that have been approved can be found in the “Approved” filter on the “Approvals” Tab. If anyone else should approve the Invoice it will move to each approver until each one has approved it. Once approved by all Approvers, the Invoice status will appear on the “AP Invoice” tab in an “Invoice Complete” status. TRANSMITTING INVOICES Any Invoices in a status of “Invoice Complete” will be automatically transmitted to the back office system on a regular schedule. Page 46 BirchStreet Capital Expenditure Projects Once the Invoice has been transmitted, the status will change to “Transmitted” and a date will appear in the “Transmission Date” field. Processing of the transmitted invoices should now be done through the back office system that handles payment. Upon transmission of an invoice, the lifecycle of a PO created against a Project will be completed within BirchStreet. No further editing of a PO or Invoice can be done within this system. Once all Invoices related to a particular Project have been matched and transmitted to the back office payment system, the lifecycle of the Project in BirchStreet will be complete. All Project data will be retained within BirchStreet indefinitely for future reference. Final Note: Historical information can always be reviewed by using many of the filters on the Tabs, Screen,s and Reports. LEARN MORE The following table provides information on where to get help in the following areas. Topic Online Help Application Training, Video Tutorials, and Quick Guides Application Support Business Process Questions Security Access to BirchStreet Features including Tabs, Screens, Departments & GL Accounts Where to Go Log in to BirchStreet and click the “Help” link in the upper right corner of BirchStreet Email [email protected] Email [email protected] Contact your Property or Corporate BirchStreet Administrator Contact your Property or Corporate BirchStreet Administrator Page 47