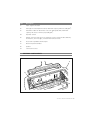
1
INK-JET FAX FAX_LAB 650/680 USER’S GUIDE EDITED/PUBLISHED/PRODUCED BY: Printed in China. Olivetti S.p.A. con unico azionista Code of user's guide: 381746B-01 Gruppo Telecom Italia Direzione e coordinamento di Telecom Italia S.p.A. Date of publication: September 2008. Copyright © 2008, Olivetti All rights reserved. No parts of this manual may be photocopied, reproduced or translated into other languages without prior written authorization from Olivetti S.p.A. The manufacturer reserves the right to make any changes to the machine described in this manual, at any time, and without prior warning. This machine has been approved, under the terms of Council Decision 98/482/EC, for Europe-wide connection as a single terminal to an analogue Public Switched Telephone System (PSTN) system. However, due to differences between individual PSTNs in the various countries, the approval does not unconditionally guarantee success operation of every PSTN termination point. If you encounter any problems, you should contact your supplier immediately. The manufacturers declare under their own responsibility that this product complies with provisions laid down by the directive 1999/05/CE (the full declaration can be found at the end of this manual). Conformance is certified by the application of the mark to the product. Network compatibility declaration This product has been designed and developed to operate in the networks of all European Community countries, and in those of Switzerland and Norway. Full compatibility with the networks of individual countries will depend on specific national software parameters which can be set in the product. If you encounter problems with non EC PSTN networks, contact your national technical support service. Your attention is drawn to the following conditions that could compromise the conformity attested above as well as the machine’s characteristics: • incorrect electrical supply; • incorrect installation, erroneous or improper use, or any use that differs from what is indicated in the User Manual supplied with the machine; • replacement of components or original parts using other types, not approved by the manufacturer, or where carried out by unauthorized persons. The electrical socket must be near to hand and easily accessible. To disconnect the machine from the electrical power supply, unplug it from the supply socket. CONTENTS 1 BEFORE YOU START . . . . . . . . . . . . . . . . . . . . . . . . . . . . . . 1-1 CONSULTING THE MANUAL . . . . . . . . . . . . . . . . . . . . . . ENVIRONMENTAL RECYCLING . . . . . . . . . . FOR COUNTRIES IN THE EUROPEAN UNION (EU) FOR OTHER COUNTRIES (NOT IN THE EU) . . . . SAFETY PRECAUTIONS . . . . . RISK OF AN ELECTRIC SHOCK RISK OF SUFFOCATION . . . . RISK OF FIRE . . . . . . . . . RISK OF ACCIDENT . . . . . . OPERATING PRECAUTIONS . . IMPROPER USE . . . . . . . . . . . . . . . . . . . . . . . . . . . . . . . . . . . . . . . . . . . . . . . . . . . . . . . . . . . . . . . . . . . . . . . . . . . . . . . . . . . . . . . . . . . . . . . . . . . . . . . . . . . . . . . . . . . . . . . . . . . . . . . . . . . . . . . . . . . . . . . . . . . . . . . . . . . . . . . . . . . . . . . . . . . . . . . . . . . . . . . . . . . . ABOUT THE INSTALLATION AND SETUP PARAMETERS 2 1-2 1-2 1-2 1-3 1-3 1-3 1-3 1-3 1-4 1-4 1-4 GETTING TO KNOW THE FAX MACHINE . . . . . . . . . . . . . . 2-1 CONSOLE . . . . . . . . . . . . . . . . . . . . . . . . . . . . . . . . . . EXTERNAL COMPONENTS . INTERNAL COMPONENTS 3 . . . . . . 1-2 2-2 . . . . . . . . . . . . . . . . . . . . . . . 2-4 . . . . . . . . . . . . . . . . . . . . . . . . 2-5 INSTALLATION INSTRUCTIONS . . . . . . . . . . . . . . . . . . . . . 3-1 PACKAGE CONTENTS . . . . . . . . . . . . . . . . . . . . . . . . . . INSTALLATION CONDITIONS . . . . . . . . . . . . . . . . . . . . . . CONNECTING TO THE TELEPHONE LINE AND POWER SUPPLY . . CONNECTING THE TELEPHONE HANDSET . . . . . . . . . . . . . . CONNECTING THE FAX MACHINE TO THE TELEPHONE LINE . . . . CONNECTING AN EMERGENCY TELEPHONE (IN THE EVENT OF A VOLTAGE DROP OR POWER FAILURE) . . . . . . . . . . . . . CONNECTING THE FAX MACHINE TO THE POWER SUPPLY . . . . . . . . . 3-2 3-2 3-2 3-2 3-3 3-3 3-4 CONTENTS 1 SETTING SOME PARAMETERS . . . . . . . . . . . . . . . . . . . . SETTING THE LANGUAGE AND THE COUNTRY OF DESTINATION . . CHANGING THE LANGUAGE AND THE COUNTRY OF DESTINATION CHANGING THE COUNTRY ONLY . . . . . . . . . . . . . . . . . . CHANGING THE LANGUAGE ONLY . . . . . . . . . . . . . . . . . SETTING THE DATE AND TIME FOR THE FIRST TIME . . . . . . . . . CHANGING THE DATE AND TIME . . . . . . . . . . . . . . . . . . SWITCHING FROM A PUBLIC LINE TO A PRIVATE LINE (PBX) . . . . SETTING YOUR NAME AND FAX NUMBER . . . . . . . . . . . . . SETTING UP THE FAX MACHINE . . . . . . . . . FEEDING THE PRINT PAPER INTO THE MACHINE INSERTING THE PRINT CARTRIDGE . . . . . . . . PRINTING THE MENU AND ITS FUNCTIONS 4 . . . . . . . . . 3-11 3-11 3-12 . . . . . . . . . . . 3-14 . . . . . . . . . . . . . . . . . . FAX TRANSMISSION AND RECEPTION OPERATIONS . . . . 4-1 SENDING A DOCUMENT . . . . . . . . . . . . . . . . . . . . . . WHAT DOCUMENTS MAY BE USED . . . . . . . . . . . . . . . PLACING THE DOCUMENT IN THE ADF . . . . . . . . . . . . . . ADJUSTING THE CONTRAST AND RESOLUTION . . . . . . . . . . SENDING A DOCUMENT . . . . . . . . . . . . . . . . . . . . . HEARING THE DIALLING TONE WHEN SENDING A DOCUMENT . . SENDING A DOCUMENT WITH THE RECEIVER RAISED . . . . . . AUTOMATIC REDIAL . . . . . . . . . . . . . . . . . . . . . . . SENDING A DOCUMENT TO SEVERAL CORRESPONDENTS. . . . . SENDING A DOCUMENT FROM THE MEMORY . . . . . . . . . . CHANGING/REPEATING/DELETING A TRANSMISSION FROM THE . 4-2 4-2 4-2 4-3 4-4 4-4 4-5 4-5 4-5 4-5 MEMORY THAT IS ALREADY SET . . . . . . . . . . . . . . . . 4-6 RECEIVING A DOCUMENT . . . . . . . . . . . . . . . . . . . . CHOOSING THE RECEPTION MODE . . . . . . . . . . . . . . . RECEIVING DOCUMENTS IN THE VARIOUS RECEPTION MODES . RECEIVING A DOCUMENT IN POLLING MODE . . . . . . FIRST OF ALL, WHAT POLLING IS . . . . . . . . . . . . . . MAKING A TRANSMISSION REQUEST (POLLING RECEPTION) CHANGING A POLLING RECEPTION THAT HAS BEEN SET . . DELETING A POLLING RECEPTION THAT HAS BEEN SET . . . 2 CONTENTS 3-4 3-4 3-5 3-5 3-6 3-6 3-7 3-8 3-9 . . . . . . . . . . . . . . . . . . . . . . . . . . . . . . . . . . 4-7 4-7 4-8 4-8 4-8 4-9 4-9 4-10 5 PHONE BOOK . . . . . . . . . . . . . . . . . . . . . . . . . . . . . . . . . . . 5-1 PHONE BOOK . . . . . . . . . . . . . . . . . . . . . . . . . . . . . . PROGRAMMING THE PHONE BOOK . . . . . . . . . . . . . . . . . MODIFYING A NUMBER FROM THE PHONE BOOK . . . . . . . . . DELETING A NUMBER FROM THE PHONE BOOK . . . . . . . . . . PRINTING DATA FROM THE PHONE BOOK . . . . . . . . . . . . . SENDING A DOCUMENT USING THE PHONE BOOK SEARCH FUNCTION SENDING A DOCUMENT USING THE QUICKEST METHOD . . . . . . 6 USING THE TELEPHONE . . . . . . . . . . . . . . . . . . . . . . . . . . . 6-1 USING THE TELEPHONE . . . . . . . . . . . . . . . . . . . . . . . TELEPHONING BY SEARCHING THROUGH THE PHONE BOOK . . . TELEPHONING USING THE QUICKEST METHOD . . . . . . . . . . REDIALLING ONE OF THE LAST 20 INCOMING NUMBERS OR ONE OF THE LAST 10 OUTGOING NUMBERS . . . . . . . . . . . 7 5-2 5-2 5-3 5-3 5-4 5-4 5-4 . 6-2 6-2 6-2 . 6-3 . . THE TELEPHONE ANSWERING DEVICE . . . . . . . . . . . . . . . 7-1 THE TELEPHONE ANSWERING DEVICE . . . . . . . . . . . . . . . 7-2 . . . . . . . . . . . . . . . . . . . . . . . . 7-2 . . . . . . . . . . . . . . . . . . . . . . . . . . 7-3 TURNING ON THE TAD THE TAD CONSOLE OUTGOING MESSAGES AND MEMOS . . . . . . RECORDING OGM1 (OUTGOING MESSAGE 1) . LISTENING TO OGM1 (OUTGOING MESSAGE 1) RECORDING OGM2 (OUTGOING MESSAGE 2) . LISTENING TO OGM2 (OUTGOING MESSAGE 2) ERASING OGM2 (OUTGOING MESSAGE 2) . . . RECORDING THE TRANSFER MESSAGE (OGM3) . LISTENING TO THE TRANSFER MESSAGE . . . . . RECORDING MEMOS . . . . . . . . . . . . . . . . . . . . . . . . . . . . . . . . . . . . . . . . . . . . . . . . . . . . . . . . . . . . . . . . . . . . . . . . . . . . . . . . . . . . . . . . . . . . . . . . SETTING THE LENGTH OF MEMOS AND INCOMING MESSAGES LISTENING TO INCOMING MESSAGES AND MEMOS . . . . . . . . . DELETING MESSAGES AND MEMOS YOU HAVE ALREADY LISTENED TO . . . . . . . . . . . . . . . . . . . . . . . . . DELETING THE MESSAGE OR MEMO YOU ARE LISTENING TO . DELETING ALL MESSAGES ALREADY PLAYED . . . . . . . . . . . . . . . . 7-4 7-5 7-5 7-5 7-6 7-6 7-6 7-6 7-6 7-7 7-7 7-8 7-8 7-8 CONTENTS 3 TRANSFERRING MESSAGES AND MEMOS TO A REMOTE TELEPHONE . . . . . . . . . . . . . . . . . . . . . . . . . . . . OPERATING THE TELEPHONE ANSWERING DEVICE FROM A REMOTE LOCATION . . . . . . . . . . . . . . . . . . . . . SECURITY AND ACCESS FUNCTIONS . . . . . . . . . . . . . . . SETTING THE TAD ACCESS CODE . . . . . . . . . . . . . . . . CHANGING/DELETING THE TAD ACCESS CODE . . . . . . . . . ENABLING/DISABLING ACCESS TO THE TELEPHONE ANSWERING . . DEVICE IN LOCAL MODE . . . . . . . . . . . . . . . . . . . OPERATING THE TELEPHONE ANSWERING DEVICE FROM A SPECIAL FUNCTIONS OF THE TELEPHONE ANSWERING DEVICE TOLL SAVER . . . . . . . . . . . . . . . . . . . . . . . . . . OUTGOING MESSAGE ONLY . . . . . . . . . . . . . . . . . SILENT RECEPTION OF INCOMING MESSAGES . . . . . . . . . PRINTING THE TAD CONFIGURATION PARAMETERS . . . . . . . . . . . . . . . . . . . . . . . . . . . . . . . . . . . . . . . . . . . . . . . . . . . . . . . . . . . . . 7-11 7-12 7-12 7-13 7-13 7-14 8-2 8-2 8-2 MORE ADVANCED OPERATIONS . . . . . . . . . . . . . . . . . . . . 9-1 ADVANCED RECEPTION SETTINGS . . . . . . . . . . . . . . . . . REDUCING THE AREA OF A DOCUMENT RECEIVED . . . . . . . . . RECEIVING A DOCUMENT THAT IS LONGER THAN THE PAPER SIZE 9-2 9-2 USED . . . . . . . . . . . . . . . . . . . . . . . . . . . . . . 9-2 9-3 9-3 9-4 9-5 9-5 9-6 9-6 9-7 9-8 9-8 ENABLING/DISABLING SILENT RECEPTION . . . . . . . . . . . . DISPLAYING THE CALLER ID . . . . . . . . . . . . . . . . . . . CHANGING THE NUMBER OF RINGS . . . . . . . . . . . . . . CHANGING THE RING VOLUME . . . . . . . . . . . . . . . . . ENABLING/DISABLING RECOGNITION OF THE RING FREQUENCY CHANGING THE LENGTH OF THE ACOUSTIC SIGNAL . . . . . . CHANGING THE SILENCE LAPSE . . . . . . . . . . . . . . . . . CHANGING THE REMOTE CONTROL CODE . . . . . . . . . . . SETTING THE BLACK LIST . . . . . . . . . . . . . . . . . . . . MODIFYING THE BLACK LIST . . . . . . . . . . . . . . . . . . 4 CONTENTS 7-10 MAKING COPIES . . . . . . . . . . . . . . . . . . . . . . . . . . . . . . . . . 8-1 MAKING COPIES . . . . . . . . . . . . . WHAT DOCUMENTS CAN BE COPIED . MAKING A COPY . . . . . . . . . . . 9 7-9 7-9 7-10 7-10 REMOTE LOCATION . . . . . . . . . . . . . . . . . . . . . . . . . . 8 7-8 . . . . . . . . . . . . . . . . . . . . DELETING THE BLACK LIST PRINTING THE BLACK LIST . . . . . . . . . . . . . . . . . . . . . . . . . . . . . . . . . . . . . . . . . . . ADVANCED TRANSMISSION SETTINGS . . . . . . . . . . . . . CHANGING THE POSITION OF YOUR NAME AND FAX NUMBER HEARING THE LINE SIGNALS. . . . . . . . . . . . . . . . . . . REGULATING THE SPEAKER VOLUME . . . . . . . . . . . . . . REGULATING THE BUZZER VOLUME . . . . . . . . . . . . . . . ENABLING/DISABLING THE FLASH FUNCTION . . . . . . . . . . ENABLING/DISABLING ECM . . . . . . . . . . . . . . . . . . . . . . . . . . . . 9-8 9-9 9-9 9-9 9-10 9-10 9-10 9-11 9-12 10 PRINTING REPORTS AND LISTS . . . . . . . . . . . . . . . . . . . . 10-1 PRINTING REPORTS . . . . . . . . . . . . . . . . . . . . . READING THE REPORTS . . . . . . . . . . . . . . . . . . ENABLING/DISABLING THE AUTOMATIC PRINTING OF THE . . . . 10-2 10-2 TRANSMISSION AND FAILED TRANSMISSION REPORT . . . . 10-3 . . . . PRINTING THE TRANSMISSION, ACTIVITY, BROADCAST TRANSMISSION AND CALLER ID REPORTS ON REQUEST . . . PRINTING LISTS . PRINTING THE PRINTING THE PRINTING THE PRINTING THE PRINTING THE . . . . . . . . . . . . . . . . . . . . . . . . . . . LIST OF INSTALLATION PARAMETERS . . . . . . . . LIST OF SETUP PARAMETERS . . . . . . . . . . . . LIST OF RECEPTION SETUP PARAMETERS . . . . . . BLACK LIST NUMBERS . . . . . . . . . . . . . . . DATA SAVED IN THE PHONE BOOK . . . . . . . . 10-4 10-4 10-4 10-4 10-5 10-5 10-5 11 TROUBLESHOOTING GUIDE . . . . . . . . . . . . . . . . . . . . . . . 11-1 GENERAL . . . . . . . . . . . . . . . . . . . . . . . . . . . . . . . . . . . . . . . . . . . . . . . . . . . . . . . . 11-3 . . . . . . . . . . . . . . . . . . . . . . . . . . . . 11-4 MINOR PROBLEMS . ERROR CODES 11-2 SIGNALS AND MESSAGES . . . . . . . . . . . . . . . . . . . . . ACOUSTIC ERROR SIGNALS . OTHER ACOUSTIC SIGNALS . . . . . . . . . . . . . . . . . . . . . . . . . . . . . . . . . . . . . . . 11-5 11-5 11-6 CONTENTS 5 12 MAINTENANCE OPERATIONS. . . . . . . . . . . . . . . . . . . . . . 12-1 REPLACING THE PRINT CARTRIDGE . . . . . . . . . . . . . . . . CLEANING THE PRINT CARTRIDGE AND TESTING THE NOZZLES . . 12-5 . . . 12-6 . . . . . . . . . . . . . . . . 12-8 . . . . . . . . . . . . . . . . . . . . . . 12-11 CLEANING THE ELECTRICAL CONTACTS OF THE PRINT CARTRIDGE . . . . . . . . . . . . . . . . . . . . . . . . CLEANING THE OPTICAL READER . CLEANING THE CASING 12-2 REMOVING JAMMED DOCUMENTS . . . . . . . . . . . . . . . REMOVING JAMMED SHEETS OF PAPER . . . . . . . . . . . . . 12-11 12-12 APPENDIX . . . . . . . . . . . . . . . . . . . . . . . . . . . . . . . . . . . . . A-1 TECHNICAL SPECIFICATIONS . . . . . . GENERAL CHARACTERISTICS . . . . . COMMUNICATION CHARACTERISTICS POWER SUPPLY CHARACTERISTICS . . ENVIRONMENTAL CONDITIONS . . . . OPTICAL READER CHARACTERISTICS . TRANSMISSION CHARACTERISTICS . . RECEPTION CHARACTERISTICS . . . . MANUFACTURER . . . . . . . . . . . . . . . A-2 A-2 A-2 A-2 A-2 A-2 A-2 A-3 . . . . . . . . . . . . . . . . . . . . . . . . . . . A-4 CUSTOMER SERVICE 6 CONTENTS . . . . . . . . . . . . . . . . . . . . . . . . . . . . . . . . . . . . . . . . . . . . . . . . . . . . . . . . . . . . . . . . . . . . . . . . . . . . . . . . . . . . . . . . . . . . . . . . . . . . . . . . . . . . . . . . . . . . . . . . . . . . . . . . . . A-4 1BEFORE YOU START CONSULTING THE MANUAL ENVIRONMENTAL RECYCLING SAFETY PRECAUTIONS ABOUT THE INSTALLATION AND SETUP PARAMETERS BEFORE YOU START 1-1 CONSULTING THE MANUAL This manual describes two models of fax machine, the only difference between them being that one is equipped with a built-in telephone answering device and the other is not. In the description that follows, whenever a distinction is to be made between these two models, reference will be made to "Base model" and "Model with a built-in TAD". ENVIRONMENTAL RECYCLING The cardboard box, the plastic present in the package and the various parts of the fax machine may be recycled in accordance with the recycling regulations in force in your country. Information about Directive 2002/96/CE on the treatment, collection, recycling and disposal of electric and electronic devices and their components. FOR COUNTRIES IN THE EUROPEAN UNION (EU) The disposal of electric and electronic devices as solid urban waste is strictly prohibited: it must be collected separately. The dumping of these devices at unequipped and unauthorized places may have hazardous effects on health and the environment. Offenders will be subjected to the penalties and measures laid down by the law. a) b) To dispose of our devices correctly: Contact the Local Authorities, who will give you the practical information you need and the instructions for handling the waste correctly, for example: location and times of the waste collection centres, etc. When you purchase a new device of ours, give a used device similar to the one purchased to our dealer for disposal. The crossed dustbin symbol on the device means that: – when it to be disposed of, the device is to be taken to the equipped waste collection centres and is to be handled separately from urban waste; – Olivetti guarantees the activation of the treatment, collection, recycling and disposal procedures in accordance with Directive 2002/ 96/CE (and subsequent amendments). FOR OTHER COUNTRIES (NOT IN THE EU) The treatment, collection, recycling and disposal of electric and electronic devices will be carried out in accordance with the laws in force in the country in question. 1-2 BEFORE YOU START SAFETY PRECAUTIONS RISK OF AN ELECTRIC SHOCK • • • • • • • • • • Never attempt to repair the fax machine yourself. If you remove the casing, you risk getting an electric shock or suffering some other kind of injury. Repairs should be carried out by qualified technical staff only. During storms we recommend you unplug the device from both the power outlet and the telephone line so as to eliminate the risk of it being damaged by lightning. Never pour liquids on the fax machine and avoid exposing it to the damp. If liquids seep inside it, unplug it immediately from the mains power supply and the telephone line. Before using it again, have it repaired by qualified, technical staff. Do not use the fax machine outside in bad weather. Connect the fax machine exclusively to a certified wall power socket. To unplug the power cable from the wall power socket, remove the plug and refrain from yanking the cable. Never touch the power cable or plug with wet hands. Do not fold or squash the power cable. Keep it away from heat sources. Before cleaning the fax machine, unplug it from the wall power socket. Before using the fax machine, check that it has not been damaged or dropped. If it has, have it checked by a qualified engineer. RISK OF SUFFOCATION • The fax machine and its accessories are wrapped in plastic so do not let children play with the packaging material. RISK OF FIRE • If you are to leave the fax machine unused for a long period of time, you should disconnect it from the power supply: in this way, it will be protected against the risk of damage due to interference or power surges. RISK OF ACCIDENT • • • Place it on a stable, flat surface free of all vibrations so as to avoid drops that could cause damage to the machine and injury to persons. Lay the power cable so that it cannot be trodden on or tripped over. Never let children use or play with the fax machine. BEFORE YOU START 1-3 OPERATING PRECAUTIONS • • • • • • • Keep the fax machine in a dust-free place away from sources of water, steam and excessive heat. Do not expose it to direct sunlight. Ensure that no books, documents, or other objects obstruct normal ventilation in any way. Use the fax machine exclusively at a temperature of between 5 °C and 35 °C and a relative humidity of between 15% and 85%. Keep the fax machine away from other electrical and electronic appliances that may cause interference, e.g. radios, televisions, etc. If a voltage drop or power failure occurs, it will not be possible to make or receive telephone calls as the keypad will be disabled. In an emergency, if you wish to make a call, you must use a telephone certified by the telephone company, connecting it directly to the fax machine (in countries where this is allowed) or directly to the telephone wall socket. Leave enough room in front of the outlet from which documents and received/copied documents are unloaded, so that they do not fall on the floor. IMPROPER USE The fax machine was designed to send and receive documents and to copy paper documents. The machine may also be used as a telephone. All other uses are to be considered improper. In particular, it is never to be connected directly to an ISDN line and, if it is, the guarantee becomes null and void. ABOUT THE INSTALLATION AND SETUP PARAMETERS As the country default values for each installation and setup parameter may change due to certification requirements or specific customers’ needs, these values do not always correspond to those indicated in the manual: it is therefore advisable to print them before changing them (see chapter "Printing reports and lists"). 1-4 BEFORE YOU START 2GETTING TO KNOW THE FAX MACHINE CONSOLE EXTERNAL COMPONENTS INTERNAL COMPONENTS GETTING TO KNOW THE FAX MACHINE 2-1 CONSOLE 1 16 2 15 14 4 3 13 12 5 11 6 10 9 8 7 Ref. Description 1 A two-line liquid crystal display with a capacity of 16 characters per line. Shows operator prompts and error messages. 2 • • Adjusts the resolution of the documents to be sent and copied (only with the document inserted in the ADF). Puts the line on hold during a telephone conversation (with the handset raised). 3 Gives access to the Phone book. 4 Error LED indicator, signals an operating fault during transmission or reception. 5 • • 6 • • • • After the key has been pressed, turns the speaker volume "up" or "down". Gives access to the SMS menu and its functions. Dial the fax or telephone number. If held down for more than one second, they automatically dial (once set) the telephone number or fax number assigned to them. Enter numeric data. Select digits and alphanumeric characters during the entry of numbers and names. 2-2 GETTING TO KNOW THE FAX MACHINE Ref. Description 7 • • With tone dialling, they send a tone down the line for special network services. They scroll "backwards" and "forwards" through characters and special symbols during the entry of names. 8 With the handset lifted, gives access to the special functions made available by the network manager and commonly known as REGISTER RECALL (R function). With the fax machine connected to a private exchange: When pressed before the telephone or fax number is dialled, it enables a call to be made on the public line (if the output mode is Flash and if the fax machine was programmed appropriately). 9 When pressed before dialling a number, it enables you to switch from pulse dialling to tone dialling. 10 • 11 Blinking, indicates that the memory contains documents that have not been printed. Off, indicates that the memory is empty. They scroll cyclically forwards or backwards through the functions and related parameters on the menu. • Move the cursor to the "right" and to the "left" while entering numbers and names. Model with a built-in TAD only • Used to perform TAD functions. See the corresponding chapter. Model with a built-in TAD only On, indicates that there are messages or memos in the memory that have already been played. Blinking, indicates that the memory contains documents that have not been printed, messages or memos that have not been played. Off, indicates that the memory is empty. 12 • • Gives access to the menu and its functions. Inserts a pause during the dialling of the telephone or fax number. 13 • • • Deletes incorrect settings from the display. During the function programming phase, it moves one function back. Displays a list of the last 10 fax or telephone numbers dialled (outgoing calls) or the last 20 numbers from which calls have been received and not answered (incoming calls), irrespective of whether or not a document was present in the ADF. 14 Used to dial a telephone or fax number without lifting the telephone handset. GETTING TO KNOW THE FAX MACHINE 2-3 Ref. Description 15 • • In "MANUAL" and "PHONE/FAX" reception modes, starts receiving a document. After the fax number has been dialled, starts sending a document (only with the document inserted in the ADF). Confirms the selection of menus, submenus, parameters and their values and moves on to the next condition. Starts copying a document (only with the document inserted in the ADF). • • Unloads a document from the ADF. Turns off the LED indicator. • • Returns the fax machine to the stand-by mode. Stops the programming, transmission, reception or copying operation in progress. • • 16 EXTERNAL COMPONENTS 9 1 LINE EXT. 2 3 8 7 5 6 2-4 GETTING TO KNOW THE FAX MACHINE 4 Ref. Description 1 Paper support extension 2 Plain paper feed compartment (ASF). Maximum capacity: 40 sheets (80 gr/m2). 3 Automatic feeder for documents to be sent and copied (ADF). Maximum capacity: 10 sheets of A4 size paper (80 gr/m2). 4 Operator console 5 Display, consists of two lines of 16 characters each. It shows the date and time, menu items, error messages, resolution and contrast values. 6 Received or copied document output 7 Built-in telephone handset 8 Speaker 9 Connection sockets INTERNAL COMPONENTS 1 3 2 GETTING TO KNOW THE FAX MACHINE 2-5 Ref. Description 1 Machine serial number plate (see base) 2 Cartridge compartment 3 Optical reader 2-6 GETTING TO KNOW THE FAX MACHINE 3INSTALLATION INSTRUCTIONS PACKAGE CONTENTS INSTALLATION CONDITIONS CONNECTING TO THE TELEPHONE LINE AND POWER SUPPLY SETTING SOME PARAMETERS SETTING UP THE FAX MACHINE PRINTING THE MENU AND ITS FUNCTIONS INSTALLATION INSTRUCTIONS 3-1 PACKAGE CONTENTS In addition to the fax machine and this manual, you will find the following items in the package: • • • • • • • The paper support extension. The cable for connecting the fax machine to the telephone line. The power cable The telephone plug (if applicable). The box containing a free monochrome print cartridge provided with the machine. The telephone handset. Aftersales support information. Warning: The use of non-original or refilled print cartridges makes the product's guarantee null and void. INSTALLATION CONDITIONS Place the fax machine on a stable, flat surface. Make sure there is enough room for ventilation. Keep the fax machine in a dust-free place away from sources of excessive heat or humidity. Do not expose it to direct sunlight. CONNECTING TO THE TELEPHONE LINE AND POWER SUPPLY CONNECTING THE TELEPHONE HANDSET 1. Insert the connector of the handset cable into the socket marked with the symbol on the rear of the fax machine. 3-2 INSTALLATION INSTRUCTIONS 2. Place the handset in its seat. CONNECTING THE FAX MACHINE TO THE TELEPHONE LINE 1. Insert the plug on the cable for connection to the telephone line into the "LINE" socket on the rear of the fax machine (A). 2. Insert the connector or the plug (if applicable) at the other end of the cable into the wall telephone line socket (B). (B) (A) CONNECTING AN EMERGENCY TELEPHONE (IN THE EVENT OF A VOLTAGE DROP OR POWER FAILURE) 1. Remove the cover from the socket for connection to the external line and then insert the plug of the emergency telephone in this socket. EXT. Warning: In countries where this kind of connection is not allowed (for example, Germany and Austria), connect the emergency telephone directly to the telephone wall socket. INSTALLATION INSTRUCTIONS 3-3 CONNECTING THE FAX MACHINE TO THE POWER SUPPLY 1. Insert the female connector at one end of the power cable into the male connector on the rear of the fax machine (A). Then insert the plug at the other end of the cable into the wall power socket (B). (B) (A) Note: The plug of the power supply cable may vary from country to country. SETTING SOME PARAMETERS Once the fax is connected to the power supply, it automatically runs a short test to check that its components are working and the display may show: – the language in which the messages will be displayed or – the message automatic 00 ( automatic in the base model) and, alternating on the second line, the messages set date/time and check cartridge . In the first case, to enable the fax machine to work properly, you must set the language and country in which it is to be used as described in the procedure below. In the second case, you can move on to set the date and time directly. SETTING THE LANGUAGE AND THE COUNTRY OF DESTINATION 1. To select the desired language, press the 2. To confirm the setting, press the 3. To select the desired country, press the keys. key. keys. To select a different country, see the following table: Country Country to be selected Argentina ARGENTINA Australia AUSTRALIA Austria ÖSTERREICH Belgium BELGIUM Brazil BRASIL Chile AMERICA LATINA 3-4 INSTALLATION INSTRUCTIONS Cont. Country China 4. Country to be selected CHINA Colombia AMERICA LATINA Denmark DANMARK Finland SUOMI France FRANCE Germany DEUTSCHLAND Holland NEDERLAND Irlanda IRELAND Italy ITALIA Luxembourg BELGIUM Mexico AMERICA LATINA New Zealand AUSTRALIA Norway NORGE Peru AMERICA LATINA Portugal PORTUGAL Rest of world INTERNATIONAL Spain ESPAÑA Sweden SVERIGE Switzerland SWITZERLAND UK U.K. Uruguay AMERICA LATINA Venezuela AMERICA LATINA To confirm the setting, press the key. The fax machine automatically returns to its initial stand-by mode. Note: The fax machine may not be on sale in all of the countries listed above. CHANGING THE LANGUAGE AND THE COUNTRY OF DESTINATION Press + and repeat the procedure "Setting the language and the country of destination" from the start remembering always to confirm, by pressing the key, the settings made. CHANGING THE COUNTRY ONLY 1. Press the 2. Press the 3. Press the 4. Press the key. keys until the display shows installation . key. keys until the display shows country set-up . INSTALLATION INSTRUCTIONS 3-5 5. Press the key. The display shows the default country. 6. To display the other available countries, press the 7. 8. 9. key. To confirm your choice, press the To return the fax machine to its initial stand-by mode, press the If you want to move back one function, press the key. keys. key. CHANGING THE LANGUAGE ONLY 1. Press the 2. Press the key. keys until the display shows installation . 3. Press the 4. Press the key. 5. Press the 6. To display the other available languages, press the 7. To confirm your choice, press the 8. To return the fax machine to its initial stand-by mode, press the 9. If you want to move back one function, press the keys until the display shows language . key. The display shows the default language. keys. key. key. key. SETTING THE DATE AND TIME FOR THE FIRST TIME The first time you connect the fax machine to the power supply or whenever there is a power failure you must set the date and time as described below. The date and time will be printed at the top of all documents sent and will be shown on the display when the fax is in stand-by mode. Once set, the date and time can be changed at any time. You can also modify the format in which they are shown on the display, see "Changing the date and time". The display shows automatic 00 ( automatic in the base model) on the first line and set date/time on the second line. 1. Press the 2. Press the key. key. The display shows set date/time where XX-XX-XX XX:XX indicate XX-XX-XX XX:XX 3. the date and time shown on the display for the first time having connected the fax machine. To enter the new date and time (e.g. 10-05-08; 12:25), press the keys. As each digit is entered, the cursor will move to the next one. 4. If you wish to move the cursor to digits to be modified, press the 5. Then overwrite the digits with the correct ones, by pressing the 6. To confirm the setting, press the initial stand-by mode. Note: keys. - keys. key. The fax machine automatically returns to its Stand-by mode is the status in which the fax machine is idle and is the mode in which the machine can be programmed. Stand-by mode will be shown on the display as follows: 3-6 INSTALLATION INSTRUCTIONS - Without the original document inserted in the ADF. For the model with a built-in TAD: automatic 00 10-may-08 12:25 For the base model: automatic 10-may-08 12:25 - With the original document inserted in the ADF. document ready normal CHANGING THE DATE AND TIME If the date and time shown on the display are not correct, you can change them at any time. Bear in mind that if you have the caller ID function enabled, the date and time will be automatically brought up to date whenever you receive a call. 1. Press the 2. Press the 3. Press the key. 4. Press the key to select date and time . 5. At this point, you can choose between the following options: SET DATE/TIME - To modify the date and time set previously. DATE FORMAT - To choose the date format that will be shown on the display. HOUR FORMAT - To choose the time format that will be shown on the display. Press the key. The display shows set date/time where xx-xx-xx xx:xx indicate 6. key. keys until the display shows fax set-up . the current date and time. xx-xx-xx xx:xx 7. To display one of the options listed above, press the 8. To confirm the setting, press the 9. If you have made a mistake or wish to abort the procedure in progress, press the key. SET keys. key. DATE/TIME OPTION 1. If you have chosen the SET DATE/TIME option, proceed as follows: Enter the new date and time (e.g. 13-05-08; 18:00), by pressing the As each digit is entered, the cursor will move to the next one. 2. If you wish to move the cursor to digits to be modified, press the 3. Then overwrite the digits with the correct ones, by pressing the 4. To confirm the setting, press the 5. To return the fax machine to its initial stand-by mode, press the 6. If you want to move back one function, press the - keys. keys. - keys. key. key. key. INSTALLATION INSTRUCTIONS 3-7 DATE FORMAT OPTION 1. If you have chosen the DATE FORMAT option, proceed as follows: The display shows DATE FORMAT and DD/MM/YY . 2. If you want to select a different format from the one displayed, press the 3. To confirm the setting, press the 4. To return the fax machine to its initial stand-by mode, press the 5. If you want to move back one function, press the HOUR/FORMAT key. key. key. OPTION 1. 2. If you have chosen the hour format option, proceed as follows: The display shows hour format and 24 hours . If you want to select a different format from the one displayed, press the 3. To confirm the setting, press the 4. To return the fax machine to its initial stand-by mode, press the 5. If you want to move back one function, press the Note: 1 keys. key. key. key. If you have chosen the 12-hour time format, the display will show the letter "p" (post meridiem) or the letter "a" (ante meridiem). To switch from one format to the other: Repeat the procedure until the message date and time - set date/time appears key. and then press the 2 Position the cursor, using the 3 Press the keys, below the letter to be modified. keys. SWITCHING FROM A • • keys. PUBLIC LINE TO A PRIVATE LINE (PBX) The fax machine is set up for connection to a public line but you can connect it to a private line and use it on a public line, too. To do this, proceed as follows: Select the private (PBX) parameter. Set the same dialling mode (tone or pulse) as the one used by the private telephone exchange that manages the line to which you have connected the fax machine. If in doubt about the choice to be made, ask the company that manages your private telephone network. Switching from the public line to the private line: 1. Press the 2. Press the 3. Press the 4. Press the 5. Press the key. 6. Press the key. key. keys until the display shows installation. key. keys until the display shows tel.line setup . 3-8 INSTALLATION INSTRUCTIONS 7. To view the available option line type - public (PSTN) or line type - private (pbx) , press the keys. 8. To confirm the setting, press the 9. To return the fax machine to its initial stand-by mode, press the 10. If you want to move back one function, press the key. key. key. Modifying the dialling mode (only enabled in some countries): 1. Press the 2. Press the 3. Press the 4. Press the keys 5. Press the 6. Press the 7. Press the 8. To view the available option dial mode - pulse or dial mode - tone , press the key. keys until the display shows installation . key. until the display shows tel.line setup . key. keys until the display shows: dial mode . key. keys. 9. To confirm the setting, press the key. 10. To return the fax machine to its initial stand-by mode, press the 11. If you want to move back one function, press the key. key. SETTING YOUR NAME AND FAX NUMBER Once set, the name (max. 16 characters) and number (max. 20 digits) will remain unchanged until they are intentionally changed and will be printed on each page received by your correspondent's fax machine. Setting your name: 1. Press the 2. Press the 3. Press the key. 4. Press the key to select station name . key. keys until the display shows installation . To: select the characters of each key cyclically, press the keys. keys. Leave a space, press the Move the cursor under the first character of the name, press the key. - Move the cursor after the last character in the name, press the key. - Include a variety of special symbols, e.g. &, in your name, press the keys. - INSTALLATION INSTRUCTIONS 3-9 - - Insert a character in the name, move the cursor to the point where you want to insert the new character, by pressing the keys and then type the character you want to add. Delete incorrect characters, move the cursor to the right of the incorrect keys and then press the character by pressing the 5. key. key. To delete the whole name, hold down the To confirm the name, press the key. Setting your fax number: 1. Press the 2. Press the 3. Press the 4. Press the 5. Press the 6. To enter your fax number, press the 7. To leave a space, press the key. keys until the display shows installation . key. keys until the display shows station number . key. - keys. keys. If you make any typing errors, correct them in the same way as for your name. If you want to include the international code in your number, instead of the zeros, press the key; the display will show the symbol "+". 8. To confirm the fax number, press the key. 9. To return the fax machine to its initial stand-by mode, press the 10. If you want to move back one function, press the key. key. Positioning your name and fax number: The information at the top of the document to be sent (name, fax number, date and time and number of pages) may be received by your correspondent's fax machine: outside the text area or inside the text area. Your fax machine is designed to send this information inside the text area. Changing the position: 1. Press the 2. Press the 3. Press the 4. Press the 5. Press the 6. Press the key. keys until the display shows fax set-up . key. keys until the display shows various sett . key. 3-10 INSTALLATION INSTRUCTIONS keys until the display shows fax header . 7. Press the key. 8. To select the INSIDE or OUTSIDE parameter, press the 9. To confirm the setting, press the 10. To return the fax machine to its initial stand-by mode, press the 11. If you want to move back one function, press the keys. key. key. key. SETTING UP THE FAX MACHINE FEEDING THE PRINT PAPER INTO THE MACHINE 1. Push the paper support extension in the slot until it clicks into position. 2. Holding the sheets by their upper edge, insert them by letting them "drop" into the ASF without folding or forcing them. Note: If you add sheets (max. 40) to the ASF, make sure you place them under and not on top of those already present. The fax machine has a memory that enables it to receive up to 50 pages (base model only) even if you do not add any paper; for the model with a built-in telephone answering device only, the capacity may be less than 50 pages according to the duration of the messages recorded on the telephone answering device. INSTALLATION INSTRUCTIONS 3-11 INSERTING THE PRINT CARTRIDGE Warning: The fax machine comes with a free starter cartridge which may, however, only be used once. If you reinsert it after the ink out message has been displayed, the following message will appear: beware! cartridge already used! the cartridge may only be used once. 1. Remember only to use original cartridges (see code printed at the end of the manual). Non-original or refilled cartridges are not to be used. The use of such cartridges makes the product's guarantee null and void. If, after the cartridge has been installed, the check cartridge message appears again, try removing it and then reinserting it, pressing it more firmly into position. If the message remains on the display, remove the cartridge and clean the electrical contacts of the cartridge and the carriage, see the "Cleaning the electrical contacts of the print cartridge" section of the "Maintenance operations" chapter. Lower the handset and place it on a stable surface. 2. Lift the operator console as indicated by the arrow. 3-12 INSTALLATION INSTRUCTIONS 3. Take the cartridge out of its package and, holding it on both sides, peel off the film covering the nozzles. 4. Insert the cartridge in its compartment with the electrical contacts facing towards the print cartridge compartment. 5. Push the cartridge until it clicks into place. Note: The free cartridge provided with the machine allows you to print up to 60 pages*, whereas the cartridges that you will buy subsequently have a greater capacity and will thus allow you to print up to 300 pages*. *Based on Test Chart ITU-TS n.1 (black coverage = 3,8%). Once the cartridge has been inserted, the operator console closed and the handset replaced, the fax machine starts the nozzle cleaning and checking procedure. When the display shows set date/time : xx-xx-xx xx:xx INSTALLATION INSTRUCTIONS 3-13 1. Enter the new date and time (eg. 13-05-08; 18:00) by pressing the 2. . and then press When the display shows confirm d/t , press the • • 1. 2. • • - keys key to confirm the data entered key to make any modification. or press the The procedure is completed by: the printing, on the sheet loaded automatically, of a diagnostic test sheet containing: a numbered scale, for checking the flow of ink and the electrical circuits of the cartridge nozzles. a group of graphics and text, so that the printing quality may be evaluated. the display of the message: check print out , 1=exit 0=repeat . Examine the print test sheet as follows: Check that the numbered scale is not broken at any point and that the black areas do not present any horizontal white lines: if these conditions, which confirm that the cartridge has been inserted correctly and is working properly, are respected, set the value 1. The fax machine returns to its initial stand-by mode and is ready for use. The display shows AUTOMATIC 00 ( AUTOMATIC on the base model) on the first line and the current date and time on the second line. On the other hand, if there are any breaks or white lines present, set 0 to clean the nozzles again: if the new print test continues to be unsatisfactory, repeat the procedure another time. At this point: if the printing quality still does not meet your expectations, clean the electrical contacts as indicated in the "Cleaning the electrical contacts of the print cartridge" section of the "Maintenance operations" chapter. if the printing quality is satisfactory, set the value 1. The fax machine returns to its initial stand-by mode and is ready for use. Warning: When the cartridge is about to run out of ink, the display shows CARTRIDGE LOW and the fax machine prints, on a sheet loaded automatically, the indication that the ink is about to run out. When there is no ink left, the display shows CHANGE CARTRIDGE . To replace the cartridge, see chapter "Maintenance operations". When buying new print cartridges, use the related code at the end of the manual. PRINTING THE MENU AND ITS FUNCTIONS As it is always useful to have the menu structure and its functions close at hand, it is suggested that you print it out. key. 1. Press the 2. Press the 3. To confirm the setting, press the key. Having printed the report, the fax machine automatically returns to its initial stand-by mode. 3-14 INSTALLATION INSTRUCTIONS keys until the display shows PRINT FUNC.LIST. 4FAX TRANSMISSION AND RECEPTION OPERATIONS SENDING A DOCUMENT RECEIVING A DOCUMENT RECEIVING A DOCUMENT IN POLLING MODE FAX TRANSMISSION AND RECEPTION OPERATIONS 4-1 SENDING A DOCUMENT WHAT DOCUMENTS MAY BE • • • Dimensions Width 210 mm Length min. 105 mm - max. 600 mm Unit weight 70 - 90 gr/m2 (max. 10 sheets) For documents of different sizes from those specified above, photocopy the original onto A4 sheets or another supported format and send the copy. NEVER • • • • • • • USED USE curled paper excessively thin paper torn paper damp or set paper excessively small paper crumpled paper carbon paper In addition, in order to avoid damaging your fax machine and invalidating your guarantee, make sure that the documents you are to use do not contain: • • • • staples paper clips adhesive tape correcting liquid or glue that has not yet dried. In all these cases, photocopy the document and send the copy. PLACING THE DOCUMENT IN THE ADF 1. Place the document in the automatic document feeder (ADF) with the side to be sent face down (A). Place the document against the right-hand side of the feeder (B): see the mark printed on the fax machine's casing. (A) 4-2 FAX TRANSMISSION AND RECEPTION OPERATIONS (B) 2. Once the document has been inserted in the automatic document feeder (ADF), the display shows on the top line document ready and on the bottom line, the default contrast value NoRMAL . Note: If you do not perform any operation within about two minutes of inserting the document in the automatic document feeder (ADF), the fax machine will automatically unload the document from the feeder. ADJUSTING THE CONTRAST AND RESOLUTION Before sending a document you can make some adjustments so as to optimize the printing quality. ADJUSTING THE CONTRAST 1. Press the key. 2. Press the 3. Press the 4. Press the keys until the display shows: fax set-up . key. keys until the display shows: various sett. . 5. Press the 6. Press the key. 7. Press the 8. To view the available options, contrast - normal, contrast - dark and contrast - light , press the keys. 9. To confirm your choice, press the 10. To return the fax machine to its initial stand-by mode, press the 11. If you want to move back one function, press the • • • The contrast should be regulated on the basis of the following criteria: NORMAL, if the document is neither very light nor very dark. LIGHT, if the document is dark. DARK, if the document is light. keys until the display shows: contrast . key. ADJUSTING THE key. key. key. RESOLUTION The document must be present in the automatic document feeder (ADF). 1. Press the key until the desired resolution value appears on the display. The resolution should be regulated on the basis of the following criteria: • STD (STANDARD), if the document contains easily legible characters. An "arrow" • appears on the bottom line of the display in line with the symbol printed on the console. FINE, if the document contains very small characters or drawings. An "arrow" appears on the bottom line of the display in line with the console. symbol printed on the FAX TRANSMISSION AND RECEPTION OPERATIONS 4-3 • HALF TONES, if the document contains shaded areas. An "arrow" in line with the symbol and an "arrow" in line with the on the bottom line of the display. symbol printed on the console appear SENDING A DOCUMENT 1. 2. 3. Insert the document in the automatic document feeder (ADF). The default contrast value is displayed on the bottom line. The initial resolution value is: (standard). If you want, change the contrast and resolution values as described previously. To dial the number of the correspondent to whom you wish to send the document, keys. press the To start sending the document, press the key. If the document is sent correctly, once this operation has been completed, the display will show the message tx completed for a moment. Note: To delete an incorrect digit, move the cursor, using the right of the incorrect digit and press the Note: Note: key; if you want to delete key for a few seconds. the whole number, hold down the If you want, you can dial the correspondent's number from the phone book, see "Programming the phone book" and "Sending a document using the quickest method". If you want to abort the transmission in progress, press the key. The fax machine unloads the document from the ADF and returns to its initial stand-by mode. If the document to be removed consists of more than one sheet, before pressing HEARING 1. keys, to the to unload the first, remove all the others by hand. THE DIALLING TONE WHEN SENDING A DOCUMENT Insert the document in the automatic document feeder (ADF). The display shows on the top line DOCUMENT READY and on the bottom line the default contrast value NORMAL . The initial resolution value is (standard). If you want, change the contrast and resolution values as described previously. 2. 3. 4. To hear the dialling tones, press the key. The display shows ON LINE and the length of the transmission in minutes and seconds in the top right-hand corner. To dial the number of the correspondent to whom you wish to send the document, press the keys. As soon as you hear the tone of your correspondent's fax machine, press the key. Transmission is started. If the document is sent correctly, once this operation has been completed, the display will show the message tx completed for a moment. 4-4 FAX TRANSMISSION AND RECEPTION OPERATIONS SENDING A DOCUMENT WITH THE RECEIVER RAISED 1. Insert the document in the automatic document feeder (ADF). The display shows on the top line document ready and on the bottom line the default contrast value normal . The initial resolution value is (standard). If you want, change the contrast and resolution values as described previously. 2. Lift the receiver to engage the line ( ) The display shows on line and the length of the transmission in minutes and seconds in the top right-hand corner. To dial the number of the correspondent to whom you wish to send the document, 3. 4. press the keys. If your correspondent's fax machine is set up for automatic reception, you will hear the fax machine signal. If it is set up for manual reception, the correspondent himself will answer so you can ask him to press the start key on his fax machine, after which you will hear the fax machine signal. To start sending, press the key. If the document is sent correctly, once this operation has been completed, the display will show the message tx completed for a moment. AUTOMATIC REDIAL If no connection is established due to line errors or because the correspondent's number is busy, the fax machine automatically redials the number of times laid down by the legislation in your country. SENDING A DOCUMENT TO SEVERAL CORRESPONDENTS The fax machine's memory allows you to send a document (even at a preset time: "Delayed transmission") to several correspondents (max. 10): "Broadcast transmission". See the following section "Sending a document from the memory". SENDING A DOCUMENT FROM THE MEMORY 1. Insert the document in the automatic document feeder (ADF). The display shows on the top line DOCUMENT READY and on the bottom line the default contrast value (standard). normal . The initial resolution value is If you want, change the contrast and resolution values as described previously. key. 2. Press the 3. Press the 4. Press the key. 5. Press the document. key to select new setting . The fax machine starts to save the 6. When prompted, type the time at which you wish to send the document, for example keys until the display shows TX FROM MEMORY . "16:50", by pressing the 7. - keys. Confirm both the current time and the time set in step 6, by pressing the key. FAX TRANSMISSION AND RECEPTION OPERATIONS 4-5 8. Type your correspondent's number directly on the numeric keypad, by pressing 9. keys. the If you like, you can find your correspondent's number in the phone book (see "Programming the phone book" further on). To do this: 1 Press the 2 Press the key. keys to find the desired number. 11. 12. or Press the key bearing the first letter of the name you are looking for. The fax machine will search for the name in alphabetical order. Press the key. The fax machine prompts you to enter another number. If you want to send the document to more than one correspondent, repeat the previous two steps once for each correspondent. If, instead, you want to send the document to one correspondent only, move straight on to the next step without typing any numbers. Press the key. To view the available option PRINT SETTINGS - YES , press the keys. 13. To confirm your choice, press the 14. To view the available option CONFIRM SETTINGS - no , press the 15. To confirm your choice, press the 1 10. key: keys. key. If you chose CONFIRM SETTINGS - YES , the fax ends the procedure and the display shows the messages AUTOMATIC 00 on the first line ( AUTOMATIC on the base model) and TX FROM MEMORY on the second line. If you chose CONFIRM SETTINGS - NO , the fax allows you to modify the previous settings, for example: the correspondent's number or the time at which you want to send the document. Note: If there is a power failure, the transmission from the memory will be cancelled. CHANGING/REPEATING/DELETING A TRANSMISSION FROM THE MEMORY THAT IS ALREADY SET 1. Press the 2. Press the 3. Press the 4. Press the key. keys until the display shows tx from memory . key. keys until the display shows change . You can choose any of the following options: tx from memory - change - To change the correspondent's number or the time at which you want to send the document. tx from memory - PRINT settings - To print the memory transmission parameters only. When it has finished printing, the fax machine returns automatically to its initial stand-by mode. tx from memory - DELETE - To clear the setting. The fax machine returns to its initial stand-by mode. 4-6 FAX TRANSMISSION AND RECEPTION OPERATIONS 5. To view the available options, press the 6. To confirm your choice, press the keys. key. If you chose tx from memory - change , follow the procedure described in "Sending a document from the memory" from step 6. RECEIVING A DOCUMENT • • • • You can set up the fax machine to receive the documents sent by your correspondents in four separate modes: Manual reception, for all occasions in which you are present and you can therefore answer the calls yourself. Automatic reception, for all occasions in which you are out but want to receive documents anyway. This is the mode originally set on your fax machine. Automatic reception with recognition of the type of call. In this reception mode, after a given number of rings (default setting: 2 rings), the fax machine connects to the telephone line and is capable of recognizing whether the incoming call is a fax call or a telephone call. Reception with telephone answering device (only the model with a built-in telephone answering device). In this reception mode, the TAD receives the calls, records any messages left by the correspondent and, if he wants to send you a document, enables the fax machine to receive it. See chapter "The telephone answering device". CHOOSING THE RECEPTION MODE 1. Press the key. 2. Press the key. 3. Press the key again. The display shows the message reception mode . 4. To view the available options reception mode - automatic , reception mode - manual , reception mode - phone/fax and reception mode - tad/fax (only the model with a built-in telephone answering device), press the keys. 5. To confirm the setting, press the 6. To return the fax machine to its initial stand-by mode, press the 7. If you want to move back one function, press the Note: key. key. key. To activate reception with TAD mode, you must first record the OUTGOING MESSAGE 1 (see chapter "The telephone answering device"). FAX TRANSMISSION AND RECEPTION OPERATIONS 4-7 RECEIVING DOCUMENTS IN THE VARIOUS RECEPTION MODES MANUAL RECEPTION 1. 2. When the telephone rings, lift the handset ( ) to engage the line. As soon as you hear the fax machine signal or if the correspondent asks you to receive a document, press the 3. key. ). The fax machine starts to receive and the display shows some Hang up ( information about the reception in progress, including your correspondent's fax number or, if programmed, his name. Once the document has been received, the display shows the message rx completed for a few seconds and then the initial stand-by mode. AUTOMATIC RECEPTION After two rings, the fax machine prepares to receive a document. The document is received as in manual reception mode. AUTOMATIC RECEPTION WITH RECOGNITION OF THE TYPE OF CALL The action taken by the fax machine in this reception mode depends on who is calling: If the caller is another fax machine, after two rings your fax machine automatically prepares to receive a document. If the caller is a telephone, after two rings, the fax machine emits an acoustic signal for about 20 seconds and the display shows lift handset . If you do not lift the handset within 20 seconds, the fax machine automatically prepares to receive a document. If you lift the handset before the fax machine connects to the telephone line and you hear the dialling tone, proceed as follows: 1. Press the key. 2. Hang up ( ). Note: Any kind of reception may be stopped by pressing the machine then returns to its initial stand-by mode. key. The fax RECEIVING A DOCUMENT IN POLLING MODE FIRST OF ALL, WHAT POLLING IS • • It is a transmission request that a fax machine makes to another fax machine so that the latter sends the document requested automatically. There are two main characteristics of communication using the polling method: the user who is to receive the document requests transmission. In other words, a user may connect to another fax machine and request it to send a document (specially prepared) to him, even when the user at the other end of the line is out. the transaction is paid for by the person who requested transmission (that is, the user who receives the document) and not the person whose fax machine sends the document. 4-8 FAX TRANSMISSION AND RECEPTION OPERATIONS MAKING A TRANSMISSION REQUEST (POLLING RECEPTION) Arrange with your correspondent the time at which you intend to make the transmission request so that he has time to put the document to be sent in his fax machine. Then set up your fax machine to receive the document, by programming the dialling mode to be used to call your correspondent and the time at which you wish to receive the document. 1. Press the 2. Press the 3. Press the key. 4. Press the key to select new setting . key. keys until the display shows POLLING RX . At this point, you can confirm the current time or overwrite the time with the correct one. - keys. 5. To overwrite the new time, press the 6. To confirm both the current time and the new time, press the 7. Type your correspondent's number directly on the numeric keypad. - To do this, press the 8. 9. key. keys. If you like, you can find your correspondent's number in the phone book (see "Programming the phone book"). To do this: 1 Press the key. 2 Press the 1 or Press the key bearing the first letter of the name you are looking for. The fax machine will search for the name in alphabetical order. 2 To confirm the setting, press the keys to find the desired number. key. The fax machine shows the message POLL SET for a few seconds and then returns automatically to its initial stand-by mode. The second line of the display shows POLL RX 18:20 . CHANGING A POLLING RECEPTION THAT HAS BEEN SET 1. Press the 2. Press the key. 3. Press the 4. Press the 5. Press the 6. From this point on, follow the procedure described in "Making a transmission request (polling reception)" from step 5. keys until the display shows POLLING RX . key. keys until the display shows CHANGE . key. FAX TRANSMISSION AND RECEPTION OPERATIONS 4-9 DELETING A POLLING RECEPTION THAT HAS BEEN SET 1. Press the key. 2. Press the 3. Press the 4. Press the 5. Press the 6. To view the available options DELETE? - YES or no , press the 7. To confirm your choice, press the keys until the display shows POLLING RX . key. keys until the display shows DELETE . key. keys. key. Polling reception is cancelled automatically and the fax machine returns automatically to it initial stand-by status. 4-10 FAX TRANSMISSION AND RECEPTION OPERATIONS 5PHONE BOOK PHONE BOOK PHONE BOOK 5-1 PHONE BOOK The fax can also store 100 numbers and associate a name to them, thus creating an electronic diary which not only saves time but also eliminates the risk of making mistakes in dialling numbers. The telephone number or fax number that you associated with each of the first 10 numeric keys (0 - 9) may be dialled quickly simply by pressing and holding down the relevant key for more than a second. Each number in the phone book may be assigned one of the 4 ring tunes to make it even easier to recognize the caller (for all new numbers added, the default ring tune is number 1). PROGRAMMING THE PHONE BOOK 1. Press the key. 2. Press the key until the display shows phone book . 3. Press the key. 4. Press the key to select new number . 5. Choose the position where you want to save the telephone number or fax number, for example: 01. To do this, press the - keys. 6. 7. To confirm the setting, press the key. Dial your correspondent's telephone number or fax number. To do this, press the 8. keys. To leave a space, to correct typing mistakes or to enter characters or special symbols, proceed as explained in "Setting your name and fax number". 9. To confirm the setting, press the 10. Enter the correspondent's name (max. 16 characters) as you did for your name (see "Setting your name and fax number"). 11. To confirm the setting, press the 12. To view the other available ring types ring type 2 , ring type 3 or ring type 4 , press the keys. key. key. When switching from one ring tune to another, the fax machine plays the first few seconds of the tune. 13. To confirm the setting, press the key. At this point, you can terminate the procedure or you can program another number. 14. To abort the procedure, press the 15. To program other numbers, repeat the procedure from step 4. 16. If you want to move back one function, press the 5-2 PHONE BOOK key. key. MODIFYING A NUMBER FROM THE PHONE BOOK 1. Press the key. 2. Press the 3. Press the key. 4. Press the keys until the display shows modify . 5. To confirm the setting, press the key. The display shows the number and the name associated with the first of the 100 available positions (00-99) saved previously. To find the telephone number or name you want to modify, you can: 1 Press the keys until the desired number or name appears on the display. or 2 Press the key bearing the first letter of the name you are looking for. The fax machine will search for the name in alphabetical order. To confirm the setting, press the key. From this step on, to modify the number, repeat the procedure "Programming the phone book" from step 7. 6. 7. key until the display shows phone book . DELETING A NUMBER FROM THE PHONE BOOK 1. Press the 2. Press the keys until the display shows phone book . 3. Press the key. 4. Press the keys until the display shows delete . 5. 7. To confirm the setting, press the key. The display shows the number and the name associated with the first of the 100 available positions (00-99) saved previously. To find the telephone number or name you want to delete: 1 Press the keys until the desired number or name appears on the display. or 2 Press the key bearing the first letter of the name you are looking for. The fax machine will search for the name in alphabetical order. Press the key. 8. To view the available option delete? yes or no , press the 9. To confirm the setting and delete the number, press the 6. key. keys. key. At this point, you can terminate the procedure or delete another number. 10. To abort the procedure, press the 11. 12. To delete other numbers, repeat the procedure from step 5. If you want to move back one function, press the key. key. PHONE BOOK 5-3 PRINTING DATA FROM THE PHONE BOOK 1. Press the key. 2. Press the 3. Press the key. 4. Press the keys until the display shows PRINT PHONE B. 5. To confirm the setting, press the key. Having printed the report, the fax machine automatically returns to its initial stand-by mode. keys until the display shows phone book . SENDING A DOCUMENT USING THE PHONE BOOK SEARCH FUNCTION 1. If you cannot remember the position with which you associated a given number, you can send the document from the phone book as follows: Insert the document in the automatic document feeder (ADF). The display shows on the top line DOCUMENT READY and on the bottom line the default contrast value NORMAL . The initial resolution value is: (standard). If you want, change the contrast and resolution values as described previously. 2. 3. 4. Press the key. The display shows the fax number or telephone number and the name associated with the first of the 100 available positions (00-99) saved previously. To locate the fax number or name of the correspondent to whom you wish to send your document: 1 Press the keys until the desired number or name appears on the display. or 2 Press the key bearing the first letter of the name you are looking for. The fax machine will search for the name in alphabetical order. To start sending, press the key. SENDING A DOCUMENT USING THE QUICKEST METHOD 1. Insert the document in the automatic document feeder (ADF). The display shows on the top line DOCUMENT READY and on the bottom line the default contrast value NORMAL . The initial resolution value is: (standard). If you want, change the contrast and resolution values as described previously. 2. Press the number key ( 3. which you want to send the document, for example , for more than one second. The display shows the digits in the fax number that you assigned to it (see "Programming the phone book"). If the name has also been saved, the display shows this as well. Once the number has been dialled, transmission continues in the ordinary way. 5-4 PHONE BOOK - ) under which you previously saved the fax number to 6USING THE TELEPHONE USING THE TELEPHONE USING THE TELEPHONE 6-1 USING THE TELEPHONE When you engage the line by lifting the telephone handset ( ), you may use all the telephone functions available on ordinary telephones sold on the market. These also include the R function (REGISTER RECALL, activated by pressing the key) which provides access to the special services made available by the company that manages the telephone network. • • You can also use the following functions: Call the correspondent using the phone book, see "Telephoning by searching through the phone book" and "Telephoning using the quickest method". Momentarily hold a telephone call by pressing the key. The call is resumed as soon as the same key is pressed again. TELEPHONING BY SEARCHING THROUGH THE PHONE BOOK Do not place the document in the ADF. 1. Lift the handset to engage the line ( ). The display shows the length of the call in minutes and seconds in the top right-hand corner. 2. Press the key. The display shows the fax number or telephone number and, if set, the name associated with the first of the 100 available positions (00-99) saved previously (see "Programming the phone book", chapter "Phone book"). 3. To find the telephone number or name of the person you wish to call: 1 Press the keys until the desired number or name appears on the display. or 2 Press the key bearing the first letter of the name you are looking for. The fax machine will search for the name in alphabetical order. To start dialling, press the key. Once the number has been dialled, if the correspondent is free, you can start talking. 4. TELEPHONING USING THE QUICKEST METHOD 1. 2. Do not place the document in the ADF. Press and hold down for more than one second the number key ( ) under which you saved previously the telephone number you wish to call, for example . The display shows the digits of the telephone number that you associated with it (see "Programming the phone book", chapter "Phone book"). If you also associated a name with it, the display will show this as well. Having dialled the number, if the correspondent is free, lift the handset to talk( ). The display shows the length of the call in minutes and seconds in the top right-hand corner. 6-2 USING THE TELEPHONE REDIALLING ONE OF THE LAST 20 INCOMING NUMBERS OR ONE OF THE LAST 10 OUTGOING NUMBERS Do not place the document in the ADF. 1. 2. 3. Lift the handset to engage the line ( ). The display shows the length of the call in minutes and seconds in the top right-hand corner. Press the key. To select the list of incoming calls, press the key. 4. To select the list of outgoing calls, press the 5. To find the telephone number or name of the correspondent you wish to call on the list of the last 20 unanswered incoming calls or on the list of the last 10 outgoing calls, press the keys. 6. To start dialling, press the key. Once the number has been dialled, if the correspondent is free, you can start talking. key. USING THE TELEPHONE 6-3 Page intentionally left blank. 6-4 USING THE TELEPHONE 7THE TELEPHONE ANSWERING DEVICE THE TELEPHONE ANSWERING DEVICE TURNING ON THE TAD THE TAD CONSOLE OUTGOING MESSAGES AND MEMOS SETTING THE LENGTH OF MEMOS AND INCOMING MESSAGES LISTENING TO INCOMING MESSAGES AND MEMOS DELETING MESSAGES AND MEMOS YOU HAVE ALREADY LISTENED TO TRANSFERRING MESSAGES AND MEMOS TO A REMOTE TELEPHONE OPERATING THE TELEPHONE ANSWERING DEVICE FROM A REMOTE LOCATION SPECIAL FUNCTIONS OF THE TELEPHONE ANSWERING DEVICE THE TELEPHONE ANSWERING DEVICE 7-1 THE TELEPHONE ANSWERING DEVICE • • • • • • • • • If you have purchased the fax machine model equipped with a built-in telephone answering device you can perform the same functions as those performed by external telephone answering devices. You can therefore: record outgoing messages which will be played automatically when you are out, to request callers to leave a message or call back later; record memos; listen to the outgoing messages; change the outgoing messages; record the messages left by callers when you are out, to ensure that your calls do not get lost; listen to the messages and memos recorded; delete the messages and memos recorded; transfer messages to a remote telephone; control the TAD from a remote location. The TAD recording capacity depends on the size of the memory available (18 minutes), which may be less according to the number of pages in the memory. The length of the messages is programmable and may be 30 or 60 seconds, see "Setting the length of memos and incoming messages". TURNING ON THE TAD The answering machine may only be activated after recording outgoing message 1. See "Outgoing messages and memos", and, in particular, "Recording OGM1 (outgoing message 1)". In addition, the fax must be set to "TAD/FAX" reception mode. See "Choosing the reception mode" of the "Receiving a document" section of chapter "Fax Transmission and reception operations". In "TAD/FAX" reception mode, the fax machine automatically prepares to receive when it is called by another fax machine, to prevent the documents that are sent to you from getting lost. 7-2 THE TELEPHONE ANSWERING DEVICE THE TAD CONSOLE Keys only present on model with a telephone answering device: Key Description To start playing new messages and memos. If there are any messages or memos that you have not heard, start with the memos from the first one you have not heard. Momentarily to stop playing messages and memos. When pressed again, resumes the play function. To start recording "MEMOS" (personal memos). To move, while playing messages and memos, to the start of the next message or memo. To return, while playing messages and memos, to the previous message or memo. (DELETE) To delete messages and memos that have already been played. INDICATOR LED (MESSAGES) On, to indicate that there are messages or memos that have already been played in the memory. Blinking, to indicate that there are new messages or memos in the memory. Off, to indicate that there are no messages or memos in the memory. THE TELEPHONE ANSWERING DEVICE 7-3 Keys required to use the telephone answering device: Key Description To access to the TAD configuration menu. To select submenus. To select the available options of a parameter. To start recording or playing. To confirm the selection of the menus for setting up the TAD, submenus, parameters and settings, and to switch to the next condition. To stop recording or playing. To abort the current programming function. To return the fax machine to the initial stand-by mode. To remove an incorrect setting from the display. To move one function back during the programming phase. OUTGOING MESSAGES AND MEMOS • • • • You can record several different types of outgoing messages: OGM 1, which has a maximum length of 20 seconds, prompting the caller to leave a message on the TAD, for example: "You have called the telephone number ... I'm out at the moment. You can leave a message after the beep or press the Start key on your fax machine if you want to send a fax. Thanks". OGM 2, which has a maximum length of 10 seconds, may be recorded: if you are out and have selected the "TAD/FAX" reception mode, to inform the caller that the answering device cannot receive messages because its memory is full, for example: "I'm sorry but I can only receive faxes at the moment. If you need to speak to me, please call back later"; if you are in but have selected "PHONE/FAX" mode, to tell the caller not to hang up, for example: "Please wait". OGM 3 (CALL TRANSFER MESSAGE), which has a maximum length of 10 seconds, to inform you on a remote telephone that there are new messages for you on the telephone answering device. To actually transfer the new messages, you must: have set up the telephone answering device correctly (see "Transferring messages and memos to a remote telephone" later on in this chapter). activate the functions that enable you to operate the telephone answering device from a remote location (see "Operating the telephone answering device from a remote location"). MEMOS (Voice), which have a length that may be programmed to 30 or 60 seconds, for personal memos. This message is never played when an incoming call is received. 7-4 THE TELEPHONE ANSWERING DEVICE RECORDING OGM1 (OUTGOING MESSAGE 1) 1. Press the key. 2. Press the keys until the display shows tad set-up . 3. Press the key. 4. Press the keys until the display shows ogm # 1 . 5. Press the key. 6. Press the keys until the display shows record . 7. Press the key. 8. 9. Lift the handset ( ). To start recording the message, press the key. You have 20 seconds (counted on the display) to record your message: if the message lasts less than 20 seconds, when you reach the end of the message hang up or press the - key or the key. the fax machine automatically plays back the message you have recorded. Note: If the volume of the message is too low or too high you can adjust it, during playback, using the on the bottom line. key. The display shows the volume level set LISTENING TO OGM1 (OUTGOING MESSAGE 1) 1. Press the key. 2. Press the keys until the display shows tad set-up . 3. Press the key. 4. Press the keys until the display shows ogm # 1 . 5. Press the key. 6. To listen to message 1 recorded previously, press the key to select play . When it gets to the end of the message, the fax machine automatically prepares to record a new OUTGOING MESSAGE 1. In this case, if you like, you can change or replace the message recorded previously by repeating the recording procedure. 7. To return the fax machine to the initial stand-by mode, press the 8. If you want to move back one function, press the key. key. RECORDING OGM2 (OUTGOING MESSAGE 2) Record outgoing message 2 as you recorded OUTGOING MESSAGE 1, but modifying step 4 as follows: 1. Press the Note: keys until the display shows ogm # 2 . Bear in mind, however, that you only have 10 seconds. THE TELEPHONE ANSWERING DEVICE 7-5 LISTENING TO OGM2 (OUTGOING MESSAGE 2) Play back outgoing message 2 as you played back OUTGOING MESSAGE 1, modifying step 4 as follows: 1. Press the keys until the display shows: ogm # 2 . ERASING OGM2 (OUTGOING MESSAGE 2) 1. Press the key. 2. Press the keys until the display shows tad set-up . 3. Press the key. 4. Press the keys until the display shows ogm # 2 . 5. Press the key. 6. Press the keys until the display shows DELETE . 7. To erase outgoing message 2 recorded previously, press the 8. To select DELETE? YES , press the keys. 9. To confirm the setting, press the key. 10. To return the fax machine to the initial stand-by mode, press the RECORDING THE TRANSFER MESSAGE key. key. (OGM3) Record the transfer message as you recorded OUTGOING MESSAGE 1, but modifying step 4 as follows: 1. Press the Note: keys until the display shows ogm # 3 . Bear in mind, however, that you only have 10 seconds. LISTENING TO THE TRANSFER MESSAGE Play back the transfer message as you played back OUTGOING MESSAGE 1, but modifying step 4 as follows: 1. Press the keys until the display shows ogm # 3 . RECORDING MEMOS As mentioned previously, the telephone answering device may be used to record one or more memos, which are handled in the same way as incoming messages. 1. Press the 2. Lift the handset ( 3. To start recording, press the Note: key. ). key. You have 30 or 60 seconds at your disposal (see "Setting the length of memos and incoming messages") to record your memo in the same way as OUTGOING MESSAGES 1 and 2. 7-6 THE TELEPHONE ANSWERING DEVICE SETTING THE LENGTH OF MEMOS AND INCOMING MESSAGES 1. Press the key. 2. Press the keys until the display shows tad set-up . 3. Press the key. 4. Press the keys until the display shows ICm REC. TIME . 5. Press the key. 6. To view the other available value ICm REC. TIME - 30 secs or 60 secs , press the keys. 7. To confirm the setting, press the 8. To return the fax machine to the initial stand-by mode, press the 9. If you want to move back one function, press the key. key. key. LISTENING TO INCOMING MESSAGES AND MEMOS If there is one or more incoming messages or memos in the memory of the telephone answering device that have not yet been played back, the (MESSAGES) LED indicator blinks. On the right-hand side of the first line, the display shows the total number of messages recorded (including the memos). At this point, you can listen to all the messages (through the speaker or the handset), including the memos - which are recorded in the memory and numbered progressively up to a maximum of 50 - starting from the first that you have not yet played. Whenever a message is played, the display shows the day and time at which the message was received. You can listen to the messages through the speaker of the fax machine, which plays them in sequence, separating them by a brief audible signal. To do this, press the key. You can also listen to the messages without anyone else hearing. To do this: 1. Press the key. 2. Lift the handset ( 3. Press the key. Having played back the last message, the fax machine emits two short beeps and ). returns automatically to the initial stand-by mode. The LED stops blinking and will remain on steady. (MESSAGES) indicator THE TELEPHONE ANSWERING DEVICE 7-7 DELETING MESSAGES AND MEMOS YOU HAVE ALREADY LISTENED TO You cannot delete a message or a memo until you have started listening to it. Incoming messages and memos that have not been played back cannot be deleted. The memory cannot therefore be completely cleared until all the messages and memos present in it have been played back. DELETING THE MESSAGE OR MEMO YOU ARE LISTENING TO 1. To start listening to the messages or memos, press the 2. To delete the message you are listening, press the next message. 3. To delete the next message, press the key. Proceed in the same way for all the messages you want to delete. Note: key. key. The TAD moves to the If you do not want to delete any messages, press the DELETING ALL MESSAGES key. ALREADY PLAYED 1. 2. Let's suppose there are 6 messages on the TAD of which 3 have already been played back: Press the key. To select delete old msg? - yes , press the keys. 3. To confirm the setting, press the key. The display shows the initial stand-by status and the number of messages remaining after deletion. In this case, 3. Note: If you do not want to delete any messages, press the key. TRANSFERRING MESSAGES AND MEMOS TO A REMOTE TELEPHONE If you wish, you can program the TAD to call you on a remote telephone at a given time to let you listen to any new messages received. In addition to the time and number at which you wish to be called, you can program the way in which the transfer is to be made (once only or once a day). 1. Press the 2. Press the keys until the display shows tad set-up . key. 3. Press the key. 4. Press the keys until the display shows forward msgs . 5. Press the key. The display shows new setting . 7-8 THE TELEPHONE ANSWERING DEVICE 6. To view the other available mode, forward msgS - delete or forward msgs - change , press the keys. forward msgs - delete - To cancel the transfer of incoming messages and memos to a remote telephone. forward msgs - change - To modify the parameters of a transfer already set: transfer time, frequency and telephone number to be called. 7. To confirm new setting , press the key. 8. To view the other available mode, forward msgS - off , forward msgS - one time or forward msgs - daily , press the keys. forward msgS - off - To exit (not programmed). forward msgs - ONE TIME - To transfer incoming messages and memos to a remote telephone once only. 9. forward msgs - DAILY - To transfer incoming messages and memos every day at the same time. To confirm the setting, press the key. 10. Type the time at which you want the messages to be transferred, for example: "11:45", by pressing the - keys. 11. To confirm the setting, press the 12. Type the telephone number at which you want to be called, by pressing the keys. To confirm the setting, press the key. If you have not recorded the transfer message yet, see "Recording the transfer message (OGM3)". If, however, you have recorded it the fax machine will return to stand-by mode. 13. Note: key. The message transfer setting is cancelled by a power failure. Note: To change or replace the transfer message, see "Recording the transfer message (OGM3)". Now that you have programmed the TAD to transfer new messages to a remote location, you can listen to them by operating the TAD as described in the following section "Operating the telephone answering device from a remote location". OPERATING THE TELEPHONE ANSWERING DEVICE FROM A REMOTE LOCATION SECURITY AND ACCESS FUNCTIONS To operate the TAD from a remote location (except to leave messages), you must set a four-digit numeric code which you can change or delete at any time (see "Changing/Deleting the TAD access code"). THE TELEPHONE ANSWERING DEVICE 7-9 • The same code may also be used to: prevent unauthorized subscribers from playing the messages left for you and from modifying the set-up parameters you have set on the telephone answering device in local mode (see "Enabling/Disabling access to the telephone answering device in local mode"). SETTING THE TAD ACCESS CODE 1. Press the key. 2. Press the 3. Press the key. 4. Press the keys until the display shows security . 5. Press the key. 6. Press the key again to select SET ACCESS CODE . 7. Enter the code, for example "0001", by pressing the 8. To confirm the setting, press the 9. To return the fax machine to the initial stand-by mode, press the 10. If you want to move back one function, press the keys until the display shows tad set-up . - keys. key. key. key. CHANGING/DELETING THE TAD ACCESS CODE 1. Press the key. 2. Press the keys until the display shows tad set-up . 3. Press the key. 4. Press the keys until the display shows security . 5. Press the key. 6. Press the key again to select SET ACCESS CODE . 7. 8. To change the code, press the key once for each digit you have to replace and then type in the new digit. If you like, you can delete the entire code by holding down the key. 9. 10. To confirm the setting, press the key. To return the fax machine to the initial stand-by mode, press the 11. If you want to move back one function, press the ENABLING/DISABLING ACCESS TO key. key. THE TELEPHONE ANSWERING DEVICE IN LOCAL MODE Follow the procedure described in "Setting the TAD access code" to step 5, then carry out the following procedure: 1. Press the keys until the display shows access lock . 2. Press the key. 7-10 THE TELEPHONE ANSWERING DEVICE 3. To stop unauthorized users from playing the messages received on the telephone answering device, press the 4. 5. 6. keys. The display shows yes . To confirm the setting, press the key. To return the fax machine to the initial stand-by mode, press the If you want to move back one function, press the key. key. OPERATING THE TELEPHONE ANSWERING DEVICE FROM A REMOTE LOCATION You can operate the TAD not only directly using specific keys on the operator console of the fax machine, but also from any other location providing the telephone used operates in tone mode, for example: a mobile phone. To operate the TAD from a remote location, you must set the fax machine in "TAD/FAX" or "PHONE/FAX" reception mode and, once the fax has answered the call, you must also type in the access code set previously (see "Setting the TAD access code"). The remote functions available are activated by another numeric code consisting of one or two digits (see the following table). If the code has two digits, it is advisable to wait for the confirmation signal between one digit and the other. Code Operating function 1 Plays new messages. 2 Plays all messages. 3 Stops playing current message and returns to previous message. 4 Stops playing current message and skips to next message. 5 Plays outgoing message 1. 6+6 Deletes all played messages. Code Programming function #1 Disables the "TAD/FAX" reception mode and enables the "AUTOMATIC" reception mode. #2 Sets up the fax machine for "TAD/FAX" reception mode. #3 Enables the OUTGOING MESSAGE 1 to be recorded. #4 Enables the OUTGOING MESSAGE ONLY to be played. #5 Disables the transfer of messages and memos to a remote telephone. Typing 0 after an operating sequence from 1 to 6 aborts the function in progress. Typing 0 after a programming sequence from #1 to #5 aborts the programming function in progress and returns to the operating functions. In this case, to resume the programming phase, press # again. If any code is typed during the recording of outgoing message 1 (programming #3), the TAD will stop immediately and confirm the recording. THE TELEPHONE ANSWERING DEVICE 7-11 • • • • To perform both the remote playback and programming functions: Dial the fax number on the remote telephone. The TAD will answer the call and play OUTGOING MESSAGE 1. Type the access code on the remote telephone keypad. If the code is correct, the TAD will confirm the operation by emitting a beep. Choose the function that you want to perform and type its code with reference to the previous table. The TAD confirms the operation by emitting a beep. Terminate communication using the method applicable to the telephone you are using. SPECIAL FUNCTIONS OF THE TELEPHONE ANSWERING DEVICE • • • You can set up the TAD for the following special functions: TOLL SAVER OUTGOING MESSAGE ONLY SILENT RECEPTION OF INCOMING MESSAGES TOLL SAVER • • Using this function, when you access the TAD from a remote location to listen to any messages, the fax machine will answer as follows: if there are no new messages, it will answer the call two rings after the number preset; if there are some new messages, it will answer the call after the preset number of rings (see "Changing the number of rings", chapter "More advanced operations"). Therefore, if you hear one ring more than the preset number, you will know that there are no new messages and you can hang up before the fax machine answers the call. This function may only be enabled by the customer engineering service and is not available in all countries. 1. Press the key. 2. Press the 3. Press the key. 4. Press the keys until the display shows toll saver . 5. To confirm the setting, press the 6. To view the available options toll saver - yes or no , press the 7. To confirm the setting, press the 8. To return the fax machine to the initial stand-by mode, press the 9. If you want to move back one function, press the keys until the display shows tad set-up . 7-12 THE TELEPHONE ANSWERING DEVICE key. keys. key. key. key. OUTGOING MESSAGE ONLY Using this function, whenever an incoming call is received, the TAD plays the OGM 1 but does not record any incoming messages. You can use this function when you expect to be away for a long time and it would not be possible to record all messages received in your absence. In this case, in place of the ordinary outgoing message, it is advisable to record a different one, for example: "From 22nd June to 19th September only faxes will be accepted. No incoming messages will be recorded". 1. Press the 2. Press the 3. Press the key. 4. Press the keys until the display shows annouNce only . 5. To confirm the setting, press the 6. To select the option announce only - yes , press the 7. To confirm the setting, press the 8. If you have already recorded OGM 1, the display will show the message pLAYING and the TAD will play it back. If you have not recorded it the display will show the message OGM NOT RECORDED for a few seconds, followed by the message RECORD . To change the outgoing message recorded previously or to record a new one, press 9. the 10. key. keys until the display shows tad set-up . key. key. key and then lift the handset ( To start recording, press the SILENT RECEPTION keys. ). key. OF INCOMING MESSAGES Using this function you can receive messages confidentially. In other words, the TAD receives messages without playing them over the speaker so that any other persons present cannot hear your messages. 1. Press the 2. Press the keys until the display shows tad set-up . key. 3. Press the key. 4. Press the key to select icm on speaker . 5. To view the available option icm on speaker - yes or no , press the 6. To confirm the setting, press the 7. To return the fax machine to the initial stand-by mode, press the 8. If you want to move back one function, press the keys. key. key. key. THE TELEPHONE ANSWERING DEVICE 7-13 PRINTING THE TAD CONFIGURATION PARAMETERS 1. Press the key. 2. Press the keys until the display shows tad set-up . 3. Press the key. 4. Press the keys until the display shows print set-up . 5. To start printing, press the key. Once this operation has been completed, the fax machine automatically returns to its initial stand-by status. 7-14 THE TELEPHONE ANSWERING DEVICE 8MAKING COPIES MAKING COPIES MAKING COPIES 8-1 MAKING COPIES WHAT DOCUMENTS CAN BE COPIED As for transmission, copying requires the document to be inserted in the automatic document feeder (ADF). Before making a copy, make sure that the document is correctly inserted in the feeder and that it respects the characteristics described previously (see the "Sending a document" section). Bear in mind, however, that for the copying function you can only insert one sheet at a time in the automatic document feeder (ADF). In addition, if no copies are made within about two minutes, the fax will automatically unload the original and return to stand-by mode. MAKING A 1. 2. 3. 4. 5. COPY As mentioned previously, you can also use the fax machine as a photocopier. The printing quality obtained depends on the type of copy you want to obtain "Normal copy" or "Quality copy" and the contrast and resolution values that you select before starting the copying function. Choose the type of contrast on the basis of the following criteria: • NORMAL, if the document is neither very light nor very dark. • LIGHT, if the document is very dark. • DARK, if the document is very light. Choose the type of resolution on the basis of the following criteria: • TEXT, if the document contains easily legible text or simple graphics. • PHOTO, if the document contains shaded areas. Insert the document in the ADF. The display shows on the top line DOCUMENT READY and on the bottom line the default contrast value NORMAL (for fax transmission). Press the key. The display shows the default copy size, contrast and resolution settings: 100%, NORMAL and text , respectively. It also shows the number of copies set (1). If you want to confirm these values, press the key. The fax machine starts copying. To change some of the values indicated above, skip straight to the next step. 6. 7. Press the key. To view the available option QUALITY - NORMAL or high , press the 8. To confirm your choice, press the 9. To choose the desired copy size setting (ZOOM), 200% , 140% , 100% , 70% or 50% , press the keys. 10. To confirm your choice, press the 11. To display the other types of contrast available, CONTRAST - LIGHT , keys. CONTRAST - normal or CONTRAST - DARK , press the 12. To confirm your choice, press the key. The display shows the values that you have just selected. At this point, simply choose the resolution you want and set the number of copies you want to make: To choose the desired resolution setting, text or photo , press the key. 13. 8-2 MAKING COPIES keys. key. key. 14. If you want to make more than one copy (max. 9), enter the desired number by 15. pressing the keys. If you only want to make one copy, skip to the next step. 16. To make the copy, press the key. The fax machine starts to save the document. Having done this, the fax machine starts copying. Note: If you want to abort the copy in progress, press the key. The fax machine will stop copying, unload the document from the ADF and return to its initial stand-by mode, displaying the message copy interrupted . Press the Note: key to clear the message from the display. To make enlarged or reduced copies of the document, remember to place the document against the right-hand side of the feeder (see the mark printed on the fax machine's casing). The maximum printing width is 210 mm and the maximum length is 282 mm. The maximum unprintable margins are: 4 mm on the left and right sides, 3 mm at the top and 14 mm at the bottom. MAKING COPIES 8-3 Page intentionally left blank. 8-4 MAKING COPIES 9MORE ADVANCED OPERATIONS ADVANCED RECEPTION SETTINGS ADVANCED TRANSMISSION SETTINGS MORE ADVANCED OPERATIONS 9-1 ADVANCED RECEPTION SETTINGS REDUCING THE AREA OF A DOCUMENT RECEIVED 1. Press the key. 2. Press the 3. Press the 4. Press the 5. Press the 6. 7. Press the key to select reduction . To choose one of the available reduction ratios 94% , 80% ,76% ,70% , and no , press the keys. 8. To confirm your choice, press the 9. To return the fax machine to its initial stand-by mode, press the 10. If you want to move back one function, press the keys until the display shows fax set-up . key. keys until the display shows pRINTER PARAM. key. key. RECEIVING A DOCUMENT THAT IS LONGER THAN key. key. THE PAPER SIZE USED If you receive a document that is longer than the paper size used, you can have the surplus text printed by your fax machine on another sheet. 1. Press the 2. Press the 3. Press the 4. Press the 5. Press the 6. Press the 7. Press the 8. To choose one of the other available settings, SURPLUS-no , SURPLUS-YES or keys. SURPLUS-automatic , press the 9. To confirm your choice, press the 10. To return the fax machine to its initial stand-by mode, press the 11. If you want to move back one function, press the Note: key. keys until the display shows fax set-up . key. keys until the display shows pRINTER PARAM. key. keys until the display shows SURPLUS . key. key. key. key. If you choose the SURPLUS-automatic setting, the fax machine will print the surplus text on another sheet providing the surplus exceeds 8 mm. If you choose the SURPLUS-yes setting, the fax machine will always print the surplus text on another sheet. If you choose the SURPLUS-no setting, the fax machine will not print the surplus text. 9-2 MORE ADVANCED OPERATIONS ENABLING/DISABLING SILENT RECEPTION 1. In the "AUTOMATIC", "PHONE/FAX" and "TAD/FAX" reception modes, you can set up the fax machine to receive documents without any rings being emitted when an incoming call is received. When this function is enabled, the behaviour of the fax machine depends on the reception mode selected and the caller: in "AUTOMATIC" and "TAD/FAX" modes, the fax machine will never ring when an incoming call is received; in "PHONE/FAX" mode, when an incoming call is received, the fax machine will only not ring if the caller is another fax machine. If the call is a telephone call, the fax machine will emit an acoustic signal, in place of the ring, to prompt you to lift the handset. Press the key. 2. Press the 3. Press the 4. Press the 5. To select one of the available options silent rx - daily or silent rx - yes , press the keys. 6. To confirm your choice, press the 7. To return the fax machine to its initial stand-by mode, press the 8. If you want to move back one function, press the • • Note: key. keys until the display shows SILENT RX . key. The display shows NO . key. If you have confirmed the option SILENT RX - DAILY , the fax machine will prompt you to enter the time at which it is to start and end silent reception. Once you have set the time, press the Note: key to confirm. The daily silent reception setting (SILENT RX - DAILY ) is cancelled by a power failure. DISPLAYING • • • key. key: THE CALLER ID This function, which may be activated by the telephone company on request by the user, is only available in some countries and conforms to the ETSI ETS 300 778-1 standard. This function tells you immediately who is calling. In this way, you will be able to decide whether to answer the call or not. When this function is enabled, if the fax machine is in stand-by mode, whenever a call is received, it always shows one of the following items of information: number or name of the correspondent who called you; PRIVATE: if the correspondent has chosen not to reveal his identity to you; UNAVAILABLE: if the correspondent is connected to a telephone exchange that does not support this service. If you are programming your fax machine and, when an incoming call is received, want to know who is calling you, you must press the the call. key before answering MORE ADVANCED OPERATIONS 9-3 It may however happen, if you are connected to a particular kind of telephone network, that the number of the caller is not displayed on the fax machine. If this happens, call your local customer engineering service centre. The fax machine is already set up to display the caller ID. You may however set it up not to display it, as follows: 1. Press the 2. Press the 3. Press the 4. Press the 5. Press the 6. Press the 7. Press the 8. To view the available option CALLER ID-YES or no , press the 9. To confirm your choice, press the 10. To return the fax machine to its initial stand-by mode, press the 11. If you want to move back one function, press the Note: key. keys until the display shows INSTALLATION . key. keys until the display shows TEL. LINE SETUP . key. keys until the display shows CALLER ID . key. keys. key. key. key. With this function enabled, the date and time will be brought up to date whenever a call is received. CHANGING THE NUMBER OF RINGS This function is only enabled in some countries. If set in "AUTOMATIC", "PHONE/FAX" or "TAD/FAX" reception mode, the fax machine automatically answers calls after a certain number of rings. If you want, you can change the number of rings as follows: 1. Press the 2. Press the key. 3. Press the 4. Press the 5. To view the other available values RINGS NUMBER - 1 , RINGS NUMBER - 3 , key to select recept. set-up . keys until the display shows RINGS NUMBER . key. The display shows the predefined value ( 2 ). RINGS NUMBER - 4 , RINGS NUMBER - 5 , RINGS NUMBER - 6 , RINGS NUMBER - 7 and RINGS NUMBER - 8 , press the keys. 6. To confirm your choice, press the 7. To return the fax machine to its initial stand-by mode, press the 8. If you want to move back one function, press the 9-4 MORE ADVANCED OPERATIONS key. key. key. CHANGING THE RING VOLUME 1. Press the key. 2. Press the 3. Press the 4. 5. Press the key. The display shows the preset volume level. To turn the volume up/down, press the keys. 6. To confirm your choice, press the 7. To return the fax machine to its initial stand-by mode, press the 8. If you want to move back one function, press the key to select recept. set-up . keys until the display shows RING VOLUME . key. ENABLING/DISABLING RECOGNITION OF THE RING key. key. FREQUENCY In some countries, local telephone companies offer the possibility of assigning the same telephone line two or more numbers, corresponding to different users. When an incoming call is received, a different ring frequency will indicate which user is to answer the call. This function is extremely useful at home or in small offices, where the same telephone line is shared by more than one person. Your fax machine is capable of "learning" one of these frequencies (see the following procedure). In this way, when a call with the specific ring frequency is received, the fax machine (in "PHONE/FAX" and "TAD/FAX" reception modes) prepares exclusively to receive a document. This function is particularly useful when associated with silent reception in that the fax machine will only ring if the call is coming from a telephone. 1. Press the 2. Press the 3. Press the 4. Press the 5. Press the 6. To view the available option DISTINCT. RING - SEt PATTERN , press the 7. To confirm the setting, press the 8. Call the fax machine with the desired frequency so that the fax machine detects it. The display now shows RING detected . At this point you can enable the new ring frequency. To enable the new ring frequency, return to the point at which the display shows 9. key. keys until the display shows INSTALLATION . key. keys until the display shows DISTINCT. RING . key. keys. key. The display shows autodetect ring . DISTINCT. RING -SEt OPTION . 10. Press the key. 11. To view the available option SEt OPTION - YES or no , press the 12. 13. To confirm your choice, press the key. To return the fax machine to its initial stand-by mode, press the keys. key. MORE ADVANCED OPERATIONS 9-5 14. If you want to move back one function, press the Note: key. If the fax machine cannot detect that particular frequency, the display will show the message RING NOT DETECT . At this point, press the repeat the procedure. key and CHANGING THE LENGTH OF THE ACOUSTIC SIGNAL This function is only enabled in some countries. • • When the fax machine is set up for automatic reception with recognition of the type of call, it behaves as follows: if it is being called by a fax machine, it will automatically prepare to receive a document after the preset number of rings if it is being called by a telephone, it will emit an acoustic signal for a time of 20 seconds, after which, if you still have not lifted the handset, it will automatically prepare to receive a document. If you want, you can change the length of the acoustic signal as follows: 1. Press the key. 2. Press the 3. Press the 4. Press the 5. Press the 6. Press the 7. Press the 8. To view the other available value fax/tel timer - 15 secs, fax/tel timer - 30 secs or keys until the display shows INSTALLATION . key. keys until the display shows TEL. LINE SETUP . key. keys until the display shows FAX/TEL TIMER . key. The display shows the predefined value of 20 seconds. fax/tel timer - 40 secs , press the keys. 9. To confirm your choice, press the key. 10. To return the fax machine to its initial stand-by mode, press the 11. If you want to move back one function, press the key. key. CHANGING THE SILENCE LAPSE When a call is received with the fax machine in "TAD/FAX" reception mode, if the TAD hears no answering message within the programmed time (silence lapse), it stops recording and returns to the initial stand-by mode. 1. Press the 2. Press the 3. Press the 4. Press the 5. Press the 6. Press the key. keys until the display shows INSTALLATION . key. keys until the display shows TEL. LINE SETUP . key. keys until the display shows SILENCE LAPSE . 9-6 MORE ADVANCED OPERATIONS 7. Press the 8. To view the other available value silence lapse - 3 secs , silence lapse - 4 secs, silence lapse - 8 secs, silence lapse - 10 secs or silence lapse - no , press the key. The display shows the predefined value of 6 seconds. keys: If you select SILENCE LAPSE - NO , the fax machine will not interrupt the recording in any case. 9. To confirm your choice, press the 10. To return the fax machine to its initial stand-by mode, press the key. 11. If you want to move back one function, press the key. key. CHANGING THE REMOTE CONTROL CODE If the fax machine is connected to an extension that operates in tone dialling mode and is set up for manual reception, whenever there is a call from a correspondent wishing to send you a document, you can set it to receive the document by typing the code * * on the extension. This operation has the same effect as pressing the key on the fax machine. You can replace the second "asterisk" of this code using digits from 0 to 9. 1. Press the 2. Press the 3. Press the 4. Press the 5. Press the 6. Press the 7. Press the 8. Press the 9. Press the 10. To type the new code, press the 11. To confirm the new code, press the 12. To return the fax machine to its initial stand-by mode, press the 13. If you want to move back one function, press the Note: key. keys until the display shows INSTALLATION . key. keys until the display shows TEL. LINE SETUP . key. keys until the display shows REMOTE CONTROL. key. keys until the display shows yes . key. The display shows the code you set previously. - keys. key. key. key. If you want to disable this function, after step 7, press the display REMOTE CONTROL - NO , then press the keys to key to confirm and the key to return the fax machine to its initial stand-by mode. MORE ADVANCED OPERATIONS 9-7 SETTING THE BLACK LIST As mentioned previously, you can save a series of unwanted numbers on a black list (max. 10) so as to avoid receiving documents from the correspondents on this list. 1. Press the key. 2. Press the 3. Press the 4. Press the key. 5. Press the key to select new NUMBER . 6. Dial the fax number you wish to inhibit. key to select recpt. set-up . keys until the display shows BLACK LIST . To do this, press the - keys. 7. To leave a space, to correct typing mistakes or to enter characters or special symbols, proceed as explained in "Setting your name and fax number". 8. To confirm the setting, press the or inhibit another number. 9. To abort the procedure, press the 10. To block another number, repeat the procedure from step 5. key. At this point, you can abort the procedure key. MODIFYING THE BLACK LIST 1. Press the key. 2. Press the 3. Press the 4. Press the 5. Press the 6. To confirm the setting, press the black list. 7. To find the number you wish to modify, press the 8. To confirm the setting, press the key to select recpt. set-up . keys until the display shows BLACK LIST . key. keys until the display shows MODIFY NUMBER . key. The display shows the first number on the keys. key. From this point on, to change the number, repeat the "Setting the black list" procedure from step 6. DELETING THE BLACK LIST 1. Press the 2. Press the 3. Press the 4. Press the 5. Press the key. key to select recpt. set-up . keys until the display shows BLACK LIST . key. keys until the display shows DELETE NUMBER . 9-8 MORE ADVANCED OPERATIONS 6. To confirm the setting, press the black list. key. The display shows the first number on the 7. To find the number you wish to delete, press the keys. 8. To confirm the setting, press the 9. To view the available option DELETE? - YES or no , press the key. 10. To confirm the setting, press the 11. From this point on, to delete other numbers from the list, repeat the procedure from step 6. keys. key. PRINTING THE BLACK LIST 1. Press the key. 2. Press the 3. Press the 4. Press the 5. Press the 6. To confirm the setting, press the key to select recpt. set-up . keys until the display shows BLACK LIST . key. keys until the display shows PRINT LIST . key. Having printed the report, the fax machine automatically returns to its initial stand-by mode. ADVANCED TRANSMISSION SETTINGS CHANGING THE POSITION OF YOUR NAME AND FAX NUMBER The information in the heading of the document to be sent (name, fax number, date and time and number of pages) may be received by your correspondent's fax machine outside the text area or inside the text area. Your fax machine is set up to send this information inside the text area. Changing the position 1. Press the key. 2. Press the 3. Press the 4. Press the 5. Press the 6. Press the 7. Press the 8. To select the alternative parameter, press the keys until the display shows FAX SET-UP . key. keys until the display shows VARIOUS SETT. key. keys until the display shows FAX HEaDER . key. keys until the display shows OUTSIDE or inside . 9. To confirm the setting, press the key. MORE ADVANCED OPERATIONS 9-9 10. To return the fax machine to its initial stand-by mode, press the 11. If you want to move back one function, press the HEARING key. key. THE LINE SIGNALS The fax machine is set up so that you can hear the dialling tones during the dialling phases as well as the connection signals exchanged between your fax machine and your correspondent's fax machine. If you cannot hear them, program the function as follows: 1. Press the 2. Press the key. 3. Press the 4. Press the 5. Press the 6. Press the 7. Press the 8. To view the available option LINE MONITOR - YES or no , press the 9. To confirm the setting, press the 10. To return the fax machine to its initial stand-by mode, press the 11. If you want to move back one function, press the keys until the display shows INSTALLATION . key. keys until the display shows TEL. LINE SETUP . key. keys until the display shows LINE MONITOR . key. REGULATING THE keys. key. key. key. SPEAKER VOLUME If the volume of the dialling tones and connection signals is too low or too high, adjust it using the key. 1. Press the key. 2. To raise or lower the volume of the speaker, press the volume level set on the top line. 3. To return the fax machine to its initial stand-by mode, press the REGULATING THE key. The display shows the key. BUZZER VOLUME The buzzer indicates particular operating conditions and faults or errors. The volume of the buzzer may be set to eight levels, or may be turned off altogether. 1. Press the 2. Press the 3. Press the 4. Press the 5. Press the key. keys until the display shows FAX SET-UP . key. keys until the display shows various sett . key. 9-10 MORE ADVANCED OPERATIONS keys until the display shows BUZZER VOLUME . 6. Press the 7. Press the key. The display shows the preset volume level. 8. To turn the volume up/down, press the 9. To confirm your choice, press the 10. To return the fax machine to its initial stand-by mode, press the 11. If you want to move back one function, press the keys. key. key. key. ENABLING/DISABLING THE FLASH FUNCTION If the fax machine is connected to a private branch exchange (PBX) with Flash pulse management, this function enables a call to be made on the public line. 1. Press the 2. Press the 3. Press the 4. Press the 5. Press the 6. Press the 7. Press the 8. To view the available option PBX FLASH - YES or no , press the 9. To confirm your choice, press the 10. To return the fax machine to its initial stand-by mode, press the 11. If you want to move back one function, press the Note: key. keys until the display shows INSTALLATION . key. keys until the display shows TEL. LINE SETUP . key. keys until the display shows PBX FLASH . key. keys. key. key. key. Having enabled the Flash function, to switch from the private branch exchange (PBX) to the public line, press the key before dialling the telephone or fax number (the letter "E" appears on the display). MORE ADVANCED OPERATIONS 9-11 ENABLING/DISABLING ECM The ECM (Error Correction Mode) is a system for correcting the errors caused by interference on the line. This function only has effect if it has been enabled both on your fax machine and on your correspondent's fax machine and is indicated by a letter "E" appearing on the display. The fax machine is set up to send documents in this mode. However, you can set it up to send documents in normal mode, as follows: 1. Press the key. 2. Press the 3. Press the 4. Press the 5. Press the key. 6. Press the key to select ECM . 7. To view the available option ECM - yes or no press the 8. To confirm your choice, press the 9. To return the fax machine to its initial stand-by mode, press the 10. If you want to move back one function, press the keys until the display shows FAX SET-UP . key. keys until the display shows VARIOUS SETT. 9-12 MORE ADVANCED OPERATIONS keys. key. key. key. 10PRINTING REPORTS AND LISTS PRINTING REPORTS PRINTING LISTS PRINTING REPORTS AND LISTS 10-1 PRINTING REPORTS • • • • • • By printing out reports, the fax machine enables you to check the result of all the transactions carried out (transmission and reception), the volume of documents handled and provides a lot of other useful information. The fax machine prints the following reports: Power failure report: it is always and automatically printed after a power failure, if there are documents in the memory. Once normal operating conditions have been restored, the fax machine will automatically print a report indicating the number of pages in the memory up to that time that you have lost. In this case, it is advisable to print the activity report to track down the number or name of the persons who sent you the documents that were lost. Activity report: contains information about the last 42 transactions carried out (fax transmission and reception operations), which the fax machine keeps in its memory and is printed automatically after the thirty-second transaction or on request. Last transmission report: contains information about the last transmission and can be printed, once programmed, always and automatically after each transmission or on request at the desired moment. Failed transmission report: also contains information about the last transmission but is printed automatically only when the transmission has failed. The fax machine is set by default to print this kind of report automatically, if you want to disable it, see the relevant section. Last broadcast transmission report: contains information about the last broadcast transmission and may be printed always and automatically after each broadcast transmission or on request at the desired moment. Caller list: contains the last 20 calls received (telephone or fax). READING THE REPORTS Item Description Act.N. Progressive number of the transactions (transmission/reception) carried out. Type Type of transaction: TX or TX ECM for transmission. RX, RX ECM or RX POLLING for reception. Doc.N Reference number of document stored, assigned directly by the fax machine. Dialled Number Fax number of the correspondent you called. Name Name of the correspondent you called. Only displayed if you have saved it in the phone book. This field is not printed on the activity report. 10-2 PRINTING REPORTS AND LISTS Item Description Remote Id Number (and, sometimes, name) of the correspondent called. This number corresponds to the number you dialled, only if the correspondent set his own fax number correctly. Otherwise, it may be different or not be present at all. Date/Time Date and time at which the transaction was carried out. Duration Length of transaction (in minutes and seconds). Pages Total number of pages sent/received. Result Result of the transaction: • OK: if the transaction was completed successfully. • ERROR CODE XX: if the transaction was not completed due to the cause indicated by the error code (see "Error codes", chapter "Troubleshooting guide"). ENABLING/DISABLING THE AUTOMATIC PRINTING OF THE TRANSMISSION AND FAILED TRANSMISSION REPORT 1. Press the 2. Press the 3. Press the 4. Press the 5. Press the 6. Press the 7. Press the key. keys until the display shows fax set-up . key. keys until the display shows various sett. key. keys until the display shows tx report . key. You can choose any of the following options: tx report - for failed tx , tx report - always and tx report - no . tx report - for failed tx - the fax machine will automatically print a report only after each failed transmission. tx report - always - the fax machine will automatically print a report after each transmission irrespective of the result. tx report - no - the fax machine will not print any report. 8. To view the other available options, press the keys. 9. To confirm the setting, press the 10. To return the fax machine to its initial stand-by mode, press the 11. If you want to move back one function, press the key. key. key. PRINTING REPORTS AND LISTS 10-3 PRINTING THE TRANSMISSION, ACTIVITY, BROADCAST TRANSMISSION AND CALLER ID REPORTS ON REQUEST 1. Press the key. 2. Press the keys until the display shows print report . 3. Press the key. You can choose any of the following options: print report - LAST TX REPORT , print report - LAST broadcast , print report - activity report and print report - caller id list . 4. To view the other available options, press the keys. 5. To confirm the setting, press the key. Having printed the report, the fax machine automatically returns to its initial stand-by mode. PRINTING LISTS At any time, you can print a complete list of the installation parameters, setup parameters and disabled numbers as well as print the data saved in the phone book. By printing out the lists of installation and setup parameters, you will obtain an up to date report of the default values and those that you have set to adapt it to your operating requirements. PRINTING THE LIST OF INSTALLATION PARAMETERS 1. Press the key. 2. Press the 3. Press the 4. Press the 5. To confirm the setting, press the key. Having printed the report, the fax machine automatically returns to its initial stand-by mode. keys until the display shows INSTALLATION . key. keys until the display shows PRINT INSTALL. PRINTING THE LIST OF SETUP PARAMETERS 1. Press the key. 2. Press the 3. Press the 4. Press the 5. To confirm the setting, press the key. Having printed the report, the fax machine automatically returns to its initial stand-by mode. keys until the display shows FAX SET-UP . key. 10-4 PRINTING REPORTS AND LISTS keys until the display shows PRINT set-up . PRINTING THE LIST OF RECEPTION SETUP PARAMETERS 1. Press the key. 2. Press the 3. Press the 4. To confirm the setting, press the key. Having printed the report, the fax machine automatically returns to its initial stand-by mode. key to select recept. set-up . keys until the display shows print set-up . PRINTING THE BLACK LIST NUMBERS Once programmed (see "Setting the black list", chapter "More advanced operations"), the fax machine can disable a series of correspondents from whom you do not wish to receive any documents whatsoever. This function is useful to avoid receiving undesired documents such as: advertisements, propaganda, etc. All you have to do is save the undesired numbers on a list. Having done this you will not receive any documents from the correspondents whose numbers appear on the list (see "Printing the black list", chapter "More advanced operations"). PRINTING THE DATA SAVED IN THE PHONE BOOK As described previously, you can print a list of the telephone numbers and fax numbers that you have saved in the phone book, see "Programming the phone book" and "Printing data from the phone book". PRINTING REPORTS AND LISTS 10-5 Page intentionally left blank. 10-6 PRINTING REPORTS AND LISTS 11TROUBLESHOOTING GUIDE GENERAL MINOR PROBLEMS ERROR CODES SIGNALS AND MESSAGES ACOUSTIC ERROR SIGNALS TROUBLESHOOTING GUIDE 11-1 GENERAL Problem Description There is a power failure. If a power failure occurs, the fax machine keeps the following data in the memory: the numbers set in the phone book and the reports, while the documents present in the memory will be lost. The date and time will also be lost so they will have to be reset by carrying out the procedure described in the "Setting the date and time for the first time" section of chapter "Installation conditions". The paper or ink has run out. If, during reception, the paper runs out or gets jammed, the ink runs out or the operator console is raised, the machine stops printing and the display shows the relevant message and the document you are receiving is temporarily recorded in the memory. Once the problem has been solved, the fax machine resumes printing. The transmission is unsuccessful. If transmission is not completed due to errors on the line or A document is placed in the automatic document feeder (ADF) while the fax machine is printing. If you place a document in the automatic document feeder (ADF) while the fax machine is making a copy, printing a report or printing a document being received, the fax machine behaves as follows: • if it is making a copy, the fax machine will stop printing and display a series of prompts to enable you to restore it to its initial stand-by mode; • if it is printing a report, the fax machine will stop printing and display a series of prompts to enable you to restore it to its initial stand-by mode; • if it is receiving a document: fax machine, the error LED lights up and a short beep is emitted; in this case, the fax machine automatically prints the transmission report (see "Printing reports and lists"), on which an error code indicates the cause of the error (you will find a list of all the error codes later). - it will stop printing and start to save the document received. The display will show the message rx in memory . - Having saved the document, the display shows the message doc in memory . At this point, the fax machine will prompt you to remove the document from the document feeder. The fax machine will then print the saved document. 11-2 TROUBLESHOOTING GUIDE MINOR PROBLEMS The list below may be used as a guide to the solution of minor problems. Problem Solution The fax machine displays no message at all. Check that it is connected to the power outlet and the telephone socket. The document is not fed in correctly. Check that the document respects the recommendations listed in "What documents may be used", chapter "Fax Transmission and reception operations". The fax machine will not send a document. Check that the document is not jammed. The line is busy: wait until it is free and then try sending the document again. The fax machine will not receive a document automatically. It is set for manual reception: set it up for automatic reception. The fax machine will not copy or receive documents. Check that no documents or sheets of paper are jammed. You are using an unsuitable kind of paper: check the characteristics of the paper listed under "Technical data" in the "Appendix". The fax machine prints blank sheets. Place the document in the correct position with the side to be copied face down. Note: Incorrect transmission or reception by the fax machine may also depend on factors other than those listed above, which will be signalled in the form of error codes on the "Transmission report" and "Activity report", see chapter "Printing reports and lists". TROUBLESHOOTING GUIDE 11-3 ERROR CODES The error codes printed both on the transmission report and the activity report consist of two digits indicating the cause of the error. To save space, the two-digit code without any message is printed on the activity report. Code Message Cause of error What to do OK OK Operation performed successfully. No action. 02 impossible connection check with other party The fax machine does not detect any dialling tone or receives an irregular signal. Check that the fax machine is correctly connected to the telephone line and that the handset is not off the hook. Then try connecting again. 03 receiver does not answer The correspondent is not answering or is a fax machine. Check that the correspondent’s number is correct. 04 err. while transmitting resend from page: An error occurred during transmission. Resume transmission from the page indicated in the report. 05 err. while transmitting resend pages: The correspondent’s fax machine found errors during reception. Resume transmission of the pages indicated in the report. 06 LINE busy The line is busy. Retry when the line is free. 07 DOCUMENT too Long The document to be sent is too long. The time taken to send it exceeds the allowed limits. Split up the document to be sent. 01 and 08 check the document The optical reader cannot read the document. Remove the document from the ADF and reinsert it. Then try connecting again. 09 stop pressed You aborted transmission. No action. 10 errors while receiving check with other party An error occurred during reception. Call the correspondent and ask to send you the document again. 11-4 TROUBLESHOOTING GUIDE Code Message Cause of error What to do 11 impossible reception memory full During reception, a printing error occurred. Reception continued in the memory but the space left in the memory was filled before reception was completed. Correct the fault and wait for the document in the memory to be printed. OK OK? The document was received but the printing quality is unsatisfactory. Call the correspondent. 13 errors while polling check with other party The correspondent did not leave any document in the ADF and did not set up fax machine for polling transmission. Call back the correspondent. 76 cartridge error 76. replace CARTridge! Print cartridge malfunction. Replace the cartridge. SIGNALS AND MESSAGES Any problems that may arise are generally indicated by acoustic signals (accompanied, in some cases, by visual signals: ERROR LED error messages on the display. indicator on) or by The fax machine also emits acoustic signals and shows messages on the display, which do not indicate an error condition. ACOUSTIC ERROR SIGNALS • • • Short 1 second signal You pressed an incorrect key during an operating phase. Long 3 second signal plus error LED indicator on Transaction not carried out correctly. Continuous signal Request to hang up if you forgot to do so after an operation that required the handset to be lifted. Note: To turn off the ERROR LED indicator, press the key. TROUBLESHOOTING GUIDE 11-5 OTHER ACOUSTIC SIGNALS • • Short 1-second signal Transaction carried out successfully. Intermittent 20-second signal Prompt to lift the handset to answer a telephone call. 11-6 TROUBLESHOOTING GUIDE 12MAINTENANCE OPERATIONS REPLACING THE PRINT CARTRIDGE CLEANING THE PRINT CARTRIDGE AND TESTING THE NOZZLES CLEANING THE ELECTRICAL CONTACTS OF THE PRINT CARTRIDGE CLEANING THE OPTICAL READER CLEANING THE CASING REMOVING JAMMED DOCUMENTS REMOVING JAMMED SHEETS OF PAPER MAINTENANCE OPERATIONS 12-1 REPLACING THE PRINT CARTRIDGE The print cartridge must be replaced when the ink runs out (used print cartridges cannot be used) or when you notice a deterioration in the print quality. In the former case, the fax machine automatically prints a sheet to remind you that the ink is about to run out and that you should replace the print cartridge. The print cartridge being used is univocally associated to the fax machine. Therefore to safeguard correct printing, do not swap the print cartridges between fax machines. 1. Lower the handset and place it on a stable surface. 2. Lift the operator console as indicated by the arrow. 3. Release the print cartridge by pressing the lever as indicated by the arrow. 12-2 MAINTENANCE OPERATIONS 4. Remove the used print cartridge from its compartment. 5. Take the new print cartridge out of its package and, holding it on both sides, peel off the film covering the nozzles. Warning: Avoid touching the electrical contacts and the nozzles. 6. Insert the new print cartridge in its compartment with the electrical contacts facing towards the print cartridge compartment. MAINTENANCE OPERATIONS 12-3 7. Push the print cartridge until it clicks into place. 8. Close the operator console and put the handset back on its support. Note: If you have replaced the cartridge because the ink ran out, when the operator console is closed, the fax machine will automatically recognize that the cartridge has been replaced and the display will show the message set data/time : xx-xx-xx xx:xx 1 Enter the new date and time (eg. 13-05-08; 18:00) by pressing the keys and then press 2 . When the display shows confirm D/T , press the entered or press the - key to confirm the data key to make any modification. At this point, the fax machine automatically resets the cartridge and tests the nozzles, and prints out a numbered scale and a message indicating that the cartridge has been replaced correctly on a sheet that it has loaded automatically. If the print quality of the numbered scale is not satisfactory, see "Inserting the print cartridge" in the "Installation instructions" chapter. 12-4 MAINTENANCE OPERATIONS CLEANING THE PRINT CARTRIDGE AND TESTING THE NOZZLES If you notice a deterioration in the print quality, you can quickly clean the print cartridge and test the nozzles by following a procedure that ends by printing out the diagnostic test result with regard to its condition. 1. Press the key until the display shows recept. set-up . 2. Press the keys until the display shows clean cartridge . 3. To confirm your choice, press the 4. To view the available option clean cartridge - yes , press the 5. Press the key. keys. key. The fax machine resets the cartridge and tests the nozzles, and then prints out the result of the diagnostic test. To interpret the diagnostic test result correctly, see "Inserting the print cartridge" in the "Installation instructions" chapter. Note: The procedure may be aborted at any time, if desired, by pressing the key. Note: If the quality of the test result still fails to meet your expectations after carrying out the cleaning procedure, continue as follows, stopping when you get a satisfactory printing quality: - Make a copy of a document with the desired type of graphics or text on the fax machine and evaluate its quality. - Change the type of paper (the paper in use could be excessively porous) and repeat the procedure. - Remove and reinsert the print cartridge. - Remove the print cartridge and check that there are no foreign bodies on the print nozzles; if there are, remove them carefully, taking care not to touch the electrical contacts. Finally, reinstall the print cartridge. - Remove the print cartridge and clean the electrical contacts both on the print cartridge and on the print cartridge carriage, see the following section "Cleaning the electrical contacts of the print cartridge". - Reinstall the print cartridge. - Call the engineering service. MAINTENANCE OPERATIONS 12-5 CLEANING THE ELECTRICAL CONTACTS OF THE PRINT CARTRIDGE Warning: Before proceeding, the fax machine must be unplugged from the electrical outlet. 1. Unplug the fax machine’s power cord from the electrical outlet. 2. Lower the handset and place it on a stable surface. 3. Lift the operator console as indicated by the arrow. 12-6 MAINTENANCE OPERATIONS 4. Release the print cartridge by pressing the lever as indicated by the arrow. 5. Take the print cartridge out of its compartment. 6. Clean the electrical contacts using a slightly damp cloth. Warning: Do not touch the nozzles! MAINTENANCE OPERATIONS 12-7 7. Clean the electrical contacts of the print cartridge carriage with a slightly damp cloth. 8. Insert the print cartridge in its compartment with the electrical contacts facing towards the print cartridge compartment. Push the print cartridge until it clicks into place. Close the operator console and put the handset back on its support. 9. 10. CLEANING THE OPTICAL READER Dust accumulating on the glass surface of the optical reader may cause problems in the scanning of documents. To avoid these problems, the glass should be cleaned every now and again as follows: Warning: Before proceeding, the fax machine must be unplugged from the electrical outlet. 1. Unplug the fax machine’s power cord from the electrical outlet. 12-8 MAINTENANCE OPERATIONS 2. Lower the handset and place it on a stable surface. 3. Lift the operator console as indicated by the arrow. 4. Move the print cartridge carriage to the left-hand edge of the fax machine. MAINTENANCE OPERATIONS 12-9 5. Release the paper feed roller by pressing the lever, as indicated by the arrow. 6. Remove the roller from its compartment. 7. Clean the glass surface of the optical reader with a cloth dampened with a product designed specifically for cleaning glass and then dry it thoroughly. Warning: Do not pour or spray the cleaning product directly onto the glass surface. 12-10 MAINTENANCE OPERATIONS 8. Place one end of the roller on the pin situated on the left-hand side of the fax machine, as indicated by the arrow. 9. Engage the roller by pressing the lever, as indicated by the arrow. 10. Close the operator console and put the handset back on its support. Note: To check whether the optical reader is clean, make a copy of a blank sheet. If any vertical lines appear on the copy and the optical reader looks perfectly clean, contact qualified technical staff. CLEANING THE CASING 1. 2. Unplug the fax machine from the power outlet and the telephone socket. Use exclusively a soft, lint-free cloth dampened with a neutral detergent diluted with water. REMOVING JAMMED DOCUMENTS During transmission or copying, a document could get jammed (this condition is signalled by the display showing the message: REMOVE DOCUMENT, PRESS <>). Try to unload the document by pressing the key. MAINTENANCE OPERATIONS 12-11 If the document is not unloaded, remove it manually as follows: 1. Pull the document upwards, taking care not to tear it. or 2. Pull the document downwards, taking care not to tear it. Note: Never use pointed objected to remove jammed documents. REMOVING JAMMED SHEETS OF PAPER If the paper used to print received documents or to copy documents gets jammed (this error is signalled on the display by the message PAPER ERROR, PRESS <>), try to unload the sheet by pressing the manually as follows: 12-12 MAINTENANCE OPERATIONS key. If the sheet is not unloaded, remove it 1. Pull the sheet upwards, taking care not to tear it. 2. or Pull the sheet downwards, taking care not to tear it. Note: Never use pointed objects to remove jammed sheets of paper. Note: 1. 2. 3. 4. 5. 6. 7. 8. 9. If you cannot manage to remove the jammed document or sheet of paper after performing the removal operations, it may be trapped inside the fax machine. If this is the case, proceed as follows: Lower the handset and place it on a stable surface (see fig. 2 of procedure "Cleaning the optical reader"). Open and lift the operator console (see fig. 3 of procedure "Cleaning the optical reader"). Move the print cartridge carriage to the left-hand edge of the fax machine (see fig. 4 of procedure "Cleaning the optical reader"). Release the paper feed roller by pressing the lever (see fig. 5 of procedure "Cleaning the optical reader"). Remove the roller from its compartment (see fig. 6 of procedure "Cleaning the optical reader"). Remove the jammed document or sheet of paper. Place one end of the roller on the pin situated on the left-hand side of the fax machine (see fig. 8 of procedure "Cleaning the optical reader"). Engage the roller by pressing the lever (see fig. 9 of procedure "Cleaning the optical reader"). Close the operator console and put the handset back on its support. MAINTENANCE OPERATIONS 12-13 Page intentionally left blank. 12-14 MAINTENANCE OPERATIONS APPENDIX TECHNICAL SPECIFICATIONS MANUFACTURER CUSTOMER SERVICE APPENDIX A-1 TECHNICAL SPECIFICATIONS GENERAL CHARACTERISTICS Model ................................. Desktop transceiver Display ................................. LCD, 16 + 16 char. Capacity memory ................. max. 50 pages Dimensions ........................ Width .................................. 340 mm Depth................................... 220 mm - 235 mm (**) Height.................................. 133 mm - 272 mm (**) Weight................................. approx. 2.5 Kg COMMUNICATION CHARACTERISTICS Telephone network............... Public/private Compatibility........................ ITU Communication speed ......... 14400 - 9600 - 7200 - 4800 - 2400 (with automatic "fall back") Compression method ........... MH, MR, MMR POWER SUPPLY CHARACTERISTICS Voltage ............................... 220-240 VAC or 110-240 VAC (see the data plate on the base of the fax machine) Frequency ............................ 50-60 Hz (see the data plate on the base of the fax machine) Power absorbed: - in stand-by mode .............. < 4 W - max. power........................ max. 25 W ENVIRONMENTAL CONDITIONS Temperature......................... from +5 oC to +35 oC (operating) from -15 oC to +45 oC (transport) from 0 oC to +45 oC (short and long-term storage) Relative humidity.................. 15%-85% (operating/short and long term storage) 5%-95% (transport) OPTICAL READER CHARACTERISTICS Scanning method ................. CIS Scanning resolution: - Horizontal .......................... 8 pixels/mm - Vertical STANDARD ............ 3.85 lines/mm - Vertical FINE ....................... 7.7 lines/mm TRANSMISSION CHARACTERISTICS Transmission speed..................... approx. 7 sec (14400 bps) (*) Capacity of document feeders...... Automatic Document Feeder (ADF): 10 sheets A4 (70-90 gr/m2) A-2 APPENDIX RECEPTION CHARACTERISTICS Printing system ..........................Printing on plain paper, bubble ink jet printer Max. printing width ....................204 mm Max. printing length ...................282 mm Printing paper.............................A4 (210 x 297 mm) Paper feed ..................................Plain paper cassette (max 40 sheets of 80 gr/m2) TELEPHONE ANSWERING DEVICE CHARACTERISTICS (ONLY MODEL WITH A BUILT-IN TELEPHONE ANSWERING DEVICE) • • • • • • • • • • Recording capacity: about 18 minutes Memo 2 outgoing messages Outgoing messages-only function "Toll saver" function Fast access from console and remote location Access code Call transfer message Message recording Retention of messages in case of a power failure. (*) = Test Sheet Slerexe Letter with standard resolution, MMR compression. (**) = With the paper support extension. APPENDIX A-3 MANUFACTURER Olivetti S.p.A. con unico azionista Gruppo Telecom Italia Direzione e coordinamento di Telecom Italia S.p.A. Via Jervis, 77 - 10015 IVREA (TO) ITALY CUSTOMER SERVICE If the fax machine is not working as it should, or you require information or clarification from the manufacturer, call the number indicated on the "Warranty Card". A-4 APPENDIX Page intentionally left blank. APPENDIX A-5 ECO-FRIENDLY ORIGINAL OLIVETTI CONSUMABLES ECO-FRIENDLY RESPECT YOUR HEALTH AND THE ENVIRONMENT Olivetti continues in its pursuit to improve the environmental conditions and protect the environment in which it operates. It provides its customers with safe and reliable consumables in respect of the best operating conditions, and strives to ensure the full environmental compatibility of its technologies and production processes. Olivetti bases its production aims on respect of the principles of environmental protection and the conservation of natural resources for future generations. To this aim, Olivetti has adopted the following environmental policy measures: to conform to the provisions of the national laws by taking the necessary steps to change its management policy towards the safeguarding of the environment, to take environmental aspects into consideration right from the decision-making processes involved in the design of consumables, to use materials that have a lighter impact on the environment, to avoid using raw materials containing excipients that are believed to cause cancer, to avoid manufacturing consumables that, during normal use, may cause harm to man or the environment, and to collaborate with organizations that promote the principles of environmental protection. To implement a schedule of periodic checks of environmental performance, with the spirit of prevention that comes from the improvement achieved, such as: – To reduce in the estimate and design phase the production of waste and pollutants, by carrying out incoming tests on the goods received; – To use thermal, electrical and transformation energy with high efficiency, to save nonrenewable natural resources; – To choose processes and equipment with a low energy consumption both inside the company and towards suppliers; – To recover and recycle the materials and consumables that permit effective, concrete collection processes: paper, cardboard, aluminium/iron, PET, glass, packaging wood. All consumables are manufactured in such a way as to limit the environmental impact and conform to the regulations in force. Olivetti has banned the use of a number of hazardous substances (chromium, cadmium, mercury, lead and others) in the manufacture of its products. A-6 APPENDIX Olivetti consumables conform to the CONTROL OF POLLUTION FROM ELECTRONIC INFORMATION PRODUCTS SJ/T11363-2006 (CHINA RoHs) regulation in force since 1st March 2007 in the Republic of China and bear the trademark “Free from hazardous substances”. In addition, Olivetti takes part in the process of implementation of the R.E.A.C.H. (Registration, Evaluation and Authorisation of Chemicals - CE 1907/2006) regulation, which establishes a single regulatory framework for the classification and registration of existing chemical substances and came into force on 1 st June 2007 with a view to protecting health and the environment, using exclusively substances conforming to the regulation. The company: – Requests suppliers to certify that the substances, preparations, consumables and packages conform to the general health and environmental protection specifications; – Guarantees that no substances harmful for the ozone layer are used in the processes for the manufacture of consumables and packages; – Reduces the quantity of material used, through efficient production processes; – Prints cartridge installation instructions only in the machine’s manual without adding leaflets to the cartridge packet, thus saving many tons of paper per year; – Designs consumables and packages in such a way that they can be recycled easily. In the pursuit of this policy, Olivetti has started to manufacture, also for its new fax machines, a new generation of ECO-FRIENDLY consumables, following the implementation of complete and constant improvements in its development and production processes. They meet environmental safety requirements and regulations right from the design phase, offering high levels of quality, performance and reliability, using fewer materials that are more efficient from the energy point of view and easy to recycle, and maximizing added value. FJ83 THE ONLY CARTRIDGE TO BE USED WITH YOUR FAX APPENDIX A-7 Page intentionally left blank. A-8 APPENDIX MANUFACTURER’S CE DECLARATION of CONFORMITY according to ISO/IEC 17050 OLIVETTI S.p.A. Via Jervis, 77 - IVREA (TO) - ITALY Declares under its sole responsibility that: the product described in this guide is IN COMPLIANCE with directive 99/5/EC dated 9th March 1999 fulfills the essential requirements of Electromagnetic Compatibility and of Electrical Safety as prescribed by the Directives: 2004/108/EC dated 15th December 2004; 2006/95/EC dated 27th December 2006; since designed and manufactured in compliance with the following European Harmonized Standards: EN 55022 : 2006 (Limits and methods of measurements of radio interference characteristics of Information Technology Equipment) / Class B; EN 61000-3-2 : 2005 (Electromagnetic Compatibility (EMC) - Part 2: Limits - Section 2: Limits for harmonic current emissions (equipment input current d 16 A per phase); EN 61000-3-3/A1 : 2002 (Electromagnetic Compatibility (EMC) - Part 3: Limits - Section 3: Limitation of voltage fluctuations and flicker in low voltage supply systems for equipment with rated current up to and including 16A); EN 55024/A2 : 2003 (Electromagnetic Compatibility - Information technology equipment - Immunity characteristics - Limits and methods of measurement); EN 60950-1 : 2006 (Safety of Information Technology Equipment, including electrical business equipment). Moreover the product is in compliance with following Standards: ETSI TBR 38: May 1998 (Requirements for a terminal equipment incorporating an analogue handset function capable of supporting the justified case service when connected to the analogue interface of the PSTN in Europe); ETSI ES 203 021: January 2006 Access and Terminal (AT); Harmonized basic attachment requirements for Terminals for connection to analogue interfaces of the Telephone Networks. Compliance with the above mentioned essential requirements is shown by affixing the CE marking on the product. Scarmagno, 8th June 2008 Olivetti S.p.A. Notes: 1) CE Marking has been affixed in 2008. 2) The Quality System is in compliance with the UNI EN ISO 9000 series of Standards. Olivetti S.p.A. Sede Sociale Ivrea, Via Jervis, 77 - Cap. Soc. Euro 154.000.000 - C.C.I.A.A. Torino n. 547040 - Trib. Ivrea Reg. Soc. n.1927 - Cod. Fisc. e Part. IVA 02298700010 381746B-01