1
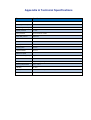
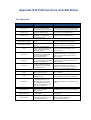
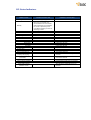
GT100 User Manual Version 1.2 Copyright ©2010 EU3C Technologies Corp. Reserved® All rights reserved. This publication is protected by federal copyright law. No part of this publication may be copied or distributed, transmitted, transcribed, stored in a retrieval system, or translated into any human or computer language in any form or by any means, electronic, mechanical, magnetic, manual or otherwise, or disclosed to third parties without the express written permission from EU3C. EU3C makes no representation or warranties with respect to the contents hereof and specifically disclaims any implied warranties of merchantability or fitness for a particular purpose. Trademarks EU3C is a registered trademark of EU3C Technologies Corp. All other registered and unregistered trademarks are the properties of their respective holders. FCC Regulations This mobile phone complies with part 15 of the FCC Rules. Operation is subject to the following two conditions: (1) This device may not cause harmful interference, and (2) this device must accept any interference received, including interference that may cause undesired operation. This mobile phone has been tested and found to comply with the limits for a Class B digital device, pursuant to Part 15 of the FCC Rules. These limits are designed to provide reasonable protection against harmful interference in a residential installation. This equipment generates, uses and can radiated radio frequency energy and, if not installed and used in accordance with the instructions, may cause harmful interference to radio communications. However, there is no guarantee that interference will not occur in a particular installation If this equipment does cause harmful interference to radio or television reception, which can be determined by turning the equipment off and on, the user is encouraged to try to correct the interference by one or more of the following measures: Reorient or relocate the receiving antenna. Increase the separation between the equipment and receiver. Connect the equipment into an outlet on a circuit different from that to which the receiver is connected. Consult the dealer or an experienced radio/TV technician for help. Changes or modifications not expressly approved by the party responsible for compliance could void the user's authority to operate the equipment. The antenna(s) used for this transmitter must not be co-located or operating in conjunction with any other antenna or transmitter. RF Exposure Information (SAR) This mobile phone meets the government's requirements for exposure to radio waves. This phone is designed and manufactured not to exceed the emission limits for exposure to radio frequency (RF) energy set by the Federal Communications Commission of the U.S. Government. The exposure standard for wireless mobile phones employs a unit of measurement known as the Specific Absorption Rate, or SAR. The SAR limit set by the FCC is 1.6W/kg. *Tests for SAR are conducted using standard operating positions accepted by the FCC with the phone transmitting at its highest certified power level in all tested frequency bands. Although the SAR is determined at the highest certified power level, the actual SAR level of the phone while operating can be well below the maximum value. This is because the phone is designed to operate at multiple power levels so as to use only the poser required to reach the network. In general, the closer you are to a wireless base station antenna, the lower the power output. The highest SAR value for the model phone as reported to the FCC when tested for use at the ear is 1.31 W/kg and when worn on the body, as described in this user guide, is 0.323 W/kg (Body-worn measurements differ among phone models, depending upon available accessories and FCC requirements.) While there may be differences between the SAR levels of various phones and at various positions, they all meet the government requirement. The FCC has granted an Equipment Authorization for this model phone with all reported SAR levels evaluated as in compliance with the FCC RF exposure guidelines. SAR information on this model phone is on file with the FCC and can be found under the Display Grant section of www.fcc.gov/oet/ea/fccid after searching on FCC ID: WFZGT100A. For body worn operation, this phone has been tested and meets the FCC RF exposure guidelines for use with an accessory that contains no metal and the positions the handset a minimum of 1.5 cm from the body. Use of other accessories may not ensure compliance with FCC RF exposure guidelines. If you do no t use a body-worn accessory and are not holding the phone at the ear, position the handset a minimum of 1.5 cm from your body when the phone is switched on. Revisions Product features and specifications described in this manual are subject to change without notice. EU3C reserves the right to periodically revise this manual without notice. Revisions will be incorporated into new editions. EU3C shall not be liable for any damages, or for the loss of information resulting from the performance or use of the information contained herein. EU3C Technologies Corp. Room 918, 9F No. 3-2, Yuanqu Street, Nangang District, Taipei City 115, Taiwan www.eu3c.com Table of Contents Table of Contents ..................................................................................................................................... 3 Chapter 1 Introduction .............................................................................................................................. 4 1.1 Preface........................................................................................................................................ 4 1.1.1 Technical Support............................................................................................................... 4 1.1.2 Privacy and Other Guidelines ............................................................................................. 4 1.2 Introduction.................................................................................................................................. 4 1.2.1 Key Features ..................................................................................................................... 5 1.2.2 GT100 package contents.................................................................................................... 9 1.2.3 Safety Notes .................................................................................................................... 10 Chapter 2 Installing the SIM Card, Battery, and Management Tool ........................................................... 11 2.1 Installing the SIM Card and Battery ............................................................................................ 11 2.2 Installing the Management Tool .................................................................................................. 12 2.2.1 Minimum System Requirements ....................................................................................... 12 2.2.2 Installation ....................................................................................................................... 12 Chapter 3 Using Your GT100 .................................................................................................................. 13 3.1 Understanding the Buttons and Indicators................................................................................... 13 3.2 Charging the GT100 .................................................................................................................. 14 3.2.1 Charging the Battery Using the USB Cable ....................................................................... 14 3.2.2 Charging the Battery Using the Battery Charger ................................................................ 14 3.3 Powering Up the GT100............................................................................................................. 14 Chapter 4 Using the Management Tool.................................................................................................... 15 4.1 Starting with the Management Tool ............................................................................................. 15 4.2 Management Tool Introduction.................................................................................................... 15 4.2.1 Configuration Tool ............................................................................................................ 16 4.2.2 Monitoring Tool................................................................................................................. 19 4.2.3 Trace Log Tool ................................................................................................................. 21 Chapter 5 Troubleshooting...................................................................................................................... 22 5.1 Frequently Asked Questions....................................................................................................... 22 Appendix A Technical Specifications........................................................................................................ 24 Appendix B GT100 Functions and LED Status ........................................................................................ 25 B.1 Functions .................................................................................................................................. 25 B.2 Status Indicators........................................................................................................................ 26 Appendix C Short Messages (SMS) Format for GPS Data ....................................................................... 27 C.1 SMS Location Symbols and Abbreviations ................................................................................. 27 C.2 SMS Format.............................................................................................................................. 28 C.2.1 Street Number, Point of Interest (POI), and GPS Coordinates ........................................... 28 C.2.2 Location When Traveling on a Highway ............................................................................ 29 C.3 SMS Remote Commands .......................................................................................................... 30 Appendix D Current Map Supported Countries ........................................................................................ 31 Chapter 1 Introduction 1.1 Preface This document provides operating instructions for configuring and using the GT100 device. Note that the GT100 comes with preset settings which allow one to start using the GT100 by simply inserting a SIM card and powering up the device. To get up and running quickly, please refer to the Quick Start Guide. 1.1.1 Technical Support For further questions, contact EU3C as follows: By internet: www.eu3c.com By email: [email protected] By phone: +886-2-2655-8080 By mail: EU3C Technologies Corp. Room 918, 9F No. 3-2, Yuanqu Street, Nangang District,Taipei City 115, Taiwan 1.1.2 Privacy and Other Guidelines The GT100 is designed to help support loved ones, safeguard property, and provide protection. It should not be used for any other purposes that might violate the privacy of others or for criminal purposes. EU3C assumes no liability or responsibility for behavior related to the misuse of this device. GPS technology, although sufficiently accurate for normal tracking purposes, is still bound by actual operating environmental factors, such as signal strength and battery condition. The data acquired during normal operation are for reference only. EU3C does its best to produce an accurate device; nevertheless, do not to rely on the data for critical applications, such as pinpoint evidence for legal purposes or as a sole resource for life-saving purposes. 1.2 Introduction The GT100 is a GSM-based safety device that is designed to be a portable multi-purpose safety product in a very small footprint. The patented technology that is built into this device allows the end user to actively call help with accurate location information in emergent cases and let their family or friends who care about the user’s safety track and monitor the GT100 down to the detailed street addresses without the use of server-hosted programs. 1.2.1 Key Features Press and hold the Help button for three seconds to send a "help" announcement to others Using the HELP function allows a GT100 user to broadcast a "help" announcement to all the telephone numbers pre-programmed in the pre-set buttons. Know the whereabouts of loved ones Use the GT100 to easily know where loved ones are without the need of a PC. SOS Panic Button for Personal Security Press and hold the red SOS button for three seconds and the GT100 will call a pre-programmed number(e.g., 112 in Europe, 911 in the USA, or any pre-programmed number) if the user enables this function. Functions as a Remote Monitor The GT100 can function as a baby monitor that allows remote voice monitoring through a cell phone. Serves as a Child’s Phone The GT100 can serve as a child’s phone with simple-to-use pre-programmed buttons for making and receiving calls. Stolen Vehicle Recovery Device The GT100 can help police track and recover a vehicle if it gets stolen by acting as a transmitter in the vehicle. GPS Position Trace Log on a PC By enabling the Trace Logging feature, the GT100 will record its position to a flash card at periodic intervals, allowing the user to download the device’s GPS position history. The Trace Log can be used to reproduce the device’s positions on your PC. Geo Fence Define a virtual boundary (safe zone) around any area and receive an alert when the GT100 travels outside the safe zone. Speed Alert Set a speed limit for the GT100 and receive a notification every time the device travels faster than the defined speed. Google Maps Link The location message provided by the GT100 contains an internet hyperlink which brings up the location of the GT100 in Google Maps when using a smartphone with internet connectivity. Real Time Monitoring With the Management Tool bundled in the box, people can do real time monitoring on their PCs to know where their loved ones are and whether they are safe. 1.2.2 GT100 package contents You should get the following items when you open your GT100 box: GT100 Lithium ion battery AC Adapter - power adapter used with USB cable for either power outlet charging or PC-connected charging 1 USB cable - USB cable used for interfacing with Management Tool software and downloading GPS position trace log Micro SD memory card - used for storing map database and user settings. DO NOT use another memory card unless it is provided by EU3C and DO NOT reformat this memory card. Companion CD – Management Tool software and User manual are included Quick Start Guide Lanyard Attached micro USB to USB 2.0 cable complies with USB specifications for micro USB type B connector for portable devices 1.2.3 Safety Notes The GT100 complies with Parts 15B, 22H, 24E, OET65(SAR) of the FCC Rules. Operation is subject to the following conditions: 1. 2. 3. 4. 5. 6. 7. 8. 9. The GT100 may not cause harmful interference and (2) this device must accept any interference received, including interference that may cause undesired operations. TheGT100 is a GSM enabled GPS integrated safety device. Pay special attention to local laws and general health and safety regulations. The GT100 should be turned off in hospitals and airplanes. DO NOT operate the GT100 in areas where there are flammable materials such as gas stations. DO NOT operate the GT100 if the device is wet. The GT100 is not waterproof. A GSM SIM card is required for proper operation. Users can use the connection to USB interfaces with USB 2.0 version or higher. Risk of explosion if battery replaced aced by an incorrect type. Dispose of used batteries according to the instructions. Please make sure the temperature for adapter will not be higher than 65 ˚C Chapter 2 Installing the SIM Card, Battery, and Management Tool 2.1 Installing the SIM Card and Battery 1 Install the SIM card and battery as follows: 1. 2. 3. 4. 5. 6. Gently push down on the raised arrow of the back cover and slide off the battery cover. Lift the SIM card cover. Place the SIM card in its respective holder. Carefully lower the cover in place and slide it down until it clicks securely. Insert the battery and ensure that the battery contacts are at the top right corner. Replace the battery cover and slide up to secure it in place. SIM card is purchased separately. SIM cards can be purchased through GSM mobile network operators such as Orange, Vodafone, T-Mobile, AT&T, etc. SIM cards have various service plans –check your mobile operators for details. 2.2 Installing the Management Tool 2.2.1 Minimum System Requirements PC running Win98/Win2000/Windows XP/Windows Vista/Windows 7 CD-ROM drive USB 2.0 port 2.2.2 Installation The Management Tool is a Windows program that allows you to change the setting of the GT100. 1. 2. 3. Insert the Companion CD into the CD-ROM drive Wait for the installation menu screen to appear. If no menu appears, browse the CD contents and double-click on Autorun.exe. Follow the on-screen instructions to install the Management Tool software. Chapter 3 Using Your GT100 3.1 Understanding the Buttons and Indicators Item Function Descriptions Answer button Answer incoming voice call Press the Answer button to pick up an incoming call Park button Activate the motion detection alert function Press the Park button for three seconds to activate. Press the Hang up button to deactivate Speaker Used for voice calls Support both receiver mode and speaker phone mode Help/Assist button Broadcast continuous help messages to all six pre-programmed numbers Press the Help/Assist button and hold for three seconds to activate. Press the Hang up button again to release Power ON/OFF button Power ON/OFFGT100 Press and hold to toggle the Power ON/OFF button Microphone Used for voice calls and room monitor mode Built in for audio calls and surveillance mode Preset dial keys Three buttons for three different preset numbers enabling one-button dialing for phone calls Press one of the preset dial buttons and hold for three seconds to place a call. Press the Power button to end the call LED indicator DisplaysstatusoftheGT100 Help users know the status of the device USB port Used with USB cable included in package Used with bundled USB cable for charging and the configuration of GT100's settings Key lock button Lock buttons to prevent accidentally dialing out or activating features Slide the key lock slider to lock or unlock the buttons SOS button Automatically dial the preset emergency number(e.g.,911) Press and hold the red SOS button for three seconds to activate an SOS call 3.2 Charging the GT100 3.2.1 Charging the Battery Using the USB Cable 3.2.2 Charging the Battery Using the Battery Charger 3.3 Powering Up the GT100 Press the Power ON/OFF button and hold for over four seconds. The GT100 will power ON and enter Standby mode as it acquires a satellite signal. Longer satellite searching time may occur when powering up the GT100 for the first time or if the GT100 has been moved to another state or country since the last time it was used. If there is no satellite signal or movement detected for a long period of time, the GT100 will enter power saving mode as defined by the power saving parameter set using the Management Tool. Chapter 4 Using the Management Tool 4.1 Starting with the Management Tool The GT100 Management Tool software is used to program all of the features and settings of the GT100. These settings include the preset phone numbers, SOS emergency calls, standby time, and a lot of other functions. 1. 2. 3. Power down the GT100. Connect the GT100 to a PC using the USB cable. Run The Management Tool.exe on the PC. 4.2 Management Tool Introduction After installing the Management Tool with the CD-ROM provided in the box, the applications bundled with the GT100 is ready to use. When the Management Tool is launched, a Home screen will appear showing the Configuration Tool, Monitoring Tool, and Trace Log Tool. The Configuration Tool allows a user to do simple or advanced settings depending on application requirements. The user also can monitor their GT100 online by The Monitoring Tool. If GPS logging function is enabled in Configuration Tool, the data log recorded in the micro SD card inGT100 can be downloaded via the Trace Log Tool enabling the user to view his or her outdoor activities on Google map integrated in the Trace Log Tool. 4.2.1 Configuration Tool Select the preferred profile To configure the GT100 settings is simple. The user can quickly make the configuration done to meet requirements for different people or situations. It’s the user’s decision to always keep only one setting profile or more depending on personal applications. GT100 allows users to name any saved profiles at their discretion and let users to import any of the profiles any time when it’s necessary. They can pick from different profiles, such as Child, Senior, Adult, Pet, Automobile and Sport if profiles were saved with these names, to fit the user’s needs, and enter 1 to 3 phone numbers allowing the user to make calls from the GT100 to these pre-set numbers. For other applications and settings, click Modify button to configure the GT100 further. Press the Save profiles button to save your settings. Set the GT100 After pressing Modify button, the user can see different settings options below. Simply with a few checks in the tables, the settings can be done as per the user’s preference quickly. Please note: the Surveillance function will conflict with Incoming Call function if Surveillance Function is enabled. The user can set the message contents easily with checks or un-checks in the table. Message Format allows the user to see a sample SMS message pattern whenever the user modified the required message contents. The GPS logging function is good for people who need to record trace logs of activities, such as traveling, hiking, etc., from their GT100. GT100 users can see visualized routes on Google Map which is integrated in the Trace Log Tool. System Setting In order to keep the GT100 working properly, the Configuration Tool provide the System Setting functions. For detailed information, please refer to the System Setting page on the Configuration Tool. 4.2.2 Monitoring Tool Add GT100 to Monitor List For the first time, the user needs to add the GT100 to the Monitor list. The user can identify the GT100s by the name and the Telephone. Tracker Device Setting After adding the ID of GT100 into the monitoring list, the user need to click the setting button to enable the GPRS data connection which allows GT100 keeps sending out location information to support real time monitoring application. Note: Enabling the GPRS data connection will shorten the battery life a lot. Main Page If you have added the GT100 device ID and enabled GPRS connection, you can see a real time monitoring user interface below when accessing Monitoring Tool. The following is a brief introduction on icons in the Monitoring Tool. ① The battery status ② The GSM signal strength ③ The GPS or A-GPS status (when GT100 is indoor and can’t receive satellite signal, it will use A-GPS technology to get the location with around cellar base stations.) ④ Select the GT100 user ⑤ The location of the GT100 user st ⑥ Add GT100 to Monitor List (only required for the 1 time connection) ⑦ Add or remove GT100 users ⑧ Search the place on map ⑨ Detach the GT100 user connection on the Monitor List ① ② ③ ④ ⑤ ⑥ ⑦ ⑧ ⑨ 4.2.3 Trace Log Tool After importing the trace log from the GT100, the user can visualize outdoor activity on the Trace Log Tool. The Trace Log Tool can store recorded log files in the GT100 into a PC and allow the user to name the log files at the user’s discretion. For further information, please refer to the Trace Log Tool. Chapter 5 Troubleshooting 5.1 Frequently Asked Questions GT100 does not power on. Make sure the device is fully charged with a valid SIM card. Press and hold the Power ON/OFF button until the device powers up. GT100 cannot receive GPS signal. An open view to the sky is required. If using the GT100 device for the first time, it may longer than normal. I pressed the preset dial (#1, #2, #3) button but nothing happens Preset numbers must be entered using the Management Tool in the companion CD packaged in the box. Install the Management Tool from the included CD and set the preset dial number for each of the three buttons. Make sure this feature is checked as enabled. Management Tool program cannot detect the device. Make sure the GT100 is connected to the PC first. If the GT100 is powered on, then power it off first. Then, run the Management Tool software on the CD. GT100 does not seem to get charged. Use the charger included in the package. Certain PC or notebook USB ports may not supply enough power current for charging. SOS button does not seem to be working. Make sure the SOS button pre-programming is correct. Use the Management Tool to program the SOS button if it is not programmed correctly for the area the GT100 is located. Remote monitoring does not work. I cannot hear anything. The surveillance feature must be enabled using the Management Tool program. Make sure it is set to allow anyone or people in the contact list to receive remote monitoring calls. I cannot use my own USB to mini USB cable. Please use the USB cable which is specially designed to support GT100 safety device in the package. I cannot dial in to get the device location. You need to either enable dial in from anyone or numbers from the contact list using the Management Tool program. I cannot use Park function. Make sure the Park feature is enabled by pressing the park button three seconds. Help/Assistance key doesn't work. Make sure Help function is enabled and the help preset phone numbers are entered correctly in the contact list. I cannot dial in the device and use it as a phone. Make sure the Direct Call feature is enabled. How can I use the Track logging feature. Make sure the track logging feature is enabled. I cannot monitor the GT100. Make sure the call in feature is disabled and the surveillance feature is enabled. I cannot use the Call in / Surveillance functions. These two functions cannot be used at the same time. Please check to see the GT100 is set properly. #1, #2, and #3 keys are remained lit after power on. This means the SIM card was not installed or was not installed correctly. Re-install the SIM card and ensure that it is in place correctly. Appendix A Technical Specifications Parameter Specification GSM module GSM900/1800 or GSM850/1900 Tracking sensitivity -162 dBm Positioning accuracy < 20m Speed precision 0.1 m/s Time precision Synchronized with satellite GPS data protocol NMEA0183 Hot start 5 seconds Cold start 34 seconds Standby time 112 hours Working time 13 hours Highest altitude 18,270 m Maximum speed 515 m/s Acceleration of gravity < 4g Dimensions 68mm x 48mm x 18mm Weight 60g (excluding battery) Working temperature -15°C ~ +65°C Humidity 5%~90% Battery 3.7v,850mAh rechargeable Li-ion battery Power 5 VDC Appendix B GT100 Functions and LED Status B.1 Functions Function Operation Description Voice Phone Functions Speed dialing Receiving Call Speaker phone Set phone numbers for each corresponding (#1,#2,#3)buttons Pick up an incoming call by pressing the Answer button When call connected, press the Answer button to toggle the speaker phone mode. Press the speed dial button for three seconds to make calls to the pre-programmed number Pick up calls with the Answer button Use the GT100 as a speaker phone. Positioning Functions Call the GT100 and hang-up the phone Return SMS with detailed position information, SMS format see Appendix C Send formatted SMS to the GT100 Press and hold the red Park button for three seconds to enter parking mode and leave the device in a vehicle. Return SMS with detailed position information, SMS format see Appendix C Geo fence Enable the Geo fence function in the Management Tool and sets the fence range defined by center point and radius Once the GT100 travels outside a pre-programmed boundary, the GT100 will trigger a "Outside" SMS message with its current location. Speed alert Set device to notify the user when the device is traveling at a speed higher than the preset value. TheGT100canbeprogrammedtosendoutaSMS message when the device is traveling over the preset speed limit Enable the Tracking function in the Management Tool and sets the recording interval The GT100 will record its GPS position at pre-programmed intervals and store the location on a micro SD card for downloading or connecting to Google Map from a PC SOS Press and hold the red SOS button for three seconds Automatically dial preset emergency number (e.g., 112 or911) Help Press and hold the Help button for three seconds TheGT100willsendoutaHelp message to pre-programmed numbers in the contact list Surveillance Enable the surveillance function in the Management Tool. The caller’s phone number must be pre-programmed in the "Allow calls" list. The caller dials in and waits for over 8 seconds Caller uses the device as a surveillance voice monitor Management Tool Power off the GT100 and connect it to PC Use Management Tool to change the settings SMS Commands Edit a formatted SMS and send it to the GT100 Use formatted SMS to change the settings or working state Battery low Alert Set the device to notify the user when battery reaches a low level in the Management Tool The GT100 will automatically send out a battery low SMS message to the pre-programmed numbers Check Position by Call Check Position by SMS Park Trace log Once the GT100 detects motion, the GT100 will trigger a "Moving" SMS message with its current location. Emergency Functions Settings and Misc B.2 Status Indicators Tracker Function Powering On Standby Power Saving SOS activated Charging Fully charged Battery low Surveillance mode Park mode Activated Deactivated Help/Assistance Activated Deactivated Function keys Dial out call (connected) Dial out call (hang-up) Incoming call (ringing) Incoming call (connected) Incoming call (hang-up) Pager call back (missed) Error State Invalid SIM card/ SIM locked/no T card Feedback on Status LED Blue LED ON(Top Right) When GPS is available, flashes Blue every two seconds, one second ON and one second OFF; When GPS signal is not available, the 1s ON is replaced by three quick blinks indicating an action of searching for GPS Flashes Blue every eight seconds Flashes Blue twice a second Red ON Green ON Flashes Red every two seconds Feedback on Function LED Power button LED ON Send button LED ON Park button LED ON Park button LED OFF Help button LED ON Help button LED OFF Send button LED ON Send button LED OFF Flashes Send button LED every two seconds Send button LED ON Send button LED OFF Flashes dial key LED every two seconds All three dial key LEDs flash every two seconds Appendix C Short Messages (SMS) Format for GPS Data C.1 SMS Location Symbols and Abbreviations <N>, <S>,<W>,<E> North of, South of, West of, East of <N.E>,<N.W>,<S.E>,<S.W> Northeast of, Northwest of, Southeast of, Southwest of Yds, m Yards, meters & Cross Street Symbol http://maps.google.com/maps/ api/staticmap?zoom=16&size= 800x800&sensor=false&marke rs=37.39263,-121.89418 Internet hyperlink; clicking this link from an internet-capable mobile phone will bring up the location in Google Maps 37.39263,-121.89418 GPS coordinates; these coordinates can be manually entered into Google Maps to have the location shown graphically. The coordinates can also be used in setting the Geo fence function (see page 4-7) C.2 SMS Format There are two types of SMS messages that can be sent out from the GT100. C.2.1 Street Number, Point of Interest (POI), and GPS Coordinates Section 1: Location address with the house number + nearby intersection Section 2: Distance and direction to a nearby POI Section 3: City, State Section 4: Google Maps link including GPS coordinates For example: http://maps.google.com/maps?q=W122.48428,N37.67904;196 Edgemont Dr& Lincoln Ave; 88m <W> Jesus Christ ls Lord Church; South San Francisco, San Mateo, CA,15:40; The GPS location is at 196 Edgemont Dr; near the intersection of Edgemont Drand Lincoln Ave; 88meters away from the west of Jesus Christ ls Lord Church; South San Francisco, San Mateo, California, the GPS coordinates are West 122.48428, North 37.67904. C.2.2 Location When Traveling on a Highway Section 1: Highway name + moving direction Section 2: Distance closest to an exit + closest exit name Section 3: City, State Section 4: GPS coordinates For example: I-280 SB;<E>;13.12 km; Exit "10";San Jose,Santa Clara,CA;15:50;W121.95059,N37.31666; The location is at southbound highway I-280, moving direction is East;13.12 kilometers away from the next exit "10"; Santa Clara, California; GPS coordinates are West 121.95059, North 37.31666. C.3 SMS Remote Commands 1. Park Status • Send SMS message "park on" to enter Park status • Send SMS message "park off" to quit Park status Be aware that the command may fail in conditions such as the GT100 is in calling state, SOS status, Help status, etc. 2. Help Status • • Send SMS message "help on" to enter Help status Send SMS message "help off" to quit Help status 3. Over speed Alert • • Send SMS message, "speed on" to enable Over speed Alarm Send SMS message, "speed off" to disable Over speed Alarm 4. Geo fence Alert • • Send SMS message, "geo fence on" to enable Geo fence Alert Send SMS message, "geo fence off" to disable Geo fence Alert 5. System Monitoring Alarm • • Send SMS message, "system alarm on" to enable Stem Alarm Send SMS message, "system alarm off" to disable System Alarm 6. GPS Trace Log • • Send SMS message, "trace log on" to enable GPS position logging Send SMS message, "trace log off" to disable GPS position logging 7. Check Position • Send SMS message, "check pos" to check the current position of the GT100. The GT100 will send back a SMS with the current position 8. Change Contact List • Send SMS message, "set 1/2/3 <number>" to change the contact lists. The corresponding number in the “location permission list” will be changed, so are the same numbers in other lists 9. Voice status • • Send SMS message, "voice on" to activate the voice response Send SMS message, "voice off" to dis-activate the voice response Appendix D Current Map Supported Countries North America USA, Canada, Mexico South America Argentina, Brazil, Chile Europe Austria, Belarus, Croatia, Czech Republic, Estonia, Finland, Great Britain, Greece, Hungary, Italy, Latvia, Lithuania, Norway, Poland, Portugal, Romania, Slovakia, Slovenia, Ukraine, Albania, Andorra, Bosnia, Denmark, France, Germany, Ireland, Luxembourg, Macedonia, Malta, Moldova, Montenegro, San Marino, Sweden, Switzerland, Yugoslavia, Bulgaria, Netherlands, Russia, Spain, Turkey Middle East Egypt, Saudi Arabia, UAE, Israel Asia & Pacific Ocean China, India, Taiwan, Vietnam, HK/Macao, Indonesia, Malaysia, Thailand, Australia, New Zealand