1
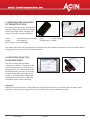
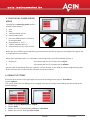
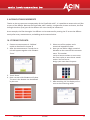
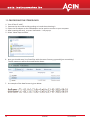
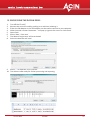
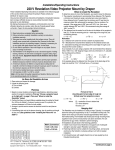
FlowFinder
®
MK
made in holland
The new standard for air-balancing
“VALIDATING AND ADJUSTING VENTILATION SYSTEMS”
The FlowFinder mk2® is the successor of the well known FlowFinder 153, which has
proven itself as the benchmark for air flow measurements to balance mechanical air
supply and exhaust systems. The new FlowFinder mk2® is fully zero pressure compensated
in the range 10 to 550 m m3/hr (6 to 323cfm) and has a calculated compensation for its
resistance up to 850 m3/hr (500cfm).
Characteristics
●
●
●
●
●
MANUAL
Applications
Large range (10 to 850 m /hr or 6 to
500cfm, supply and exhaust)
Light and easy to handle
Short measuring cycle
With full battery 8 hours of
measurement (at flows < 100m3/hr)
High accuracy
3
Standard equipment:
● Battery charger
● Transport case
● User manual
● Calibration certificate
(traceable to primary standards)
● MicroSD card with USB and
SD adapter.
●
●
●
●
●
Ventilation systems, also with low terminal
resistance
Small air volumes
Heat exchange units
Natural ventilation
Line and large diffusers (with optional hoods or
by adding measurements)
Options:
● Foldable hood 600 x 600mm
● Non-foldable hood 400 x 400mm
● Extra battery pack
Rijswijk
Look at w w w.acin.nl for more information
tel: +31 70-3070703 I fax: +31 70-3070938 I email:www.acin.nl I web: www.acin.nl
@awsrijswijk
CONTENTS
1. PARTS OF THE FLOWFINDER MK2®
4
2. SPECIFICATIONS OF THE FLOWFINDER MK2®
4
3. REMOVING AND CHARGING OF THE BATTERY PACK
5
4. SWITCHING ON OF THE FLOWFINDER MK2®
5
5. THE DISPLAY IN MEASURING MODE
6
6. DEFAULT SETTINGS
6
7. USING THE HOODS 7
8. MEASURING WITH THE FLOWFINDER MK2®
8
9. ADDING OF MEASUREMENTS 9
10. STORING THE DATA
9
11. PROCESSING THE STORED DATA 10
12. PROCESSING THE DATA IN EXCEL
11
13. NAMING THE DATA STORAGE LABELS
12
14. EMERGENCY STOP
12
15. SWITCHING OFF OF THE FLOWFINDER MK2®
12
16. STORING THE FLOWFINDER MK2®
12
17. CALIBRATION
12
18. NOTES
13
Despite the fact that this manual has been carefully put together by ACIN instrumenten bv, no responsibility is accepted for
any errors in the manual and possible consequences. We are obviously very interested in your comments and additions.
No part of this publication may be reproduced and / or published by print, photocopy, microfilm or any other method
without prior written permission of ACIN instrumenten bv.
19-11-2013
manual
3
1. PARTS OF THE FLOWFINDERMK2
Use the packing list to verify all
elements of the FlowFinder mk2® are
present. Avoid lifting the FlowFinder mk2®
while holding onto a hood.
1. FlowFinder mk2® with display
2. Transport case (with key)
3. Battery pack (mounted onto the
FlowFinder mk2®, or stored in the case)
4. Battery charger
5. Hood 230x230x145mm
6. Hood 600x600mm (optional)
7. MicroSD card, USB adapter, SD adapter
6
2
5
3
5
1
4
2. SPECIFICATIONS OF THE FLOWFINDER MK2
®
SPECIFICATIONS
FF MK2
Air flow range (supply and exhaust)
10..550 m³/uur with zero pressure compensation
551..850 m³/uur with calculated compensation
Air temperature range
-20..+80oC
Uncertainty (@ 20°C) *
3% of the reading, with a minimum of 3 m³/hr
Repeatability
better than 1%, with a minimum of 3 m³/hr
Resolution
1 m³/hr, 0.1cfm, 0.1l/s
RV range
0..100%
Full charge capacity
8 hours
Weight
Dimensions FlowFinder
7
2230 gram battery pack included
mk2
ø 260 x 350mm
* Uncertainty is defined as the square root of the sum of the squares of non-lineairity, hysteresis and repeatability.
4
manual
19-11-2013
3. REMOVING AND CHARGING
OF THE BATTERY PACK
The battery pack has to be removed from
the FlowFinder mk2® before the charger
can be connected. While charging, the
colour of the LED indicates the status.
yellow
: no battery pack connected
orange
: fast charging
green-yellow : top of charging
green
: trickle charging
orange-green : ERROR
The battery pack has to be removed from the FlowFinder mk2® before the charger can be connected. While
charging, the colour of the LED indicates the status.
4. SWITCHING ON OF THE
FLOWFINDER MK2®
There are two measuring modes:
‘Validate’ and ‘Adjust’. In validate mode
the FF decides when it is ready with a
measurement. The measured value will
be displayed only when the FF is ready.
In adjust mode, after pushing the red
button, a measured value is displayed
continuously. One can then adjust the
ventilation system while measuring.
Important:
When the FlowFinder mk2® is stored away for a longer period of time one should store the battery pack
separately, after having it charged first. Extra battery packs can be ordered from ACIN.
19-11-2013
manual
5
5. THE DISPLAY IN MEASURING
MODE
The display in measuring mode shows a
number of parameters
1.
2.
3.
4.
5.
time
date
USB connected: yes/no
status battery pack
pressure difference ΔP in Pascal to
be compensated
6. temperature in °C of °F
7. relative humidity RH in %
8. measured flow in l/s, m³/u of CFM
Below the unit of flow is a bar that during a measurement will fill up in green, the length of the green bar
is proportional to the airflow.
When the FlowFinder mk2® is in rest and in measuring mode, you will find below this bar a:
1. blinking ‘0’ 2. ‘- - -‘
: this means that the FF has been set to adjust
: this means that the FF has been set to validate
On the sides of the display there are a slot for a micro SD card, a mini USB port and a programming cable.
At this moment the SD card and the USB port cannot be used yet.
6. DEFAULT SETTINGS
Press the white arrow in the right upper corner of the starting screen to go to Start Menu.
Choose Options
This screen allows for the settings to be changed. Once you are ready these settings will be stored as the
default settings.
1.
2.
3.
4.
6
Choose language Nederlands or English
Choose Units
Choose the unit of temperature: Celcius or Fahrenheit
Choose the unit for flow: l/s, m³/u or CFM
manual
19-11-2013
Leave this menu by pressing the white arrow again. The Options menu appears again.
5. Choose Validate or Adjust as default start up measurement of the FlowFinder mk2®
6. Set the Date:
6.1 Press date
6.2 Enter the year (yyyy)
6.3 OK
6.4 Enter the month (mm)
6.5 OK
6.6 Enter the day (dd)
6.7 OK
7. Set the Time:
7.1 Press time
7.2 Enter the hour (0 tot 23)
7.3 OK
7.4 Enter the minutes
7.5 OK
Leave the Options menu by pressing the white ‘return’ arrow. The
Start Menu appears. From the Start Menu the FlowFinder mk2® will
go into measuring mode by touching ‘validate’ or ‘adjust’.
7. USING THE STRAIGHT HOOD 230X230X145mm AND
THE HOOD 600X600mm
Preferably, the FlowFinder mk2® is used with at least the
straight hood, certainly for most supply grilles. If space
is limited certainly exhaust can be measured without a
hood.
The straight hood is placed on top of the housing and is
hold in place by pulling the O-rings over the little black
knobs.
The same procedure can be used to mount the
600x600mm foldable hood.
For flows above 50CFM it is assumed that the
600x600mm hood is used.
Avoid lifting the FlowFinder mk2® just using the hoods.
19-11-2013
manual
7
8. MEASURING WITH THE FLOWFINDER MK2®
The FlowFinder mk2® has two measuring modes. The so-called
‘validation mode’ and the ‘adjustment mode’. In the options
menu one of these modes can be set as default. At start up the FFmk2 will be ready to measure in the default mode.
The measuring mode can be recognized by the red blinking ‘0’
(adjustment mode) or the ‘- - -‘ (validation mode).
In validation mode the FF-mk2 a measurement starts by pushing the red button (behind the left knob).
The FF-mk2 decides when the measurement is ready, normally within 10 to 15 seconds. It will display the
measurement result which then can be stored by touching ‘store’.
In adjustment mode the FF-mk2 a measurement starts by pushing the red button. The blinking number
turns green and will change depending on the air flow volume. The measurement will only stop after the
red button is pushed again. This way you can adjust the diffuser or valve to the desired air flow. You may
take down the FF-mk2 to adjust the valve. Wait long enough until a more or less stable reading is reached,
also after placing the FF-mk2 back again. Always stop and start again when going from one measuring
location to another. The measuring result can’t be stored.
Switching between modes: push the ‘return’ button in the right upper corner. Then you can select either
‘validate’ or ‘adjust’. To change the default mode you have to go to the options menu.
To do a measurement, hold the FlowFinder mk2® by the left and right round handles and place the
instrument over the outlet or inlet you want to measure. Make sure to make a tight connection by
pushing enough to avoid measuring secondary air.
Press the red button behind the left knob shortly in order to start the measurement.
In validation mode the text “compensating pressure” will appear, after a few seconds followed by ”measuring”. Also an arrow will appear on the bottom of the display, indicating the direction of the flow.
After approximately 10 seconds the result of the measurement will appear, expressed in l/s, m³/u of CFM.
In adjustment mode the colour of the blinking number will turn green and change until it reaches the air
flow amount.
As a consequence of variations in the ventilation system itself and to lower the total uncertainty,
we advise to repeat the measurement 2 or 3 times shortly after each other.
A new measurement can be started by pressing the red button.
Best is to wait until the ventilator in the FF has come to a rest (at low flows) or runs at its non-zero
pressure compensated speed as dictated by the flow.
8
manual
19-11-2013
9. ADDING OF MEASUREMENTS
Thanks to the zero pressure compensation of the FlowFinder mk2®, it is possible to measure the air flow
at part of the diffuser. Because the FlowFinder mk2® actively compensates its own resistance, the flow
through the other (free) part of the diffuser will not or hardly be influenced.
As an example, the flow through a line diffuser can be measured by moving the FF across the diffuser
evenly after every measurement, and adding each measured value.
10. STORING THE DATA
1. Execute a measurement in ‘Validate’
mode as described in chapter 8
2. After the measurement is ready the result will appear together with a button
‘Store’
5. Select one of the options and a
numerical keypad will show
6. Here you can add a 4-digit numerical
identifier to the record of this measurement. This number
can be a house number or some number from a plan or some clever combination. You are free to
design your own data-id system.
3. Touch ‘Store’
4. Now a screen with 8 buttons will show.
The text in the buttons can be defined
by the user.
19-11-2013
7. After touching ‘ok’ the display will return to the measuring mode
manual
9
11. PROCESSING THE STORED DATA
1. Turn off the FF-mk2®
2. Remove the micro-SD card by pushing on it and then releasing it
3. Either the SD adapter or the USB adapter can be used to connect to your computer
4. After inserting the card, a screen ‘Automatic…’ will pop up.
5. Select ‘Show maps and files’
6. Now you should see a list of text files with the name format yyyymmdd (year month day).
The file names.txt will be discussed further down
7. An example of the data format is given below.
10
manual
19-11-2013
12. PROCESSING THE DATA IN EXCEL
1.
2.
3.
4.
5.
6.
7.
8.
Turn off the FF-mk2®
Remove the micro-SD card by pushing on it and then releasing it
Either the SD adapter or the USB adapter can be used to connect to your computer
When inserted a screen ‘Automatic…’ will pop up. Ignore this screen or click cancel.
Open Excel
Select ‘Data’, ‘From text’
The Wizard ‘Import text’ will be activated
Select the data file and ‘next’
9. Select ‘; ‘ as separator and ‘Continue’
10. The data are now ready for further processing and reporting
19-11-2013
manual
11
13. NAMING THE DATA STORAGE LABELS
1.
2.
3.
4.
5.
6.
Connect de microSD card using the USB or SD adapter with
your computer
Open the file ‘names.txt’with a text editor like WordPad. This
file should already be on the micro SD card.
The labels for the buttons are listed where each label is given in
square brackets like [kitchen].
All these identifiers can be edited to your wish (so project
name / apartment type / room / grill type)
IMPORTANT: take care always to use these [] brackets around
the labels. For instance [kitchen]
Save the file to the microSD card overwriting the old file
14. EMERGENCY STOP
If for any reason it is needed to interrupt the measurement just press the red button shortly.
15. SWITCHING OFF OF THE FLOWFINDER MK2®
To switch off the FlowFinder mk2® press the button on the left side of the
display. The display will turn black for a moment and will then show an information screen displaying, among other info, the serial number, the software
version and the last calibration date. This screen can also be found through
the touch screen under Options, Information.
16. STORING THE FLOWFINDER MK2®
1. 2. 3. 4. 5. 6. Place the hood 230x230x145mm upside down over the top of the FlowFinder mk2®.
Place the FlowFinder mk2® in the transport case with the display facing up. Take care the display is not
tilted, but laying horizontally.
Behind the elastics in the lid, paperwork can be stored.
If any resistance is felt when closing the lid of the case, don’t push, but try to remove the cause.
When the FlowFinder mk2® will not be used for a longer period of time, the battery pack has to be
removed. It can be stored in the bottom of the transport case.
Consequently, when the FF hasn’t been used for several weeks, the battery has to be charged fully before
using.
17. CALIBRATION
We recommend to have the FlowFinder mk2® calibrated once every year. Please contact us or your
distributor to arrange
12
manual
19-11-2013
18. NOTES
Model
DATE:
FlowFinder mk2®
Serial no. housing
Serial no. battery pack:
Delivered to
Contact person
Department
Address
Zip code
Country
Telephone
Email
Last calibration
19-11-2013
Initials
Remarks
Next calibration
manual
13