1
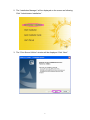
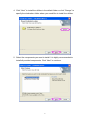
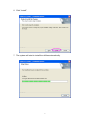
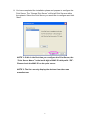
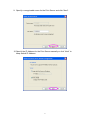
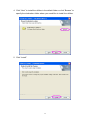
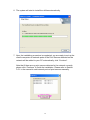
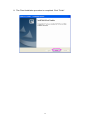
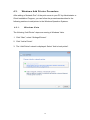
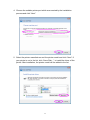
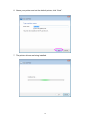
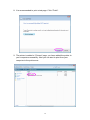
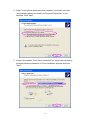
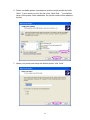
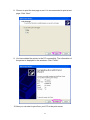
Print Server
Quick Installation Guide
1. Product Introduction
Thank you for purchasing and using our print server. This print server allows
your printer to become a shared device on the network. It offers printing
flexibility and manageability on your Wired or Wireless Local Area Network
with an absolute minimum setup and maintenance required.
This print server supports TCP/IP, NetBEUI, IPX/SPX, and AppleTalk protocols.
It is the best network printing solutions for various common network operating
systems such as:
z
Windows Peer-to-Peer Printing (Windows
98SE/Me/NT/2000/XP/2003/Vista)
z
Microsoft Windows NT/2000/2003 Server-Based Printing
z
Novell NetWare 3.x/4.x/5.x
z
Unix/Linux
z
MAC OS 9.x above
With the help of Installation Wizard, you can easily and instantly complete the
settings for the printing environment, and start enjoying the fantastic features
provided by this print server.
This guide is used for quick installation on Windows peer-to-peer printing
environments. If you have a simple network you can simply follow the
procedures described in this guide step-by-step to complete the installation. If
you find any problem, please refer to the User’s Manual on the CD-ROM for
more detail information.
1
2. Package Contents
This package contains the following components:
z
One Print Server
z
One Antenna (Only for Wireless Print Server)
z
One Power Adapter
z
One Quick Installation Guide
z
One CD-ROM (Including all the software utilities, drivers and User’s
Manual)
2
3. Hardware Installation
1. Unpack the print server package and verify that all the items listed in the
previous section are provided.
2. Connect the print server to the printer you want to share on the network.
3. Connect the print server to your network by attached the network cable
to the UTP port of the print server.
4. Connect the power adapter to the print server. The print server will
perform the Power-On-Self-Test (POST) after it is powered on. During
the POST, the Status LED will be blinking. When the Status LED is
unlighted, the print server is ready.
Note: You must use the power adapter shipped along with the print
server, do NOT use any other power adapter from other sources.
3
4. Software Installation
4.1.
Administration Utilities Installation
The Administrator Installation Program executes a wizard-driven procedure
that performs the following tasks:
z
Install all necessary utilities and drivers in your PC (including the
client utilities).
z
Prompt to configure the print server (including the print server name
and IP Address).
z
Add the network port of the print server to your PC.
After the installation, perform the standard “Add Printer” procedure and
choose the print server’s “Network Port” in the “Available Ports” list. Then, you
can test printing function from the Administrator PC.
The Administrator Installation can be performed on Windows
98SE/Me/NT/2000/XP/2003/Vista with the same user interface. Before the
installation, please verify that your network protocol is installed on your PC
(TCP/IP, IPX and/or NetBEUI). Note that the following steps are running in
Windows XP, for other Operation Systems the procedures are similar.
1. Insert the CD shipped along with the print server into your CD-ROM
drive. The Autorun.exe program should be executed automatically. If not,
run Autorun.exe manually from CD-ROM drive’s root directory.
4
2. The “Installation Manager” will be displayed on the screen as following.
Click “Administrator Installation”.
3. The “Print Server Utilities” window will be displayed. Click “Next”.
5
4. Click “Next” to install the utilities in the default folder or click “Change” to
specify the destination folder where you would like to install the utilities.
5. Select the components you want to install. It is highly recommended to
install all provided components. Click “Next” to continue.
6
6. Click “Install”.
7. The system will start to install the utilities automatically.
7
8. You have completed the installation phase and prepare to configure the
Print Server. The “Choose Print Server” will list all Print Servers within
the network. Select the Print Server you would like to configure and click
“Next”.
NOTE 1: If this is the first time you configure the Print Server, the
“Print Server Name” is the last 6-digit of MAC ID with prefix “PS”.
Please check the MAC ID on the print server.
NOTE 2: The list can only display the devices from the same
manufacturer.
8
9. Specify a recognizable name for the Print Server and click “Next”.
10. Specify the IP Address for the Print Server manually or click “Next” to
keep default IP Address.
9
11. The configuration summary is displayed in the window. Now, you have
completed the Print Server setup. Click “Finish” and your system will add
network port of the Print Server to your PC automatically.
12. The Administrator Installation procedure is totally completed. Click
“Finish”.
10
4.2.
Client Utilities Installation
The Client Installation Program is a wizard driven procedure which will
perform the following tasks:
z
Install client utilities and drivers into your PC.
z
Automatically add all Network Ports to your PC.
The network port driver supports network protocol auto-detection. It will
automatically select an available network protocol (TCP/IP, IPX or NetBEUI) of
the client computer to connect to the print server.
Since both the print server side and client side support multi-protocols, the
configuration process of the client side is fully automatic.
After the installation, perform the standard “Add Printer” procedure and
choose the print server’s “Network Port” in the “Available Ports” list. You can
test printing from the PC to the print server as your local printer.
The Client Installation can be performed on Windows
98SE/Me/NT/2000/XP/2003/Vista with the same user interface. Before
installation, please confirm that your PC has already connected to the network
and installed at least one network protocol. Note that the following steps are
running in Windows XP, for other Operation Systems the procedures are
similar.
1. Insert the CD shipped along with the print server into your CD-ROM
drive. The Autorun.exe program should be executed automatically. If not,
run Autorun.exe manually from CD-ROM drive’s root directory.
11
2. The "Installation Manager" will be displayed on the screen as follows.
Click “Client Installation”.
3. The “Print Server Utilities” window will be displayed. Click “Next”.
12
4. Click “Next” to install the utilities in the default folder or click “Browse” to
specify the destination folder where you would like to install the utilities.
5. Click “Install”.
13
6. The system will start to install the utilities automatically.
7. Now, the installation procedure is completed, you are ready to set up the
client’s computer. All network ports of the Print Servers detected on the
network will be added to your PC automatically, click “Continue”.
Note that if there are no print servers detected in the network currently,
please click “Continue” to finish the installation. Please refer to Section
3.5.1 in the manual to add network ports of print servers manually.
14
8. The Client Installation procedure is completed. Click “Finish”.
15
4.3.
Windows Add Printer Procedure
After adding a “Network Port” of the print server to your PC by Administrator or
Client Installation Program, you can follow the procedures described in the
following sections to add printer to the Windows Operation Systems.
4.3.1.
Windows Vista
The following “Add Printer” steps are running in Windows Vista.
1. Click “Start”, select “Settings\Printers”.
2. Click “Add a Printer”.
3. The “Add Printer” wizard is displayed. Select “Add a local printer”.
16
4. Choose the suitable printer port which was created by the installation
process and click “Next”.
5. Select the printer manufacturer and the printer model and click “Next”. If
your printer is not in the list, click “Have Disk…” to install the driver of the
printer. After installation, the printer model will be added to the list.
17
6. Name your printer and set the default printer, click “Next”.
7. The printer drivers are being installed.
18
8. It is recommended to print a test page. Click “Finish”.
9. The printer is added to “Printers” page, you have added the printer to
your computer successfully. Now you can start to print from your
computer to the print server.
19
4.3.2.
Windows XP
The following “Add Printer” steps are running in Windows XP, the steps in
other Operating Systems such as Windows 98SE/Me/2000 are similar.
1. Click “Start”, choose “Settings” and select “Printers and Faxes”.
2. Click “Add a Printer”.
3. The “Add Printer Wizard” is displayed. Click “Next”.
20
4. Select “Local printer attached to this computer” and make sure that
“Automatically detect and install my Plug and Play printer” is not
selected. Click “Next”.
5. Choose the suitable “Print Server Network Port” which was created by
the Administrator Installation or Client Installation process and click
“Next”.
21
6. Select a suitable printer manufacturer and the printer model and click
“Next”. If your printer is not in the list, click “Have Disk…” to install the
driver of the printer. After installation, the printer model will be added to
the list.
7. Name your printer and setup the default printer, click “Next”.
22
8. Choose to print the test page or not. It is recommended to print a test
page. Click “Next”.
9. You have added the printer to the PC successfully. The information of
the printer is displayed in the windows. Click “Finish”.
10. Now you can start to print from your PC to the print server.
23