1
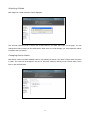
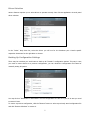
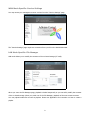
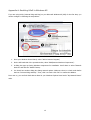
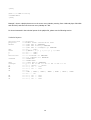
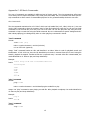
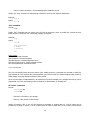
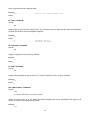
N-Series User’s Manual 156 Fifth Avenue, Suite 434, New York, NY 10010 212-647-9080 www.agnpro.com AGNPRO NMP/NXP Media Processors User's Manual Table of Contents Introduction.......................................................................................................................................... 2 Choosing A Mode................................................................................................................................... 2 System Requirements............................................................................................................................ 2 Operating Trimode™.............................................................................................................................. 2 Logging In............................................................................................................................................ 3 Selecting A Mode................................................................................................................................... 4 Changing Device Name.......................................................................................................................... 4 IP Configuration.................................................................................................................................... 4 Date/Time Setting................................................................................................................................. 5 Changing Password............................................................................................................................... 6 Driver Selection..................................................................................................................................... 6 Backing Up Configuration Settings........................................................................................................... 7 Logging Out.......................................................................................................................................... 7 WAN Mode Specific: Server Configuration................................................................................................ 8 WAN Mode Specific: Service Settings....................................................................................................... 8 LAN Mode Specific: File Manager............................................................................................................ 9 LAN Mode Specific: View Logs................................................................................................................ 9 SI Mode Specific: Protocol Selection...................................................................................................... 10 Appendix A: Enabling UPnP in Windows XP............................................................................................ 11 Appendix B: Playlist File Format............................................................................................................ 12 Example 1: simple playlist................................................................................................................ 12 Example 2: play-once playlist........................................................................................................... 12 Example 3: timed playlist................................................................................................................. 12 Technical Syntax............................................................................................................................. 13 Appendix C: SI Mode Commands.......................................................................................................... 14 Slot Commands............................................................................................................................... 14 Core Commands.............................................................................................................................. 15 1 Introduction The AGNPRO NMP/NXP media processors are equipped with the Trimode™ system to allow configuration for WAN (wide-area networking), LAN (local area networking), and SI (systems integration) operations. This document introduces the functionality of Trimode™ to provide basic understanding of the system. Choosing A Mode Trimode™ offers a selection of three modes: WAN (wide-area networking), LAN (local area networking), and SI (systems integration) modes. Each one is suitable for a different application: WAN mode: if you would like to use centralized management across the globe, choose this mode. The WAN mode works with the Adfotain Central Management Server that allows you to manage your media processor from anywhere TCP/IP is available. LAN mode: if you are using your media processor within a local network where direct TCP/IP connection is possible (no firewalls blocking access), use this mode to control the device via web pages to upload media files and playlists. SI mode: if you are integrating your media processor to be controlled from a PC by sending ASCII commands over TCP/IP, SSH (secure shell), or RS-232 (on applicable devices models only), choose this mode. System Requirements 1. A Trimode media processor; 2. Microsoft Internet Explorer or Mozilla Firefox web browser running on a desktop or laptop computer; 3. Optional: Microsoft Windows XP System with UPnP browsing enabled. See Appendix A on how to enable UPnP browsing. Operating The unit operated through a set of built-in browser-accessible configuration pages inside the the Media Processors. To access configuration pages, follow these steps: 1. Connect your device to a PC via Ethernet cable; 2. Connect the device to a VGA monitor; 3. Power up the device; 4. If you have the optional Windows XP with UPnP browsing enabled, then a. Open your Windows Explorer, look for a device named “Media Processor” under “My Network Places”; 2 b. Double-click on the icon to open the configuration page in your browser. 5. If you do not have the optional Windows XP with UPnP browsing enabled, then a. Note the device IP that is shown on the device’s screen during power up; if necessary, you may power-cycle the device to see the IP address again; b. Open your browser on the PC and view the URL http://nnn.nnn.nnn.nnn where nnn.nnn.nnn.nnn is the IP displayed by the device at power-up; this opens up the configuration page. Logging In When you first connect, you see the following log-in page: Use the default account “admin” and password “digiSignage” (case sensitive) to log in. Password can be changed later. After you have successfully logged, you may carry out the following device actions. 3 Selecting A Mode Each page has a mode selection control displayed: The currently selected mode is shown with a radio button in the dark strip region on the page. You can change the mode by clicking on the radio button. When there is a mode change, you are prompted to reboot to activate the new setting. Changing Device Name Each device carries a human-readable name to help identify the device. The name is shown when browsing in UPnP. The name can be changed in any one of the three modes by clicking on the “Device name” menu item on the left-hand side. 4 IP Configuration Each device can be configured an IP. Trimode™ supports dynamic IP assignment with DHCP and static IP assignment. You may specify a “DHCP class” if your DHCP server supports it. A configuration with static IP is shown in the figure above. Note that any changes in this page requires rebooting the device. Whenever rebooting is required, you will be given two buttons: click “Save” if you want to make more changes and reboot later, or “Save & Reboot” if you want to save settings and reboot immediately to make the new settings effective. WARNING: if you accidentally set the device to an improper IP setting, you may no longer be able to access the device. To restore the device to factory defaults (where DHCP is selected), hold down the “Reset” button located on the back of the media processor for at least five seconds during boot up. 5 Date/Time Setting The scheduling features of Trimode™ require the device’s clock to be set correctly. On the date/time setting page, your media processor is automatically synchronized with the PC’s clock. To synchronize device’s clock with your PC’s, first select the correct time zone for your device’s installed region. Then click the “Sync & Save” button to synchronize the clocks and save the time setting. Changing Password A single password allows you to access the Trimode™ configuration page and gain access in SI mode. To change the device’s password, enter the current password in the “Original Password” field, followed by the new password in each of the “New Password” and “Retype New Password” fields. When this is done, click the “Change Password” button to save the new password. 6 Driver Selection Various features requires you to select drivers to operate correctly. One of these applications is touch panel driver selection. In the “Driver” drop down list, select the driver you will use for the hardware port. Consult specific expansion documents for the right driver to choose. Backing Up Configuration Settings There may be occasions you would want to back up all Trimode™ configuration options. This way in case you need to restore device to a previous configuration, you can reload the configuration file instead of manually setting all options. You may click on “Download” to download the current configuration file. Save it to your PC in case you need to restore it later. To restore a previous configuration, click the “Browse” button to select a previously saved configuration file and click “Restore & Reboot” to restore it. 7 Logging Out After configuration is complete, you should log out of Trimode™, optionally reboot if any of your latest chages require reboot to activate. WAN Mode Specific: Server Configuration WAN mode operates by listening to controls issued by a centralized server. This can be configured in the “Server Configuration” page. You can also configure your HTTP Proxy and FTP Proxy if your network requires these settings to get pass firewalls. WARNING: if you accidentally set the device to an improper server/proxy setting, you may no longer be able to access the device. To restore the device to factory defaults (where DHCP is selected), hold down the “Reset” button located on the back of the media processor for at least five seconds during boot up. 8 WAN Mode Specific: Service Settings You may access your management server services from the “Service Settings” page. The “Service Settings” page requires a connection from your PC to the World Wide Web. LAN Mode Specific: File Manager LAN mode allows you to modify the contents of the on-board storage (CF card). When you enter the File Manager page, playback is halted temporarily so you can safely modify the contents of the on-board storage. When you switch out of the File Manager, playback of the new content resumes. You may upload media files as well as playlists. Please see Appendix B for instruction on how to create a playlist. 9 LAN Mode Specific: View Logs LAN mode also allows you to view device logs, including the exact time each file is played, as well as diagnostic information. You can click “Download” to obtain the logs as an .CSV spreadsheet that is compatible with Microsoft Excel and OpenOffice Calc. Remember to “save” the file instead of “open” to ensure log file is downloaded completely before opened. SI Mode Specific: Protocol Selection In SI mode, you can choose a variety of ways to control the device. In the “Protocol Selection” page, you can turn the following control paths on and off: Serial port (RS-232) SSH (secure shell, port 22) 10 Telnet (TCP/IP, port 46877) And you can select among two command sets Core commands; and Slot commands For details on the SI mode commands, see Appendix C. 11 Appendix A: Enabling UPnP in Windows XP If you are using UPnP (Universal Plug and Play) on your Microsoft Windows XP (SP2) for the first time, you need to configure it following the steps below: 1. Go to your Windows Control Panel, select “Add or Remove Program”; 2. On the left-hand-side of the opened window, select “Add/Remove Windows Components”; 3. A dialog box pops up listing Windows components for installation. Scroll down to select “Network Services” and click the “Details” button; 4. You should see another dialog box listing network options. Make sure there is a check mark before the item “Universal Plug and Play.” If not, click it to check. Click “OK” to confirm the addition. From now on, you can find UPnP devices listed in your Windows Explorer listed under “My Network Places” node. 12 Appendix B: Playlist File Format Each media player can play according to a complex schedule defined as a “playlist” file located on the on board storage. A playlist file is an ASCII text file. A simple playlist looks like Example 1: simple playlist [PL1:start] <VID1.MPG> <VID2.AVI> ^[PL1] Example 1 shows a simple playlist file defining one playlist named PL1 with two items: files VID1.MPG and VID2.AVI. At the end of the playlist a jump instruction ^[PL1] indicates that the flow logic goes back to the start of PL1. Example 2: play-once playlist [PL1:start] <VID1.MPG> <VID2.AVI> ^[PL2] [PL2] <VID3.MPG> <VID4.MPG> ^[PL2] Example 2 shows a playlist file containing two playlists: PL1 and PL2. PL1 defines the playback of VID1.MPG and VID2.AVI. Note that at the end of PL1, flow logic goes to play PL2, which loop plays VID3.MPG and VID4.MPG files. So in this example, VID1.MPG and VID2.AVI is played once, followed by continuous play back of VID3.MPG and VID4.MPG in a loop. Example 3: timed playlist [PL1:*/*/*-MON-08:00:00] <<VIDEO:ON>> <VID1.MPG> <VID2.AVI> 13 ^[PL1] [PL2:*/*/*-MON-17:00:00] <<VIDEO:OFF>> ^[PL2] Example 3 shows a playlist that turns on the screen every Monday morning from 8 AM and plays VID1.MPG and VID2.AVI, and turns off the screen every Monday at 5 PM. For those interested in the technical syntax of the playlist file, please see the following section. Technical Syntax playlist_file playlist header num event x y instruction command next timespec yy mm dd ww hh mm ss ::= ::= ::= ::= ::= ::= ::= ::= ::= ::= ::= ::= ::= ::= ::= ::= ::= ::= ::= ::= ::= ::= ::= ::= playlist* header event* instruction* next “[PL” num “]” NEWLINE “[PL” num “:start]” NEWLINE “[PL” num “:” timespec “]” NEWLINE “0” ... “255” “@(RECT:” x “,” y “,” x “,” y “)” next “0” ... “640” “0” ... “480” “<” filename “>” NEWLINE “<<” command “>>” NEWLINE “VIDEO:ON” “VIDEO:OFF” “^[PL” num “]” NEWLINE yy “/” mm “/” dd “-” ww “-” hh “:” mm “:” ss “*” | “2000” ... “2050” “*” | “1” ... “12” “*” | “1” ... “31” “*” “SUN” | “MON” | “TUE” | “WED” | “THU” | “FRI” | “SAT” “0” ... “6” “*” | “0” ... “23” “*” | “0” ... “59” “*” | “0” ... “59” 14 Appendix C: SI Mode Commands Two sets of commands are available for different level of device control. The slot command set offers ease of use with just four simple commands: LIST, LOAD, PLAY and LOOP; the core command set offers Pioneerstyle commands to allow control of customizable play lists for the greatest flexibility the device can offer. Slot Commands The slot commands maintain a list of 64 “slots” which can hold media files (.AVI, .MPG, .DSA, etc.). User can use the LIST command to show the contents (sizes) of the files loaded into each slot. He can use the LOAD command to load a media file (as a URL) into one of the slots. He can also play each slot using the PLAY command or loop a certain slot using the LOOP command. Slot #1 is allocated as a special “background slot” that is always playing (as a background) when no other play/loop commands is issued. “load” command Format: load index [url] index: a number between 1 and 64 (inclusive). url: an HTTP URL (optional) Usage: “load” command fetches an URL and identifies it as index. Index is used for playback control and identification. If URL is left out, then the file identified by the index is removed from the CF card. During file transfer, playback is stopped. Transferred file size is reported every 3 seconds. After file is downloaded, the media identified as #1 starts to play and loops indefinitely. Example: load 2 http://192.168.1.232/media/menu.avi Result: 202 Accepted 1324 2732 5201 10321 ... 200 OK “play” command Format: play index index: a number between 1 and 64 identifying the media file to play Usage: Use “play” command to start playing a media file. After playback completes, the media identified as #1 starts to play and loops indefinitely. Example: play 2 Result: 200 OK “loop” command Format: loop index 15 index: a number between 1 and 64 identifying the media file to play Usage: Use “loop” command to start playing a media file and loop the playback indefinitely. Example: loop 2 Result: 200 OK “list” command Format: list Usage: “list” command lists free space of the CF card as well as the sizes of media files, ordered by their index numbers. During the “list” command, playback is stopped. Example: list Result: 200 OK free 128343526 1 324232 2 12312323 ... 64 0 Result Codes 200 OK: Command executed. 202 Accepted: Command accepted. 400 Bad Request: Command argument error. 500 Internal Server Error: Device internal problem. 501 Not Implemented: Command invalid. Core Commands The core commands provide low-level control of the media processor. Commands are provided to select file, play selected file, loop selected file, pause playback, turn screen on/off (for DPMS-compliant VGA monitors), select playlist, and jump between sections of the playlist. At the current stage of implementation, all media files must be preloaded to the storage before they can be played back. The core commands provide no facilities for downloading or deleting files. SE “select” command Format: "filename"SE filenumSE filename: a file name in the storage. filenum: a file number in the storage. Usage: SE selects a file on the CF card storage for playback or looping later on. The file name can be provided as a string in quotes, or as a number which is used to match files of the format nnnnnnnn.DAT 16 where nnnnnnnn must be exactly 8 digits. Example: 4SE Result: R Select file named 00000004.DAT PL “play” command Format: PL Usage: Plays the file previously selected once. The command returns a response code when the command is received, and another when the playback completes. Example: PL Result: R R Playback starts... Playback finishes... LP “loop play” command Format: LP Usage: Loop-plays the file previously selected. Example: PL Result: R ST “still” command Format: ST Usage: Pauses playback of the current file. To continue playback, use the PL play command. Example: ST Result: R VD “video control” command Format: nVD n: 0 to turn off screen, 1 to turn on screen Usage: Turns the screen on or off. Works with DPMS-compliant VGA screen, specifically those that turn off when the H-sync/V-sync signals are grounded. Example: 0VD 17 Result: R #LP “load playlist” command Format: "filename"#LP filename: file name of the playlist Usage: Loads a playlist. See the later section on the definition of a playlist file. Example: "PL1.LST"#LP Result: R #JP “jump” command Format: n#JP n: number of the playlist section to jump to Usage: Jump to a section defined in the previously loaded playlist file (see #LP command). Example: 15#JP Result: R Result Codes R: Ok. E00: Communication error. E04: Feature not available. E12: Search error. 18