1
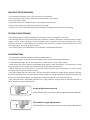
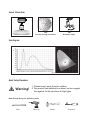
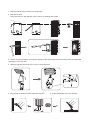
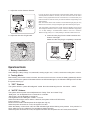
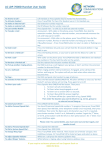
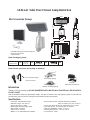
LX-SLL48 Solar Power Sensor Lamp Instruction
208mm
360mm
126mm
What’s Inside the Package
100mm
94mm
188.5mm
152.mm
177mm
• 48 LED matrix light w/motion detector
• Solar charger board
• User Manual
Note:Packaging items
LED
SENSOR LIGHT
1X
Solar panels
10V/2.5W
Cord: 5M
50mm
1X
Φ6 Plastic expansion
8X
4x30 Screw
8X
Note:Please purchase according to demand.
Car-mounted Charger
Auto repair lighting
12V Convert 9V
Charger
100V-240V Convert 9V
Introduction
Outdoor camping lighting
Thank you for purchasing SOLAR POWERED WITH MOTION ACTIVATED 48 LED SECURITY
FLOOD LIGHT
With its effortless setup and lightweight design, the light conforms to all your lighting needs. It was made to
provide many years of service using environmentally friendly solar power.
Specifications
• Coverage: 180º detection angle
• Detection range: 15m (22 ºC)
• LED single power: 0.06W
• Matrix light: 48 super bright LEDs
• Rated load: 3.5W Max.
• Light-control: <10LUX
• Battery: 7.4V, 2200mAH lithium battery
• Solar charger board: 10VDC/2.5W Monocrystalline
(with 15' cable) ( Life: over 3 years )
• Continuous illumination time: (2200mAH) Up to 4 hours
• Time setting: Min. 10 seconds, Max. 3 minutes.
• LED lamp installation height: 1m to 3m.
• Working temperature: -10 ºC to +40 ºC
• Luminous flux: 125lm
Important Safety Information
• Do not dispose of battery in fire. This may result in an explosion.
• Do not expose the light to fire or intense heat as the battery may explode.
• Do not immerse in water.
• Never look directly into the light or shine it into another person’s eyes.
• Follow proper safety tips to prevent from falling off a ladder.
• Consult your local construction safety guide if needed for installing the light fixture on a building.
One Year Limited Warranty
• This warranty does not apply to damage from misuse or incorrect installation/ connection.
• This warranty does not cover accessories, bulbs, batteries, accidents, alterations, unauthorized use or repair,
neglect, misuse, abuse, damages or defects resulting from normal wear and tear (including chips, fading
scratches, abrasions or discoloration due to usage or sun exposure), or failure to follow instructions for care
and maintenance, fire, flood, and Acts of God.
• This warranty does not include liability for incidental or consequential damages.
Installation Guide
• The light fixture should be installed on a flat and stable surface.
• Avoid placing objects in front of the motion detector that may affect detecting performance.
• Avoid installing the light near an air conditioner, a central heater, or high voltage system.
• Avoid placing the motion detector head toward street traffic or other movements. This will result in a false
trigger that will prompt the light to illuminate excessively and drain the battery life.
• Motion detection is most sensitive to movement across the device and less sensitive to motion moving
towards or away from it (see pictures below).
• The solar charger board should be set in a sunny area where maximum sunlight can be collected. Typically,
the solar board should face a direction (south) where sunlight can charge the board for at least 3 hours per day
(5 hours per day if behind glass). It is suggested to charge the light for 24 hours before first use.
• Use a soft wet cloth to periodically (at least once a year) clean the charger board to avoid the reduction of
power output due to accumulated dust.
Angle adjustment around
+45°
-45°
15°
HIGH SENSITIVITY from motion activity coming across the detector.
Fluctuation angle adjustment
LOW SENSITIVITY from motion activity coming towards the detector.
Sensor Information
15m
Correct moving orientation
180°
Detection angle
Spectrogram
Quick Setup Procedure
Warning!
1. Please keep it away from the children.
2.This product can installed for outdoor, but we suggest
that against for the rain/storm & High lights.
Note:Please bring the following tools
Pencil
Electric drill
Hammer
Screwdriver
1. Mark the wall where you wish to mount the light.
2. Drill all four holes.
Place the mount on the wall with nylon anchors ( if needed) and screws.
95.00
60.00
66.00
3. Please connect the battery according to diagram in the warning part of the instruction book, and assemble
the battery cover as it was.
4. Slide the light into the mount, then screw in the bottom bolt.
26.50
5. Mount solar board with screws. Adjust the direction.
6. Place solar board at a sunny location.
44.50
7. Adjust the motion detector direction.
It can be set at the range of 8second (counterclockwise rotation to the end) to
3minute(clockwise rotation to the end) .The timer will recount when the sensor
detect a moving signal before the end of the last time, so we advise that you’d
better set the time to minimum when you make the detection range testing or the
walking testing.
Note: The sensor need to wait 1secend to re-work after the light going off. Only
I
after the end of the time, the light will lighten again when detecting the signal.
This range refers to the radii of the circular region that appears on the ground
15°
when the light is installed in the 2.5 m height. A minimum detection range (nearly
+45°
4 m in radii) rotating a counterclockwise rotation to the end. A maximum
-45°
detection range (nearly 15 m in radii) rotating a clockwise rotation to the end.
8. Adjust the direction of light head.
+30°
-100°
9. Insert the wire plug from the solar board into the
bottom of the light.
Make sure the wire plug is completely connected.
+90°
-90°
Operational Guide
1. Battery Installation
Solar LED light, battery voltage 7.4V, 2200mAH, sensing angle> 150 º, in full lit, continuous working time> 4 hours.
2. Testing Mode:
Before testing, remove the screws in the back, then remove the back cover; connect the battery (2200mAH) with the
power connectors, the system will be started and the red LED indicate light on; the indication LED light will be off after
the system warming up.
3. “OFF” Statues
The system will be in “power fail safeguard” model. No motion detecting function. Consumes <25UA.
4. “AUTO” Statues
The system will accept the manual adjustment for “Delay Time” and “Sensi Tivity”.
“Delay time” can be adjusted from 10 seconds to 3 minutes.
“Sensi Tivity” can be adjusted to 15m(22°C).
The brightness of the LED lights: outside <10 LUX.
When the external light-control values > 200LUX, the system will shut off PIR sensor;
Power consume: <3MA
Electrical current:380~430 MA (when all the lights are fully on)
When the power is lower than <6.4V, the system Turn OFF.
When the battery is lower than 6.6V, the LED indication light will be blinking every 30secs for a period of 8
hours ,after 8 hours ,the voltage is not complete to sustain the work.
When the power is lower than <6.2V, the system will enter into the“power shut off ”mode,Current<25UA.
5. “ON” Statues
All the lights will be on under the system has been set at “ON”.The system will reduce the brightness to 70lux(≥
1/3 of the original brightness) with no motion being detected for 8 minutes.
Electrical current:500~600MA
When the power is lower than <6.4V, the system Turn OFF
When the battery is lower than 6.6V, the LED indication light will be blinking every 30secs for a period of 8
hours ,after 8 hours ,the voltage is not complete to sustain the work.
When the power is lower than <6.2V, the system will enter into the“power shut off ”mode.Current<25UA.
6. Oki Management
Impulse voltage is 9V, the maximum electric current is 650MA.
When connected to an external power adapter, LED indicator light will flash once.
Warning!
1.When leaving factory,the battery is disconnected. Please connect the battery when using the product.
2.When don’t use the product or conserve the product for a long time,Please disconnect the battery.
Connect/disconnect the battery connector.
Remove the installation base
Twist off two screws on the battery cover, and then remove the cover.
3.The LEDS in serial can function when all the seals installed in place.
4.Please don’t remove or connect with other lamp when powered on.
5.When the LEDS in serial are damaged ,you need experienced technician to repair using
the same rating LEDS.
Please confirm with profession installation.
Please cut off power supply before installation and removal operations.
Make sure that you have cut off the power for safety purposes.
Improper operation caused losses, the manufacturer does not undertake any responsibility.