1
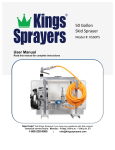
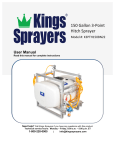
50 Gallon Skid Sprayer Model #: KSU50P6 User Manual
Read this manual for complete instructions
Need help? Call Kings Sprayers if you have any questions with this product.
Technical service hours: Monday – Friday, 8:00 a.m. – 5:00 p.m. ET
1-800-228-0905
|
[email protected]
Model #: KSU50P6
Table of Contents
Warranty .......................................................................................................................... 3
General Safety Information ........................................................................................... 3
Hazardous Substance Alert .......................................................................................... 4
Sprayer Components ..................................................................................................... 5
Getting Started ............................................................................................................... 7
Starting Your Skid Sprayer for the First Time ...................................................................... 7
Shutting Down Your Skid Sprayer ........................................................................................ 7
Engaging / Disengaging the Regulator ................................................................................. 7
Troubleshooting Your Sprayer ..................................................................................... 8
2 Warranty 5 year frame / 5 year tank / 1 year parts and labor (limited to manufacturer defects) / 1 year
pump (limited to manufacturer defects) / 3 year gas engine (limited to manufacturers defects).
The warranty will not apply to products that were improperly installed, misapplied, damaged,
altered or incompatible with fluids or components. Kings Sprayers obligation under this
warranty is limited to the repair or replacement of the product. All returns will be tested per
factory criteria. Products found not defective (under the terms of this warranty) are subject to
charges paid by the returnee for testing and packing of “tested good” non-warranty returns.
No credit or labor allowances will be given for products returned as defective. Warranty
replacement will be shipped at Kings Sprayers discretion. Kings Sprayers reserves the right to
choose the method of transportation.
Contact Kings Sprayers at 800-228-0905 to receive a Return Merchandise Authorization
(RMA#) before returning any products. The RMA number should be clearly marked on the
outside of the package. Kings Sprayers shall not be liable for freight damage incurred during
shipping. All products returned for warranty work should be sent shipping charges prepaid.
General Safety Information Roller pumps are intended for creating or booting dynamic pressure and depending on the type
of body, rotor and rollers used, will work with a variety of fluids. These pumps will work in a
variety of environments but they should never be used to pump liquids above 140°F (60°C) or
below 34°F (1°C), or when ambient air temperature is above 140°F (60°C). Any uses outside of
those specified in the pump manual are considered misuses and are prohibited. Only use
approved chemicals in your pump. Contact Kings Sprayers with any questions regarding
specific acceptable uses.
The following chemicals should never be put through any pump:
•
•
•
•
•
•
•
Gasoline (Petrol)
Kerosene/Kerosine (Paraffin)
Diesel Fuel
Ceramic Slurries
Sewage
Potable Water
Abrasive Fluids
Roller pumps are designed to operate effectively within the specified speed, pressure and
environmental ranges. Going outside of these ranges will void the warranty and could cause
damage to property, serious injury or death.
DO NOT run the pump faster than the maximum recommended speed
DO NOT run the pump higher than the maximum recommended pressure
DO NOT run pumps when the liquid, or ambient air, has exceed the maximum or minimum
temperature limit
DO NOT pump non-approved liquids (See Below)
DO NOT pump water or other liquids for human consumption
DO NOT operate any roller pump under the influence of drugs or alcohol
DO NOT run the pump dry
DO NOT pump abrasive fluids
DO NOT perform service or maintenance to the pump or attached components until the
pumping unit is below 109°F
3 Only authorized operators having the knowledge and skill necessary to safely use the pump, or
any equipment the pump is connected to, may run the pump.
When running roller pumps, it is essential that operators use hearing protection as the sound
levels reach levels of 80 decibels.
When handling pumps, wear steel-toed shoes and protective gloves in order to protect the feet
in the event the pump is dropped and protect the hands from chemicals or any sharp surfaces
on the pump.
When spraying manually, chemical-resistant facemasks and clothing should be worn to prevent
any chemicals from coming into contact with the skin or being inhaled.
When spraying manually, always spray downwind of yourself as long as the sprayed chemical
will not drift into the vicinity of other people.
When installing, adjusting or removing a roller pump, ensure that there are no objects which can
fall on the installer, and make certain that all machinery to which the pump is to be attached is
turned off.
Never operate a roller pump outside while there is a chance of getting struck by lightning.
Never leave wires or plumbing components where they can be a tripping hazard or become
entangled in a moving component.
Roller pumps should not be used if the ambient light is below 200lux.
All maintenance should be done when machinery is stationary and has been isolated from its
energy sources. It is dangerous to perform maintenance while machinery is still connected to its
power source. Machinery should be isolated from its electrical, hydraulic, shaft driven or gas
engine power source.
Be sure to release all pressure from the system before performing any sort of maintenance on a
roller pump.
Hazardous Substance Alert Any hazardous liquids should be disposed of in a manner that complies with local and national
regulations. Never dump fluids onto the ground.
Always drain and flush pump before servicing or disassembling for any reason.
Always drain and flush pump prior to returning unit for repair.
Never store pumps containing hazardous chemicals.
Before returning pump for service/repair, drain out all liquids and flush unit with neutralizing
liquid. Then, drain the pump. Attach tag or include written notice certifying that this has been
done. Please note that it is illegal to ship or transport any hazardous chemicals without United
States Environmental Protection Agency Licensing.
4 Sprayer Components Ball valve to shut off flow when cleaning strainer or servicing sprayer Inline strainer to keep debris out of system Figure 1: Side View Regulator – screw in/out to adjust pressure (“in” increase; “out” decrease) Nut to lock pressure setting Unobstructed bypass line Pressure gauge to calibrate when spraying On/Off Ball valve for agitation Figure 2: Detailed View 5 Quick disconnect to spray gun 50’ high pressure hose Figure 3: Back View Drain Figure 4: Side View
6 Getting Started Starting Your Skid Sprayer for the First Time 1.
2.
3.
4.
5.
6.
7.
8.
9.
10.
11.
12.
13.
14.
15.
16.
17.
Ensure all unnecessary personnel are clear of the area.
For initial testing, it is recommended to start with clean water instead of chemicals to
confirm the system and plumbing components are leak free.
Ensure there is fluid in the tank and supply line. DO NOT run dry.
Check line strainer for debris or clogs and remove if any found.
Check all plumbing connections to ensure tightness.
Ensure all valves and regulators are set to the desired setting and working properly.
Ensure all hoses are positioned properly and undamaged.
Then, follow these steps to starting the engine.
First, set the ON/OFF switch to the “ON” position.
Set the throttle to SLOW.
Make sure the gas is set to the ON position.
For a cold start, set the choke to FULL.
Pull start the engine.
Release the choke.
Raise the throttle to FULL.
Pressure should be adjusting to approximately 150 psi. Notice a slight drop in
pressure when the agitator is turned ON and rise when it is turned to the OFF
position. The agitator mixes the tank to help evenly dispense chemicals.
Adjust the spray gun to the proper setting and you are ready to spray.
Shutting Down Your Skid Sprayer 1.
2.
3.
4.
Shut sprayer down using the outlined steps.
Disengage the regulator. (Refer to the Engaging/Disengaging the Regulator section
below).
Idle-down the throttle to the “SLOW” position.
If the pump will not be used for several hours flush your system to prolong the life of
the components.
For a step-by-step video guide, visit the Sprayer Depot YouTube Channel to watch instructional
videos on a variety of topics. Tune in by visiting http://YouTube.com/SprayerDepot.
Engaging / Disengaging the Regulator 1. To create pressure, screw the “T” handle clockwise to compress the spring until you
reach the desired PSI setting on the gauge.
2. Lock in the pressure rating by tightening the nut on the “T” handle.
3. To lower the pressure rating, unscrew the “T” handle counterclockwise.
4. To prolong the life of the regulator’s internal components back the pressure off
before shutting down your sprayer.
7 Troubleshooting Your Sprayer Symptom
Pump does not prime
Possible Reason
Leak in suction line
Obstruction in suction line
Suction hose sucked to
bottom or side of tank
Rollers stuck in pump
Loss of pressure
Pump seals leaking air
Pump turning in wrong
direction
Clogged suction strainer
Kinked or blocked suction
hose
Air leak in inlet side plumbing
Relief valve setting too low or
weakened spring
Faulty gauge
Pump seals leak air
Nozzle orifices worm
Pump worn
Pump will not turn
Corrosion (rust), scale or
residue
Solid object lodged in pump
Correction
Check hose and fittings for
leaks and correct
Inspect hose for obstructions
such as debris or loose inner
liner and remove from the line
Cut a notch or “V” in end of
suction hose
Disassemble pump and
inspect rollers
Replace seals
Correct rotation of pump
Check strainer and clean
regularly
Inspect suction hose and
repair as necessary
Check hose and connections
for leaks. Use pipe joint
sealant and retighten
connection
Check relief valve and correct
setting or replace spring
Replace gauge
Replace seals
Replace nozzles
Repair pump (See Repair
Instructions)
Replace pump
Disassemble pump and
remove objects
8