1
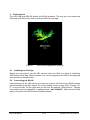
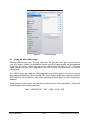
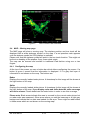
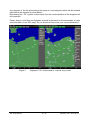
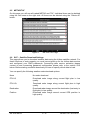
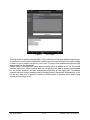
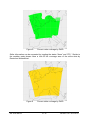
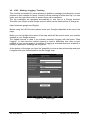
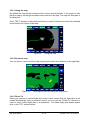
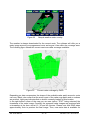
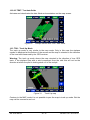
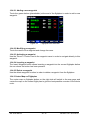
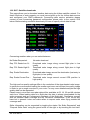
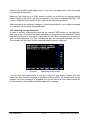
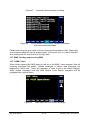
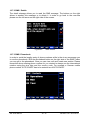
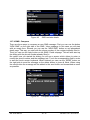
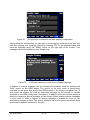
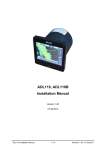
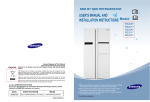
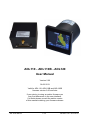
ADL110 - ADL110B - ADL120
User Manual
Version 2.00
06.09.2013
Valid for ADL110, ADL110B and ADL120B
firmware version 2.00 and later
If your device is using an earlier firmware you
may find differences in the user interface.
If in doubt please consult the earlier version
of this manual matching your firmware release.
ADL User Manual
1 / 42
Revision 2.00 - 06.09.2013
Contents
1 Version History......................................................................................................... 4
2 Page Index ............................................................................................................... 4
3 General Description ................................................................................................. 4
4 Certification ADL110 – ADL110B – ADL120 ............................................................ 4
5 Disclaimer ................................................................................................................ 4
6 Warning!................................................................................................................... 4
7 Emergency procedures ............................................................................................ 5
8 Dedicated touchscreen interface vs. WLAN iPad interface ...................................... 5
9 iPad Interface ........................................................................................................... 6
9.1
Installing the iPad App ...................................................................................... 6
9.2
Connecting the WLAN ...................................................................................... 6
9.3
Using the ADLConnect app............................................................................... 7
9.4
MAP – Moving map page.................................................................................. 8
9.4.1
Configuring the map................................................................................... 8
9.4.2
Managing the flightplan.............................................................................. 9
9.5
METAR/TAF.................................................................................................... 11
9.6
SAT – Satellite Download Settings ................................................................. 11
9.7
SMS – Satellite SMS....................................................................................... 14
9.7.1
Composing SMS messages..................................................................... 15
9.8
LOG – Weblog / Logging / Tracking................................................................ 16
9.9
SYS – System Configuration........................................................................... 17
10 Dedicated touchscreen interface............................................................................ 18
10.1 Permanent Status Information ........................................................................ 19
10.2 MAP: Moving Map with Weather Overlay........................................................ 19
10.2.1 Using the map.......................................................................................... 20
10.2.2 Zoom the map.......................................................................................... 20
10.2.3 Direct To .................................................................................................. 20
10.2.4 Center on Airplane ................................................................................... 21
10.2.5 Enlarge Map / Hide Navigation ................................................................ 21
10.2.6 Map Overlay options ................................................................................ 21
10.3 TRK : Track Up Mode ..................................................................................... 26
10.4 FPL : Flightplan / Route .................................................................................. 27
10.4.1 Automatic FPL / Serial Aviation In ........................................................... 27
10.4.2 Manual FPL ............................................................................................. 27
10.4.3 Center Map on Flightplan......................................................................... 28
10.5 MET: METAR / TAF ........................................................................................ 29
10.6 SAT: Satellite downloads ................................................................................ 31
10.6.1 Starting a single download....................................................................... 32
10.6.2 Activating automatic downloads............................................................... 33
10.7 SMS: Sending and receiving SMS .................................................................. 34
10.7.1 SMS / Inbox ............................................................................................. 34
10.7.2 SMS / Details ........................................................................................... 35
10.7.3 SMS / Phonebook .................................................................................... 35
10.7.4 SMS / Compose....................................................................................... 36
10.8 LOG: Weblog / Internet logging....................................................................... 37
10.9 SYS: System Data and Configuration ............................................................. 39
10.9.1 Deutscher Wetterdienst Credentials ........................................................ 39
ADL User Manual
2 / 42
Revision 2.00 - 06.09.2013
11 Deutscher Wetterdienst (DWD) credentials ........................................................... 40
12 Contact................................................................................................................... 42
ADL User Manual
3 / 42
Revision 2.00 - 06.09.2013
1
Version History
Version 0.9 published 10.12.2012
Version 0.91 published 22.01.2013
Version 0.92 published 29.01.2013
Version 0.93 published 08.02.2013
Version 0.94 published 12.02.2013
Version 1.20 published 16.04.2013
Version 1.30 published 20.06.2013
Version 2.00 published 06.09.2013
2
Page Index
This manual contains numbered pages 1 to 42.
3
General Description
The ADL devices provide data link devices. They can download weather data while in
flight. Besides they feature in flight SMS communication. The data link works through
the Iridium satellite network with global coverage.
4
Certification ADL110 – ADL110B – ADL120
The ADL devices can be installed in certified aircraft if a suitable minor change is used.
The device itself does not come with any certification. Please consult the minor change
documentation for details.
5
Disclaimer
The ADL devices are provided as non certified components. The only basis on which
they can be installed permanently is an appropriate minor change. It is the sole
responsibility of the user and installer that they are installed and used in a legal way.
The devices may stop working at any time. Do not undertake flights you would not
undertake without the ADL devices.
6
Warning!
While we do everything we can to ensure quality the ADL devices might not work at
any time. In addition they may display false information. Never penetrate weather
based on the information provided by the ADL110 – ADL110B or ADL120. This
information is for situational awareness only. The devices features a GPS moving map
system. This system is designed to display the aircraft position in relation to the
weather data. It is not designed as a means of primary navigation. Especially the build
in database is not updated in a regular aviation cycle. It is also not maintained to the
standards of certified aviation databases.
ADL User Manual
4 / 42
Revision 2.00 - 06.09.2013
7
Emergency procedures
If you suspect any malfunction of the ADL devices or interference with other aircraft
systems, deactivate the device by pulling / deactivating the aircraft circuit breaker for
the device or unplugging it from the cigarette lighter socket. Whichever is applicable
depends on your installation. Do not reactivate the device until the problem has been
investigated and resolved on the ground.
In case of a generator failure or similar situation requiring electric load shedding,
deactivate the ADL devices by pulling / deactivating the aircraft circuit breaker for the
device or unplugging the cigarette lighter cable.
8
Dedicated touchscreen interface vs. WLAN iPad interface
Depending on your device it will feature a dedicated touscreen, a WLAN interface for
the iPad or both. The devices have the following capabilities:
ADL110
ADL110B
ADL120
ADL120 with external display
ADL User Manual
Dedicated touchscreen only
Dedicated touchscreen and WLAN iPad interface
WLAN iPad interface only
Dedicated touchscreen and WLAN iPad interface
5 / 42
Revision 2.00 - 06.09.2013
9
iPad Interface
The ADL110B and ADL120 feature the WLAN interface. This way you can connect an
iPad and control the ADL device using the ADLConnect App.
Figure 1
9.1
ADLConnect application starting
Installing the iPad App
Before you can start to use the ADL devices with your iPad, you have to install the
ADLConnect iPad App. Please contact us so we can register your iPad for the App and
provide you the download link.
9.2
Connecting the WLAN
After powering up the ADL device you have to connect the iPad to the WLAN access
point provided by the ADL device. Go to the Setting screen of your iPad. Choose “WiFi” on the left side. On the right side you will see the network “ADLConnect”. Choose
this network and if prompted for a password type “adl110adl120”. Make sure the iPad
really connects to the ADLConnect wireless network.
ADL User Manual
6 / 42
Revision 2.00 - 06.09.2013
Figure 2
9.3
WLAN settings
Using the ADLConnect app
Start the ADLConnect app. The top status bar will indicate if the app is connected to
your ADL device. When connected the Iridium and GPS signal quality will be displayed
in the top left corner. In the right top corner you will see the time in UTC. This time
signal comes from the GPS integrated in your ADL device and thus does not need to
be adjusted.
The ADLConnect app used the GPS integrated in the ADL device. It does not require
any additional Bluetooth GPS or similar. But due to Apple certification requirements this
GPS signal is not available to other iPad applications which have not been specifically
adapted.
At the bottom of the screen you find the six main screens of the application. These will
be explained in the following sections:
MAP – METAR/TAF – SAT – SMS – LOG - SYS
ADL User Manual
7 / 42
Revision 2.00 - 06.09.2013
Figure 3
9.4
ADLConnect user interface
MAP – Moving map page
The MAP page will show a moving map. The airplane position and true track will be
displayed with a white airplanes symbol on the map. If a red question mark appears
over the airplane symbol no GPS position is available.
Please note that the airplane symbol will point in the true track direction. This might not
be the true heading of the airplane if any cross winds exists
The map can be zoomed and scrolled in traditional iPad fashion using one or two
fingers.
9.4.1 Configuring the map
At the top of the screen you see a button bar which allows configuring the screen. If a
button is green it means that the information is displayed. If it is gray that layer of
information is not shown on the map. The buttons are
Radar
Displays the currently loaded radar picture. A timestamp for this image will be shown at
the right bottom of the map.
Strike
Displays the currently loaded strike picture. A timestamp for this image will be shown at
the right bottom of the map. If you display radar and strike data the strike coverage
will not be shown. Please deactivate the radar button in order to see this coverage.
Please note: Black areas indicate this area is covered by the current radar picture but
no radar echo was measured. Other areas where you see the basemap or a light gray
background indicate that no data was loaded for this area. There might be radar echos
in these areas which are not shown on the moving map!
ADL User Manual
8 / 42
Revision 2.00 - 06.09.2013
Figure 4
ADLConnect - MAP Page
Route
Your current route including all its waypoints is displayed on the map.
Basemap
The basemap containing coastlines and international borders is displayed using this
button.
Navaids
VOR and NDB. If you zoom out beyond a certain zoom level no more navaids will be
shown for a better overview.
Airports
The airports displayed are adapted to the current zoom level of the map. Please zoom
in to see all airports in a certain area.
9.4.2 Managing the flightplan
On the right side of the map page you see your current flightplan as a list of waypoints.
If you activate the “FPL IN” button at the right top, the ADL device will start to read
flightplan data from the panel mounted GPS. This feature will only work if the
appropriate cable connection has been installed.
If you do not want to receive the current flightplan from the panel mounted GPS,
deactivate “FPL IN”. Now you can enter the flight plan manually. In order to do so touch
the placeholder and enter the name of a navaid or airport. Waypoints can be deleted
from the list using the red cross. You can insert a waypoint by touching the name of
ADL User Manual
9 / 42
Revision 2.00 - 06.09.2013
any waypoint in the list and entering the name of a new waypoint which will be inserted
right before the waypoint touched before.
By pressing the “-D>” symbol a direct track from the current position to the waypoint will
be computed.
Please keep in mind that the flightplan entered is the basis for the downloads of radar
and strike data on the SAT page. So you should at least enter your current destination.
Figure 5
ADL User Manual
Flightplan: FPL IN activated vs. manual entry mode
10 / 42
Revision 2.00 - 06.09.2013
9.5
METAR/TAF
On this page you will see all loaded METAR and TAF. Individual items can be deleted
using the red cross on the right side. All items can be deleted using the “Delete All”
button.
Figure 6
9.6
METAR/TAF Page
SAT – Satellite Download Settings
This page allows you to download weather data using the Iridium satellite network. For
these functions to work properly you must have signed up for the Iridium data service
and configured your DWD passwords. Concerning data service activation please
contact us and concerning password configuration please refer to the section SYS
below. Before starting a satellite download you have to specify which data to load.
You can specify the following weather radar download options:
None
No radar download
FPL LQ
Download radar image along current flight plan in low
quality
FPL HQ
Download radar image along current flight plan in high
quality
Destination
Download radar image around the destination (last entry in
flight plan) in low quality.
Position
Download radar image around current GPS position in
high quality.
ADL User Manual
11 / 42
Revision 2.00 - 06.09.2013
Figure 7
SAT Page
The high and low quality settings differ in the resolution of the downloaded radar image.
In general we recommend loading the smaller and more cost efficient low quality image
in order to get a rough overview of your route. For any more detailed analysis the high
quality data can be requested.
Please keep in mind that new radar data currently will be available at 03, 18, 33 and 48
minutes each hour. When loading data for a flight plan the data is always downloaded
for the active segment and any subsequent segments of the flight plan. Familiarize
yourself with the current weather radar coverage area by Deutscher Wetterdienst. It will
not do any harm but in general it does not make sense to request radar when flying
outside the coverage area.
ADL User Manual
12 / 42
Revision 2.00 - 06.09.2013
Figure 8
Current radar coverage by DWD
Strike information can be requested by toggling the states “None” and “FPL”. Similar to
the weather radar please have a look at the coverage area of the strike data by
Deutscher Wetterdienst.
Figure 9
ADL User Manual
Current strike coverage by DWD
13 / 42
Revision 2.00 - 06.09.2013
Below you can enter up to 8 ICAO codes for which you would like to receive weather
reports. On the right side of the ICAO code you can specify if you want to download
METAR, TAF or both. Using the red cross ICAO codes can be deleted from the list.
After completing the download settings you have the possibility to do a single download
or to activate the automatic download mode.
At the bottom of the Sat page you will see the ADL system messages. These show you
the current status messages of your ADL device.
Warning: Automatic downloads are a powerful tool to keep the weather information up
to date. But it will initiate each hour four downloads specified as specified by you.
Expect transmission cost of up to approximately 10 Euro per hour.
After turning off the ADL device the automatic download mode will be deactivated in
order to protect you from unwanted downloads the next time you turn it on. If you want
to use the automatic download mode again, you have to reactivate this mode after
powering up your ADL device.
9.7
SMS – Satellite SMS
The ADL devices can send and receive SMS messages via satellite. This functionality
is completely separated from the SMS functionality your iPad might have on the
ground, being connected to a conventional cellular network.
Figure 10
ADL User Manual
SMS Page
14 / 42
Revision 2.00 - 06.09.2013
SMS sent from the airplane will appear at the receiver originating from a special phone
number. The recipient can then answers and the messages will be routed back to the
ADL device. If you wish to send SMS from a mobile phone without first sending a
message from the ADL device to this phone number please contact us.
The SMS page will show you a list of all incoming messages received. New messages
will be highlighted by a yellow border. By pressing the OK button of the individual
message you can indicate that you read the message and the yellow border will
disappear. Using the arrow you can reply to an individual message. The red cross
allows to delete messages.
9.7.1 Composing SMS messages
In order to send an SMS message either use the reply button of an existing message or
the “Compose” button at the top of the screen.
A “Compose SMS” dialog will appear. Please enter the mobile phone number of the
recipient starting with a “+” sign and the country code. This is very important else
the system does not know in which country the SMS should be routed.
The ADLConnect App will request access to your iPad phone book. If you grant access
to your phonebook all entries will be displayed and you can choose one of the
numbers. Below you can enter a text which may contain a maximum of 160 signs.
Figure 11
Composing and sending a SMS
By pressing the “Send SMS” button the SMS will be transferred to the ADL device and
send as soon as possible. You can follow this process on the Sat page where status
messages will be generated for the SMS delivery.
ADL User Manual
15 / 42
Revision 2.00 - 06.09.2013
9.8
LOG – Weblog / Logging / Tracking
This function is intended for users whishing to publish a message including their current
position on their website for family, friends or others wishing to follow their trip. You can
make your trip logs either public or protect them with a password.
The log messages are uploaded automatically in real time to a Google Account.
Therefore you require a valid Google account which can be obtained free of charge at:
https://accounts.google.com/SignUp
Before using the LOG functions please enter your Google credentials at the top of the
page.
Below you can configure the name of the map which will be used to store your position
updates in your Google account.
The Update Interval is used if you activate automatic Logging with the button “Start
Logging”. In that case the interval entered is used to determine how often to post
updates of your current position. In addition if logging is activated whenever a takeoff or
landing is detected a message will be posted.
At the bottom of the page you have the possibility to enter a manual message and post
it together with your current position on the Google map.
Figure 12
ADL User Manual
LOG Page
16 / 42
Revision 2.00 - 06.09.2013
9.9
SYS – System Configuration
At the top part of the SYS page you have to enter your credentials from Deutscher
Wetterdienst. For details on how to get these please refer to the section “Deutscher
Wetterdienst (DWD) credentials“ below.
At the bottom of the SYS page you will see a set of system information which is mainly
transferred from the ADL device. Of special interest are the iPad and ADL software
versions.
Figure 13
ADL User Manual
SYS Page
17 / 42
Revision 2.00 - 06.09.2013
10 Dedicated touchscreen interface
The ADL110, ADL110B and ADL120 with external display are operated through a
touch screen.
The ADL devices do not feature an on/off switch. The devices are switched on and off
using the radio master switch of the aircraft. After electrical power is delivered to the
device it will show the boot screen. At the bottom of the screen you will see boot
messages. After booting the warning page will be displayed. You have to confirm that
you understood the warning by pressing “Ok”. Then the map page will be displayed and
the device is ready for operation.
Figure 14
Figure 15
ADL110 Boot screen
ADL110 general warning
Once booted the main navigation of ADL devices is found on the bottom of the screen.
The selected page of the user interface will be highlighted in blue.
ADL User Manual
18 / 42
Revision 2.00 - 06.09.2013
Figure 16
Empty MAP page showing the bottom navigation
10.1 Permanent Status Information
On the right top of the screen you will permanently see status information. This
includes the current time in UTC as provided by the GPS receiver. Below you will see
two signal quality indicators. The left symbol related to the Iridium satellite signal
quality. On the right side you see the GPS quality bars. At least 1 bar will be required in
order to get a GPS position fix. If no GPS position is available the last aircraft position
will be shown on the map overlaid with a red question mark.
Figure 17
Time: 10:51 UTC, five bars Iridium reception, five bars GPS reception
10.2 MAP: Moving Map with Weather Overlay
The MAP page shows a moving map. The current aircraft position is displayed using a
white airplane symbol. The symbol will be turned according to the current true ground
track. Please not if any side wind component exists, this will not be the heading of your
aircraft. Thus in strong winds weather you see in front of your aircraft may not be in
front of your aircraft symbol on the moving map and vice versa.
The map is displayed using a mercator projection. Therefore true north will always be at
the top of the screen but surface representation may be distorted compared to the real
dimensions on the globe. Please note the ADL devices have not yet been tested for
operations near the geographic earth poles.
ADL User Manual
19 / 42
Revision 2.00 - 06.09.2013
10.2.1 Using the map
By default the map will be centered at the current aircraft position. If you wish you can
pan the map by touching the borders and corners of the map. The map will then pan in
this direction.
If the “TEXT” Overlay is activated (see below) a scale in nautical miles will be indicated
at the bottom left corner of the map
Figure 18
Using the map
10.2.2 Zoom the map
You can zoom in and out of the map using the plus und minus buttons on the right side.
Figure 19
Zooming into the map using the plus button
10.2.3 Direct To
When you operate in manual flight plan mode, which means that the flight plan is not
loaded automatically from an external device, you can use the “Direct To” shortcut in
order to enter a direct flight plan to a destination. For further flight plan details please
refer to the “FPL” section below.
ADL User Manual
20 / 42
Revision 2.00 - 06.09.2013
10.2.4 Center on Airplane
This button centers the map at the current airplane position if the map has been
panned manually before.
Figure 20
Centering the panned map using the airplane symbol
10.2.5 Enlarge Map / Hide Navigation
Using this button you can enlarge the map area by hiding the top navigation controls. In
order to show the controls again you have to press this button again.
Figure 21
Enlarged map
10.2.6 Map Overlay options
On the top of the screen you see the sub navigation for the different map overlays. You
can select the following overlays. If an overlay is selected the corresponding button will
turn green.
10.2.6.1 RADAR: Weather Radar Overlay
This overlay shows the currently loaded weather radar image. For instructions on how
to load new data please refer to the SAT section.
ADL User Manual
21 / 42
Revision 2.00 - 06.09.2013
Figure 22
Sample weather radar overlay
The weather is always downloaded for the current route. The software will offer you a
radar image around your programmed route as long as it lies within the coverage area.
The following figure shows the current maximum radar coverage available:
Figure 23
Current radar coverage by DWD
Depending on data compression the shape of the available radar patch around a route
can vary. Black color mean that the area is part of the radar map patch and no echoes
are present. Light gray indicates that no data is currently loaded for this location.
In the right bottom corner of the map you can see (option “TEXT” being selected) the
timestamp of the radar image. Currently the european radar images are produced with
a timestamp at the hour and at 15, 30 and 45 minutes. Please note that DWD takes
approximately 3min to produce the final image. Thus, new radar data is available for
ADL User Manual
22 / 42
Revision 2.00 - 06.09.2013
download at 03, 18, 33 and 48 minutes each hour. Radar data is displayed using six
colors including black as shown on the scale below.
Figure 24
Ascending radar color scale
Warning: Weather radar is for situational awareness only. The moving map system
can produce unnoticed errors or the radar image provided by DWD could contain
errors. Even if no fault exists the radar information will always be several minutes old.
Therefore this system is not suitable for weather penetration.
10.2.6.2 STRIKE: Strike Overlay
The strike overlay displays the available strike / lightning map. This function
automatically deactivates the weather radar overlay and vice versa. Please note that
the strike information provided by Deutscher Wetterdienst (DWD) differs in its coverage
from the radar data.
Figure 25
Current strike coverage by DWD
Contrary to radar data strike data is constantly updated. When a new strike map patch
is loaded the strike information of a 8 minute interval starting 10minutes before the
request will be considered.
On the display black color indicates that this area is part of the loaded strike map patch.
Light gray indicates areas which are not included. Strike events are indicated by yellow
crosses. Please note that the cross will be centered in a map pixel containing strikes. If
multiple strikes have been measured by DWD in the raw data for this area only one
yellow cross will appear on the strike map.
ADL User Manual
23 / 42
Revision 2.00 - 06.09.2013
Figure 26
Sample strike overlay
Warning: Strike information is for situational awareness only. The moving map system
could produce unnoticed errors or the strike image provided by DWD could contain
errors. Therefore this system is not suitable for weather penetration.
10.2.6.3 ROUTE: Flightplan Overlay
This function allows overlying the currently active flightplan over the map. The active
leg is drawn in magenta. The rest of the route is drawn in white color.
Figure 27
ADL User Manual
Sample flightplan overlay
24 / 42
Revision 2.00 - 06.09.2013
Figure 28
Sample flightplan with active waypoint EDDS
10.2.6.4 AIP: Airports and Navaids
Displays or hides the database airports and navaids. Depending on the zoom level of
the map only major airports or in some cases no airports at all will be shown.
Figure 29
Sample view with AIP overlay
Warning: The incorporated database is for situation awareness only. The database is
not compiled and updated following aviation standards.
ADL User Manual
25 / 42
Revision 2.00 - 06.09.2013
10.2.6.5 TEXT: Text data fields
Activates and deactivates the data fields and annotations on the map screen.
Figure 30
Sample screen with TEXT data fields
10.3 TRK : Track Up Mode
The track up mode is very similar to the map mode. Only in this case the airplane
symbol is displayed at the bottom of the screen and the map is oriented in the direction
of the true track measured by the GPS receiver.
Warning: The track up mode shows the map oriented in the direction of true GPS
track. If the airplane flies with a wind component from the side this will not be the
direction at which the pilot is looking strait out of the cockpit.
Figure 31
Track Up map
Contrary to the MAP mode it is not possible to pan the map in track up mode. But the
map can be zoomed in and out.
ADL User Manual
26 / 42
Revision 2.00 - 06.09.2013
10.4 FPL : Flightplan / Route
The FPL page will display the current route. We have to distinguish two totally separate
operating modes. First automatic flightplan mode (FPL IN activated) and manual
flightplan mode FPL IN deactivated.
Figure 32
Manual flightplan with waypoint DENKO activated
10.4.1 Automatic FPL / Serial Aviation In
The automatic flightplan mode is selected by pressing the “FPL IN” button on the right
side. In this mode the current flight plan is received through the serial port from another
FMS/GPS System. The ADL device will only display this flight plan. Any changes must
be made in the primary system. If available this is the preferred mode because the
database in the primary GPS will probably contain more data and no work is required
entering the route multiple times for different devices.
Figure 33
Automatic flight plan (FPL IN)
10.4.2 Manual FPL
If no automatic flight plan mode is activated the flight plan is entered manually by the
user as follows.
ADL User Manual
27 / 42
Revision 2.00 - 06.09.2013
10.4.2.1 Adding a new waypoint
Touch the green dashes (placeholder) at the end of the flightplan in order to add a new
waypoint.
Figure 34
Flightplan edit interface
10.4.2.2 Modifying a waypoint
Touch the name of the waypoint and change its name.
10.4.2.3 Activating a waypoint
Use the “Direct To” button next to the waypoint name in order to navigate directly to this
waypoint.
10.4.2.4 Inserting a waypoint
The Insert Waypoint button allows inserting a waypoint into the current flightplan before
the row where the button has been pressed.
10.4.2.5 Delete a waypoint
Use the delete waypoint function in order to delete a waypoint from the flightplan.
10.4.3 Center Map on Flightplan
The center map on flightplan button on the right side will switch to the map page and
center the map on the current flight plan to give the best possible overview of the whole
route.
ADL User Manual
28 / 42
Revision 2.00 - 06.09.2013
Figure 35
Figure 36
The center on flightplan button on the FPL page
Map centered on the flightplan for better overview
10.5 MET: METAR / TAF
The met page displays the currently available METAR/TAF reports. If reports are
available the list of corresponding airports will be displayed. By touching the airport
name you get to the detail page where you can read METAR and/or TAF.
Use the arrow on the right side in order to get back to the overview. With the red cross
button on the overview you can delete all METAR/TAF. With the red cross symbol on
the individual METAR/TAF detail page you can delete this specific message. For
information on how to download METAR/TAF please refer to the “SAT” section below.
ADL User Manual
29 / 42
Revision 2.00 - 06.09.2013
Figure 37
ADL User Manual
METAR/TAF overview
Figure 38
METAR/TAF details
Figure 39
METAR/TAF details
30 / 42
Revision 2.00 - 06.09.2013
10.6 SAT: Satellite downloads
This page allows you to download weather data using the Iridium satellite network. For
these functions to work properly you must have signed up for the Iridium data service
and configured your DWD passwords. Concerning data service activation please
contact us and concerning password configuration please refer to the section SYS
below. Before starting a satellite download you have to specify which data to load.
Figure 40
Configuring the weather download
Concerning weather radar you can select between:
No Radar Requested:
No radar download
Req. FPL Radar Low Q.:
Download radar image along current flight plan in low
quality
Req. FPL Radar High Q.:
Download radar image along current flight plan in high
quality
Req. Radar Destination:
Download radar image around the destination (last entry in
flight plan) in low quality.
Req. Radar Current Pos. :
Download radar image around current GPS position in
high quality.
The high and low quality settings differ in the resolution of the downloaded radar image.
In general we recommend loading the smaller and more cost efficient low quality image
in order to get a rough overview of your route. For any more detailed analysis the high
quality data can be requested.
Please keep in mind that new radar data will be available at 03, 18, 33 and 48 minutes
each hour. When loading data for a flight plan the data is always downloaded for the
active segment and any subsequent segments of the flight plan. Familiarize yourself
with the weather radar coverage area by Deutscher Wetterdienst. It will not do any
harm but in general it does not make sense to request radar when flying outside the
coverage area.
Strike information can be requested by toggling the states “No Strike Requested” and
“Request Strike Data” using the green arrow on the right or by touching the text itself.
ADL User Manual
31 / 42
Revision 2.00 - 06.09.2013
Similar to the weather radar please have a look at the coverage area of the strike data
by Deutscher Wetterdienst.
Below you can enter up to 8 ICAO codes for which you would like to receive weather
reports. Right of the ICAO code you can specify if you want to download METAR, TAF
or both. Using the delete button ICAO codes can be deleted from the list.
After completing the download settings you have the possibility to do a single download
or to activate the automatic download mode.
10.6.1 Starting a single download
In order to actually download the data use the request “REQ” button on the right side.
After you do so a log screen will open indicating the progress of your download. Please
note that a minimum of two signal quality bars for the Iridium network are necessary in
order to download data. You can nevertheless start the download whenever you like.
The software will then wait until the required satellite signal is detected.
Figure 41
Transmission log screen
You can abort the transmission at any time using the stop button. Please note that
before the data request message is uploaded to the satellite, the transmission will be
stopped. Once the message is uploaded you can still cancel but the data packets will
be transmitted to the satellite and data usage will be charged.
ADL User Manual
32 / 42
Revision 2.00 - 06.09.2013
Figure 42
Transmission log screen
The satellite transmission works in data packets. First a request package is send to our
proxy server. The data is downloaded using your credentials from the DWD servers
and finally the data is split into multiple packets for the transmission to the ADL device.
Finally the ADL device will receive the individual packets until the request weather
download is completed. The log will indicate the receipt of the individual packets. In
general you can expect a total duration of two minutes for the download depending on
conditions.
When the download is finished the stop button on the right transforms into an Ok
button. Pressing this button brings the SAT page back to its initial stage and directs you
to the MAP or MET page depending on your weather download.
The actual transmission costs will depend on your individual data contract.
10.6.2 Activating automatic downloads
Besides the possibility to start an individual download you can activate automatic
downloads. In this mode the device will automatically download the data selected when
new data is available. In order to start this mode you have the press the Auto button on
the right side and confirm in the pop up dialog that you want to start this mode.
A green border around the SAT button in the bottom navigation indicated that auto
mode is activated.
ADL User Manual
33 / 42
Revision 2.00 - 06.09.2013
Figure 43
Figure 44
Automatic download pop up dialog
Green border in the bottom navigation indicates
active automatic downloads
Please note using the auto mode involves continuous transmission costs. Depending
on the data selected this can be approximately 10 Euro per hour. In order to stop the
auto mode press the stop button on the right side.
10.7 SMS: Sending and receiving SMS
10.7.1 SMS / Inbox
When initially opening the SMS page you will be on the SMS / Inbox subpage. Here all
incoming messages are shown. Unread messages in yellow, read messages are
displayed in white color. Touch any message in order to get to the detail subpage.
While unread messages exist the SMS symbol in the bottom navigation will be
highlighted by a yellow frame.
Figure 45
ADL User Manual
SMS inbox with one unread message
34 / 42
Revision 2.00 - 06.09.2013
10.7.2 SMS / Details
The detail subpage allows you to read the SMS message. The buttons on the right
allows to answer this message or to delete it. In order to go back to the overview
please use the left arrow on the right side of the screen.
Figure 46
SMS details
10.7.3 SMS / Phonebook
In order to avoid the lengthy entry of phone numbers while in the air we encourage you
to use the phonebook. With the phonebook button on the right side of the SMS / Inbox
you can get to the phonebook. Here you can view, edit and create new entries. Please
remember when entering phone number for you contact to always use the international
notation using the plus sign and the country code. For example a German mobile
phone number 0172/1234567 has to be entered as +491721234567.
Figure 47
ADL User Manual
SMS contacts overview / Phonebook
35 / 42
Revision 2.00 - 06.09.2013
Figure 48
SMS contacts details
10.7.4 SMS / Compose
There are three ways to compose an new SMS message. First you can use the button
“NEW SMS” on the right side of the SMS / Inbox subpage. In this case you will start
with an empty form. Second you can use the “NEW SMS” button on any phonebook
detail page. This way you start with the phone number of the recipient already filled in.
Third you can use the reply button on the SMS / Detail subpage. This will also start up
the dialog with the phone number already filled in.
No matter how you started the dialog you will see a screen which allows to enter or
modify the phone number and the message text. Touch the corresponding field in order
to start the touch screen keyboard. When finished you can use the “SEND” button on
the right side to send the message or the delete button to clear all fields. When using
the send button the message will be added to the send buffer and transmitted as soon
as possible.
Figure 49
ADL User Manual
Compose a new SMS
36 / 42
Revision 2.00 - 06.09.2013
Figure 50
Entering the phone number, always preceeded by a + sign
10.8 LOG: Weblog / Internet logging
This function is intended for users whishing to publish a message including their current
position on their website for family, friends or others wishing to follow their trip. You can
make your trip logs either public or protect them with a password.
The log messages are uploaded automatically in real time to a Google Account.
Therefore you require a valid Google account which can be obtained free of charge at:
https://accounts.google.com/SignUp
Using the lock symbol on the right side of the WEB page you can open the
configuration screen.
Figure 51
Auto mode activated
On the configuration screen you have to enter your Google username and Password.
Besides you have to specify the name of the map on which your messages should be
displayed. If the map does not exist in the Google account once the first message is
posted it will be created automatically.
ADL User Manual
37 / 42
Revision 2.00 - 06.09.2013
Figure 52
Google Login credentials and auto weblog configuration
Having done the configuration you can type in a message by pressing on the gray text
field and entering your message. Return by pressing “OK” on the keyboard page and
send the message using the “SEND” button on the right side of the screen. Your
message will then be posted on your Google map.
Figure 53
LOG page allowing to enter a new Weblog message
In addition to manual message you can activate the automatic mode by pressing the
“Auto” button on the WEB pages. The activity of the auto mode is continuously
indicated by the green box around the WEB symbol in the bottom navigation bar. In
auto mode the system will post an automatic message at the interval in minutes
specified on the WEB config page (see above). In addition when the system detects a
takeoof or landing a special message will be posted. When posting manual messages
in auto mode or when a takeoff or landing message is posted the timer for the
automatic messages is reset. This feature allows to log your for family and friends while
producing no addition workload for the pilot.
ADL User Manual
38 / 42
Revision 2.00 - 06.09.2013
When using the automatic weblog please take into account that every position
message will produce modest satellite transmission costs. Depending on your contract
these will be approximately 0,08 EUR + VAT per message.
10.9 SYS: System Data and Configuration
The SYS page displays current technical information including software versions, GPS
receiver data etc. Plus und Minus Symbols on the right you can adjust the brightness of
the display for night use.
Figure 54
System Data page with display brightness controls on the right side.
10.9.1 Deutscher Wetterdienst Credentials
Using the lock symbol on the right side of the SYS page you can edit the Deutscher
Wetterdienst credentials. For details please refer to the section “Deutscher
Wetterdienst (DWD) credentials” below.
Figure 55
ADL User Manual
DWD login screen
39 / 42
Revision 2.00 - 06.09.2013
11 Deutscher Wetterdienst (DWD) credentials
In order to use the weather data link you need a current account at Deutscher
Wetterdienst. If you do not yet please contact us we will help you.
The required login details can be found on the login letter send to you by DWD. Please
not that you will be given two usernames and passwords. One is used for www login.
This is the username / password combination you also use for login on
http://www.flugwetter.de. The second is the FTP login which is used for programmatic
downloads from ftp://ftp.pcmet.de. Figure 56 shows a sample letter from DWD
containing the login credentials.
You have to enter both as parts of the desired data (strike maps) are downloaded via
the www login while other parts (radar, METAR, TAF) are downloaded via the FTP
login.
ADL User Manual
40 / 42
Revision 2.00 - 06.09.2013
Figure 56
ADL User Manual
DWD credentials sample
41 / 42
Revision 2.00 - 06.09.2013
12 Contact
Dr. Golze Engineering
Bredowstr. 29
10551 Berlin
http://www.ing-golze.de
[email protected]
+49 30 39805204
ADL User Manual
42 / 42
Revision 2.00 - 06.09.2013