1
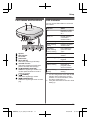
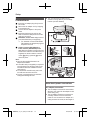
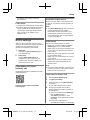
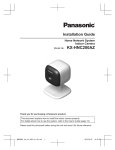
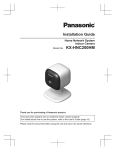
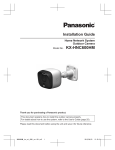
System Setup Guide
Home Network System
HUB
Model No.
KX-HNB600AZ
Thank you for purchasing a Panasonic product.
This document explains how to configure the hub and access it using a mobile
device. These steps must be followed before you can use the system.
For details about how to use the system, refer to the User’s Guide (page 17).
Please read this document before using the unit and save it for future reference.
HNB600AZ_(en_en)_0325_ver.040.pdf
1
2015/03/25
13:55:42
Table of Contents
Introduction
Accessory information ..................................3
Expanding the Panasonic Home Network
System .........................................................4
Important Information
About this system .........................................6
For your safety .............................................6
Important safety instructions ........................8
Security cautions ..........................................8
For best performance ...................................9
Other information .........................................9
Setup
Part names and functions ..........................11
LED indicator ..............................................11
Connections ...............................................12
Wi-Fi® settings ...........................................13
Registering another mobile device .............15
Registering other devices to the hub ..........16
Appendix
Wireless communication range (DECT) .....17
Accessing the User’s Guide .......................17
Wall mounting ............................................18
Specifications .............................................20
Open source software notice .....................21
Software information ..................................21
Warranty (for New Zealand) .......................22
2
HNB600AZ_(en_en)_0325_ver.040.pdf
2
2015/03/25
13:55:42
Introduction
Accessory information
Supplied accessories
No.
Accessory item/Part number
A
AC adaptor/PNLV236AL
B
Telephone line cord (for Australia)*1
1
C
Telephone line cord (for New Zealand)
1
D
Wall mounting adaptor
1
*1
Quantity
1
The telephone line cord comes connected with the telephone plug.
A
B
C
D
Additional accessories
microSD card (not supplied)
A commercially-available microSD card must be inserted into the hub in order to record images
from cameras. The following types of microSD cards are supported.
R microSD / SDHC card: Up to 32 GB
Other information
R Design and specifications are subject to change without notice.
R The illustrations in these instructions may vary slightly from the actual product.
Trademarks
R
R
R
R
R
microSDHC Logo is a trademark of SD-3C, LLC.
iPhone and iPad are trademarks of Apple Inc., registered in the U.S. and other countries.
iPad mini is a trademark of Apple Inc., registered in the U.S. and other countries.
Android is a trademark of Google Inc.
Microsoft, Windows, and Internet Explorer are either registered trademarks or trademarks of
Microsoft Corporation in the United States and/or other countries.
R Wi-Fi, WPA, and WPA2 are registered trademarks or trademarks of Wi-Fi Alliance.
R All other trademarks identified herein are the property of their respective owners.
Notice
R The hub supports microSD and microSDHC memory cards. In this document, the term
“microSD card” is used as a generic term for any of the supported cards.
3
HNB600AZ_(en_en)_0325_ver.040.pdf
3
2015/03/25
13:55:42
Introduction
Expanding the Panasonic Home Network System
The Panasonic Home Network System is a wireless system that lets you create a powerful
network of devices, such as cameras, sensors, and smart plugs, and control them all with an
easy-to-use app.
Compatible devices are explained below. For information about the Home Network app, refer to
the User’s Guide (page 17).
The maximum number of devices for each device type is listed below.
Digital Cordless Handset (KX-HNH100AZ: 6 max.*1)
R Makes and receives calls using your home landline
R Can be used to change the system’s arm mode
R Displays system status
R Receives notification when the sensors are triggered
Indoor Camera (KX-HNC200AZ: 4 max.*2)
R Full-colour camera and built-in microphone for live monitoring
and recording
R Built-in visual sensor, audio sensor, and temperature sensor
can be used to trigger other actions (camera recording, turning
on a light, etc.)
R Built-in microphone and speaker for two-way communication
Outdoor Camera (KX-HNC600AZ: 4 max.*2)
R Full-colour camera with built-in microphone for live monitoring
and recording
R Built-in visual sensor and infrared sensor can be used to trigger
other actions (camera recording, turning on a light, etc.)
R Built-in microphone and speaker for two-way communication
R Splash proof design for permanent, outdoor installation
Window/Door Sensor (KX-HNS101AZ: 50 max.*2)
R Detects when the corresponding window or door is opened
R Can be used to trigger other events (camera recording, turning
on a light, etc.)
Motion Sensor (KX-HNS102AZ: 50 max.*2)
R Detects motion in the surrounding area
R Can be used to trigger other events (camera recording, turning
on a light, etc.)
4
HNB600AZ_(en_en)_0325_ver.040.pdf
4
2015/03/25
13:55:42
Introduction
Smart Plug (KX-HNA101AZ: 50 max.*2)
R Can be turned on and off using the handset or Home Network
app, when triggered by a sensor, or according to a schedule
R Built-in overcurrent and overwattage detection for added peace
of mind
R Power consumption is logged for your reference
*1
*2
Optional handsets may be a different colour from that of the handset supplied as part of a
pre-configured bundle.
A total of 6 cordless handsets, 4 cameras, and 50 other devices (motion sensors, window/
door sensors, smart plugs, etc.) can be registered to the hub.
The Home Network System product lineup is growing!
You can look forward to new devices that will make your Home Network System even more
useful and convenient.
For information about the latest devices and bundles, visit the website below.
For Australia: www.panasonic.com/au
For New Zealand: www.panasonic.com/nz
Mobile devices
Your mobile devices: 8 max.*1
You can expand the system by installing the Home Network
app on your mobile devices (smartphones, tablets, etc.) and
registering your mobile devices to the hub.
See page 13 for more information about the Home Network
app.
Note:
R You must configure the hub’s Wi-Fi settings before you can
use the app.
*1
8 mobile devices can be registered to the hub, however, only the first 4 can use phone
features.
5
HNB600AZ_(en_en)_0325_ver.040.pdf
5
2015/03/25
13:55:42
Important Information
About this system
R This system is an auxiliary system; it is not
designed to provide complete protection
from property loss. Panasonic will not be
held responsible in the event that property
loss occurs while this system is in operation.
R The system’s wireless features are subject
to interference, therefore functionality in all
situations cannot be guaranteed.
Panasonic will not be held responsible for
injury or damage to property that occurs in
the event of wireless communication error
or failure.
For your safety
To prevent severe injury and loss of life/
property, read this section carefully before
using the product to ensure proper and safe
operation of your product.
WARNING
Power connection
R Use only the power source marked on the
product.
R Do not overload power outlets and
extension cords. This can result in the risk
of fire or electric shock.
R Completely insert the AC adaptor/power
plug into the power outlet. Failure to do so
may cause electric shock and/or excessive
heat resulting in a fire.
R Regularly remove any dust, etc. from the
AC adaptor/power plug by pulling it from
the power outlet, then wiping with a dry
cloth. Accumulated dust may cause an
insulation defect from moisture, etc.
resulting in a fire.
R Unplug the product from power outlets if it
emits smoke, an abnormal smell, or makes
an unusual noise. These conditions can
cause fire or electric shock. Confirm that
smoke has stopped emitting and contact an
authorised service centre.
R Unplug from power outlets and never touch
the inside of the product if its casing has
been broken open. Danger of electric shock
exists.
R Never touch the plug with wet hands.
Danger of electric shock exists.
R Do not connect non-specified devices.
Installation
R To prevent the risk of fire or electrical
shock, do not expose the product to rain or
any type of moisture.
R Do not place or use this product near
automatically controlled devices such as
automatic doors and fire alarms. Radio
waves emitted from this product may cause
such devices to malfunction resulting in an
accident.
R Do not allow the AC adaptor or telephone
line cord to be excessively pulled, bent or
placed under heavy objects.
R Keep small parts, such as microSD cards,
out of the reach of children. There is a risk
of swallowing. In the event they are
swallowed, seek medical advice
immediately.
R It is advised not to use the equipment at a
refuelling point. Users are reminded to
observe restrictions on the use of radio
equipment in fuel depots, chemical plants
or where blasting operations are in
progress.
Operating safeguards
R Unplug the product from power outlets
before cleaning. Do not use liquid or
aerosol cleaners.
R Do not disassemble the product.
R Do not spill liquids (detergents, cleansers,
etc.) onto the telephone line cord plug, or
allow it to become wet at all. This may
cause a fire. If the telephone line cord plug
becomes wet, immediately pull it from the
telephone wall socket, and do not use.
R Never put metal objects inside the product.
If metal objects enter the product, turn off
the circuit breaker and contact an
authorised service centre.
Medical
R Consult the manufacturer of any personal
medical devices, such as pacemakers or
6
HNB600AZ_(en_en)_0325_ver.040.pdf
6
2015/03/25
13:55:42
Important Information
hearing aids, to determine if they are
adequately shielded from external RF
(radio frequency) energy. DECT features
operate between 1.88 GHz and 1.90 GHz
with a peak transmission power of 250 mW.
Wi-Fi features operate between 2.412 GHz
and 2.472 GHz with a peak transmission
power of 100 mW.
R Do not use the product in health care
facilities if any regulations posted in the
area instruct you not to do so. Hospitals or
health care facilities may be using
equipment that could be sensitive to
external RF energy.
CAUTION
Installation and location
R Never install wiring during a lightning storm.
R Never install telephone line sockets in wet
locations unless the socket is specifically
designed for wet locations.
R Never touch uninsulated telephone wires or
terminals unless the telephone line has
been disconnected at the network interface.
R Use caution when installing or modifying
telephone lines.
R The AC adaptor is used as the main
disconnect device. Ensure that the AC
outlet is installed near the product and is
easily accessible.
R This product is unable to make calls when:
– there is a power failure.
– when the cordless handset or mobile
device’s batteries need recharging or
have failed.
General notices
R This equipment will be inoperable when
mains power fails.
R When a failure occurs which results in the
internal parts becoming accessible,
disconnect the power supply cord
immediately and return this unit to an
authorised service centre.
R To minimise the possibility of lightning
damage, when you know that a
thunderstorm is coming, we recommend
that you:
– Unplug the telephone line cord from the
phone socket.
– Unplug the AC adaptor from the AC
power outlet.
R No “000” (for Australia), “111” (for New
Zealand), and/or other calls can be made
from this device during a mains power
failure.
R The earpiece on the handset is magnetised
and may retain small metallic objects.
Important notice:
R Under power failure conditions, this
telephone may not operate. Please ensure
that a separate telephone, not dependent
on local power, is available for emergency
use.
For New Zealand
R Disconnect the telecom connection before
disconnecting the power connection prior to
relocating the equipment, and reconnect
the power first.
R This equipment shall not be set to make
automatic calls to the Telecom “111”
Emergency Service.
R The unit’s answering system only responds
to Distinctive Alert cadence(s) DA1 and
DA3.
R Not all telephones will respond to incoming
ringing when connected to the extension
socket.
R This equipment may not provide for the
effective hand-over of a call to another
device connected to the same line.
R The grant of a Telepermit for any item of
terminal equipment indicates only that
Telecom has accepted that the item
complies with minimum conditions for
connection to its network. It indicates no
endorsement of the product by Telecom,
nor does it provide any sort of warranty.
Above all, it provides no assurance that any
item will work correctly in all respects with
another item of Telepermitted equipment of
a different make or model, nor does it imply
that any product is compatible with all of
Telecom’s network services.
7
HNB600AZ_(en_en)_0325_ver.040.pdf
7
2015/03/25
13:55:42
Important Information
Important safety
instructions
When using your product, basic safety
precautions should always be followed to
reduce the risk of fire, electric shock, and
injury to persons, including the following:
1. Do not use this product near water for
example, near a bathtub, washbowl,
kitchen sink, or laundry tub, in a wet
basement or near a swimming pool.
2. Avoid using a telephone (including a
cordless type) during an electrical storm.
There may be a remote risk of electric
shock from lightning.
3. Do not use the telephone to report a gas
leak in the vicinity of the leak.
4. Use only the power cord indicated in this
document.
SAVE THESE INSTRUCTIONS
Security cautions
Take appropriate measures to avoid the
following security breaches when using this
product.
– Leaks of private information
– Unauthorised use of this product
– Unauthorised interference or suspension of
the use of this product
Take the following measures to avoid security
breaches:
R Configure the wireless router that connects
your mobile device to this product to use
encryption for all wireless communication.
R You may be vulnerable to security
breaches if the unit is used with the login
password, disarm code, or PIN code, or
other settings at their defaults values.
Configure your own values for these
settings.
R Do not use passwords that could be easily
guessed by a third party. If you keep a
record of your passwords, protect that
record. Change passwords regularly.
R If you lose your mobile device, change the
password used to access this product.
R If you enable the product’s auto login
feature, enable the screen lock or similar
security feature on your mobile device.
R Take care when performing important
security related operations such as deleting
MAC address, unit IDs, etc.
R To prevent disclosure of personal
information, enable the screen lock or
similar security feature on your mobile
device.
R When submitting the product for repair,
make a note of any important information
stored in the product, as this information
may be erased or changed as part of the
repair process.
R Before handing the product over to a third
party for repair or other purposes, perform
a factory data reset to erase any data
stored in the product and remove the
microSD card. Use only trusted repair
services authorised by Panasonic.
R Before disposing of the product, perform a
factory data reset to erase any data stored
in the product. Remove and erase the
microSD card.
R If your mobile device will no longer be used
with the product, delete your mobile
device’s registration from the product and
delete the corresponding app from your
mobile device.
R If this product experiences a power outage,
its date and time setting may become
incorrect. In this case, the date and time
setting will be automatically corrected when
your mobile device and this product are
connected to the same wireless network.
Additionally, note the following.
R Multiple hubs cannot be used on the same
network.
R Only one mobile device can access this
product while away from home. If a second
mobile device connects to this product
while away from home, the first mobile
device is disconnected.
R Communications may be interrupted
depending on network conditions and
wireless signal quality.
R This product may be used in ways that
violate the privacy or publicity rights of
others. You are responsible for the ways in
which this product is used.
8
HNB600AZ_(en_en)_0325_ver.040.pdf
8
2015/03/25
13:55:42
Important Information
For best performance
Hub location/avoiding noise
The hub and other compatible Panasonic
devices use radio waves to communicate with
each other.
R For maximum coverage and noise-free
communications, place your hub:
– at a convenient, high, and central
location with no obstructions between
the devices and hub in an indoor
environment.
– away from electronic appliances such as
TVs, radios, personal computers,
wireless devices, or other phones.
– facing away from radio frequency
transmitters, such as external antennas
of mobile phone cell stations. (Avoid
putting the hub on a bay window or near
a window.)
R Coverage and voice quality depends on the
local environmental conditions.
R If the reception for a hub location is not
satisfactory, move the hub to another
location for better reception.
Environment
R Keep the product away from electrical noise
generating devices, such as fluorescent
lamps and motors.
R The product should be kept free from
excessive smoke, dust, high temperature,
and vibration.
R The product should not be exposed to
direct sunlight.
R Do not place heavy objects on top of the
product.
R When you leave the product unused for a
long period of time, unplug the product from
the power outlet.
R The product should be kept away from heat
sources such as radiators, cookers, etc. It
should not be placed in rooms where the
temperature is less than 0 °C or greater
than 40 °C. Damp basements should also
be avoided.
R The maximum communication range may
be shortened when the product is used in
the following places: Near obstacles such
as hills, tunnels, underground, near metal
objects such as wire fences, etc.
R Operating the product near electrical
appliances may cause interference. Move
away from the electrical appliances.
Other information
Routine care
R Wipe the outer surface of the product with a
soft moist cloth.
R Do not use benzine, thinner, or any
abrasive powder.
Protecting your recordings
R Do not remove the microSD card or
disconnect the hub’s AC adaptor while
reading or writing data to the microSD card.
Data on the card could become corrupted.
R If a microSD card malfunctions or is
exposed to electromagnetic waves or static
electricity, data on the card could become
corrupted or erased. Therefore we
recommend backing up important data to a
computer or other device.
Notice for product disposal, transfer,
or return
R This product can store your private/
confidential information. To protect your
privacy/confidentiality, we recommend that
you erase information such as phonebook
or caller list entries from the memory before
you dispose of, transfer, or return the
product.
Information on Disposal in other
Countries outside the European Union
These symbols are only valid in the European
Union. If you wish to discard these items,
9
HNB600AZ_(en_en)_0325_ver.040.pdf
9
2015/03/25
13:55:42
Important Information
please contact your local authorities or dealer
and ask for the correct method of disposal.
10
HNB600AZ_(en_en)_0325_ver.040.pdf
10
2015/03/25
13:55:43
Setup
Part names and functions
A
LED indicator
You can use the LED indicator to confirm the
hub’s status.
B
Indicator
Status
Off
No power, or LED
indicator is turned
off*1
Green, lit
Normal operation,
connected to
wireless router*1
C D E
F
G
H
I
Speaker
LED indicator
DC socket
LINE socket
MWi-Fi SETUPN
Used when performing initial setup.
microSD card slot
Used when inserting a microSD card.
Remove the label when inserting.
M
HANDSET/LOCATORN
Used when registering a handset. You
can also press this button to locate a
misplaced handset.
M
CAMERAN
Used when registering a camera.
M
OTHER DEVICEN
Used when registering a sensor or smart
plug.
Green, blinking
Registration mode
Green, blinking
quickly
Failed to connect to
wireless router
Alternating:
Green, blinking
Yellow, blinking
Hub is starting up
(cannot be used
yet)*2
Red, lit
Alarm system is
armed*1
Red, blinking quickly
Alarm system was
triggered
Yellow, lit
Initial setup required
Yellow, blinking
Initial setup in
progress, mobile
device connected
Yellow, blinking
quickly
Initial setup is
starting
*1
*2
You can configure the hub so that its LED
indicator does not light during normal
operation. For more information, refer to
the User’s Guide (page 17).
It may take some time for the hub to finish
starting up.
11
HNB600AZ_(en_en)_0325_ver.040.pdf
11
2015/03/25
13:55:43
Setup
R The unit’s answering system will not
answer incoming calls on your FaxAbility
number. (for New Zealand)
Connections
Insert the AC adaptor plug firmly into the
DC socket.
Secure the AC adaptor cord by wrapping
it around the hook.
Connect the AC adaptor to the power
outlet.
Insert the telephone line cord into the
LINE socket and a telephone line socket
until you hear a click.
DSL/ADSL service users only: Connect
your DSL/ADSL filter (not supplied)*1.
*1 For Australia: Connect a DSL/ADSL
filter between the telephone plug and
telephone line cord.
Outdoor Camera (KX-HNC600) or
Indoor Camera (KX-HNC200) users
only: Remove the label covering the card
slot and then insert the microSD card (not
supplied) into the slot with the notched
corner (1) facing upwards (2) until it
clicks into place.
Note:
R Use only the supplied Panasonic AC
adaptor PNLV236AL.
R A microSD card (not supplied) is required to
record images from cameras. Refer to the
information about the available microSD
card (page 3).
R To remove the microSD card, push in the
microSD card and then remove it.
R The unit is not designed to be used with
rotary/pulse dialling services.
4
3
4
5
1
2
6
2
1
Note about power connections
AC adaptor connection
R The AC adaptor must remain connected at
all times. (It is normal for the adaptor to feel
warm during use.)
R The AC adaptor should be connected to a
vertically oriented or floor-mounted AC
outlet. Do not connect the AC adaptor to a
ceiling-mounted AC outlet, as the weight of
12
HNB600AZ_(en_en)_0325_ver.040.pdf
12
2015/03/25
13:55:43
Setup
the adaptor may cause it to become
disconnected.
Power failure
R The hub will not work during a power failure.
R The hub’s telephone features will not work
during a power failure. We recommend
connecting a corded-type telephone that
does not use an AC adaptor to your
telephone line.
Wi-Fi® settings
Compatible mobile devices
iPhone 4 or later, iPad, or iPad mini (iOS 6.0
or later) or an Android™ device (Android 4.0
or later)
Note:
R The [Home Network] app may not function
properly depending on the system
environment, such as the model of your
mobile device, peripherals connected to
your mobile device, and the apps installed
on your mobile device.
Initial setup
After you have connected your hub, here is
what you will need to do in order to access the
system from your mobile device. Each
procedure is explained in this chapter.
1
Download
Download the [Home Network] app to
your mobile device.
2
Initial setup
Use the [Home Network] app to
configure the hub to connect to your
wireless router, and then register your
mobile device to the hub.
Downloading the [Home
Network] app
Download information is available at the web
page listed below.
Confirm the following before you begin.
– Make sure you have installed the [Home
Network] app on your mobile device
– Make sure the hub and your wireless router
are turned on and the hub’s LED indicator
is lit in yellow
– Make sure your mobile device is connected
to your wireless router
– Make sure your mobile device can connect
to the Internet
– Make sure you know the network name
(SSID) and password assigned to your
wireless router
Note:
R If the hub’s region setting is not set, the hub
prompts you to set it. Follow the on-screen
instructions to set up the hub.
Initial setup for iPhone, iPad
1
2
3
www.panasonic.net/pcc/support/tel/
homenetwork/
4
Start the [Home Network] app.
Tap [Set up the Hub].
When prompted, press MWi-Fi SETUPN
on the hub.
R The LED indicator blinks in yellow.
Change your mobile device’s Wi-Fi
setting temporarily so that it connects to
the hub directly.
R Open your mobile device’s [Settings]
app, tap [Wi-Fi], select
“KX-HNB600_Panasonic”, enter
“00000000” as the password, and then
tap [Join].
R If more than 1 item named
“KX-HNB600_Panasonic” is displayed,
13
HNB600AZ_(en_en)_0325_ver.040.pdf
13
2015/03/25
13:55:43
Setup
wait approx. 10 minutes and perform
this procedure from the beginning.
5
6
When prompted, press MWi-Fi SETUPN
on the hub.
R The LED indicator blinks in yellow.
R The app temporarily changes your
mobile device’s Wi-Fi setting so that it
connects to the hub directly.
4
If necessary, enter the password required
to connect to your wireless router and
then tap [Next].
R The hub and your mobile device
connect to your wireless router.
5
When prompted, press MWi-Fi SETUPN
on the hub.
R Your mobile device will be registered
to the hub.
6
When prompted, follow the on-screen
instructions and set the password used to
log in to the hub while away from home.
7
When prompted, enter a name for your
mobile device and then tap [OK].
R This setting allows you to change the
name assigned to your device. It can
help you identify your mobile device
when performing certain operations,
such as deregistering or making
intercom calls using a cordless
handset.
R The app’s home screen is displayed
when initial setup is complete.
Start the [Home Network] app again.
If necessary, enter the password required
to connect to your wireless router and
then tap [Next].
R The hub and your mobile device
connect to your wireless router.
R If prompted, follow the on-screen
instructions and connect your mobile
device to your wireless router, start the
app again, and then tap [Add This
Mobile Device].
R If you enter the wrong Wi-Fi password,
[Setup failed.] is displayed and the
hub’s LED indicator blinks in green. In
this case, perform the following.
1. Press and hold the 3 registration
buttons on the side of the hub and
the MWi-Fi SETUPN button on the
back of the hub at the same time (4
buttons total) until the hub’s LED
indicator blinks in green and yellow.
2. Wait for the hub’s LED indicator to
light in yellow.
3. Repeat the initial setup procedure.
7
When prompted, press MWi-Fi SETUPN
on the hub.
R Your mobile device will be registered
to the hub.
8
When prompted, follow the on-screen
instructions and set the password used to
log in to the hub while away from home.
9
When prompted, enter a name for your
mobile device and then tap [OK].
R This setting allows you to change the
name assigned to your device. It can
help you identify your mobile device
when performing certain operations,
such as deregistering or making
intercom calls using a cordless
handset.
R The app’s home screen is displayed
when initial setup is complete.
Initial setup for Android devices
1
2
3
Start the [Home Network] app.
Tap [Set up the Hub].
Information about Wi-Fi
communication
The hub uses Wi-Fi to communicate with your
wireless router. Refer to the following
information when planning where to place the
hub.
Do not use the hub in the following areas or
locations. Malfunction or interference to radio
communication may result.
R Indoor areas that have certain types of
radio or mobile communications equipment
R Locations near microwave ovens or
Bluetooth devices
R Indoor areas where antitheft devices or
2.4 GHz frequency devices such as POS
systems are used
14
HNB600AZ_(en_en)_0325_ver.040.pdf
14
2015/03/25
13:55:43
Setup
Do not place the hub in areas where the
following materials or objects are located
between the hub and the wireless router.
These materials and objects may interfere
with wireless communication or cause
wireless transmission speed to become slower.
R Metallic doors or shutters
R Walls containing aluminium-sheet insulation
R Walls made of concrete, stone, brick, or tin
R Multiple walls
R Steel shelving
R Fireproof glass
Registering another mobile
device
In order to access the system from a mobile
device, you must first register the mobile
device to the hub. You can register up to 8
mobile devices to a hub.
Confirm the following before you begin.
– Make sure you have completed the initial
setup procedure
– Make sure your mobile device can connect
to the Internet
– Make sure your wireless router and the hub
are turned on
– Make sure your mobile device and the hub
are connected to the same wireless router
1
2
3
Using the mobile device that you want to
register, download the [Home Network]
app and then start the app.
Tap [Add This Mobile Device].
When prompted, press MWi-Fi SETUPN
on the hub.
R Your mobile device will be registered
to the hub.
4
When prompted, follow the on-screen
instructions and enter the password used
to log in to the hub while away from home.
5
When prompted, enter a name for your
mobile device and then tap [OK].
R This setting allows you to change the
name assigned to your device. It can
help you identify your mobile device
when performing certain operations,
such as deregistering or making
intercom calls using a cordless
handset.
R The app’s home screen is displayed
when initial setup is complete.
15
HNB600AZ_(en_en)_0325_ver.040.pdf
15
2015/03/25
13:55:43
Setup
Registering other devices
to the hub
This procedure is not required for devices
that were included as part of a bundle.
Before you can use devices such as cameras,
sensors, and smart plugs, they must be
registered to the hub.
If you purchased devices separately (i.e., not
as part of a bundle), you must register each
device to the hub.
You can register each device by using the
registration buttons or the [Home Network]
app.
Using registration buttons
1
Hub:
Press and hold the registration button
until the LED indicator blinks in green.
R Press and hold the appropriate
registration button (page 11) according
to the device you want to register.
M
HANDSET/LOCATORN: For
handsets
M
CAMERAN: For cameras
M
OTHER DEVICEN: For other
devices
Using the app
1
2
3
4
5
Start the [Home Network] app.
From the [Home Network] app home
screen, tap [Settings].
Tap [Device Registration].
Tap [Registration].
Select the type of device that you want to
register.
6
Handset:
Place the handset on the charger.
Devices other than handset:
Press and hold the registration button on
the device you want to register until the
device’s LED indicator blinks in green.
R When registration is complete, the hub
sounds one long beep.
Note:
R If registration fails, the hub sounds several
short beeps.
2
Handset:
Place the handset on the charger.
Devices other than handset:
Press and hold the device’s registration
button until the device’s LED indicator
blinks in green.
R When registration is complete, the hub
sounds one long beep.
Note:
R If registration fails, the hub sounds several
short beeps.
R To register a mobile device, use the
procedure described on page 15.
16
HNB600AZ_(en_en)_0325_ver.040.pdf
16
2015/03/25
13:55:43
Appendix
Wireless communication
range (DECT)
The wireless communication range of each
device in the system from the hub is
approximately 50 m indoors and
approximately 300 m outdoors. Wireless
communication may be unreliable when the
following obstacles are located between the
hub and other system devices.
R Metal doors or screens
R Walls containing aluminium-sheet insulation
R Walls made of concrete or corrugated iron
R Double-pane glass windows
R Multiple walls
R When using each device on separate floors
or in different buildings
Accessing the User’s Guide
The User’s Guide is a collection of online
documentation that helps you get the most out
of the [Home Network] app.
1
iPhone/iPad
in the app’s home screen.
Tap
Android devices
Tap or press your mobile device’s
menu button in the app’s home screen.
2
Tap [User’s Guide].
Note:
R Microsoft® Windows® Internet Explorer® 8
and earlier versions are not supported.
R Android 4.1 or later versions are
recommended.
R You can also access the User’s Guide at
the web page listed below.
www.panasonic.net/pcc/support/tel/
homenetwork/manual/
17
HNB600AZ_(en_en)_0325_ver.040.pdf
17
2015/03/25
13:55:43
Appendix
2
Wall mounting
You can use the included wall mounting
adaptor to wall mount the hub if desired.
Note:
R Make sure that the wall and the fixing
method are strong enough to support the
weight of the unit.
R Drive the screws (not supplied) into the wall.
1
Connect the AC adaptor and the
telephone line cord to the hub.
R Secure the AC adaptor cord by
wrapping it around the hook.
Slide the wall mounting adaptor up until it
clicks into place.
R Make sure the “UP” mark on the wall
mounting adaptor faces upwards.
R Align and insert the tabs (1) of the
wall mounting adaptor to the grooves
(2) of the hub.
UP
UP
2 1
UP
18
HNB600AZ_(en_en)_0325_ver.040.pdf
18
2015/03/25
13:55:43
Appendix
3
Mount the hub on a wall then slide down
to secure in place.
R Pass the AC adaptor cord and the
telephone line cord through the groove
(1) in the wall mounting adaptor.
Wrap up the telephone line cord as
shown to prevent the cord from being
pinched.
2 Screws
3 83 mm
4 To telephone line socket
Note:
R Use the following template below when
determining the location of the screw
holes.
1
2
3
83 mm
4
19
HNB600AZ_(en_en)_0325_ver.040.pdf
19
2015/03/25
13:55:43
Appendix
Removing the wall mounting adaptor
While pushing the release levers (A) away
from the centre of the wall mounting adaptor,
slide the adaptor down (B).
A
A
B
Specifications
R Standards
DECT:
DECT (Digital Enhanced Cordless
Telecommunications)
GAP (Generic Access Profile)
Wi-Fi:
IEEE 802.11b/g/n
R Frequency range
DECT:
1.88 GHz – 1.90 GHz
Wi-Fi:
2.412 GHz – 2.472 GHz (channels 1 – 13)
R RF transmission power
DECT:
Approx. 83 mW (average power per
channel: when 4 cameras, a handset, and
another device are registered)
Wi-Fi:
100 mW (peak transmission power)
R Encryption
WPA2™-PSK (TKIP/AES), WPA™-PSK
(TKIP/AES), WEP (128/64 bit)
R Simplified configuration
WPS (PBC)
R Power source
220 – 240 V AC, 50/60 Hz
R Power consumption
Standby: Approx. 4.0 W
Maximum: Approx. 4.5 W
R Operating conditions
0 °C – 40 °C
20 % – 80 % relative air humidity (dry)
R Alert tone volume
High alert level: approx. 90 dB
Low alert level: approx. 73 dB
(measured approx. 10 cm in front of the
centre of the unit)
R Dimensions (height ´ width ´ depth)
Approx. 42 mm ´ 130 mm ´ 130 mm
R Mass (weight)
Approx. 220 g
20
HNB600AZ_(en_en)_0325_ver.040.pdf
20
2015/03/25
13:55:43
Appendix
Open source software
notice
R Parts of this product use open source
software supplied based on the relevant
conditions of the Free Software
Foundation’s GPL and/or LGPL and other
conditions. Please read all licence
information and copyright notices related to
the open source software used by this
product. This information is available at the
following web page:
www.panasonic.net/pcc/support/tel/
homenetwork/
At least three (3) years from delivery of this
product, Panasonic System Networks Co.,
Ltd. will give to any third party who contacts
us at the contact information provided
below, for a charge of no more than the
cost of physically distributing source code,
a complete machine-readable copy of the
corresponding source code and the
copyright notices covered under the GPL
and the LGPL. Please note that software
licenced under the GPL and the LGPL is
not under warranty.
www.panasonic.net/pcc/support/tel/
homenetwork/
Software information
R The End User Licence Agreement (EULA)
for the Home Network app is available at
the following web page:
www.panasonic.net/pcc/support/tel/
homenetwork/
21
HNB600AZ_(en_en)_0325_ver.040.pdf
21
2015/03/25
13:55:43
Appendix
Warranty (for New Zealand)
Panasonic New Zealand undertakes to:
Repair or at its option, replace without cost to the owner, either for material or labour,
any part which is found to be defective within two years of the date of purchase.
THIS EXPRESS WARRANTY DOES NOT COVER:
1) Pick up and delivery.
2) Batteries.
3) Repairs when the product has not been used in accordance with the Operating
Instructions Manual or has been modified.
4) Normal maintenance and cleaning as required in the product’s Operating
Instructions Manual.
5) Service calls to:
a Correct the set up of the product
b Instruct you how to use the product
c Replace fuses or correct your building’s wiring
6) Damage to the product caused by accident, misuse or Act of God.
7) Repairs when the product has been dismantled, repaired, modified or serviced
by other than a Panasonic Authorised Dealer authorised to service that type of
product.
IF YOUR PANASONIC PRODUCT FAILS WITHIN THE
WARRANTY PERIOD:
Take it to the Authorised Panasonic Dealer from whom you purchased the product
who will repair it (or arrange to have it repaired) during their normal business
hours. All enquiries regarding warranty or otherwise, please call – Customer
Support Centre Tel. No.: (09) 272 0178
NOTE: THIS EXPRESS WARRANTY IS OFFERED AS AN
EXTRA BENEFIT AND DOES NOT AFFECT YOUR LEGAL
RIGHTS.
22
HNB600AZ_(en_en)_0325_ver.040.pdf
22
2015/03/25
13:55:43
Notes
23
HNB600AZ_(en_en)_0325_ver.040.pdf
23
2015/03/25
13:55:43
For your future reference
We recommend keeping a record of the following information to assist with any repair under
warranty.
Serial No.
Date of purchase
(found on the bottom of the unit)
Name and address of dealer
Attach your purchase receipt here.
For Australia
Customer Care Centre Tel. No.: 132600
or website www.panasonic.com/au
For New Zealand
Customer Care Centre Tel. No.: (09) 272 0178
or website www.panasonic.com/nz
Sales Department:
1 Innovation Road, Macquarie Park NSW 2113, Australia
Sales Department:
18 Sir Woolf Fisher Drive, Highbrook, East Tamaki, Auckland,
New Zealand
Phone: (09) 272 0100
Fax:
(09) 272 0137
1-62, 4-chome, Minoshima, Hakata-ku, Fukuoka 812-8531, Japan
© Panasonic System Networks Co., Ltd. 2015
*PNQX7350ZA*
*PNQX7350ZA*
PNQX7350ZA
HNB600AZ_(en_en)_0325_ver.040.pdf
24
CC0315WK0 (E)
2015/03/25
13:55:43