1
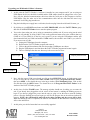
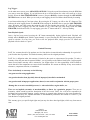
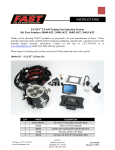
INSTRUCTIONS
#170536 Air/Fuel Meter RPM Module Upgrade Kit
Thank you for choosing FAST™ products; we are proud to be your manufacturer of choice. Please read this
instruction sheet carefully before beginning installation, and also take a moment to review the included limited
warranty information.
Kit Includes:
• Inductive Pickup
Software Installation Instructions:
• RPM Module
• Upgrade CD
You will first need to install the FAST™ Flasher update
• Communication Cable
program onto your computer. It is a small program, contained
• USB to Serial Cable Adapter
on the RPM module installation disk we have included in your
• Power Supply
kit. This program will enable your computer to load or update
• Instruction Manual
the new firmware into your FAST™ Air/Fuel Meter.
• MSD RPM Cable
1. Insert the RPM module installation disk into the CD drive on you computer. Within about 5 seconds or
so, the software installation program should automatically start to guide you through the installation
process. If it does not automatically start, you will have to manually start the software installation
program. This is easily done by clicking the START button and selecting the RUN icon. Then, click on
the BROWSE button, opening the BROWSE window. Click on the MY COMPUTER icon. Now, you
will select your computer’s CD DRIVE. It should have the name FAST Flasher 1.0 as a title. Click the
OPEN button, and you will see the window change to show you what files are on the CD. First open the
AUTOPLAY folder and then the INSTALL UPDATE folder. You will now want to select the
“setup.exe” file and click the OPEN button. This will close the BROWSE window and take you back
to the RUN window. Finally, click the OK button to start the installation.
2. After the CD starts opening, it will stop at the FAST™ Flasher 1.0 Setup window. It is telling you to
make sure all other programs are closed so that they don’t interfere with the installation. If this is not the
case, click EXIT SETUP and close all running programs. Then repeat step # 1 to restart the installation.
At the FAST™ Flasher 1.0 Setup window press OK to continue with the installation.
3. You can now change the location on your computer that you want to install the program, but it is
recommended that you just install it in its default location. Press the big square button with the computer
in it to begin the installation. At the next window just press CONTINUE to install the default program
group. The program will finish installing and you can click OK to leave the program.
USB Driver Installation Instructions (if you will be using our USB adapter):
If your computer has a serial port on it, you will not need to do this step. You will be able to plug the
communications cable directly into this port. If you will be using your computer’s USB port, you will need to
install these drivers. For the instructions on how to install these drivers, click on the START menu button, then
click on the MY COMPUTER button. When the window opens up, right click your mouse on the CD DRIVE
icon. It should have a title of FAST™ Flasher 1.0 on it. Select the OPEN function. Now, open the USB
DRIVERS folder and open the INSTRUCTIONS FOLDER for the operating system your computer is running
(like Windows XP or Windows 2000). If your computer can’t open these files, go back one step and open the
AdobeAcrobatReader505.exe file. This will install a program that will allow you view this type of document.
FAST™
FAST™
3400 Democrat
3400 Democrat
Rd. Rd.
Memphis,
Memphis,
TN 38118
TN 38118
Phone:Phone:
(901) 260-3278
(901) 260-3278
Fax: (901)
Fax: 375-3408
(901) 366-1807
www.fuelairspark.com
www.fuelairspark.com
PartPart
#170556
#???
Revised
Revised11/29/07
??????
Upgrading your Wideband O2 Meter’s firmware:
1. At this point the FAST™ Flasher 1.0 software is installed on your computer and if you are using our
USB adapter the drivers should be installed and the USB adapter should be plugged into a free port.
Now, plug the included communications cable into either the serial port on the computer or into the
USB adapter. Plug the other end of the communications cable into the wide-band O2 meter’s top
connector. It will only plug into this one.
2. Plug the included power supply into a wall outlet, but do not plug it into the wide-band O2 meter yet.
3. By clicking on your START menu button and ALL PROGRAMS, select the FAST™ Flasher group
and click on the FAST™ Flasher icon to start the update program.
4. You need to know what port you are using to communicate with the unit. If you are using just the serial
cable you will probably be using COM1. Click on the pull down button next to the window that says
COM1 in it. If just COM1 is on the list, you’re good. If you are using the USB adapter and the pull
down button showed just COM1 and another COMM number, the one that is not COM1 is you, select it.
If you are not sure, try this:
A. Unplug the USB adapter from the computer.
B. Shut down the FAST™ Flasher program and restart it.
C. Click on the pull down button and write down what COMM ports are shown.
D. Plug the USB adapter in and shut down the FAST™ Flasher program and restart it again.
E. The new COM port that has now shown up is the correct one to select
Files to open
Comport pull down menu
Status bar
Message window
5. Now, with the correct COM port selected, we click on the OPEN FILE button. A window now opens
for you to select the file to load. In the FILE NAME window type C:\Program Files\FAST Flasher,
then press OPEN. A file should show up in the large window called Wideband1_3.hex. Click on this
file and then click the OPEN button. You should now see C:\Program Files\FAST Flasher in the
window of the FAST™ Flasher program.
6. At this time, click the FLASH button. The message window should now be asking you to restart the
unit. If you already have plugged the unit in, turn it off and restart it, enabling the flashing process to
begin. If you haven’t plugged the power into the unit yet, plug it in at this time to start the flashing
process. Once the flashing process has begun you will see the progress bar on the software indicate its
progress. NOTE: the wide-band O2 unit will not be doing anything and the screen will be dark.
When the flashing process is completed, the software will indicate the unit should be restarting and you
will see the unit turn on.
7. At this point, your air/fuel meter has been successfully upgraded.
FAST™
FAST™
3400 Democrat
3400 Democrat
Rd. Rd.
Memphis,
Memphis,
TN 38118
TN 38118
Phone:Phone:
(901) 260-3278
(901) 260-3278
Fax: (901)
Fax: 375-3408
(901) 366-1807
www.fuelairspark.com
www.fuelairspark.com
PartPart
#170556
#???
Revised
Revised11/29/07
??????
RPM Module User’s Manual:
Features:
1. The most valuable feature added to the functionality of your FAST™ Air/Fuel Meter, when using the
RPM Module upgrade, is the rpm display/recording feature. This upgrade kit provides the user with the
ability to not only read and record the air/fuel ratio, but also the rpm of the engine as well. This makes
for a very complete engine tuning and mapping tool.
2. The rpm module calibrates by pressing a single button for all 2, 4, 6, 8, and 10 cylinder engines.
3. No need to splice into any wires. The FAST™ RPM Module uses a simple, clip-on inductive pick-up
for the rpm signal. This rpm signal can be picked up from a pulsing fuel injector wire, coil wire, or
spark plug wire. Note: Getting an rpm signal from a spark plug wire should be your last choice.
You will get a much more stable and accurate signal from the other methods.
4. Another very useful tool for data logging is the addition of a LOG TRIGGER. This allows the user to
set an rpm threshold for the unit to start logging data.
5. Lastly, to increase ease of use in data playback mode, we have added a slow motion playback speed.
This is now the default speed when a log is played back, but the speed can easily be switched between
SLOW speed and REAL-TIME speed while the log is playing back.
RPM Module Installation:
1. The FAST™ RPM Module simply installs in-line on the main Air/Fuel Meter sensor wire harness. Just
unplug the bottom connector from the Air/Fuel Meter and plug it into the RPM Module, then plug the
connector at the end of the RPM Module’s cable into the Air/Fuel meter’s bottom plug-in.
2. The RPM signal is then supplied by two different methods. The first is the universal Inductive Pickup
Clamp; simply clip this around either a fuel injector wire, ignition coil wire, or spark plug wire. After
the Inductive Pickup is installed, plug the other end into the matching jack on the side of the RPM
Module. Note: Getting an rpm signal from a spark plug wire should be your last choice. You will
get a much more stable and accurate signal from either a coil wire or fuel injector wire. The
second method for feeding an RPM signal to the FAST™ RPM Module has been specifically tailored
for MSD ignition equipped vehicles. The included MSD RPM Cable simply plugs into the “TACH”
signal port on any MSD ignition box, with the other end of the cable plugging directly into the FAST™
RPM Module.
Calibrating the RPM Module:
With the Air/Fuel Meter powered-up and actively reading air fuel, you will see the rpm value at the bottom of
the screen. The calibration process ensures that the RPM Module outputs the correct rpm signal to the Air/Fuel
Meter display. Calibration is accomplished with a simple, one button procedure. The calibration settings are
preprogrammed into the RPM Module and as you step through them by pressing the calibration button, one at a
time you will see the rpm value go to dashes and then begin reading rpm using the new calibration. Just press
the button until the rpm value that is displaying on the Air/Fuel Meter display corresponds to your vehicle’s
tachometer. If the vehicle does not have a tachometer, just let the vehicle idle and step through the calibrations
until the rpm value is in a reasonable range for the idle speed of your vehicle. (Check your vehicle’s user
manual). NOTE: If the rpm signal is unstable, you may have to switch to the second wire on the injector or
ignition coil. You may also have to unclip the Inductive Pickup and flip it around to phase it properly.
FAST™
FAST™
3400 Democrat
3400 Democrat
Rd. Rd.
Memphis,
Memphis,
TN 38118
TN 38118
Phone:Phone:
(901) 260-3278
(901) 260-3278
Fax: (901)
Fax: 375-3408
(901) 366-1807
www.fuelairspark.com
www.fuelairspark.com
PartPart
#170556
#???
Revised
Revised11/29/07
??????
Log Trigger:
At the main menu screen, press ADVANCED OPTIONS. Using the up and down buttons select the RPM that
you want to start data logging. If you hold down the up or down buttons, the value will scroll up or down
quickly. When the LOG TRIGGER RPM is correct, just press DONE to continue through the ADVANCED
OPTIONS menus as usual. When you are ready to start logging, the Air/Fuel Meter should already be running
in real-time and showing A/F and rpm values. By pressing the “L” button, you will see the “L” disappear. This
indicates the units logging feature is in PAUSE mode waiting for the RPM value to pass the LOG TRIGGER
value. When the rpm value passes that point the unit will start logging data and the “L” will begin flashing,
indicating the unit is logging. The unit will continue to log, even if the rpm value drops below the LOG
TRIGGER (for shifts and such). To stop logging, press the “L” button and the “L” will stop flashing.
Data Playback Speed:
Once a log has been created, pressing the “P” button automatically begins playback mode. Playback will
initially start in SLOW speed; which is approximately ¼ speed. Pressing the “R” button changes the playback
speed to real-time. If at any time, you wish to slow the playback down, simply press the “S” button and
playback will slow back to ¼ speed.
Limited Warranty
FAST, Inc. warrants that all of its products are free from defects in material and workmanship for a period of 1
year from the date of purchase. This limited warranty shall cover the original purchaser.
FAST, Inc.’s obligation under this warranty is limited to the repair or replacement of its product. To make a
warranty claim, the part must be returned within 1 year of purchase to the address listed below, freight prepaid.
Items covered under warranty will be returned to you freight collect. It is the responsibility of the installer to
ensure that all of the components are correct before installation. We assume no liability for any errors made in
tolerances, component selection, or installation.
There is absolutely no warranty on the following:
•Any parts used in racing applications.
•Any product that has been physically altered, improperly installed or maintained.
•Any product used in improper applications, abused, or not used in conjunction with the proper parts.
•Damage due to excessive manifold pressure, i.e. nitrous backfires, engine misfire, etc.
There are no implied warranties of merchantability or fitness for a particular purpose. There are no
warranties, which extend beyond the description of the face hereof. FAST, Inc. will not be responsible for
incidental and consequential damages, property damage or personal injury damages to the extent permitted by
law. Where required by law, implied warranties or merchantability and fitness are limited to a term of 1 year
from the date of original purchase.
This warranty gives you specific legal rights and you may also have other legal rights, which vary from state to
state.
FAST™
FAST™
3400 Democrat
3400 Democrat
Rd. Rd.
Memphis,
Memphis,
TN 38118
TN 38118
Phone:Phone:
(901) 260-3278
(901) 260-3278
Fax: (901)
Fax: 375-3408
(901) 366-1807
www.fuelairspark.com
www.fuelairspark.com
PartPart
#170556
#???
Revised
Revised11/29/07
??????