1
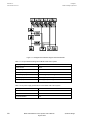
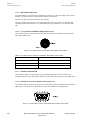
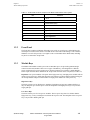
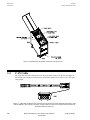
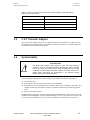
Model 1000 Modular Control System
User’s Manual
Part Number 1100-100
Quantum Design
11578 Sorrento Valley Rd.
San Diego, CA 92121-1311
USA
Technical support
(858) 481-4400
(800) 289-6996
Fax
(858) 481-7410
First edition of manual completed August 2003.
Trademarks
All product and company names appearing in this manual are trademarks or registered trademarks of their respective holders.
U.S. Patents
4,791,788
4,848,093
5,053,834
5,110, 034
5,139,192
5,311,125
Method for Obtaining Improved Temperature Regulation When Using Liquid Helium Cooling
Apparatus and Method for Regulating Temperature in a Cryogenic Test Chamber
High Symmetry DC Squid System
Superconducting Bonds for Thin Film Devices
Superconducting Bonds for Thin Film Devices
Magnetic Property Characterization System Employing a Single Sensing Coil Arrangement to Measure AC
Susceptibility and DC Moment of a Sample (patent licensed from Lakeshore)
5,319,307 Geometrically and Electrically Balanced DC Squid System Having a Pair of Intersecting Slits
5,647,228 Apparatus and Method for Regulating Temperature in Cryogenic Test Chamber
Foreign Patents
U.K.
Canada
Japan
9713380.5 Apparatus and Method for Regulating Temperature in Cryogenic Test Chamber
2,089,181 High Symmetry DC Squid System
2,533,428 High Symmetry DC Squid System
Table of Contents
PREFACE
Contents and Conventions ......................................................................................................... vii
P.1
P.2
P.3
P.4
Introduction....................................................................................................................................vii
Scope of the Manual ......................................................................................................................vii
Contents of the Manual ..................................................................................................................vii
Conventions in the Manual .......................................................................................................... viii
CHAPTER 1
Description and Specifications.................................................................................................. 1-1
1.1 Introduction.................................................................................................................................. 1-1
1.2 Functional Overview.................................................................................................................... 1-1
1.3 Model 1000 Connections ............................................................................................................. 1-3
1.3.1 Back Panel ............................................................................................................................. 1-3
1.3.1.1 Breakers and Fuses.......................................................................................................... 1-4
1.3.1.2 CAN Connector from Computer (J2-CAN).................................................................... 1-4
1.3.1.3 Terminator Switch........................................................................................................... 1-4
1.3.1.4 External CAN Bus Connector (J3-QD CAN) ................................................................. 1-4
1.3.2 Front Panel............................................................................................................................. 1-5
1.3.3 Module Bays.......................................................................................................................... 1-5
1.4 CAN Cable................................................................................................................................... 1-6
1.5 CAN Network Adapter ................................................................................................................ 1-7
1.6 System Safety............................................................................................................................... 1-7
1.6.1 Model 1000–General Safety Precautions .............................................................................. 1-8
1.6.2 Electrical Safety..................................................................................................................... 1-8
1.7 Environmental Considerations ..................................................................................................... 1-8
1.7.1 Physical Dimensions ............................................................................................................. 1-8
1.7.2 Local Altitude and Humidity................................................................................................. 1-9
1.8 Model 1000 Maintenance............................................................................................................. 1-9
1.9 Contact Information ................................................................................................................... 1-10
CHAPTER 2
Installation Instructions ............................................................................................................ 2-1
2.1 Introduction.................................................................................................................................. 2-1
2.2 Installation Overview ................................................................................................................... 2-1
2.3 Install the CAN Driver Software.................................................................................................. 2-2
2.3.1 CAN Drivers.......................................................................................................................... 2-2
2.3.2 CANopen Drivers.......................................................................................................... 2-2
2.4 Installing the CAN Network Adapter .......................................................................................... 2-2
Quantum Design
Model 1000 Modular Control System User’s Manual
August 2003
v
Contents
Table of Tables
2.5
2.6
2.7
2.8
Model 1000 Setup: Part 1 .............................................................................................................2-3
Installing QD Modules into Module Bays ....................................................................................2-3
Model 1000 Setup: Part 2 .............................................................................................................2-4
Safety ............................................................................................................................................2-4
Figures
Figure 1-1.
Figure 1-2.
Figure 1-3.
Figure 1-4.
Figure 1-5.
Figure 1-6.
Figure 1-7.
Abridged functional block diagram of the Model 1000 .........................................................1-2
External view of the Model 1000 modular control system (4100-001)..................................1-3
Back panel of Model 1000 .....................................................................................................1-3
J2-CAN connector for the Model 1000 modular control system ...........................................1-4
J3-QD CAN connector for the Model 1000 modular control system.....................................1-4
Module bays and location of exhaust–cooling air vents.........................................................1-6
CAN Cable (3100-024) and connector and pins for the end of the cable
that plugs into the CAN network adapter in the computer..................................................1-6
Tables
Table 1-1.
Table 1-2.
Table 1-3.
Table 1-4.
Table 1-5.
AC input electrical ratings for the Model 1000 control system .............................................1-2
DC power supply specifications for the Model 1000 control system.....................................1-2
J2-CAN connector and pins for the Model 1000 modular control system .............................1-4
J3-QD CAN connector and pins for the Model 1000 modular control system ......................1-5
Pins on the CAN cable connector for the end that plugs
into the CAN network adapter in the computer (PC)..........................................................1-7
Table 1-6. Physical dimensions—Model 1000 modular control system .................................................1-9
Table 2-1. Model 1000 system components ............................................................................................2-1
vi
Model 1000 Modular Control System User’s Manual
August 2003
Quantum Design
P
R
E
F
A
C
E
Contents and Conventions
P.1
Introduction
This preface contains the following information:
P.2
○
Section P.2 provides an overview of the
scope of the manual.
○
Section P.3 outlines the contents of the
manual.
○
Section P.4 shows the conventions that
appear in the manual.
Scope of the Manual
This manual contains background information and installation instructions for the PPMS Model
1000 modular control system.
P.3
Contents of the Manual
o Chapter 1 provides a functional overview of the PPMS Model 1000, including connections,
cables, and network adapters.
o Chapter 2 describes the installation procedures for the Model 1000 hardware and software.
Quantum Design
Model 1000 Modular Control System User’s Manual
August 2003
vii
Section P.4
Conventions in the Manual
P.4
Preface
Contents and Conventions
Conventions in the Manual
File menu
Bold text identifies the names of menus, dialogs, options, buttons, and panels
used in the PPMS MultiVu and VSM software.
File >> Open
The >> symbol indicates that you select multiple, nested software options.
.dat
The Courier font indicates file and directory names and computer code.
Important
Text is set off in this manner to signal essential information that is directly
related to the completion of a task.
Note
Text is set off in this manner to signal supplementary information about the
current task; the information may primarily apply in special circumstances.
CAUTION!
Text is set off in this manner to signal conditions that could result
in loss of information or damage to equipment.
WARNING!
Text is set off in this manner to signal conditions that could result in bodily
harm, loss of life, or irreparable damage to equipment.
WARNING!
Text is set off in this manner to signal electrical hazards that could result in
bodily harm or loss of life.
viii
Model 1000 Modular Control System User’s Manual
August 2003
Quantum Design
C
H
A
P
T
E
R
1
Description and Specifications
1.1
Introduction
This chapter contains the following information.
○
Section 1.2 provides a functional overview
of the Model 1000.
○
Section 1.3 describes the connections for
the Model 1000, including illustrations and
tables.
○
Section 1.4 describes and illustrates the
CAN cable.
○
Section 1.5 describes the CAN network
adapter.
1.2
○
○
○
○
Section 1.6 describes safety considerations
when using the Model 1000.
Section 1.7 describes environmental
requirements for the Model 1000.
Section 1.8 describes maintenance and
cleaning of filters.
Section 1.9 provides information about
contacting Quantum Design Customer
Service.
Functional Overview
The Model 1000 (4100-001) modular control system is a general-purpose chassis (see Figure 1-2) that
houses up to six Quantum Design CAN (control area network) modules. It provides both regulated
power and forced-air cooling to each module. Each module receives power, CAN network
connections, reset control, and line-frequency and inter-module sync signals through a DB-9 connector
integrated into the backplane of the chassis.
The chassis has two types of slots. One type of slot is designed to handle the power requirements for
low-power (up to 20 watts) modules and the other type is designed for high-power (up to 50 watts)
modules. There are three high-power slots and three low-power slots. Figure 1-1 is an abridged
functional block diagram of the Model 1000 modular control system, Table 1-1 shows the electrical
specifications, and Figure 1-6 shows the module bays and their location in the chassis.
Important: Low-power modules will fit into high-power slots, but high-power modules will not fit
into low-power slots.
Quantum Design
Model 1000 Modular Control System User’s Manual
August 2003
1-1
Section 1.2
Functional Overview
Chapter 1
Model 1000 Specifications
Figure 1-1. Abridged functional block diagram of the Model 1000
Table 1-1. AC input electrical ratings for the Model 1000 control system
Supply Voltage
100–240 V AC
Max Current
6.3 A
Frequency
50–60 Hz
Fuses (5X20 mm)
Line Sync (F1)
200 mA, type T (time delay)
Main (F2)
6.3 A, type T (time delay)
Main (F3)
6.3 A, type T (time delay)
Table 1-2. DC power supply specifications for the Model 1000 control system
1-2
Voltage
±24 V DC
Max Current
8A
Main Breaker
6A
External Breaker
3A
Model 1000 Modular Control System User’s Manual
August 2003
Quantum Design
Chapter 1
Model 1000 Specifications
1.3
Section 1.3
Model 1000 Connections
Model 1000 Connections
Figure 1-2. External view of the Model 1000 modular control system (4100-001)
1.3.1
Back Panel
WARNING!
Do not touch the input power pins after you disconnect the power, or you might
experience an electric shock. The energy dissipates in about 30 seconds.
Figure 1-3. Back panel of Model 1000
Quantum Design
Model 1000 Modular Control System User’s Manual
August 2003
1-3
Section 1.3
Model 1000 Connections
Chapter 1
Model 1000 Specifications
1.3.1.1 BREAKERS AND FUSES
The main breakers (6 A) protect the six module bays from the ±24 V DC power supply. The external
breakers (3 A) protect devices connected to the J3-QD CAN connector.
The line-sync fuse (0.2 A) protects the line-sync circuitry.
The power supply is auto-sensing, so it can be plugged into either 110 or 220-V AC without being
reconfigured. The mains fuses are 6.3 A. All the fuses (line-sync and mains) are 20 mm, time-delay
type.
1.3.1.2 CAN CONNECTOR FROM COMPUTER (J2-CAN)
The J2-CAN connector is where the main CAN network connection is made between the computer
(PC) and the Model 1000.
Figure 1-4. J2-CAN connector for the Model 1000 modular control system
Table 1-3. J2-CAN connector and pins for the Model 1000 modular control system
PIN
FUNCTION
3
CAN Ground
4
CAN High
5
CAN Low
1.3.1.3 TERMINATOR SWITCH
The terminator switch is used to properly set the termination impedance for the CAN bus. The
terminator should be in the "IN" position when the J3-QD CAN is not connected to an external device.
1.3.1.4 EXTERNAL CAN BUS CONNECTOR (J3-QD CAN)
The external CAN bus connector (J3-QD CAN) is used to daisy chain the CAN network connection to
other devices. It provides all the signals that are sent to the module bays, including power.
Figure 1-5. J3-QD CAN connector for the Model 1000 modular control system
1-4
Model 1000 Modular Control System User’s Manual
August 2003
Quantum Design
Chapter 1
Model 1000 Specifications
Section 1.3
Model 1000 Connections
Table 1-4. J3-QD CAN connector and pins for the Model 1000 modular control system
PIN
1.3.2
FUNCTION
1
–24 V
2
CAN Low
3
Power Return (24V)
4
Sync Low
5
Line Sync
6
System Ground
7
CAN High
8
Sync High/Reset
9
+24 V
Front Panel
The front panel contains an indicator LED and a reset switch. A green-lit power LED indicates the
normal power-on status of the chassis. The LED will be red for a brief time during a reset condition.
When the reset switch is pressed, a reset signal is sent to each module in the Model 1000, including
any devices connected to J3-QD CAN.
1.3.3
Module Bays
The Model 1000 modular control system can accommodate up to six QD CAN (Quantum Design
control-area network) modules. There are two types of module bay, each designed for a different
power requirement (low power or high power). Electrical connection to each bay is made through a
female 9-pin connector that is identical to the J3-QD CAN connector on the rear panel (see Table 1-4).
Important: Low-power modules will operate in the high-power bays, but high-power modules will not
operate in low-power bays. Guide pins align the CAN connector on the backplane with the mating part
on each QD module and prevent the insertion of a high-power module into a low-power bay.
High-Power Bays
The three rear bays are for "high-power" modules. The high-power bays have enhanced airflow, so
they can dissipate up to 50 W of power each. The backplane of the high-power bays is keyed with a
single guide pin.
Low-Power Bays
The three front bays are for "low-power" modules. The low-power bays have less airflow than the
high-power bays, so they can dissipate less than 20 W of power each. The backplane of the low-power
bays is keyed with a double guide pin.
Quantum Design
Model 1000 Modular Control System User’s Manual
August 2003
1-5
Section 1.4
CAN Cable
Chapter 1
Model 1000 Specifications
Figure 1-6. Module bays and location of exhaust–cooling air vents
1.4
CAN Cable
The CAN cable forms the connection between the 9-pin female connector on the network adapter in
the computer (PC) and the J2-CAN connector on the Model 1000. It carries the two-wire CAN signal
and a ground.
Figure 1-7. CAN Cable (3100-024) and connector and pins for the end of the cable that plugs into the CAN
network adapter in the computer. The other end of the cable connects to the J2-CAN on the rear panel of
the Model 1000 (see Table 1-3).
1-6
Model 1000 Modular Control System User’s Manual
August 2003
Quantum Design
Chapter 1
Model 1000 Specifications
Section 1.6
System Safety
Table 1-5. Pins on the CAN cable connector for the end that plugs into the CAN network
adapter in the computer (PC)
PIN
1.5
FUNCTION
2
CAN Low
3
CAN Ground
5
Shield
7
CAN High
CAN Network Adapter
The CAN network adapter (PCI165-A) is a standard commercial CAN network card. Please see the
documentation accompanying the network adapter for details. The CAN cable (3100-024) plugs into
the female connector on the network adapter.
1.6
System Safety
WARNING!
The Model 1000 modular control system is used with other laboratory
equipment, such as the Physical Property Measurement System (PPMS).
Hence, you should be familiar with the safety considerations for the other
equipment as well as safety precautions specific to the Model 1000. For the
PPMS, safety precautions are summarized in the Physical Property
Measurement System: Hardware Manual.
Above all, Quantum Design and its staff ask that you use standard safe laboratory procedures.
! Use common sense.
! Pay attention to the state of the system and to your surroundings.
! If the behavior of the system appears to be abnormal, there may be something wrong with it. If so,
consider whether the problem poses a threat to personnel in the laboratory and take appropriate
action.
! Supervise inexperienced users.
Quantum Design's equipment, such as the Model 1000 and the PPMS, have safety features to prevent
accidents from causing injury or serious equipment damage. If you use the equipment in a manner that
is not specified by Quantum Design, the protection afforded by the equipment may be impaired
Quantum Design
Model 1000 Modular Control System User’s Manual
August 2003
1-7
Section 1.7
Environmental Considerations
1.6.1
Chapter 1
Model 1000 Specifications
Model 1000–General Safety Precautions
General safety precautions specific to the Model 1000 are the following:
! Close the lid of the Model 1000 when it is in use. A closed lid protects the cooling vents from
accidental spills of liquids.
! Leave ventilation room around the Model 1000, especially at the rear. It is sufficient to leave 6–8
in. at the rear.
! Keep items that might restrict airflow away from the inlet filters on the rear panel of the Model
1000.
! Keep items that might restrict airflow away from the exhaust–cooling air vents (Figure 1-6).
! Cover unused module bays with the QD-provided blank plate. The plates ensure that the
equipment has the correct airflow.
! Clean the foam fan-inlet filters as outlined in Section 1.8. The fan inlets are on the rear panel, as
illustrated in Figure 1-3.
1.6.2
Electrical Safety
WARNING!
The Model 1000 and the PPMS are powered by nominal voltages between 100 V
to 240 V AC. These voltages are potentially lethal, so you should exercise
appropriate care before opening any of the electronics units, including turning off
the equipment and disconnecting it from its power source.
! Turn off and unplug all electronic equipment before removing any of its covers.
! Keep electrical cords in good working condition, and replace frayed and damaged cords.
! Keep liquids away from the workstations.
1.7
Environmental Considerations
There are few environmental constraints to consider when you install the Model 1000 in a laboratory.
However, the Model 1000 will be subject to the same constraints as the equipment with which it is
used, such as the PPMS. (Information on the PPMS is in the Physical Property Measurement System:
Hardware Manual.)
1.7.1
Physical Dimensions
Table 1-6 lists the approximate physical dimensions of the Model 1000 modular control system
cabinet. In addition to the space for the cabinet, you should leave some empty space around the Model
1000 so that it will have unrestricted airflow, especially at the rear, where the air inlets are located. At
the rear, a space of 6–8 in. will provide sufficient room for airflow and for the electrical cords. Proper
airflow also requires that the exhaust–cooling-air vents (top and front of the unit) are free of
obstructions and that any unused module bays are covered by a blank plate.
1-8
Model 1000 Modular Control System User’s Manual
August 2003
Quantum Design
Chapter 1
Model 1000 Specifications
Section 1.8
Model 1000 Maintenance
Table 1-6. Physical dimensions—Model 1000 modular control system
HARDWARE
Model 1000 cabinet
APPROXIMATE PHYSICAL DIMENSIONS
22 cm wide × 67 cm deep × 49 cm high
(8.7 in. wide × 19 in. deep × 26 in. high)
1.7.2
Local Altitude and Humidity
The Model 1000 is intended for indoor use at altitudes up to 2000 meters (6562 ft.). It should be
operated in ambient temperatures from 0°C to 40°C, in a non-condensing atmosphere (maximum
relative humidity of 80% at 40°C). Electrical safety features may be impaired if the Model 1000 is
operated outside of these environmental considerations. Contact your Quantum Design service
representative if you have any questions about environmental considerations.
1.8
Model 1000 Maintenance
The Model 1000 does not need regularly scheduled maintenance of any type. However, you must keep
the foam filters on the two fan inlets clean so that the equipment has the proper airflow. The fan inlets
are in the lower area of the rear panel, as shown in Figure 1-3.
Use the steps below to clean the foam filters.
1.
Remove the foam filters from the fan inlets:
a.
Turn off the power to the Model 1000 and unplug it.
b.
For the large fan, place the tip of a slotted screwdriver under one of the clips that holds the
fan-guard filter retainer to the unit and gently pop the cover off. You can now remove the
filter for cleaning.
c.
For the small fan, use a small Phillips screwdriver to unscrew the fan-guard filter assembly.1
Then, use a thin implement to separate the layers of the filter assembly and remove the filter
for cleaning.
2.
Blow air through the filters or gently wash them with water and mild detergent.
Important: Do not clean the filters by using an organic solvent.
3.
If you wash the filters, let them dry before you reinstall them. You can gently blot them with cloth
or paper so that they will dry more quickly.
4.
When the filters are dry, reinstall them on the Model 1000.
5.
Turn on the Model 1000.
1
You will encounter some resistance when you extract and insert the screws, because they are firmly held by a
special locking nut.
Quantum Design
Model 1000 Modular Control System User’s Manual
August 2003
1-9
Section 1.9
Contact Information
1.9
Chapter 1
Model 1000 Specifications
Contact Information
If you have trouble with your VSM or your PPMS, please contact your local Quantum Design service
representative for assistance. Your service representative will ask you to describe the problem, the
circumstances involved, and the recent history of your system.
1-10
United States
Service Center
Quantum Design World Headquarters
11578 Sorrento Valley Road
San Diego, CA 92121
Email: [email protected]
Tel: 1-858-481-4400 or 800-289-6996
Fax: 1-858-481-7410
Service for the United States, Canada,
Mexico, and other countries not listed
below
European
Service Center
c/o L.O.T. – Gmbh & Co KG
Im Tiefen See 58
D-64293 Darmstadt, Germany
Email: [email protected]
Tel: 49-6151-880631
Fax: 49-6151-896667
Service for England, Italy, Germany,
Ireland, France, Belgium, Netherlands,
Spain, Portugal, Denmark, Austria,
Norway, Sweden, Finland, Russia,
Switzerland, Czech Republic, Poland,
Slovakia, Hungary, Greece, Crete,
Turkey, Israel, Yugoslavia, Croatia, and
Slovenia.
Japan
Service Center
Sanpo Ikebukuro Building Annex
4-32-8 Ikebukuro
Toshima-ku, Tokyo
171-0014, Japan
Email: [email protected]
Tel: 81-3-5954-8570
Fax: 81-3-5954-6570
Service for Japan
Taiwan
Service Center
5F-1, No. 415, Sec. 4
Hsin Yi Road
Taipei, Taiwan R.O.C.
Tel: 886-2-8780-5228
Fax: 886-2-8780-5225
Service for Taiwan, Hong Kong,
Singapore, China
Model 1000 Modular Control System User’s Manual
August 2003
Quantum Design
C
H
A
P
T
E
R
2
Installation Instructions
2.1
Introduction
This chapter contains the following information:
○
Section 2.2 summarizes the installation
procedures for the Model 1000.
○
Section 2.3 describes how to install the CAN
driver software.
○
Section 2.4 describes how to install the CAN
network adapter.
○
Section 2.5 describes how to position the
Model 1000 and begin to set it up.
2.2
○
○
○
Section 2.6 describes how to install the Quantum
Design modules into the module bays.
Section 2.7 describes how to complete the
Model 1000 setup.
Section 2.8 describes safety precautions specific
to the Model 1000.
Installation Overview
This chapter describes the procedures you will use to install both the hardware and software for the
Model 1000. If the Model 1000 was purchased as part of a complete Quantum Design (QD) system
(e.g., a PPMS with a VSM option), most of these procedures will have been performed at the factory
before shipment.
Table 2-1 lists the components of the Model 1000 installation kit. Verify that you have received
these components before proceeding
Table 2-1. Model 1000 system components
COMPONENT
PART NUMBER
REFERENCE
Model 1000 Modular Control System
4100-001
Figure 1-2
CAN Cable
3100-024
Table 1-3, Table 1-4
CAN Network Adapter
PCI165-A
Section 1.5
Power Cord
HE2 (USA)
HC17 (International)
Quantum Design CAN Manager Software
Quantum Design
Model 1000 Modular Control System User’s Manual
August 2003
2-1
Section 2.4
Installing the CAN Network Adapter
2.3
Chapter 2
Installation
Install the CAN Driver Software
Using the Quantum Design (QD) installation disk, install the software for the CAN (control area
network) driver. Options such as the PPMS VSM use the CAN driver software to communicate
with the QD modules. You will perform this installation only once.
2.3.1
2.3.2
2.4
CAN Drivers
1.
Insert the QD installation CD into the computer (PC) and set the working directory to D:\VCI.
2.
Run vci214.exe to install the drivers.
3.
Restart the computer (PC) to activate the drivers.
CANopen Drivers
1.
Insert the QD installation CD into the computer (PC) and set the working directory to
D:\CANopen.
2.
Run Cop221.exe to install the drivers.
3.
Restart the computer (PC) to activate the drivers.
Installing the CAN Network Adapter
You should follow these instructions only if the CAN network adapter has not already been
installed in your computer.
2-2
1.
Turn off the power to the computer (PC) and disconnect the power cord.
2.
Install the CAN network adapter (PCI165-A) in an empty slot in the computer (PC) by
following the enclosed adapter installation instructions.
3.
Reconnect the computer (PC) power cord.
4.
Start the computer.
Model 1000 Modular Control System User’s Manual
August 2003
Quantum Design
Chapter 2
Installation
2.5
Section 2.6
Installing QD Modules into Module Bays
Model 1000 Setup: Part 1
Please read about system safety and environmental conditions (Sections 1.6 and 1.7) before you
begin to unpack the Model 1000. Then, find a location for the Model 1000 that is convenient to the
PPMS electronics rack, computer, and/or dewar. Be sure to provide unrestricted airflow to the fan
intakes on the rear of the Model 1000 and the exhaust vents on the front.
2.6
1.
Turn off the power to the computer (PC) and disconnect the power cord.
2.
Unpack the Model 1000 and position it near the PPMS electronics rack or in another
convenient location between the dewar and the computer.
3.
Verify that there is unrestricted airflow to the air intakes (rear panel) and the exhaust vents
(front panel) of the Model 1000.
4.
Verify that the power switch on the Model 1000 is in the off position.
5.
Connect the power cord to the rear panel of the Model 1000.
6.
Connect one end of the CAN Cable (3100-024) to the J2-CAN connector on the rear panel of
the Model 1000.
7.
Connect the other end of the CAN Cable (3100-024) to the CAN network adapter in the
computer (PC).
8.
To install QD modules into the module bays for a specific option, go to Section 2.6 (also see
the installation instructions for the QD option for specific instructions). If your modules are
already installed, go to Section 2.7.
Installing QD Modules into Module Bays
If you purchased the Model 1000 as part of an installed option like the PPMS VSM, the modules
may already be installed in the module bays. If so, you can go to Section 2.7.
1.
Verify that the power switches on the Model 1000 and computer (PC) are in the off position
and the power cords are disconnected.
2.
Open the lid on the Model 1000.
3.
Using Chapter 1 (Section 1.3.3) as a guide, determine if you are installing a high-power
module, with one guide hole on the back, or a low-power one, with two guide holes.
4.
Remove the appropriate cover plate for the module you that you plan to install. For a lowpower module, select a front bay; for a high-power module, select a rear bay.
5.
Insert the module into the bay until it is firmly seated.
6.
Gently tighten the securing screws until they are finger tight. The faceplate of the module
should be flush with the surrounding plates.
7.
If any option-specific cables need to be connected to the module, hook up the cables now.
8.
When you have installed all the modules, replace the cover plate or plates.
9.
Proceed to Section 2.7.
Quantum Design
Model 1000 Modular Control System User’s Manual
August 2003
2-3
Section 2.8
Safety
2.7
2.8
Chapter 2
Installation
Model 1000 Setup: Part 2
1.
Once you have connected the cables and installed the modules, plug in the power cord(s) and
turn on the power.
2.
Verify that the power LED is lit green. Note that the LEDs often flash red for a brief time
when the power is first turned on.
Safety
Safe use of the QD equipment, such as the PPMS and its options, requires that all laboratory staff
follow standard safe laboratory practices as well as option-specific guidelines. Safety precautions
specific to the Model 1000 are the following:
! Close the lid of the Model 1000 when it is in use. A closed lid prevents the introduction of
liquids (for example, an accidental spill) into the cooling vents.
! Ensure that the equipment has the proper airflow:
2-4
•
Keep items that might restrict airflow away from the air intakes on the rear panel of the
Model 1000 and the exhaust–cooling air vents near the modules and on the front of the
unit.
•
Cover unused module bays with the blank plates that QD has provided.
•
Keep the inlet filters on the rear panel clean (see Section 1.8).
Model 1000 Modular Control System User’s Manual
August 2003
Quantum Design