1
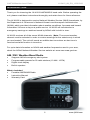
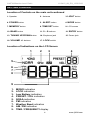
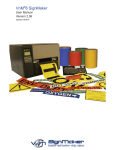
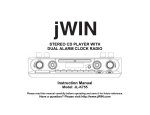
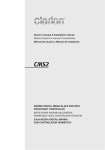
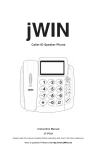
AM / FM / Weather Band Radio
JX-M122
INSTRUCTION MANUAL
Please read this manual carefully before operating and save it for future
reference.
Have a question? Please visit www.jWIN.com
AM/FM/Weather band Radio
V10M10_IM_EN_10292008
1
www.jWIN.com
AM/FM/Weather band Radio
V10M10_IM_EN_10292008
INTRODUCTION
Thank you for choosing the JX-M122 AM/FM/WB 3 band radio. Before operating the
unit, please read these instructions thoroughly and retain them for future reference.
The JX-M122 is designed to receive National Weather Service (NWS) broadcasts, by
the Department of Commerce’s National Oceanic and Aerospace Administration
(NOAA) which provides information about weather conditions, forecasts and hazard
information 24 hours a day as a public service. JX-M122 will call attention to
emergency warnings or watches issued by NOAA with its built-in siren.
JX-M122 receives all of the seven NOAA channels. (Note: The correct weather
channel must be selected in order to receive warnings for the state/county in which
you are located). The unit will sound an audible alert tone when an alert tone is
received and alert function is turned on.
For up-to-date information on NOAA and weather frequencies used in your area,
check the NOAA National Weather Service website at: www.nws.noaa.gov/nwr.
AM / FM / Weather Band Radio
•
Supports NOAA emergency alert system
•
Programmable presets for 20 radio stations (10 AM / 10 FM)
•
Digital clock display
•
Built-in speaker
What’s Included
•
Portable AM/FM/WB Radio
•
Instruction Manual
•
Warranty Card
2
www.jWIN.com
AM/FM/Weather band Radio
V10M10_IM_EN_10292008
GETTING STARTED
Location of Controls on the Main Unit
1
23 4
5
6 7 8 9 10
11
12
13
16
14
17
15
3
www.jWIN.com
AM/FM/Weather band Radio
V10M10_IM_EN_10292008
GETTING STARTED
Location of Controls on the main unit-continued
1. Speaker
2. Antenna
3. LIGHT button
4. POWER button
5. ALERT button
6. MODE button
7. MEMORY button
8. TIME/SET button
9. LCD screen
10. BAND button
11. 0 – 9 buttons
12. ENTRY button
13. TUNING UP/DOWN button
14. Earphone jack
15. Power jack
16. VOLUME +/- buttons
17. LOCK switch
Location of Indications on the LCD Screen
1
2
3
4
5
6
7
8
9
1.
2.
3.
4.
5.
6.
7.
8.
9.
MONO indication
LOCK indication
Low Battery indication
PRESET / VOL indication
NOAA indication
PM indication
Weather Band indication
AM / FM indication
TIME / FREQUENCY display
4
www.jWIN.com
AM/FM/Weather band Radio
V10M10_IM_EN_10292008
GETTING STARTED
Using an AC Adapter to Supply the Power to the Unit
Before connecting the AC adapter (included), make sure that the input voltage of the
AC adapter corresponds to your local AC outlet voltage. It is recommended to use an
AC adapter, which outputs DC 12V /
, for this unit.
1.
2.
Connect the AC adapter (included) plug to the DC Jack of the unit.
Connect the other end of the AC adapter to the wall outlet.
Important Note: To avoid the electric shock or fire, do not use the AC adapter where
lots of water particles exist in the air. Use the AC adapter with caution.
Installing batteries for portable use
This unit operates on 3 “AA” batteries (not included) for portable use.
1. Open the Battery Compartment.
2. Insert 3 "AA" size batteries into the Battery Compartment, making sure that the
batteries are installed in the designed numerical order and that the proper
polarity (+and-) are maintained.
Important Note: Please protect the environment. Dispose of old batteries properly
according to local regulations.
Notes on battery use:
•
Load new batteries with their polarities (+and-) aligned correctly.
•
Do not apply heat to batteries, or internal short circuit may occur.
•
If this unit is not to be used for a long period of time, remove all batteries and
store them in a cool and dry place.
•
Remove spent batteries immediately and dispose of them.
•
Do not use old and new batteries together. Also never use an alkaline battery
with a magnesium battery.
5
www.jWIN.com
AM/FM/Weather band Radio
V10M10_IM_EN_10292008
OPERATIONAL INSTRUCTIONS
Radio Operation
1.
2.
3.
4.
5.
6.
7.
8.
Set Lock Switch to OFF position.
To turn on the radio by press the POWER button.
Adjust the desired volume level by press the VOLUME +/- button, the volume
level will show on the right corner of display.
Select the preferred band (FM/AM/WB) by press the BAND button.
Press the LIGHT button to turn the backlight on for a few seconds. Press the
LIGHT button again after the backlight blacks out, the backlight will light all the
times; Press the light button again, the backlight will black out; Press the
LIGHT button again, the backlight will light for a few seconds.
Tune manually, automatically, direct key-in or by means of the preset button
0...9 buttons to a radio station. The LCD will display the frequency of the
received station.
Adjust the antenna to get optimal effect.
To turn off the radio by press the POWER button again.
Tuning the Radio
Manual Tuning
Frequency will be tuned up or down by one step each time when either the Tuning
UP " " or Tuning DOWN " " button is pressed.
In order to tune the stations press Tuning UP " "or Tuning DOWN " " shortly
until right frequency has been reached.
Automatic Tuning
Press Tuning UP " "or Tuning DOWN " " and hold for more than 2 seconds.
Then the automatic tuning function of the unit will start seek-up or seek-down to the
next nearest station with sufficient signal strength.
Direct Key-In Tuning
Select the waveband range. Press ENTRY, then press directly the digit value of the
frequency of the selected station, e.g. if you want to tune 90.3 MHz of the FM range,
first select FM, then press ENTRY and key in "9", "0" & "3"in sequence. And press
ENTRY again then you can receive the station that you want.
6
www.jWIN.com
AM/FM/Weather band Radio
V10M10_IM_EN_10292008
OPERATIONAL INSTRUCTIONS
Tuning the Radio-continued
Preset Tuning
You can store the frequency of 20 radio stations in the memory, 10 for each of the
AM and FM waveband range by following the steps as:
1. Press the BAND button to select AM/FM waveband and tune to the desired
station.
2. To store the radio frequency shown, press MEMORY button, "PRESET"
indicator flashes for 4 seconds. During this period, press either 0...9 buttons to
select the preset number where the tuned station will be stored. Press
MEMORY again then the "PRESET" indicator will appear again and the preset
number is indicated on the LCD that the tuned station is stored in this number.
Note: Memory preset number 10 is entered by pressing Button 0.
In order to tune the preset radio station, follow the steps as:
1. Select the desired waveband range.
2. Then press Preset 0...9 to select the preset number for the stored station, then
the radio will be tuned automatically to the stored station and LCD will display
the frequency.
Weather Band Operation
1.
2.
3.
4.
Press the POWER button to turn on the unit.
Press the BAND button to select weather band, the "WB" icon will display on
LCD.
Press the TUNING UP or TUNING DOWN button to select the channels. For
best reception, please select a clearest channel for listening.
You can directly press the 1-7 buttons for channel selection.
Weather Alert Operation
1.
In both power off and weather band receiving modes, you can press the
ALERT button to activate the alert function, the "NOAA' icon will display on
LCD. When NOAA sends out an emergency warning, unit will sound a loud
signal.
2. When you hear the loud siren sound, press the POWER button in power off
mode, or press the ALERT button in weather band receiving mode to hear
further information about the emergency.
3. To disable the alert function, press the ALERT button again until the "NOAA"
icon disappears on LCD.
Note: In power off state, if you activated the alert function, the battery current
consumption will be increased significantly. To save battery life, please connect AC
adaptor for power supply.
Antennas
FM/Weather Band
Pull out the Telescopic Antenna and adjust its length and angle for optimum
reception.
AM
This unit has a built-in AM antenna. For better AM reception, turn the unit for a
clearer signal.
7
www.jWIN.com
AM/FM/Weather band Radio
V10M10_IM_EN_10292008
OPERATIONAL INSTRUCTIONS
IMPORTANT!
The fact that you can get clear voice reception does not guarantee that an
emergency alert will trigger this unit’s alert tone. To test actual reception, your unit
must receive the weekly Test or Emergency Alert Signal Broadcast.
Follow the instructions in the previous sections and set the radio to ALERT to receive
Test Alert Broadcasts from the NWS station.
The National Weather Service (NWS) broadcasts a Test Alert every week on
Wednesday between 11:00am and 12: 00 noon. To find out the specific test schedule
in your area, contact your local National Oceanic and Atmospheric Administration
(NOAA) or National Weather Service (NWS) office. These offices are listed in the
telephone book under “US Government”.
When you are traveling with your radio and want to use it in a new location, make
sure you have the correct Weather Channel (1-7). Verify that the unit can be
activated by the test broadcast in the new location.
REMEMBER-FOR YOUR SYSTEM TO BE EFFECTIVE, THE RADIO MUST BE
PLACED IN A LOCATION THAT CAN RECEIVE AN EMERGENCY ALERT
SIGNAL AND WHERE THE ALERT TONE CAN BE HEARD.
Clock Function
1.
2.
3.
To set the time, press the TIME SET button. Then the indicated time will flash,
and then press UP " " button to adjust to the correct HOUR.
After correct HOUR is set, then press the DOWN " " button to adjust to the
correct MINUTE.
After time setting is complete, press the TIME SET button again, then the clock
will start to run in normal mode.
Cleaning the Unit
1.
2.
3.
4.
To prevent fire or shock hazard, disconnect your unit from the AC power source
when cleaning.
The finish on the unit may be cleaned with a dust cloth and cared for as other
furniture, Use caution when cleaning and wiping the plastic parts.
If the cabinets become dusty, wipe them with a soft dry dust cloth. Do not use
any wax or polish sprays on the cabinets.
If the front panel becomes dirty or smudged with fingerprints, it may be cleaned
with a soft cloth slightly dampened with a mild soap and water solution. Never
use abrasive cloths or polishes as these will damage the finish of your unit.
Caution: Never allow any water or other liquids to spill into the unit while cleaning.
8
www.jWIN.com
AM/FM/Weather band Radio
V10M10_IM_EN_10292008
TROUBLESHOOTING GUIDE AND SPECIFICATIONS
If you experience difficulties in the use of this unit, please check the following before
calling for Customer Service.
•
Noise or distorted sound when playing the radio.
o
Radio station may not be properly tuned. Tune to desired radio frequency
again.
o
•
The radio signal is weak. Reposition the unit for better reception.
No radio sound
o
o
Radio may not be turned on, turn the unit ON.
Batteries may not be installed. Install three (3) fresh “AA” batteries in the
battery compartment.
o
The unit may not be connected to power source. Connect the AC power
adaptor to both the unit and the wall outlet.
Specifications
•
Frequency Range
o
AM: 520kHz – 1710kHz
o
FM: 87.5MHz – 108MHz
o
Weather band:
CH1: 162.400MHz
CH2: 162.425MHz
CH3: 162.450MHz
CH4: 162.475MHz
CH5: 162.500MHz
CH6: 162.525MHz
CH7: 162.550MHz
•
•
•
Connectivity
o
3.5mm stereo headphone jack
o
AC adapter jack
Power Requirement
o
AC Adapter: DC 12V, 250mA, center negative (AC adapter included)
o
Battery: 4.5V (3 x “AA” batteries, not included)
Unit Dimensions (W x H x D): Approx. 5.8” x 3.6” x 1.3” (148mm x 92mm x
32mm)
•
Unit Weight: Approx. 0.49 lbs (0.22 kg)
9
www.jWIN.com
AM/FM/Weather band Radio
V10M10_IM_EN_10292008
USER SAFETY GUIDE
WARNING
•
•
TO PREVENT FIRE OR SHOCK HAZARD. DO NOT EXPOSE THIS
APPLIANCE TO RAIN OR MOISTURE.
THIS APPLIANCE SHALL NOT BE EXPOSED TO DRIPPING OR
SPLASHING WATER AND THAT NO OBJECT FILLED WITH LIQUIDS SUCH
AS VASES SHALL BE PLACED ON APPARATUS.
IMPORTANT SAFETY INSTRUCTIONS
1)
Read these instructions.
2)
Keep these instructions.
3)
Heed all warnings.
4)
Follow all instructions.
5)
Do not use this apparatus near water.
6)
Clean only with dry cloth.
7)
Do not block any ventilation openings. Install in accordance with the
manufacturer’s instructions.
8)
Do not install near any heat sources such as radiators, heat registers, stoves, or
other apparatus (including amplifiers) that produce heat.
9)
Do not defeat the safety purpose of the polarized or grounding-type plug. A
polarized plug has two blades with one wider than the other. A grounding type
plug has two blades and a third grounding prong. The wide blade or the third
prong is provided for your safety. If the provided plug does not fit into your outlet,
consult an electrician for replacement of the obsolete outlet.
10) Protect the power cord from being walked on or pinched particularly at plugs,
convenience receptacles, and the point where they exit from the apparatus.
11) Only use attachments/accessories specified by the manufacturer.
10
www.jWIN.com
AM/FM/Weather band Radio
V10M10_IM_EN_10292008
USER SAFETY GUIDE
IMPORTANT SAFETY INSTRUCTIONS-Continued
12) Use only with the cart, stand, tripod, bracket, or table specified
by the manufacturer, or sold with the apparatus. When a cart is
used, use caution when moving the cart/apparatus combination
to avoid injury from tip-over.
13) Unplug this apparatus during lightning storms or when unused for long periods
of time.
14) Refer all servicing to qualified service personnel. Servicing is required when the
apparatus has been damaged in any way, such as power-supply cord or plug is
damaged, liquid has been spilled or objects have fallen into the apparatus, the
apparatus has been exposed to rain or moisture, does not operate normally, or
has been dropped.
15) Grounding or Polarization – This product may be equipped with a polarized
alternating-current line plug (a plug having one blade wider than the other). This
plug will fit into the power outlet only one way. This is a safety feature. If you are
unable to insert the plug fully into the outlet, try reversing the plug. If the plug
should still fail to fit, contact your electrician to replace your obsolete outlet. Do
not defeat the safety purpose of the polarized plug.
Alternate Warnings – This product is equipped with a three-wire grounding-type
plug, a plug having a third (grounding) pin. This plug will only fit into a
grounding-type power outlet. This is a safety feature. If you are unable to insert
the plug into the outlet, contact your electrician to replace your obsolete outlet.
Do not defeat the safety purpose of the grounding-type plug.
16) Ventilation – Slots and openings in the cabinet are provided for ventilation and
to ensure reliable operation of the product and to protect it from overheating,
and these openings must not be blocked or covered. The openings should
never be blocked by placing the product on a bed, sofa, rug, or other similar
surface. This product should not be placed in a built-in installation such as a
bookcase or rack unless proper ventilation is provided or the manufacturer’s
instructions have been adhered to.
17) The MAINS plug or an appliance coupler is used as the disconnect device, the
disconnect device shall remain readily operable.
11
www.jWIN.com
AM/FM/Weather band Radio
V10M10_IM_EN_10292008
USER SAFETY GUIDE
IMPORTANT SAFETY INSTRUCTIONS-Continued
CLEANING
Always disconnect unit from power supply before attempting to
clean it. Use soft cloth moistened with soapy water, and wipe
gently. Do not use solvents or abrasive materials.
LASER SAFETY
This unit utilizes laser technology. Only a qualified professional
should remove the cover or attempt to service this device, due to
possible eye injury.
CAUTION – CLASS 1 LASER PRODUCT
Use of controls adjustments and/or performance of procedure other
than specified herein may result in hazardous radiation exposure.
DANGER
Invisible laser radiation when open and interlock failed or defeated.
Avoid direct exposure to beam. CAUTION: HAZAROUS LASER
RADIATION WHEN OPEN AND INTERLOCK DEFEATED.
YOU CAN HELP TO PROTECT THE ENVIRONMENT!
Please remember to respect the local regulations: Hand in the nonworking electrical equipment to an appropriate waste disposal center.
FOR USED BATTERIES
Disposed of the used batteries properly. Please follow the local
regulations for the battery disposal.
FCC NOTICE TO A USER IN USA
This equipment has been tested and found to comply with the limits for a Class B
digital device, pursuant to Part 15 of the FCC Rules. These limits are designed to
provide reasonable protection against harmful interference in a residential installation.
This equipment generates, uses, and can radiate radio frequency energy and, if not
installed and used in accordance with the instructions, may cause harmful
interference to radio communications. However, there is no guarantee that
interference will not occur in a particular installation. If this equipment does cause
harmful interference to radio or television reception, which can be determined by
turning the equipment off and on, the user is encouraged to try to correct the
interference by one or more of the following measures:
1. Reorient or relocate the receiving antenna.
2. Increase the separation between the equipment and receiver.
3. Connect the equipment into an outlet on a circuit different from that to which the
receiver is connected.
4. Consult the dealer or an experienced radio/TV technician for help.
12
www.jWIN.com
AM/FM/Weather band Radio
V10M10_IM_EN_10292008
USER SAFETY GUIDE
IMPORTANT SAFETY INSTRUCTIONS-Continued
FCC RULES
This device complies with Part 15 of the FCC Rules. Operation is subject to the
condition that this device does not cause harmful interference.
Note: Do not make changes or modify the device in any way. Changes or
modifications not expressly approved by the party responsible for compliance
could void the user’s authority to operate the equipment.
IMPORTANT NOTES ON HEARING
Your hearing is very important to you and to us, so please take care when operating
this equipment. We strongly recommend you to follow the guideline below in order to
prevent possible damage or loss of hearing.
If you continuously listen to the loud sounds, your hearing will adapt to continuous
loud sounds and will give you the impression that the volume has been reduced.
What seems normal to you may in fact be harmful. To guard against this BEFORE
YOUR HEARING ADAPTS, set the volume at a low level and slowly increase the
volume level until you can hear comfortably and clearly without distortion. Damage to
your hearing is accumulative and is irreversible. Any ringing or discomfort in the ears
indicates that the volume is too loud. Once you have established a comfortable
listening level, DO NOT INCREASE THE VOLUME LEVEL FURTHER.
In the use of headphones, please take more attention. Hearing experts say that
listening to a loud music can damage your hearing, especially when listening to
music with headphones.
IC NOTICE TO A USER IN CANADA
Since digital circuitry may cause interference to other radio or television tuners
nearby, switch this unit off when not in use or move it away from the affected
radio/television tuner.
NOTE: This digital apparatus does not exceed the Class B limits for radio noise
emissions from digital apparatus as set out in the Radio Interference Regulations of
Industry Canada. These limits are designed to provide reasonable protection against
harmful interference in a residential installation. This equipment generates, uses and
can radiate radio frequency energy and, if not installed and used in accordance with
the instructions, may cause harmful interference to radio communications. However,
there is no guarantee that interference will not occur in a particular installation. If this
equipment does cause harmful interference to radio or television operation (which
can be determined by turning the equipment off), the user is encouraged to try to
correct the interference by one or more of the following measures:
• Reorient or relocate the receiving antenna.
• Increase the separation between the equipment and receiver.
• Connect the equipment into an outlet on a circuit different from that to which the
receiver is connected.
• Consult the dealer or an experienced radio / TV technician for help.
13
www.jWIN.com
AM/FM/Weather band Radio
V10M10_IM_EN_10292008
USER SAFETY GUIDE
IMPORTANT SAFETY INSTRUCTIONS-Continued
WARNING!
•
The apparatus shall not be exposed to dripping or splashing and that no objects
filled with liquids, such as vases, shall be placed on apparatus.
•
Mains plug is used as the disconnect device. It shall remain readily operable
and should not be obstructed during intended use. To be completely
disconnected, the apparatus from supply mains, the mains plug of the apparatus
shall be disconnected from the mains socket outlet completely.
ADDITIONAL IMPORTANT INSTRUCTIONS
•
Place the apparatus with some distances from the nearby objects or walls for
sufficient ventilations. The ventilation should not be impeded by covering the
ventilation openings with items such as newspapers, table-cloths, curtains, etc.
•
No naked flame sources such as lighted candles should be placed on the
apparatus.
•
Dispose of used batteries properly. Follow the local regulation for the battery
disposal.
•
Use this apparatus in the moderate climates. It is recommended not to use this
apparatus such in a lightning storm.
14
www.jWIN.com
AM/FM/Weather band Radio
V10M10_IM_EN_10292008
TEL: 516-626-7188
FAX: 516-626-7105
Website: www.jwin.com
© 2008 jWIN Electronics Corp. All rights reserved. No portion of this printed material or
product enclosed herewith including design, shape and graphics, may be reproduced or
transmitted in any form without the expressed written consent of jWIN Electronics Corp.
by any means, electronic or mechanical, including photocopying, recording or use of an
information storage and retrieval system. Any unauthorized distribution or reproduction of
this printed material or product, or any portion there of, will be prosecuted to the fullest
possible extent of the law.
15
www.jWIN.com