1
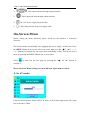
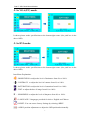
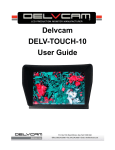
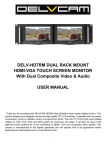
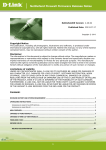
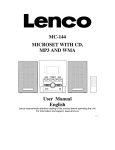
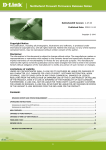
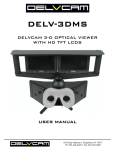
Delvcam DELV-2LCD7-CVGAD User Guide 1 Table of Contents Features.......................................................................................................................... 3 Safety Instructions ......................................................................................................... 3 Installation and Initial Setup .......................................................................................... 4 v Unpacking................................................................................................. 4 v Mounting .................................................................................................. 4 Product Description ....................................................................................................... 5 v Front panel features .................................................................................. 5 v Rear Panel Features .................................................................................. 5 On-Screen Menu ............................................................................................................ 6 v In AV mode: ............................................................................................. 6 v In VGA (PC) mode:.................................................................................. 7 v In DVI mode:............................................................................................ 7 Technical Specifications ................................................................................................ 8 Trouble Shooting ........................................................................................................... 9 Warranty ........................................................................................................................ 9 YP-01141224 2 Dual 7” 3RU Rack Mount Monitor Features Ø Metal housing; Ø With VGA, DVI (optional), Composite input and loop through output; Ø Multi-Format compatibility; Ø Easy-to-navigate on-screen menus with 5 button control (<, >, MENU, -, +); Ø Adjustable color temperature in VGA & DVI (optional) mode; Ø Image Flip (Up / Down / Left / Right); Ø Aspect ratio settings among 15:9(full screen), 16:9 and 4:3; Safety Instructions Ø Rough handling of product may cause physical damage or malfunction. Ø Never insert anything metallic into the monitor openings provided for ventilation to avoid electric shock. Please do not block any openings. Ø Put your monitor in a location with low humidity and a minimum of dust. Ø Place the monitor on a solid surface and treat it carefully. The screen is made of glass and can be damaged if dropped or sharply hit. Ø Unplug the monitor power before you connect external devices to the monitor. Ø If your monitor does not operate normally, or if there are any smells coming from it, unplug it immediately and contact us. Ø Do not attempt to disassemble the monitor. Doing so voids warranty. Ø Clean the screen with a high quality microfiber cloth only. Never spray the screen directly with any sort of cleaning fluid. Ø Dust the unit with a soft, damp cloth. Dry or abrasive cloths may cause electrostatic charge on the surface, attracting dust particles. Ø Please unplug the power if long-term no-use, or thunder weather. 3 Dual 7” 3RU Rack Mount Monitor Installation & Initial Setup v Unpacking Carefully unpack the monitor and verify that the following items are included: l Monitor l 12V Power Supply l Power Supply Cable Clamp l User Manual Inspect the unit for any physical damage that may have occurred during shipping. Should there be any damage, please immediately call us. v Mounting The monitor features a standard 7” rack mount configuration with tilt capability. First secure the upper screws and then the lower ones (as illustrated below). 4 Dual 7” 3RU Rack Mount Monitor Product Description v Front panel features 1.<: Left Button, to navigate the on-screen menu (Select the item). Default as phase adjustment. 2.>: Right Button, to navigate the on-screen menu (Select the item). Default as brightness adjustment among 6 levels circularly. 3.MENU: Press MENU Button to access the on-screen Menu. 4. -: Down Button, to confirm the item and change values (Decrease the values). 5. +: Up Button, to confirm the item and change values (Increase the values). 6. INPUT: Switch Button, to switch the input signal among Video, VGA (PC) and DVI (optional) circularly. 7. : Power Button, press power switch to turn on/off the power. v Rear Panel Features Note: The interfaces included in Monitor 1 are the signal interface for Monitor 1. The interfaces included in Monitor 2 are the signal interface for Monitor 2. The power interface is common / public interface for both Monitor 1 and Monitor 2. 1. : DVI input and loop through output interface (optional). 5 Dual 7” 3RU Rack Mount Monitor 2. : VGA input and loop through output interface. 3. 4. 5. : Video input and loop through output interface. : DC 12V Power supply input interface. : Cable clamp slot for the power supply cable. On-Screen Menu Before setting the menu functions, please check out the monitor is connected correctly. The monitor boots automatically once plugging the power supply. At this time, Press the MENU Button to access the on-screen menu, then press the “+”, “-”, “ < ”, “ > ” Buttons to navigate the on-screen menu and change values. Exit the on-screen menu by pressing the MENU Button one or more times. Select to enter into the next page by pressing the ”+” or ”-” button to confirm it. Please check the Menu Settings screen in different signal mode as below, v In AV mode: It shows current picture format (NTSC & PAL) at the bottom right corner (See pink box in the above OSD) 6 Dual 7” 3RU Rack Mount Monitor v In VGA (PC) mode: It shows picture mode specifications at the bottom right corner (See pink box in the above OSD). v In DVI mode: It shows picture mode specifications at the bottom right corner (See pink box in the above OSD). Item/Menu Explanation: -- BRIGHTNESS: to adjust the level of luminance from 0% to 100%. -- CONTRAST:to adjust the level of contrast from 0% to 100%. -- SATURATION: to adjust the level of saturation from 0% to 100%. -- TINT: to adjust the hue of image from 0% to 100%. -- SHARPNESS: to adjust the level of sharpness from 0% to 100%. -- LANGUAGE: 2 languages provided for choice: English and Chinese. -- RESET: You can restore factory Settings by selecting “YES”. -- OSD H-position adjustment: to adjust the OSD position horizontally. 7 Dual 7” 3RU Rack Mount Monitor -- OSD V-position adjustment: to adjust the OSD position vertically. -- OSD Duration: to adjust the duration of OSD from 5 to 100 seconds. -- Screen flip H-position: to flip the screen left or right. -- Screen flip V-position: to flip the screen up or down. -- Display Aspect Ratio: to switch the aspect ratio among 15:9, 16:9 and 4:3. -- EXIT OSD: select “YES” to exit OSD. -- PHASE:to adjust the beginning point and terminal point of image. -- FREQUENCY: to adjust the frequency range of image. -- OSD H-POSITION:to adjust the picture position in horizontal direction. -- OSD V-POSITION:to adjust the picture position in vertical direction. -- COLOR TEMPERATURE:to choose color and temperature among USER, 65000 K, 75000 K or 93000 K. Only if under “USER” mode, RED, GREEN and BLUE are available to be adjusted to the color value you need. -- MISCELLANEOUS:to select to enter next page OSD AUTO COLOR:If selected “YES”, it will enter the automatic color adjustment system to adjust the Color saturation and color matching according to your preferences. Technical Specifications Screen Size 7’’ Diagonal, LED backlit Aspect Ratio 15:9 (16:9 / 4:3 selectable) Resolution 800×480 Brightness 400cd/m2 Contrast 500:1 Viewing Angle 140°/ 120°(H/V) Input / Output Signal Video, VGA (PC), DVI(optional) 8 Dual 7” 3RU Rack Mount Monitor Power Consumption 1.3 Amp (Max) @ 12VDC (15.6W Max) Input Voltage DC6-24V Operating Temperature -20°~ 60°C Storage Temperature -30°~ 70°C Size(LWD) 482.5×133.5×25.3mm Weight 2560g Trouble Shooting 1. Only black-and-white display: Check whether the color saturation is properly setup. 2. Power on but no pictures: Check whether the cables of Video, VGA (PC) and DVI are correctly connected and make sure the related signal mode is open. Beside, please make sure the signal format is supported by the monitor. Please use the standard power adapter coming with the product package. Improper power input may damage the device. 3. Wrong or abnormal colors: Check whether the cables are correctly and properly connected. Broken or loose pins of the cables may cause a bad connection. 4. Any abnormal matters happen: In this situation, please enter the menu and choose to restore factory settings. Warranty We are warranties to the first consumer that this monitor will be free from defects in workmanship and materials under normal use, when received in its original container, for a period of one year from the date of delivery. Misuse, abnormal handling, alterations or modifications in design or construction void this warranty. Due to constant effort to improve products and product features, specifications may change without notice. 9