1
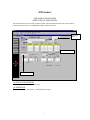
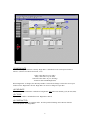
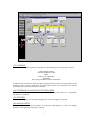
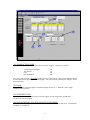
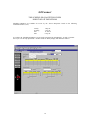
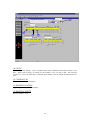
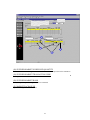
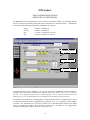
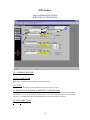
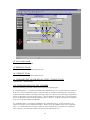
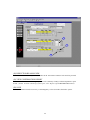
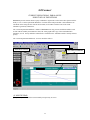
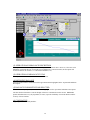
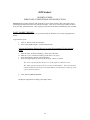
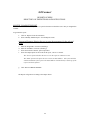
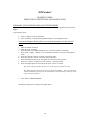
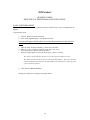
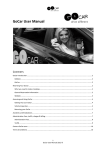
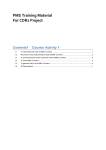
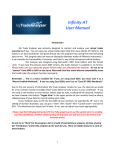
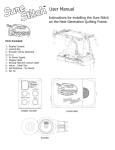
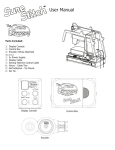
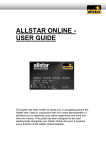
GLConnect
TABLE OF CONTENTS
NOMINATION INSTRUCTIONS
NOMINATION SCREEN……………………………………………………………………………..3
ENTERING A NEW NOMINATION……………..…………………………….…………………..11
MODIFYING AN EXISTING NOMINATION...…………………………………………………..13
ENTERING PARK AND LOAN TRANSACTIONS………………………………………………16
SCHEDULED
QUANTITIES SCHEDULED
SCREEN DEFINITIONSVIEWING
SCHEDULED QUANTITIES SCREEN……………………………………………………………18
VIEWING SCHEDULED QUANTITIES………………………………………………………….24
CONFIRMATIONS
CONFIRMATION SCREEN……………………………………………………………………….25
CONFIRMING DAILY SCHEDULED QUANTITIES…………………………………………..30
CONFIRMING MONTHLY SCHEDULED QUANTITIES…………………………………….32
IMBALANCES
OPERATIONAL IMBALANCE SCREEN………………………………………………………..33
VIEWING OPERATIONAL IMBALANCES…………………………………………………... .36
QUERIES AND REPORTS
PARK AND LOAN QUERY SCREEN……………………………………………………………37
FUEL MATRIX QUERY SCREEN……………………………………….……………………… 40
PARK AND LOAN RATES QUERY SCREEN…………………………………………………..42
REPORTS………………………………………………….………………………………………. 44
1
GLConnect
This manual has been written to provide step by step details on nominating in GLConnect. As you move
through the pages, you will discover and learn the intricacies of this upgraded system. However, prior to
beginning, it is important to call attention to the following major changes between the former
ACCELERATE System and the new GLConnect System.
1.
Nominations in the former ACCELERATE System were placed by contract. Thus, a ‘one to one’
relationship existed between contract and nomination. Further, because each nomination required
supply and market input, supply and market totals were tied to contract, as well. Shippers with more
than one contract, then, were forced to add supply and market totals at each location for each contract.
Nominations in the new GLConnect System are placed by Entity. Thus, a ‘many to one’ relationship
could exist between contract and nomination. As in the past, each nomination requires supply and
market input. However, because more than one contract can be entered at a time, the supply and
market requirements are aggregated across contracts. Thus, total requirements at receipt and delivery
points are no longer tied to specific contract. Rather, they represent the total activity that the Shipper
has nominated at each receipt and delivery point.
This fundamental nomination change has been developed with customer service in mind. By allowing
Shippers to nominate all of their contracts on one screen and then linking all contract requirements to
one supply and market total, it will streamline the nomination process, making it easier, faster and
more efficient.
2.
Scheduled Quantities were instantaneously displayed in the former ACCELERATE System.
While Great Lakes has not changed the method by which contracts are prioritized for scheduling,
because a single nomination on GLConnect may combine multiple contracts with multiple priority
schemes, viewing scheduled quantities in GLConnect is handled slightly different. In fact,
GLConnect contains a separate ‘Scheduled Quantities’ screen where gas quantities authorized to flow
on the Great Lakes System are displayed concurrently with the confirmation efforts of those quantities.
So, viewing scheduled quantities is not automatic. Rather, scheduled quantities are available for
review by the Shipper based on the confirmation begin times related to each window.
3.
Electronic confirmations were non-existent in ACCELERATE.
parties was completed via fax.
Communication with confirming
GLConnect has an electronic confirmation module. Hence, confirming parties will have the option to
communicate on-line with the Transportation Control Department regarding daily confirmation totals
at each receipt and delivery point.
Further, monthly confirmation totals are available in a report format and accessible throughout the
month on GLConnect. Confirming parties can retrieve and review location information at their
convenience thus streamlining the monthly confirmation process.
By linking a Confirmation Module directly to the electronic nomination system will provide quick,
effective and accurate communication with confirming parties to improve customer service.
4.
Finally, on-line information in ACCELERATE was considerably limited. GLConnect offers extensive
on-line information and reporting related to park and loan transactions, current operational imbalances
and imbalance statements.
With those fundamental enhancements in mind, it is time to begin exploring GLConnect. We are confident
that this new system will provide exceptional customer service for many years to come.
2
GLConnect
THE NOMINATION SCREEN
DIRECTORY OF DEFINITIONS
The Nomination Screen successfully combines default, input and calculated fields with action buttons to
make the nomination process on GLConnect simple, quick and efficient.
User log in
name
1
2
Delivery Location
Receipt Location
(1) SERVICE REQUESTOR
Nominating entity. Defaulted based on login.
(2) SHIPPER ID
Pooling Code of ‘Service Requestor’. Defaulted based on login.
3
3
5
6
4
(3) BEGIN DATE
First effective day of nomination. Initially ‘Begin Date’ is defaulted to most current open window as
follows: (All times in Central Clock Time, CCT)
Today’s date until 10:15 a.m. (ID1)
Today’s date until 5:15 p.m. (ID2)
Tomorrows date until 6:15 p.m. (Evening)
Tomorrows date until Midnight (ID1)
When ‘Begin Date’ is changed, the ‘Intra Day Window’ field will also change to reflect the correct open
window for the ‘Begin Date’ entered. ‘Begin Date’ can never be changed to a past date.
(4) END DATE
Last effective day of nomination. Defaulted to ‘Begin Date’ only when in an intraday cycle (IE: ID1, ID2).
(5) CYCLE
Open intraday window. Defaulted based on ‘Begin Date’ entered.
(6) CONTRACT ID
Contract that entity wishes to nominate under. Pick list provided featuring valid contracts related to
‘Service Requestor’ and ‘Begin Date’.
4
12
7
8
9
10
11
(7) RECEIPT LOCATION
Desired receipt location of specified path. Pick list provided.
(8) RECEIPT QUANTITY
Automatically calculated field. Delivery Quantity + Fuel = Receipt quantity.
(9) FUEL
Automatically calculated field based on ‘Delivery Quantity’, ‘Receipt Location’, and ‘Delivery Location’
entered, and monthly Transporter’s Use Rates.
(10) DELIVERY LOCATION
Desired delivery location for specified path. Pick list provided.
(11) DELIVERY QUANTITY
Desired delivered quantity for specified path.
(12) PATH RANK
Enter desired rank priority of specified path. If User does not enter a rank, system defaults to highest
priority of ‘1’.
5
13
14
15
16
(13) CAP
For contracts with contract cap restrictions, Users may activate the ‘CAP’ button to review a contract’s cap,
quantity used to date, quantity requested at the time of nomination and the remaining available quantity.
For contracts with no contract cap, this button will not apply thus will not be available.
(14) AUTO DELIVERY
An option for nomination entry where GLConnect automatically calculates a delivered quantity based on a
total receipt quantity for a location across contracts given by the user. This action button is only active
when cursor is inside the delivery quantity field to be calculated. Button activation prompts user for
the total supply quantity at said receipt point across contracts. Calculation takes into account other
nominated paths originating at the same receipt point as well as their fuel and receipt quantities.
(15) ADD RECEIPT POINT
The “short cut” means to enter a new path beginning at a different receipt point under the same contract.
(16) ADD DELIVERY POINT
The “short cut” means to enter a new path beginning at the same receipt point but going to a different
delivery point.
6
17
18
19
20
(17) VALIDATE
VALIDATE runs the following checks on the path level data and displays an error message if violated:
Contract Expiration Dates
Valid Receipt/Delivery Points
MDQ
Contract Cap (if applicable)
Segmenting
Floor/ceiling calculation (intra day nominations)
VALIDATE also calculates the supply and market requirement totals based on the receipt/delivery points
nominated. Hence, an entity can not access the supply/market sections of the nomination screen until all
path information is input and VALIDATE is activated.
(18) UPSTREAM LOCATION QUANTITY REQUIRED
The sum of the receipt quantities for each receipt location nominated on the path level. Automatically
calculated via VALIDATE.
(19) SUPPLIER
Name of desired supplier at receipt point being displayed. Pick list of suppliers is provided.
(20) NOM QUANTITY
Quantity being provided by specific supplier at receipt point being displayed. Total of all ‘Supplier
Quantities’ must equal each receipt point’s ‘Qty Req’.
7
24
22
23
21
(21) TRANSACTION CODE
Defines business transaction with a code related to selected ‘Supplier’. Options are as follows:
Current Business/Transport
Title Transfer
Loan
Park Withdrawal
CB
TT
LN
PW
CB is to be used when gas is physically entering the Great Lakes System. That is, the nomination should
be confirmed with the upstream interconnecting party. The specified entity should be the “Shipper” on the
upstream pipeline.
(22) RANK
Priority assigned to specified Supplier. Defaulted to highest priority of ‘1’. Ranks are used in supply
curtailment when necessary.
(23) SUPPLIER TOTAL
The sum of the nominated quantities entered for each supplier at each receipt point. Should equal
‘Qty Req’ for each receipt point.
(24) DOWNSTREAM LOCATION QUANTITY REQUIRED
The sum of the delivery quantities for each delivery location nominated on the path level. Automatically
calculated via VALIDATE.
8
26
25
27
(25) MARKET
Name of desired market at delivery point being displayed. Pick list provided
(26) NOM QUANTITY
Quantity being provided to specific market at delivery point being displayed. Total of all ‘Market
Quantities must equal each delivery point’s ‘Qty Req’
(27) TRANSACTION CODE
Defines business transaction with a code related to selected ‘Market’. Options are as follows:
Current Business/Transport
Title Transfer
Loan Payback
Park
CB
TT
LP
PK
CB is to be used when gas is physically leaving the Great Lakes System. That is, the nomination should be
confirmed with the downstream interconnecting party. This specified entity should be the “Shipper” on the
downstream pipeline.
9
28
29
30
31
32
(28) RANK
Priority assigned to specific Market. Defaulted to highest priority ‘1’. Ranks are used in market
curtailments when necessary.
(29) PACKAGE ID
Optional tracking field for market transactions provided by user if desired.
(30) MARKET TOTAL
The sum of the nominated quantities entered for each market at each delivery point. Should equal
‘Qty Req’ for each delivery point.
(31) BALANCE CHECKING
A grid appearing as a pop up box gives user a quick summation of supply/market requirements as well as
nominated quantities required in order to balance.
(32) SAVE
SAVE validates that supply and market totals are balanced, performs park/loan validations and submits
nomination to back office for Scheduling.
10
GLConnnect
NOMINATING INSTRUCTIONS
ENTERING A NEW NOMINATION
1.
Log on to GLConnect and select ‘Nomination Entry’ off the Nomination Sub-Menu
2.
Enter ‘Begin Date’ (if different from default)
3.
Enter ‘End Date’ (if different from default)
Service Requestor name defaults to the “Log in” Shipper. Cycle defaults to a valid open cycle based
on begin and end dates entered.
4.
With your cursor in the ‘Contract ID’ field, select a contract from the pick list provided
5.
Enter the desired path information related to the selected ‘Contract ID’ as follows:
a) Select receipt location from available pick list or type in receipt location name
b) Select delivery location from available pick list (NOTE: When an MC Contract is selected,
‘Delivery Location’ automatically defaults to ‘Receipt Location’)
c) Enter delivery quantity desired
d) Enter rank (if different from default)
e) To enter another path under the same contract and originating at the same receipt location, activate
the ADD DELV button and repeat b-d, otherwise proceed to f)
f) To enter another path under the same contract but originating at a different receipt location,
activate the ADD RECP button and repeat a-d, otherwise proceed to step 6
6.
Repeat Steps 4 & 5 for all contracts that you wish to nominate under. Proceed to Step 7 when all
Contracts are entered.
7.
Select ‘VALIDATE’ Button
8.
Complete the Upstream Identifier Section as follows:
a)
Select the receipt location from the pick list provided in the upper left- hand corner of the
Upstream Identifier Section. Please note the ‘Qty Req’ amount for each location. The total supply
amount entered must always equal the ‘Qty Req’
b) Select ‘Supplier’ from pick list provided
c) Enter the quantity associated with selected ‘Supplier’.
d) Enter corresponding ‘Transaction Code’ (NOTE: Park Withdrawal and Loan Transaction Codes
can only be selected if ‘Supplier’ = ‘Service Requestor’ and ‘Service Requestor’ holds an MC
Contract on Great Lakes, or is a shipper who holds a valid MC Contract and who’s Agent is the
‘Service Requestor’.)
e) Enter ‘Rank’
f) Repeat Steps b – e for additional suppliers at the selected receipt location.
11
GLConnect
NOMINATING INSTRUCTIONS
ENTERING A NEW NOMINATION (cont’d)
9.
Complete the Downstream Identifier Section as follows:
a)
Select the delivery location from the pick list provided in the upper right - hand corner of the
Downstream Identifier Section. Please note the ‘Qty Req’ amount for each location. The total
market quantities entered must always equal the ‘Qty Req’.
b) Select ‘Market’ from pick list provided
c) Enter the quantity associated with the selected ‘Market’.
d) Enter corresponding ‘Transaction Code’ (NOTE: Park and Loan Payback Transaction Codes can
only be selected if ‘Market’ = ‘Service Requestor’ and ‘Service Requestor’ holds an MC Contract
on Great Lakes, or is a shipper who holds a valid MC Contract and who’s Agent is the ‘Service
Requestor’.)
e) Enter ‘Rank’
f) Enter ‘Package ID’ (optional)
g) Repeats steps b – f for additional markets related to the selected delivery location.
10. SAVE
12
GLConnect
NOMINATING INSTRUCTIONS
MODIFYING AN EXISTING NOMINATION
1.
Log on to GLConnect and select ‘Nomination Entry’ off the Nomination Sub-Menu
2.
Enter ‘Begin Date’ (if different from default)
3.
Enter ‘End Date’ (if different from default)
Nominations previously entered for the begin and end dates entered will populate on the screen.
•
CHANGE A DELIVERED QUANTITY
1.
2.
3.
4.
5.
6.
•
CHANGE A DELIVERY LOCATION
1.
2.
3.
4.
5.
6.
7.
8.
9.
•
Position cursor on the ‘Delivered Qty’ field to be changed
Enter new ‘Delivered Quantity’ amount
VALIDATE
Adjust required supply information for receipt location(s) affected
Adjust required market information for delivery location(s) affected
SAVE
Zero out the ‘Delivered Quantity’ field associated with the initial path nominated
Activate the ADD DELV button to insert a new row into the existing nomination
Select a new ‘Delivery Location’ from the pick list provided
Enter the desired ‘Delivered Quantity’
Enter rank (system defaults to 1)
VALIDATE
Adjust required supply information for receipt location(s) affected
Adjust required market information for delivery location(s) affected
SAVE
CHANGE A RECEIPT LOCATION
1.
2.
3.
4.
5.
6.
7.
8.
9.
10.
Zero out the ‘Delivered Quantity’ field associated with the initial path nominated
Activate the ADD RECP button to insert a new row into the existing nomination
Select receipt location from the pick list provided
Select delivery location from the pick list provided
Enter desired ‘Delivered Quantity’
Enter rank (system defaults to 1)
VALIDATE
Adjust required supply information for receipt location(s) affected
Adjust required market information for delivery location(s) affected
SAVE
13
GLConnect
NOMINATING INSTRUCTIONS
MODIFYING AN EXISTING NOMINATION (cont’d)
•
DELETE A NOMINATION
1.
2.
3.
4.
5.
Zero out the ‘Delivered Quantity’ field associated with the initial path(s) nominated
VALIDATE
Zero out the associated supply information
Zero out the associated market information
SAVE
(NOTE: Delete can not be used on any information that has been previously SAVED. Rather, the
nomination must be assigned a zero value and re-SAVED.)
•
ADD A NEW CONTRACT TO AN EXISTING NOMINATION
1.
Place cursor in next available ‘Contract ID’ field and select desired contract from pick list
provided
2. Select ‘Receipt Location’ from pick list provided
3. Select ‘Delivery Location’ from pick list provided
4. Enter desired quantity into the ‘Delivery Qty’ field
5. Enter Rank
6. Add other paths desired by activating the ADD DELIVERY or ADD RECEIPT buttons
7. VALIDATE
8. Adjust required supply information for receipt location(s) affected
9. Adjust required market information for delivery location(s) affected
10. SAVE
•
CHANGE SUPPLIER(S)
1.
2.
3.
4.
5.
6.
7.
8.
In the upper left hand corner of the Upstream Identifier Section, select the receipt location at
which the supplier change will take place (if different from default)
Zero out the ‘Supplier Quantity’ field associated with the originally nominated supplier
With your cursor in the next available ‘Supplier’ field, select desired supplier from the pick
list provided (NOTE: To open the next available ‘Supplier’ field, press ENTER when cursor
is sitting on the ‘Rank’ field of the final ‘Supplier’ listed) OR simply begin typing the supplier
name
Enter the desired quantity associated with selected supplier
Enter ‘Rank’
Enter ‘Transaction Code’ (if different than default)
Confirm that the ‘Total’ provided by all suppliers equals the ‘Qty Req’ (quantity required) at
affected receipt location
SAVE
14
GLConnect
NOMINATING INSTRUCTIONS
MODIFYING AN EXISTING NOMINATION (cont’d)
•
CHANGE SUPPLIER TOTAL
1.
2.
3.
4.
•
ADD A NEW SUPPLIER
1.
2.
3.
4.
5.
6.
7.
•
In the upper left hand corner of the Upstream Identifier Section, select the receipt location at
which the change will take place (if different from default)
Change desired ‘Supplier Quantity’ field
Confirm that the ‘Total’ provided by all suppliers equals the ‘Qty Req’ (quantity required) at
affected receipt location
SAVE
In the upper left hand corner of the Upstream Identifier Section, select the receipt location at
which the change will take place (if different from default)
Place cursor in next available ‘Supplier’ field and select desired supplier from pick list
provided (NOTE: To open the next available ‘Supplier’ field, press ENTER when cursor is
sitting on the ‘Rank’ field of the final ‘Supplier’ listed)
Enter desired quantity associated with the selected supplier
Enter ‘Rank’
Enter ‘Transaction Code’ (if different than default)
Confirm that the ‘Total’ provided by all suppliers equals the ‘Qty Req’ (quantity required) at
affected receipt location
SAVE
CHANGE MARKET(S)
1.
2.
3.
4.
5.
6.
7.
8.
9.
In the upper left hand corner of the Downstream Identifier Section, select the delivery location
at which the market change will take place (if different from default)
Zero out the ‘Market Quantity’ field associated with the originally nominated market
With your cursor in the next available ‘Market’ field, select desired market from the pick list
provided (NOTE: To open the next available ‘Market’ field, press ENTER when cursor is
sitting in the ‘Package ID’ field of the final ‘Market’ listed) OR simply begin typing the
market name
Enter the desired quantity associated with selected market
Enter ‘Rank’
Enter ‘Package ID’ (optional)
Enter ‘Transaction Code’ (if different than default)
Confirm that the ‘Total’ provided by all markets equals the ‘Qty Req’ (quantity required) at
affected delivery location
SAVE
15
GLConnect
NOMINATING INSTRUCTIONS
MODIFYING AN EXISTING NOMINATION (cont’d)
•
CHANGE MARKET TOTAL
1.
2.
3.
4.
•
ADD A NEW MARKET
1.
2.
3.
4.
5.
6.
7.
8.
•
In the upper left hand corner of the Downstream Identifier Section, select the delivery location
at which the change will take place (if different from default)
Change desired ‘Market Quantity’ field
Confirm that the ‘Total’ provided by all markets equals the ‘Qty Req’ (quantity required) at
affected delivery location
SAVE
In the upper left hand corner of the Downstream Identifier Section, select the delivery location
at which the change will take place (if different from default)
Place cursor in next available ‘Market’ field and select desired market from pick list provided
(NOTE: To open the next available ‘Market’ field, press ENTER when cursor is sitting on the
‘Package ID’ field of the final ‘Market’ listed) OR simply begin typing market name
Enter desired quantity associated with the selected market
Enter ‘Rank’
Enter ‘Package ID’ (optional)
Enter ‘Transaction Code’
Confirm that the ‘Total’ provided by all markets equals the ‘Qty Req’ (quantity required) at
affected delivery location
SAVE
MODIFY SUPPLIER VOLUMES TO UNPARK OR LOAN GAS
1.
2.
3.
In the upper left hand corner of the Upstream Identifier Section, select the receipt location at
which the change will take place (if different from default)
Modify, as desired, the ‘Supplier Quantity’ field associated with the originally nominated
supplier
With your cursor in the next available ‘Supplier’ field, select the company as supplier from
the pick list provided (NOTE: To open the next available ‘Supplier’ field, press ENTER when
cursor is sitting on the ‘Rank’ field of the final ‘Supplier’ listed) OR simply begin typing the
Supplier name.
The MC contract of the Supplier chosen will be used for tracking/billing purposes. Agents
may select the Shipper they are agent for as Supplier if the Shipper holds an MC contract.
4.
5.
6.
7.
8.
Enter the desired quantity of park withdrawal or loan
Enter ‘Rank’
Enter ‘Transaction Code’ of PW (park withdrawal) or LN (loan) (NOTES: These transaction
codes will only appear if ‘Service Requestor’ or Shippers they are agent for holds a valid MC
Contract on Great Lakes. PW will only be accepted if ‘Service Requestor’ has gas currently
parked on the Great Lakes System. LN will not be allowed if ‘Service Requestor’ currently
has a PK balance on Great Lakes.)
Confirm that the ‘Total’ provided by all suppliers equals the ‘Qty Req’ (quantity required) at
affected receipt location (regardless of ‘Transaction Code’ entered)
SAVE
16
GLConnect
NOMINATING INSTRUCTIONS
MODIFYING AN EXISTING NOMINATION (cont’d)
•
MODIFY MARKET VOLUMES TO PARK OR PAY BACK LOANED GAS
1.
2.
3.
In the upper left hand corner of the Downstream Identifier Section, select the delivery location
at which the change will take place (if different from default)
Modify, as desired, the ‘Market Quantity’ field associated with the originally nominated
market
With your cursor in the next available ‘Market’ field, select your company as market from the
pick list provided (NOTE: To open the next available ‘Market’ field, press ENTER when
cursor is sitting on the ‘Package ID’ field of the final ‘Market listed) OR simply begin typing
the market name.
The MC contract of the Market chosen will be used for tracking/billing purposes. Agents
may select the Shipper they are agent for as the Market if the Shipper holds an MC
contract.
4.
5.
6.
7.
8.
9.
Enter the desired quantity to be parked or paid back
Enter ‘Rank’
Enter ‘Transaction Code’ of PK (park) or LP (loan payback) (NOTES: These transaction
codes will only appear if ‘Service Requestor’ or Shippers they are agent for holds a valid MC
Contract on Great Lakes. LP will only be accepted if ‘Service Requestor’ currently has a
loan outstanding on Great Lakes. PK will not be allowed if ‘Service Requestor’ currently has
a LN balance on Great Lakes.)
Enter ‘Package ID’ (optional)
Confirm that the ‘Total’ provided by all markets equals the ‘Qty Req’ (quantity required) at
affected delivery location (regardless of ‘Transaction Code’ entered)
SAVE
17
GLConnect
THE SCHEDULED QUANTITIES SCREEN
DIRECTORY OF DEFINITIONS
Scheduled quantities are available for review by the ‘Service Requestor’ based on the following
confirmation times (CCT):
Timely
Evening
ID1
ID2
1:00 p.m.
7:30 p.m.
11:30 a.m.
6:30 p.m.
As a whole, the ‘Scheduled Quantities’ screen can be categorized as informational. As such, ‘Gas Date’
and ‘Cycle’ are the only input fields. All other fields are merely display and defined as follows:
18
User Log in
Name
1
2
3
(1) SERVICE REQUESTOR
Entity that owns the nomination. Shippers/Agents will only be able to view nominations that they have
entered or owned. (NOTE: In the case of an Agent nominating on behalf of a Shipper, the Shipper can
gain access to nominated information by generating a ‘Summary of Transportation Quantities’ report for
the Contract ID involved)
(2) SHIPPER ID
Pooling Code for ‘Service Requestor’.
(3) GAS DATE
Query date. Initially, ‘Gas Date’ is defaulted to today’s date. While past days can be entered, the
successful selection of future days is contingent upon whether or not a confirmation period is open for the
future day selected.
19
4
5
6
7
(4) CYCLE
Cycle being viewed. Initially, ‘Cycle’ is defaulted based on the confirmation period open for today’s ‘Gas
Date’. When a past ‘Gas Day’ is entered, the only available ‘Cycle’ for query is ID2. The successful
selection of a ‘Cycle’ for future days is contingent upon whether or not the related confirmation period is
open.
(5) CONTRACT ID
The contract that has been nominated
(6) RECEIPT LOCATION
Originating location(s) of specified path(s)
(7) RECIPT QUANTITY
Delivery Quantity + Fuel
20
9
11
12
8
10
(8) FUEL
The amount of fuel required to move requested volume along desired path
(9) DELIVERY LOCATION
Location(s) of delivery of specified path(s)
(10) DELIVERY QUANTITY
Quantity nominated for specified path(s)
(11) RANK
Rank(s) originally given to nominated path(s)
(12) ID
ID indicates whether the path nominated is primary, secondary, within path, out of zone, etc.
(P)= Primary Point, (S)= Secondary Point, (PR)= Primary Path, (WP)= Within Path,
(OP)= Outside Path/Within Zone, (OZ)= Outside Path/Outside Zone
4 Character Point Path Identifier (ID)=
1st Character defines receipt point, (P) or (S)
2nd Character defines delivery point, (P) or (S)
3rd and 4th Characters define the path (PR) or (WP) or
(OP) or (OZ)
21
14
15
13
17
16
(13) SCHEDULED QUANTITY
Amount of gas scheduled for each path nominated according to the priorities set forth in Great Lakes’
FERC gas tariff and is subject to confirmation with upstream and downstream interconnecting parties
(14) SCHEDULED FUEL
Fuel associated with amount of gas scheduled for each path nominated
(15) SUPPLIER/MARKET QUANTITY REQUIRED
The sum of the scheduled receipt/delivery quantities for each receipt/delivery location nominated on the
path level
(16) SUPPLY/MARKET
Name of suppliers/markets nominated
(17) SUPPLIER/MARKET NOMINATED QUANTITY
Amount nominated for each supplier/market listed
22
19
18
21
20
(18) SUPPLIER/MARKET SCHEDULED QUANTITY
Amount scheduled for each supplier/market listed based on the ranks provided in the nomination
(19) SUPPLIER/MARKET TRANSACTION CODE
Defining business code(s) as nominated
(20) SUPPLIER/MARKET RANK
Priority assigned to specified supplier/market as nominated
(21) MARKET PACKAGE ID
Optional tracking number as nominated
23
GLConnect
THE SCHEDULED QUANTITIES SCREEN
VIEW SCHEDULED QUANTITIES
1.
Log on to GL Connect
2.
Select Nominations from the main menu
3.
Select Nominations from Sub menu
4.
Select ‘Scheduled Quantities’
5.
Enter ‘Gas Date’ (if different from default)
6.
Change ‘Cycle’ (if different from default)
7.
Click ‘Query’ on top tool bar
8.
Select ‘Execute’ under the ‘Query’ tab
Scheduled quantities for the gas day selected and cycle of interest will be displayed. Previously scheduled
quantities for past days may also be viewed via this method
24
GLConnect
THE CONFIRMATION SCREEN
DIRECTORY OF DEFINITIONS
The GLConnect System automatically links an electronic confirmation module to its scheduling element
for the sole purpose of providing prompt and accurate information to ‘Confirming Parties’. Confirmations
will only be accepted during the appropriate confirmation cycle periods.
Timely
Evening
ID1
ID2
1:00 PM – 3:30 PM CCT
7:30 PM – 9:00 PM CCT
11:30 AM – 1:00 PM CCT next day
6:30 PM – 8:00 PM CCT next day
SUMMARY LEVEL
DETAIL LEVEL
SUB-DETAIL LEVEL
A location will appear at the ‘Summary Level’ if one or more shipper nominations for that location have
changed between a previously confirmed cycle and the current cycle. (NOTE: There is one exception to
this rule. At the beginning of the month, a ‘Confirming Party’ will see all their locations listed at the
‘Summary Level’ since all nominations must be confirmed at the beginning of each new month.)
The ‘Detail Level’ furnishes the ‘Confirming Party’ with data based on how that ‘Confirming Party’ wishes
to confirm the location of interest, highlighted in the ‘Summary Level’ (i.e. confirming by supply, shipper
or market). The ‘Sub-Detail Level’ provides yet another tier of informational data related to the ‘Detail
Level’. If confirming by shippers at the location’s ‘Detail Level’, the ability to view supply/market
information will be granted in the ‘Sub-Detail’ tier and vice versa.
25
GLConnect
THE CONFIRMATION SCREEN
DIRECTORY OF DEFINITIONS
1
4
3
2
5
(1) CONFIRMATION FOR:
‘Confirming Party’ name
(2) GAS FLOW DATE
Query date. Defaulted to current gas day upon entry to screen.
(3) CYCLE
Query window. Defaulted to current confirmation cycle upon entry to screen.
(4) NOMINATION WINDOW(S) NEEDING CONFIRMATION
Display field that informs ‘Confirming Party’ of any other confirmation cycles that are open and awaiting
confirmations. A pick list is provided. If a date and cycle are selected from the pick list, ‘Gas Flow Date’
and ‘Cycle’ are updated with the selection and data related to that time frame is retrieved.
(5) FLOW DIRECTION
Receipt or Delivery
26
6
7
8
10
9
(6) LOCATION NAME
Name of location to be confirmed
(7) PREVIOUS TOTAL
Receipt or delivery location total for previous cycle
(8) CURRENT TOTAL
Receipt or delivery location total for selected cycle
(9) ‘SUMMARY/DETAIL/SUB-DETAIL LEVEL’ CHANGE TOTAL
‘Current Total’ – ‘Previous Total’
(10) ‘SUMMARY/DETAIL LEVEL’ CONFIRM
Check box indicating agreement with the current total for the selected cycle.
If a ‘Confirming Party’ is classified as ACTIVE in the confirmation process, a check in this box is required
at the close of each confirmation window. In the event that the ACTIVE ‘Confirming Party’ can not agree
with the Great Lakes number in the Timely, Evening or ID1 Cycle, this box may be left empty to afford both
parties an opportunity to resolve the discrepancy. The unconfirmed current total, then, will roll forward to
the next confirmation window and be designated with an *. However, ‘Confirm’ must always be completed
by the close of the ID2 Confirmation Window.
If a ‘Confirming Party’ is classified as PASSIVE in the confirmation process, a check in this box is not
required at the close of each confirmation window. Rather, due to the PASSIVE status of the ‘Confirming
Party’, it is assumed that the Great Lakes’ number(s) will be automatically accepted by the ‘Confirming
Party’, thus the system will auto-confirm at the end of each confirmation cycle.
27
11
13
14
15
12
16
17
(11) *
Symbol indicating that receipt/delivery total for said location was not confirmed in the previous cycle.
Appears in relation to ACTIVE ‘Confirming Parties’.
(12) CONFIRM ALL
Button that will, when selected, confirm all summary level totals and their related detail.
(13) ‘DETAIL/SUB-DETAIL LEVEL’ ID
Pooling code for Entity listed
(14) ‘DETAIL/SUB-DETAIL LEVEL’ ENTITY
Company name of the Supplier, Shipper or Market detailed
(15) ‘DETAIL/SUB-DETAIL LEVEL’ PREVIOUS TOTAL
Entity total for previous cycle
(16) ‘DETAIL/SUB-DETAIL LEVEL’ CURRENT TOTAL
Entity total for selected cycle
(17) INTERCONNECT AMOUNT
Input field in which ‘Confirming Party’ can only enter an amount less than the current total for cycle
selected. (NOTE: If ‘Confirming Party’ wishes to confirm an amount higher than the current total for
the cycle selected, they must contact Transportation Control directly.)
28
18
19
20
(18) REDUCTION REASON CODE
Reason associated with the entry of a lower number in the ‘Interconnect Amount’ field. Pick list provided.
(19) VIEW CONFIRMATION REPORT
Action button that allows ‘Confirming Party’ to view the ‘Summary of Daily Confirmed Quantities’ report
on-line. (NOTE: To obtain a hard copy of this report, select ‘Reports’ off the GLConnect Main Menu.)
(20) SAVE
Submits information entered on screen by ‘Confirming Party’ to the Great Lakes back office system.
29
GLConnect
THE CONFIRMATION SCREEN
CONFIRM DAILY SCHEDULED QUANTITIES
1.
Log on to GLConnect and select ‘Confirmations’ off the Nomination Sub-Menu.
2.
Enter the Gas Flow Date to be confirmed (if different than default)
3.
Enter the Cycle to be confirmed (if different than default)
4.
Query, Execute
•
CONFIRM INDIVIDUAL LOCATION QUANTITIES AT THE ‘SUMMARY LEVEL’
When the ‘Confirm’ box is checked at the ‘Summary Level’, the related entity information in the
‘Detail Level’ is automatically confirmed, as well.
Not all location confirmations have to be completed in the same session. For example: A
‘Confirming Party’ is responsible for the confirmation of multiple locations and agrees with the
numbers represented on GLConnect for all but one location. That ‘Confirming Party’ can
confirm all but that one location, SAVE, exit and return to the ‘Confirmation Screen’ prior to the
confirmation deadline for that specific window to confirm the unsettled location.
1.
2.
•
Click on the ‘Confirm’ box associated with the individual location you wish to confirm
(HINT: Move between locations using the
arrow keys.)
SAVE
‘CONFIRM ALL’ LOCATION QUANTITIES AT THE ‘SUMMARY LEVEL’
When the CONFIRM ALL button is invoked, all locations at the ‘Summary Level’ are
confirmed. Hence, all related entity information in the ‘Detail Level’ is automatically confirmed,
as well.
1.
2.
•
Click the CONFIRM ALL button
SAVE
CONFIRM INDIVIDUAL ENTITY QUANTITIES AT THE ‘DETAIL LEVEL’
‘Confirming Parties’ have the ability to confirm specific entity information at the ‘Detail Level’.
Not all entity confirmations have to be completed in the same session. For example: A location
total at the ‘Summary Level’ is comprised of multiple entity nominations as listed at the ‘Detail
Level’. The ‘Confirming Party’ agrees with the numbers represented on GLConnect for all but
one entity. That ‘Confirming Party’ can confirm all but that one entity, SAVE, exit and return to
the ‘Confirmation Screen’ prior to the confirmation deadline for that specific window.
This feature allows ‘Confirming Parties’ to pinpoint the entity with the problematic nomination
and work off-line on a resolution prior to the expiration of the confirmation window. However, if
even one line of entity information is not confirmed at the ‘Detail Level’, the location will not be
confirmed at the ‘Summary Level’.
1. Click the ‘Confirm’ box associated with the individual entity you wish to confirm
(HINT: Toggle between the ‘Summary and Detail Levels’ using PAGE UP and PAGE DOWN.)
2. SAVE
30
GLConnect
THE CONFIRMATION SCREEN
CONFIRM DAILY SCHEDULED QUANTITIES
•
SUBMIT A DIFFERENT ENTITY NUMBER TO GREAT LAKES FOR REVIEW
In the case that a ‘Confirming Party’ disagrees with an entity nomination as represented in the
‘Detail Level’ of GLConnect, a number can be submitted to Transportation Control for review.
However, GL Connect will only accept numbers that are lower than those displayed on the
confirmation screen.
1.
2.
3.
•
Enter the quantity you wish to submit in the ‘Interconnect Amount’ field
Enter the related ‘Reduction Reason Code’ (pick list provided).
SAVE
REVIEW INFORMATION IN REPORT FORMAT
1.
Activate the VIEW CONFIRMATION REPORT button on the Confirmation Screen to
review the ‘Summary of Daily Confirmed Quantities’ report on-line, or
2.
Click the REPORTS button from the menu bar at the left-hand side of the screen.
a.
Select the ‘Summary of Daily Confirmed Quantities’ report by checking the
corresponding box.
A screen will appear allowing the user to enter parameters for the selected report.
b.
c.
d.
e.
Enter the date of interest
Enter the cycle of interest
Select the location of interest
Select the output option for the results of the report, ‘Screen’ or ‘Email’
Screen will allow you to view the report on your monitor screen.
Email will require the user to enter an email address; the system will then send an
attachment of the report to the email address entered.
f.
g.
Click ‘OK’ System returns to the main Reports screen
Click ‘RUN’
The Report will generate according to the output option chosen.
31
GLConnect
THE CONFIRMATION SCREEN
CONFIRM MONTHLY SCHEDULED QUANTITIES
While the ‘Confirmation Screen’ of GLConnect is used solely for the purpose of confirming daily
scheduled quantities, the system does provide ‘Confirming Parties’ the ability to generate a hard copy,
paper report reflecting monthly location totals. To do so, simply:
a.
b.
Select ‘Reports’ from the system’s sub-menu
Select the ‘Summary of Monthly Confirmed Quantities’ report by checking the
corresponding box.
A screen will appear allowing the user to enter the parameters for the selected report.
c.
d.
e.
f.
Enter the ‘Begin Date’ (mm/dd/yy)
Enter the ‘End Date’ (mm/dd/yy)
Select the location of interest
Select the output option for the results of the report, ‘Screen’ or ‘Email’
Screen will allows the User to view the report on a monitor screen.
Email will require the user to enter an email address. The system will then send an
attachment of the report to the email address entered whereby a hard copy of the report
can then be printed.
g.
h.
Click ‘OK’ System returns to the main Reports screen
Click ‘RUN’
The Report will generate according to the output option chosen.
32
GLConnect
CURRENT OPERATIONAL IMBALANCES
DIRECTORY OF DEFINITIONS
GLConnect provides entities that are a party to Imbalance Agreements on the Great Lakes System with the
ability to view ‘Current Operational Imbalances’ for both current and past months. Such imbalances are
calculated on-line using the most current metered data, in accordance with the terms of the actual
imbalance agreement(s) themselves.
The ‘Current Operational Imbalance’ module of GLConnect not only provides ‘Imbalance Holders’ with
on-line numeric monthly and cumulative totals, but visual graphs and a copy of the actual Imbalance
Statement, as well. Timely imbalance information is available for the ‘Imbalance Holder’ literally 24 hours
per day.
The ‘Current Operational Imbalances’ screen is divided as follows:
BALANCE INFORMATION
MONTHLY TOTALS
LOCATION SUMMARY
1
GRAPH / STATEMENT EXHIBIT
(1) MONTH/YEAR
Query month/year. Defaulted to current month/year upon entry to screen.
33
4
2
6
5
3
(2) OPERATIONAL IMBALANCE DESCRIPTION
Description of the Imbalance Agreement. Generally, it will be location name. However, if the terms of an
Imbalance Agreement take into account the sum of imbalances at various locations, the description will
account for the mix in its name (i.e. Central Zone Imbalance, etc.)
(3) OPERATIONAL IMBALANCE TOTAL
Monthly Imbalance Total to date for the location of interest
(4) BEGINNING BALANCE
Previous month’s balance associated with the agreement/location highlighted in the ‘Operational Imbalance
Description’
(5) BALANCE FOR MONTH/YEAR SELECTED
Balance for month/year queried, related to location highlighted in the ‘Operational Imbalance Description’.
The date that the information is current through will also be communicated in this section. GLConnect
updates imbalance data every day dependant, of course, upon the availability of metered numbers and the
accuracy of those numbers
(6) CUMULATIVE
Beginning Balance + Monthly Balance
34
10
7
8
9
(7) IMBALANCE GRAPH
Action button that generates an Imbalance Graph in lower portion of the screen. The Imbalance Graph
provides a visual presentation of the cumulative imbalance, related to the location highlighted in the
‘Operational Imbalance Description’, through the date specified in ‘Balance for Month/Year Selected’ field
If an operational imbalance is the total of imbalances at multiple locations, the on-line ‘Imbalance Graph’
will display the sum of all location imbalances involved. (NOTE: Generating the ‘STATEMENT’ for the
highlighted location will provide the ‘Imbalance Holder’ with individual location information)
(8) SCHEDULED VS. ACTUAL
Action button that produces a graph in the lower portion of the screen that compares scheduled quantities to
actual metered quantities related to the location highlighted in the ‘Operational Imbalance Description’
(9) STATEMENT
Action button that produces an on-line Imbalance Statement in the lower portion of the screen. (NOTE:
‘Imbalance Statements’ can be physically printed in the ‘Reports’ section of GLConnect.)
(10) LOCATIONS/ZONE
A list of locations and their related zones involved in the agreement highlighted in the ‘Operational
Imbalance Description’
35
GLConnect
CURRENT OPERATIONAL IMBALANCES
QUERY CURRENT OPERATIONAL IMBALANCES
1.
Log on to GLConnect and select ‘Flowing Gas’ off the Imbalance Sub-Menu.
2.
Select a Month/Year (if different than default), upon selection of the date, imbalance information will
be displayed
3.
Select desired location/agreement using the
4.
Produce an on-line graph or statement by activating the IMBALANCE GRAPH, SCHEDULED VS.
ACTUAL or STATEMENT action buttons (NOTE: The Imbalance Graph will automatically appear
for the highlighted location/agreement)
arrow keys
5. Create a ‘Daily Imbalance Report’ and/or ‘Imbalance Statement’ by clicking the REPORTS button
from the menu bar at the left hand side of the screen (NOTE: The Imbalance Statement may also be
produced on screen, for the location/agreement highlighted, by activating the STATEMENT button)
36
GLConnect
PARK & LOAN QUERY SCREEN
DIRECTORY OF DEFINITIONS
GLConnect provides customers with the ability to query park and loan balances at their convenience. Park
and loan transactions appear on the ‘Park & Loan Query Screen’ after they have been approved and
scheduled by the Transportation Control Group.
The ‘Park and Loan Query Screen’ is divided into three sections, as follows:
1
3
LOCATION SECTION
2
DETAIL SECTION
(1) ENTITY NAME
Entity performing the query. Defaulted based on log in.
(2) TRANSACTION CODE
Park or Loan. Only one ‘Transaction Code’ can be selected at a time.
(3) DATE
Query date.
37
SUMMARY SECTION
4
6
7
5
8
(4) LOCATION SECTION
List of locations containing park and/or loan balances as well as the receipt/delivery totals related to them.
When ‘Park’ is the Transaction Code queried, the Receipt Total will reflect all scheduled Park
Withdrawals, PW transaction codes for the location listed and the Delivery Total will reflect all scheduled
Parks, PK transaction codes.
Conversely, when ‘Loan’ is the Transaction Code queried, the Receipt Total will reflect all scheduled
Loans, LN transaction codes for the location listed and the Delivery Total will reflect all scheduled Loan
Paybacks, LP transaction codes.
(5) DETAIL SECTION
The ‘Detail Section’ offers further detail related to the locations, their receipt and delivery totals.
(6) SUMMARY SECTION DAILY BALANCE
Sum of the quantity at the detail level for the day queried
(7) SUMMARY SECTION CUMULATIVE BALANCE
The balance up to the day queried
(8) SUMMARY SECTION TOTAL
Total = Cumulative Balance + Daily Balance
38
GLConnect
PARK & LOAN QUERY SCREEN
QUERY CURRENT PARK & LOAN BALANCES
1.
Log on to GLConnect and select ‘Park and Loan’ off the Query Sub-Menu.
2.
Select desired ‘Transaction Code’, a pick list provided
3.
Select desired ‘Date’
4.
Query Execute
5.
Select desire location using the
6.
Create a ‘Park and Loan Report’ by clicking the REPORTS button from the menu bar at the left hand
side of the screen
arrow keys
39
GLConnect
FUEL MATRIX QUERY SCREEN
DIRECTORY OF DEFINITIONS
GLConnect provides customers with the ability to query fuel rates at their convenience. Fuel Rates can be
found on the ‘Fuel Matrix Query Screen’.
The Fuel Matrix is divided into two sections, as follows:
SELECTION CRITERIA
1
2
FUEL RESULTS
3
4
(1) DATE
Query date.
(2) RECEIPT LOCATION
Enter receipt location of query.
(3) DELIVERY LOCATON
Enter delivery location of query.
(4) FUEL RATE
Resulting fuel rate for the date, receipt and delivery locations entered.
40
GLConnect
FUEL MATRIX QUERY SCREEN
QUERY FOR FUEL RATES
1.
Log on to GLConnect and select ‘Fuel Matrix’ off the Query Sub-Menu.
2.
Enter ‘Date’ using the calendar pop up or by typing (mm/dd/yy).
3.
Enter desired ‘Receipt Location’, Pick List provided.
4.
Enter desired ‘Delivery Location’, Pick List provided
Fuel Rate appears for the Date, Receipt and Delivery Locations entered.
41
GLConnect
PARK AND LOAN RATES QUERY SCREEN
DIRECTORY OF DEFINITIONS
GLConnect provides customers with the ability to query park and loan rates at their convenience. Park and
loan rates can be found on the ‘Park and Loan Rates Query Screen’.
The Park and Loan Rates Screen is divided into two sections, as follows:
2
1
SELECTION CRITERIA
4
3
RATE RESULTS
(1) SHIPPER
Shipper name is defaulted to the Shipper logged into the system.
(2) CONTRACT
Defaulted to the Shipper’s MC Contract
(3) BEGIN DATE
Enter begin date of interest for the park and loan rate query.
(4) LOCATION
Enter the location of interest for the park and loan rate query.
42
GLConnect
PARK AND LOAN RATES QUERY SCREEN
QUERY FOR PARK AND LOAN RATES
5.
Log on to GLConnect and select ‘Park and Loan Rates’ off the Query Sub-Menu.
6.
Enter ‘Begin Date’ using the calendar pop up or by typing (mm/dd/yy).
7.
Enter desired ‘ Location’ for park and loan query, Pick List provided.
Park and Loan Rates appear for the Date and Location entered.
43
GLConnect
REPORTS SCREEN
DIRECTORY OF DEFINITIONS AND INSTRUCTIONS
44
GLConnect
REPORTS SCREEN
DIRECTORY OF DEFINITIONS AND INSTRUCTIONS
GLConnect also provides customers with the ability to query on-line reports at their convenience; hence
eliminating the inefficiencies that exists from faxed reports. There are several reports available on-line to
meet your daily operational needs. These reports provide relevant and timely information by day or month.
DAILY MARKET REPORT
Summarizes all of the daily deliveries at a specified location in which the User’s entity is designated as a
market.
To generate the report:
a.
b.
Click on ‘Reports’ from the main menu
Select ‘Daily Market Report’ from the Reports menu
A screen will appear allowing the user to enter the parameters for the selected
report.
c.
d.
e.
f.
Enter the ‘Date’ of interest (mm/dd/yy) in the field ‘Curr Date’
Enter the ‘Cycle’ of interest (mm/dd/yy) in the field ‘ Curr Cycle’
Select the location of interest, pick list provided
Select the output option for the results of the report, ‘Screen’ or ‘Email’
The ‘Screen’ option will allow the User to view the report on a monitor screen.
The ‘Email’ option will require the user to enter an email address. The system will then
send an attachment of the report to the email address entered whereby a hard copy of the
report can then be printed.
g.
Click ‘RUN CURRENT REPORT’
The Report will generate according to the output chosen.
45
GLConnect
REPORTS SCREEN
DIRECTORY OF DEFINITIONS AND INSTRUCTIONS
MONTHLY MARKET REPORT
Summarizes all of the deliveries by month at a specified location in which the User’s entity is designated as
a market.
To generate the report:
a.
b.
Click on ‘Reports’ from the main menu
Select ‘Monthly Market Report’ from the Reports menu
A screen will appear allowing the user to enter the parameters for the selected
report.
c.
d.
e.
f.
Enter the ‘Begin Date’ of interest (mm/dd/yy)
Enter the ‘End Date’ of interest (mm/dd/yy)
Select the location of interest, pick list provided
Select the output option for the results of the report, ‘Screen’ or ‘Email’
The ‘Screen’ option will allow the User to view the report on a monitor screen.
The ‘Email’ option will require the user to enter an email address. The system will then
send an attachment of the report to the email address entered whereby a hard copy of the
report can then be printed.
g.
Click ‘RUN CURRENT REPORT’
The Report will generate according to the output chosen.
46
GLConnect
REPORTS SCREEN
DIRECTORY OF DEFINITIONS AND INSTRUCTIONS
PARK AND LOAN REPORT
Summarizes the daily Park and Loan activity for the period and location specified for a Shipper.
To generate the report:
a.
b.
Click on ‘Reports’ from the main menu
Select ‘Park and Loan’ from the Reports menu
A screen will appear allowing the user to enter the parameters for the selected
report.
c.
d.
e.
f.
Enter the ‘Begin Date’ of interest (mm/dd/yy)
Enter the ‘End Date’ of interest (mm/dd/yy)
Select the location of interest, pick list provided
Select the output option for the results of the report, ‘Screen’ or ‘Email’
The ‘Screen’ option will allow the User to view the report on a monitor screen.
The ‘Email’ option will require the user to enter an email address. The system will then
send an attachment of the report to the email address entered whereby a hard copy of the
report can then be printed.
g.
Click ‘RUN CURRENT REPORT’
The Report will generate according to the output chosen.
47
GLConnect
REPORTS SCREEN
DIRECTORY OF DEFINITIONS AND INSTRUCTIONS
SUMMARY OF TRANSPORATION QUANTITIES REPORT
Summarizes all daily transportation activity on Great Lakes by month based on parameters chosen for the
Shipper.
To generate the report:
a.
b.
Click on ‘Reports’ from the main menu
Select ‘Summary of Transportation Quantities Report’ from the Reports menu
A screen will appear allowing the user to enter the parameters for the selected
report.
c.
d.
e.
f.
g.
h.
i.
j.
k.
Enter the ‘Month’ of interest
Enter the ‘Year’ of interest
Select Nominated or Scheduled quantities, the system will default to ‘Scheduled’
Select ‘Path’, ‘Supply’, ‘Market’ or any combination of the three, the system will default to
‘Path’
Select the ‘Receipt Location’ of interest, pick list provided
Select the ‘Delivery Location’ of interest, pick list provided
Select the Path ID of interest, IE: out of path, out of zone, pick list provided
Select one ‘Contract’ of interest or ‘ALL Contracts’, pick list provided
Select the output option for the results of the report, ‘Screen’ or ‘Email’
The ‘Screen’ option will allow the User to view the report on a monitor screen.
The ‘Email’ option will require the user to enter an email address. The system will then
send an attachment of the report to the email address entered whereby a hard copy of the
report can then be printed.
l.
Click ‘RUN CURRENT REPORT’
The Report will generate according to the output chosen.
48
GLConnect
REPORTS SCREEN
DIRECTORY OF DEFINITIONS AND INSTRUCTIONS
DAILY SUPPLIER REPORT
Summarizes all the daily deliveries at a specified location in which the User’s entity is designated as the
Supplier.
To generate the report:
a.
b.
Click on ‘Reports’ from the main menu
Select ‘Daily Supplier Report’ from the Reports menu
A screen will appear allowing the user to enter the parameters for the selected
report.
c.
d.
e.
f.
Enter the ‘Date’ of interest (mm/dd/yy) in the field ‘Curr Date’
Enter the ‘Cycle’ of interest (mm/dd/yy) in the field ‘ Curr Cycle’
Select the location of interest, pick list provided
Select the output option for the results of the report, ‘Screen’ or ‘Email’
The ‘Screen’ option will allow the User to view the report on a monitor screen.
The ‘Email’ option will require the user to enter an email address. The system will then
send an attachment of the report to the email address entered whereby a hard copy of the
report can then be printed.
g.
Click ‘RUN CURRENT REPORT’
The Report will generate according to the output chosen.
49
GLConnect
REPORTS SCREEN
DIRECTORY OF DEFINITIONS AND INSTRUCTIONS
MONTHLY SUPPLIER REPORT
Summarizes all the deliveries by month at a specified location in which the User’s entity is designated as a
supplier.
To generate the report:
h.
i.
Click on ‘Reports’ from the main menu
Select ‘Monthly Supplier Report’ from the Reports menu
A screen will appear allowing the user to enter the parameters for the selected
report.
j.
k.
l.
m.
Enter the ‘Begin Date’ of interest (mm/dd/yy)
Enter the ‘End Date’ of interest (mm/dd/yy)
Select the location of interest, pick list provided
Select the output option for the results of the report, ‘Screen’ or ‘Email’
The ‘Screen’ option will allow the User to view the report on a monitor screen.
The ‘Email’ option will require the user to enter an email address. The system will then
send an attachment of the report to the email address entered whereby a hard copy of the
report can then be printed.
n.
Click ‘RUN CURRENT REPORT’
The Report will generate according to the output chosen.
50