1
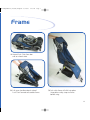
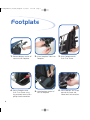
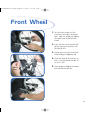
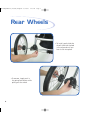
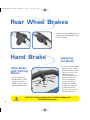
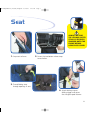
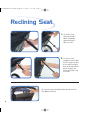
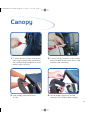
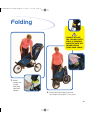
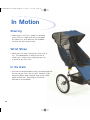
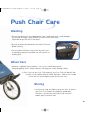
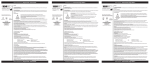
AM Independence (Assem) English
8/14/06
2:17 PM
Page 1
Assembly
Instructions
A Division of The Baby Jogger Company
Independence
Push Chair
This product is CE approved
Read these
instructions carefully
before use and
keep them for
future reference.
Your passenger’s safety may
be affected if you do not
follow these instructions.
AM Independence (Assem) English
8/14/06
2:17 PM
Page 2
For the sake of your precious cargo, please read
these warnings before using your brand new
Independence Push Chair.
• WARNING: Prevent serious injury to your passenger by always using the
safety harness.
• WARNING: Any load attached to the handle affects the stability
of the Push Chair.
• WARNING: It may be dangerous to leave your passenger unattended.
• WARNING: Recommended weight for seat pocket is 2 pounds and basket
is 10 pounds. Excessive weight may cause a hazardous unstable
condition to exist.
• Accessories which are not approved by the manufacturer or distributor
should not be used.
• Always use your wrist strap – this Push Chair can really roll, and the
wrist strap gives you control if you should slip or fall down.
• The passenger should remain seated (no standing in Push Chair).
• Watch out for cars – never assume that a driver can see you.
• Intended for large children or small adults.
• Total weight load recommended for this Push Chair is 100 lbs. (45 kg.)
(combined passenger and baggage weight.)
• This Push Chair seats one passenger.
• It may be unsafe to use replacement parts other than those supplied or
approved by the manufacturer.
2
EC-REP: European Device Solutions • Contact: [email protected]
AM Independence (Assem) English
8/14/06
2:17 PM
Page 1
Frame
1. Unpack Push Chair from box
and set wheels aside.
2. Pull up on handle and push axle of
Push Chair forward to assemble frame.
3. Push chair frame will click into place.
Snap yellow safety straps to frame
before using.
1
AM Independence (Assem) English
8/14/06
2:17 PM
Page 2
Footplate
1. Remove bottom section of
seat to install Footplate.
4. Secure Footplate onto
Push Chair Frame using
the enclosed screws and a
phillips head screwdriver.
2
2. Insert Footplate Tubes into
Footplate.
5. Velcro bottom section of
seat to Footplate.
3. Insert Footplate onto
Push Chair Frame.
6. Secure bottom seat straps
around the frame and
Velcro back to themselves.
AM Independence (Assem) English
8/14/06
2:17 PM
Page 3
Front Wheel
1. To install front wheel, lay Push
Chair back so handle is resting on
floor. Open the calipers by flipping
the caliper lever toward the rear
wheels.
2. Insert the front wheel into the fork
tips by aligning the axle flats with
the fork tip flats.
3. Tighten by turning the wheel lever
while holding the opposite side.
4. Close the wheel lever making sure
that it is facing toward the back of
the Push Chair.
Wheel
Lever
5. Close caliper by flipping the caliper
lever toward the fork tips.
3
AM Independence (Assem) English
8/14/06
2:17 PM
Page 4
Rear Wheels
• To install, gently slide the
wheel’s axle into the hole
in the axle end until you
hear it click into place.
• To remove, simply push in
the spring lock button while
pulling out the wheel.
4
AM Independence (Assem) English
8/14/06
2:17 PM
Page 5
Safety Harness
1. Unclip top of shoulder strap from seat and re-clip on
the seat loop closest to the passenger's shoulders.
2. Clip bottom section of shoulder straps to buckle loops.
3. To Adjust the strap length move the plastic guide on
the straps up or down to lengthen or shorten to the
desired comfort level for passenger.
4. To unbuckle the harness press one side of the center
buckle and repeat to the other side.
WARNING: Always use the crotch strap in combination
with the waist belt.
5
AM Independence (Assem) English
8/14/06
2:17 PM
Page 6
Rear Wheel Brakes
• Simply push brake pedal down to
engage rear parking brakes and
lift up to release.
Hand Brake
Adjusting
the Brake
Hand Brake
with Parking
Button
• To use the parking
button feature, simply
squeeze the brake
handle and push the
parking brake button.
Parking
Button
Cylinder
Ring
Small
Ring
• If you do not have good
braking action, simply
squeeze the brake lever
five or six times. If the
problem persists,
turn the cylinder ring
clockwise and then
turn the small ring
counter clockwise
to tighten the cable.
To lock ring, hold the
cylinder ring while
turning the small ring
counter clockwise.
WARNING: Engage parking device before loading and
unloading passenger.
6
AM Independence (Assem) English
8/14/06
2:17 PM
Page 7
Seat
ALWAYS BE SURE
THE YELLOW SAFETY
STRAP IS SECURELY
SNAPPED ONTO THE
FRAME BEFORE
USING PUSH CHAIR!
1. Snap seat to frame.
2. Fasten the two bottom velcro straps
to each other.
3. Thread folding strap
through openings in seat.
4. Attach folding strap to
folding trigger and secure
the triangle shaped fastener.
7
AM Independence (Assem) English
8/14/06
2:17 PM
Page 8
Reclining Seat
1. To recline: Pinch
clamp and slide it
down to desired
recline and push
down on seat.
2. To return to the
upright position: Hold
the D-ring on the end
of the recline strap in
one hand and use the
other to pinch the
clamp and slide it up
the strap.
Be sure to remove the board from the back of the
seat before washing.
8
AM Independence (Assem) English
8/14/06
2:17 PM
Page 9
Canopy
1. To attach bracket to frame: Unsnap seat
2. To attach canopy to bracket: Insert canopy
from frame to reveal mounting location.
Use a phillips head screwdriver to attach
bracket screws to frame.
frame into bracket and attach screws using
a phillips head screwdriver.
3. Snap canopy strap around frame
to itself.
4. Unsnap canopy strap to tilt forward
when you wish to block direct sunlight.
9
AM Independence (Assem) English
8/14/06
2:17 PM
Page 10
Basket
To install the basket onto the Independence frame, it is best
to remove bottom seat section as shown on the seat page
1 Place the basket under the Push Chair,
narrow end forward and secure
front basket snap straps around frame.
2 Secure rear snap straps around the
frame above center support bar.
10
AM Independence (Assem) English
8/14/06
2:17 PM
Page 11
Folding
ALWAYS BE SURE
THE YELLOW SAFETY
STRAP IS SECURELY
SNAPPED ONTO THE
FRAME BEFORE
USING PUSH CHAIR!
1. Retract
canopy and
unsnap
Fold Strap
from both
uprights.
2. Grasp Fold Strap and pull upwards.
(You might have to give it a tiny yank.)
11
AM Independence (Assem) English
8/14/06
2:17 PM
Page 12
In Motion
Steering
• Steering your Push Chair is simple: it’s balanced
to turn with just a light touch on the handlebar.
For tighter turns, push down on the handlebar
and raise the front wheel to steer.
Wrist Strap
• Make sure wrist strap is around your wrist when in
use. The Independence is ready to roll with or
without you – and the wrist strap helps you stay
in control of you Push Chair.
In the Dark
• Since we are concerned about safety, we recommend that
you not use your Push Chair at night. However, if you
choose to, please attach reflective strips to the wheel
spokes and the seat. Bicycle lights can also be
mounted on the handlebar.
12
AM Independence (Assem) English
8/14/06
2:17 PM
Page 13
Push Chair Care
Washing
• You can machine wash the Independence’s seat in cold water with a mild detergent.
To minimize shrinkage, simply reattach the seat to the frame to dry.
(Please do not put the seat in the dryer!)
• Be sure to remove the board from the back of the seat
before washing.
• You may clean the frame using a soft, dry cloth, and
an occasional spray of household wax will maintain its
healthy glow.
Wheel Care
• Moisture – especially from the beach – can rust the wheel bearing case.
Spraying regularly with a silicone lubricant will keep your wheels looking healthy.
• Also, if you use your Push Chair regularly, your Push Chair will benefit from
a yearly visit to the bike shop for wheel alignment. Refer to the number
on the tire wall for the optimum pressure for your tires.
Storing
• Sunshine can fade seat fabric and dry out tires, so storing
your Push Chair indoors will prolong its good looks.
However, if you do store it outside, using a tarp will
protect against weather wear.
13
AM Independence (Assem) English
8/14/06
2:17 PM
Page 14
Thank You!
We wish you many happy journeys with your new
Push Chair! The Independence is a great product,
and we are proud to manufacture it. If you have
any questions or comments, please give us a call at.
1.800.241.1848
Advance Mobility is a Division of Baby Jogger
8575 Magellan Parkway, Suite 1000 • Richmond, VA 23227
T: 800.241.1848 • F: 804.262.6277
www.advancemobility.org
AM IND 8/07/06