1
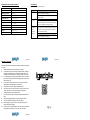
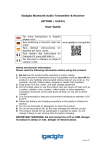
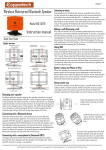
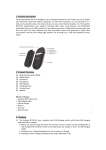
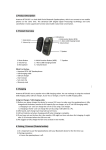
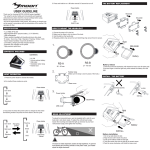
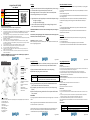
Charging:
iGadgitz ‘Disnix DS3’ (U3615)
User Manual
For more instructions in English please
visit:
Eine Anleitung in Deutsch nden Sie
unter:
www.igadgitz.com/guides
Para obtener instrucciones en Español
por favor visite:
Pour obtenir des instructions en
français s'il vous plaît aller à:
Per istruzioni in italiano si prega di
visitare il sito:
3.
4.
5.
6.
7.
8.
9.
10.
11.
iGadgitz ‘Disnix DS3’ comes with a built-in rechargeable battery. Prior to using it,
it is recommended to charge the battery fully for the first time.
When iGadgitz ‘Disnix DS3’ is low in power the red LED continually flashes.
Please recharge the battery as soon as possible.
1. Plug USB cable into a PC/Laptop USB port or suitable 5.0V USB power charger
Red light on: Charging
Red light off: Finished charging
2. It takes around 3 hours to fully charge. Do not charge for longer than 3.5
hours or battery life will be damaged.
Safety and General Information
Please read the following information before using this product.
1.
2.
Pair with a Bluetooth Transmitter:
Do not use the product while operating a motor vehicle.
To avoid electronic interference and/or compatible conflicts, turn off the product in any facilities
where posted notices instruct you to do so. For example: Aircraft, Military Base, Hospital or
Health Care Facilities.
To avoid impairing your hearing, keep the speaker volume at a moderate level. Do not listen at
high volumes for prolonged periods. Check volume before turning on.
For your safety, avoid distractions from music or phone calls while in public places or potentially
dangerous environments.
Keep away from fire, water, and high voltage equipment.
Dot not install, place or use the speaker near any source of heat such as a cooker, radiator,
oven, toaster, coffee maker or other apparatus (including microwave ovens) that gives off heat.
Do not use in direct sunlight.
It is recommended to keep the environment temperature between 15°C & 25°C
Follow the battery and charging procedure in this guide to charge the product.
Do not use chemicals or detergents to clean the product.
The speaker should not be submerged or exposed to water. Do not charge if damp or wet.
Ensure fully dry before charging.
Should the unit become hot to touch or emit smoke, switch off at the mains, disconnect and
contact the manufacturer.
IMPORTANT WARNING: Do not connect to a PC or USB charger if damp or wet. Danger of
electrocution.
If becomes very hot during charging or emits smoke/vapour; switch off at the plug socket,
disconnect, do not use and contact your retailer.
Please Note: The battery is recyclable.
Batteries (battery pack or batteries installed) should not be exposed to excessive heat, fire,
water or high voltage equipment.
You can connect DS3 to a Bluetooth transmitter to enjoy music wirelessly. The pairing steps
are as follows:
1. Place DS3 and the Bluetooth transmitter where they are easily viewable by no more than
1 metre apart
2. Switch DS3 to pairing mode
3. Turn on the Bluetooth transmitter. It will search for Bluetooth devices automatically and
send a pairing request
4. When DS3 requests to enter a PIN, the transmitter will respond “0000” automatically
5. After successfully pairing and connecting, the Blue LED of DS3 flashes twice every 4
seconds
Notes:
• The pairing password of DS3 is “0000”. DS3 can only pair with a Bluetooth transmitter
whose pairing password is “0000”.
• If pairing still fails after several times, please refer to the Bluetooth transmitter’s user
manual for further information.
Multi-Pairing:
DS3 can connect with two Bluetooth cell phones at the same time. The general pairing
procedures are as follows:
1)Pair DS3 with device A
2)Turn on DS3 and make it enter pairing mode again, and pair it with device B
3)Operate device A to connect with headset. DS3 has now connected with two devices
IMPORTANT WARNING: Do not connect to a PC or USB charger if speaker is
damp or wet. Danger of electrocution.
Page 1 of 10
Product Overview
Box contents:
Bluetooth Stereo Earphones
iGadgitz ‘Disnix DS3’
USB Charging Cable
3.5mm Audio Cable
User Manual
Key Features:
Bluetooth 4.0
Supports NFC function
Headphone battery display on
iOS devices
Supports up to two mobile
phones
Foldable headset
Notification voice prompts
Noise reduction
Key:
A: Adjustable headband
B: Multi-function button (MFB) – Power On/Off, Play/Pause, Answer/End/Reject calls/Last number redial
C: Volume up/Next track
D: Volume down/Last track
E: LED indicator
F: Micro USB charging port
G: Microphone
H: USB charging cable
I: 3.5mm audio in port
J: Folding mode
Page 2 of 10
Page 3 of 10
Pairing/Connecting:
The general pairing procedures are as follows, however, you may need to refer
to your Bluetooth device’s manual on how to pair with a Bluetooth device.
1) Keep your Bluetooth enabled device within 1 metre when pairing;
2) Make DS3 enter pairing mode as shown below:
Page 5 of 10
Using iGadgitz ‘Disnix’ DS3:
Listen to music or make a call
Play/Pause
1.
2.
3.
4.
5.
Select an audio track or video clip.
Tap (press less than one second) the Multi-function button to Play or Pause the audio track or video clip.
Short press buttons C (Next) and D (Previous) to change tracks.
Long press buttons C (Increase) and D (Decease) to adjust the volume to your desired level.
Power off the headphones, and plug in the provided 3.5mm audio cable to the headphones and a
suitable device cable to listen without Bluetooth.
Function
Operation
Answer an incoming call
Entering pairing
mode
Ensure DS3 is off. Press and hold Multi-Function Button for
approximately 8 seconds until Red and Blue LED flash rapidly
Connect the headphone to a mobile phone. Short press (less than one second) the Multi-function button to
answer an incoming call.
End a call
3) Using your Bluetooth device, scan/search for available Bluetooth devices.
Select “Disnix DS3” from the list of devices shown;
4) If prompted by your device to connect, select “Yes” (this will vary among
devices)
5) After successfully connecting, the Blue LED of the earphones will flash twice
every 4 seconds
Please Note:
If pairing fails, please turn off DS3 first and then re-pair according to steps 1~5 mentioned
above.
After pairing is successful, DS3 and the Bluetooth device will remember each other and
should not need to be re-paired next time.
Each time DS3 is turned on, it will connect automatically to last connected device. If you
want to pair it with other devices, please turn off the Bluetooth function of the last
connected device first and pair DS3 with the new device.
Page 4 of 10
Short press(less than one second) the Multi-function button to end the call.
Reject an incoming call
Press the Multi-function button for two seconds.
NFC function
1. Turn on the NFC function on your device.
2. Put your device NFC induction zone close to DS3 NFC induction zone when DS3 is off. It will turn on the
DS3.
3. Your device may ask “Do you want to connect Disnix DS3?” (Note: Different brands of phone prompt
differently). If it does, press”YES” and your device will automatically connect to DS3.
4. Disnix DS3 will be disconnected when your device is too far from the induction area.
Note: The headphones and an NFC enabled device can connect even if Bluetooth function on the devices is
switched off.
LED indications
Flashing Blue
Slow Flashing Red
Short Flashing Red
Continuous Red
A Bluetooth connection has been made. Headphones are ready to use.
Low battery; headset disconnected.
Headphones turned off successfully.
Charging. Light turns off when charging finishes.
Page 6 of 10
Specifications and technical parameters:
Troubleshooting:
See below for solutions to common problems:
Bluetooth version
Bluetooth profiles
Operating distance
Headset music time
Headset talk time
Headset standby time
Charging input
Headset charging time
Dimension
Weight
Battery capacity
Bluetooth V4.0, APT-X supported
Headset, Hands free, A2DP, AVRCP
10 metres
Approx. 16 hours
Approx. 18 hours
Approx. 300 hours
DC5.0V 60mA
Approx. 3 hours
40*24*32mm
Approx. 16.4g
550mAH
Problem
LED lights not
on
Bluetooth not
connecting
Sound is
distorted / no
sound /
Microphone
not working
Page 7 of 10
Maintenance, Care & Safety
Users are not permitted to make changes or modify the product and accessories
in any way
1.
DO NOT use the product while operating a motor vehicle.
2.
To avoid electronic interference and/or compatible conflicts, TURN OFF
the product in any facilities where posted notices instruct you to do so.
For example: Aircraft, Military Bases, Hospitals or Health Care Facilities.
3.
To avoid impairing your hearing, keep the headset volume at a moderate
level. Do not listen at high volumes for prolonged periods. Check volume
before placing on ear.
4.
For your safety, avoid distractions from music or phone calls while in
public places or potentially dangerous environments.
5.
Keep away from fire, water, and high voltage equipment.
6.
Do not install, place or use the headset near any source of heat such as a
cooker, radiator, oven, toaster, coffee maker or other apparatus
(including microwave ovens) that gives off heat.
7.
It is recommended to keep the environment temperature between 15°C
& 25°C
8.
Follow the charging procedure in this guide to charge the product.
9.
Do not use chemicals or detergents to clean the product.
10. Do not submerge or expose to water. Do not charge if damp or wet.
Ensure fully dry before charging.
11. If becomes very hot during charging or emits smoke/vapour; switch off at
the plug socket, disconnect, do not use and contact your retailer.
Page 8 of 10
Solution
Use the USB charging cable to charge the battery, referring to
the section in this guide titled ‘Charging’.
Check your headphones are receiving power from your
computer’s USB port.
Check the Bluetooth feature is enabled on your device.
Power off headphones and then power back on. If this fails,
remove the headphones from your device and pair again using
the section in this guide titled ‘Pairing | Connecting’.
Check distance between headphones and device is less than 10
metres and there are no obstructions. Physical barriers, such as
walls or doors, can affect the signal. Also check for electrical
devices that might be interfering.
Adjust the volume to a suitable level.
Use the USB charging cable to charge the battery, referring to
the section in this guide titled ‘Charging’.
Page 9 of 10