1
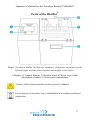
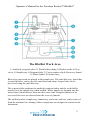
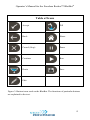
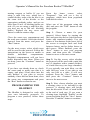
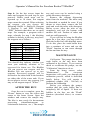
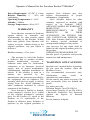
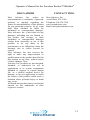
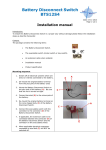
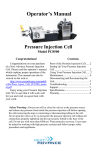
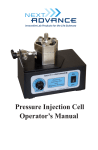
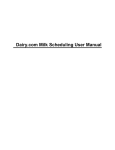
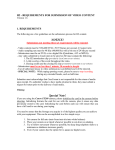
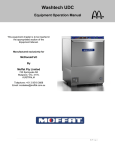
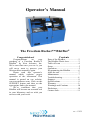
Operator’s Manual
The Freedom Rocker™ BlotBot®
Congratulations!
Contents
Congratulations
on
your
purchase of a Freedom Rocker™
BlotBot® by Next Advance, Inc.
We're sure that once you use it, you
will never want to process your
Western blots manually again.
Please read this operator’s
manual which explains proper
operation of the instrument. This
manual is posted on our website,
www.nextadvance.com. Click on the
SUPPORT button and then on the
appropriate link to the manual.
We’re confident that your
BlotBot will become an essential tool
in your laboratory and we wish you
success with your work.
Parts of the BlotBot.........................2
The BlotBot Work Area .................3
Table of Icons .................................4
Setup................................................5
Operation.........................................5
Programming the BlotBot...............6
After the run ...................................7
Maintenance ...................................7
Troubleshooting..............................8
Support............................................8
Specifications..................................9
Warranty.........................................9
Warnings and Cautions .................10
Disclaimer......................................10
Contact Info...................................11
rev. 15.F12
Operator’s Manual for the Freedom Rocker™ BlotBot®
Parts of the BlotBot®
Model 120 shown. Model 240 has two windows, work areas and doors on the
left and right, and the control panel and display in the center.
1) Display 2) Control Buttons 3) Window Knob 4) Work Area visible
through the window 5) Waste tank compartment
Caution: Follow the Instructions in the Operator’s Manual
Please dispose of the tubes, trays, and BlotBot in accordance with local
regulations
2
Operator’s Manual for the Freedom Rocker™ BlotBot®
The BlotBot Work Area
1) Antibody (reagent) tubes 2) Wash buffer tubing 3) Rocker cradle 4) Tray
cover 5) Sample tray 6) Reagent slider 7) Cover retainer clip 8) Recovery funnel
9) Waste funnel 10) Funnel tray
Blots to be processed are placed in the sample tray. The mini blot tray, which has
a central divider, can be used for mini blots and strips. Larger blots can be
processed using the midi blot tray.
The reagent slider positions the antibody (reagent) tubes and the wash buffer
nozzles over the sample tray when needed. Waste liquids are dumped into the
waste funnel which directs them into the waste tank. Reagents that are to be
recovered for reuse are directed into the recovery funnels.
The antibody tubes, sample tray, funnel tray, and waste tank are easily removed
from the machine for cleaning. Other components are designed to remain in the
instrument.
3
Operator’s Manual for the Freedom Rocker™ BlotBot®
Table of Icons
Accept
Fill
Back
Home
Cancel (Stop)
Pause
Continue
Run
Drain
Save
Edit
Figure 3: Button icons used on the BlotBot. The functions of particular buttons
are explained in the text.
4
Operator’s Manual for the Freedom Rocker™ BlotBot®
Western
blot
protocol
(see
"Programming the BlotBot", below).
SETUP
Remove all tape and packing materials
from the BlotBot, and place it on a
stable, level lab bench. Open the door(s)
and remove the funnel tray. Unscrew the
caps from the 50 mL recovery tubes and
place them in the brackets to each side of
the waste tank. Replace the funnel tray
and close the door.
Open the transparent window that
protects the work area (see Figure 2).
Place the sample tray into the rocker
cradle and fold the flaps over toward the
center of the tray. The spikes on the tray
should be facing toward the back of the
instrument. Place the tray cover onto the
sample tray and clamp it down by
rotating both of the cover retainer clips.
See Figure 2 for reference.
The wash buffer connector and the
power supply are located at the back of
the instrument. Attach the wash buffer
hose to the connector using the quickconnect fitting. Plug the power supply
into the power jack on the back of the
BlotBot and insert the plug into a wall
outlet. The machine is now set up.
OPERATION
Ensure that the window(s) and door(s)
are completely closed. Turn the power
switch on the back of the unit to the "on"
position. The display will illuminate, and
the moving parts will return to their
home positions. After a few seconds, the
home screen will display.
Program
or
select
your
preferred
Fill the buffer bottle. Ensure that the
hose hanging from the cap reaches the
bottom of the bottle. Leave the cap loose
to allow air into the bottle as liquid is
pumped out.
To fill the buffer hose, select "Flush"
from the home screen menu, and press
the "Accept" button. The reagent slider
will move forward until the buffer
dispensing nozzles are over the back of
the sample tray. Press the "Fill" button
until wash buffer is dispensed from both
nozzles. (This may take several
seconds.) When the tubing has been
filled, press the "Drain" button to
remove the dispensed buffer from the
sample tray.
Check each antibody (reagent) tube to
make sure the foil seal is intact and
firmly attached. If you are using primary
and secondary antibodies, you will need
two tubes for each blot you are
processing. Screw one tube into the
primary antibody position (toward the
back of the slider), and the other into the
secondary antibody position, just behind
the buffer dispensing nozzle.
Pour or pipet the appropriate antibody
solution or other reagent into each tube.
A standard-sized mini blot processed in
a mini blot tray requires 3.5 mL of
antibody solution per tube, but you may
use more reagent if you prefer.
Place your blot(s) into the sample tray,
along with your blocking buffer or other
5
Operator’s Manual for the Freedom Rocker™ BlotBot®
starting reagent or buffer. If you are
using a mini blot tray, which has a
central divider, make sure the blot is on
the same side of the divider as the
appropriate antibody tubes, and use no
more than 50 mL. of blocking buffer per
side. (If you are using a midi blot tray,
you may use up to 100 mL. blocking
buffer.) Replace the tray cover and
fasten it with the retainer clips.
Close the waste tray compartment and
the work area window. Select the desired
protocol from the menu, and press the
“Run” button.
On the next screen, select which trays
will be used for the protocol. Follow the
instructions on the screen to enable or
disable
individual
compartments.
Disabled compartments will not have
buffer dispensed into them. When you
are done, press the “Continue” button to
proceed.
If you have not already done so, check
the waste tank to make sure that it is
empty, and place 50-ml tubes into the
tube holders if you plan to recover
antibody. Once this has been done, close
the waste tray compartment and press
the “Run” button to start the run.
PROGRAMMING THE
BLOTBOT
The BlotBot is designed to work with
your own laboratory protocols. To
program a new protocol, follow these
steps:
From the home screen, select
"Programs". You will see a list of
programs, which have been populated
with default values.
Select one of the programs using the
dial, and press the "Edit" button to edit
the program.
Step 1: Choose a name for your
protocol. Select letters by turning the
dial, and press the dial to switch between
letters and numbers/symbols. Use the
cluster of four buttons at the lower left of
the screen to navigate back and forth
between letters, and to delete letters or
add spaces. When finished, press the
“Save” button to save your program
name, and then press the “Continue”
button to move to the next screen.
Step 2: On this screen, select whether
the protocol will be used with a mini blot
tray (2 chambers with a central divider),
or a midi blot tray (one large chamber).
If you typically run mini blots, use the
mini blot tray even if you plan to run
only one blot at a time: it will save
reagents. Press the “Save” button, and
then press the “Continue” button to
move to the next screen.
Step 3: Now, choose whether you want
a clearing rinse to be included in the
protocol. A clearing rinse will briefly
rinse the blot with 10 mL. of wash buffer
at the end of each step. If you want a
clearing rinse, highlight "Enable" on the
screen and then press the "Save" button.
Press the "Continue" button to continue.
6
Operator’s Manual for the Freedom Rocker™ BlotBot®
Step 4: On the last screen, input the
times and reagents for each step in your
protocol. Buffer wash steps can be
repeated up to 10 times, but reagent
steps cannot be repeated. When selecting
the reagent, you can choose the
following: Buffer A; Buffer B; Reagent
1; Reagent 2; and END. Selecting
“END” indicates that there are no more
steps. For example, a program with 6
steps, whereby for step 1 the blocking
solution is already in the tray, may have
the reagents set as follows.
STEP 1
STEP 2
STEP 3
STEP 4
STEP 5
STEP 6
STEP 7
REAGENT
-----BUFFER A
REAGENT 1
BUFFER A
REAGENT 2
BUFFER B
END
You should also indicate whether you
want your antibody solutions to be
recovered for future use. The BlotBot
120 can recover one reagent, and the
BlotBot 240 can recover up to two
reagents. Recovered reagents will be
diverted to the tubes held in the brackets
on either side of the waste tank. If you
do not plan to recover any reagents, you
may set all reagent steps to "Waste".
AFTER THE RUN
Once the run is complete, press the
"Home" button to stop the rocker and
return to the home screen. Open the
window and remove the sample tray.
The blot is now ready for downstream
processing
(chemiluminescent
or
colorimetric detection, etc.) The sample
tray and cover can be washed using a
gentle laboratory detergent.
Remove the reagent dispensing
tubes from the machine. The tubes may
be discarded, or washed for reuse. If you
choose to reuse them, remove the foil
seals and wash the tubes with detergent.
Before re-use, allow the tube to dry
completely and seal the bottom with
another foil seal. Packets of tubes and
seals are sold separately.
If you will not be using the BlotBot
again for a few days, you may wish to
flush the buffer line with distilled water.
To do this, place the wash buffer hose
into a container of water and use the
"Flush" function to run water through
the line and into the tray.
MAINTENANCE
Calibration. The pumps that deliver
wash buffer to the tray have been
calibrated at the factory. If you want to
check or recalibrate the pumps, use the
"Calibration" function to do so.
From the home screen, select
"Maintenance".
The
on-screen
instructions will guide you through the
calibration process, which is described
briefly below. You will require a
graduated cylinder (100 – 200 mL) to
perform the calibration.
Before you calibrate the pumps,
confirm that the wash buffer line is
completely full of liquid. If there are
bubbles in the line, use the "Flush"
function (described above) to remove
them.
7
Operator’s Manual for the Freedom Rocker™ BlotBot®
The display screen protector, the
work area window, and the interior
surfaces of the BlotBot can be wiped
down as needed with water and a
laboratory wipe. Use of alcohol is not
recommended, as it may fog some of the
plastic surfaces over time.
TROUBLESHOOTING
Open the waste compartment and
remove the funnel tray. If you are using
a larger graduated cylinder and need
extra room, you may remove the waste
tank as well. Place the graduated
cylinder under the left-hand buffer
nozzle, and press the "Fill" button to
dispense liquid into the cylinder. The
pump will dispense approximately 40
mL.
Once the pump has stopped running,
measure the actual amount of liquid
dispensed, and enter the value using the
encoder knob. Measure the volume from
the right-hand nozzle the same way, and
record its value. Press the "Save" button
to save the values. The pumps are now
calibrated. Replace the waste tank and
funnel tray and close the waste
compartment.
General cleaning. Rinse the waste
tank and funnel tray when desired. The
components are made from reagents that
are resistant to chemicals typically used
in a Western blot, but some of the
components of blocking buffers (nonfat
dry milk, BSA, etc) can form
unattractive deposits on the surface.
In addition to the tips given below, a
list of troubleshooting tips is available at
http://www.nextadvance.com.
If the BlotBot doesn’t start, the plug of
the power supply cord may not be in a
live wall outlet or the power supply
connector may not be fully inserted in
the socket on the back of the BlotBot.
If the unit stops working, turn the
system off for one minute to allow the
electronics to reset. If the BlotBot does
not turn on after this period, contact
customer service.
If the unit stops during a run and
displays an error message, the run will
resume once the error is fixed. The most
common error is that the cover or waste
compartment have not been fully closed.
If the unit has lost power because it
was unplugged, or because there was a
power outage, simply restore power to
the unit when possible. If a run was in
progress, it will automatically re-start at
the point it had reached when power was
lost. You do not need to take any special
measures.
If the antibodies are not being
dispensed, ensure that the spikes on the
sample tray are facing toward the back
of the instrument, and that they are still
sharp. The BlotBot ships with several
8
Operator’s Manual for the Freedom Rocker™ BlotBot®
trays. Replacement trays are available
for purchase.
If buffer is not being dispensed during
the run, check to make sure that the end
of the buffer hose is resting in the
bottom of a full bottle of buffer. The
bottle cap should also be slightly loose
in order to allow air to flow into the
bottle.
If the buffer supply is adequate,
use the Flush function to diagnose the
difficulty. The pumps should be audible
as soon as the "Fill" button is pressed; if
they are not, call customer support. If the
pumps are running but no liquid is
dispensed, make sure the buffer nozzles
have not become clogged with dried
salts or detergent.
SUPPORT
FAQs, protocols, and other helpful
information are available on our website,
http://www.nextadvance.com. Click on
the Freedom Rocker BlotBot, then on the
appropriate link. If you would like
further assistance, contact customer
service
by
email
at
support
@nextadvance.com or by telephone at
1.518.674.3510.
SPECIFICATIONS
BlotBot 120
BlotBot 240
Width
45 cm
(17.5 in.)
54 cm
(21.5 in)
Depth
36 cm
(14 in.)
39 cm
(15.5 in)
Height
46 cm
(18 in.)
43 cm
(17 in)
Weight
17 kg
(38 lb.)
15 kg
(32 lb.)
2 mini blots
or 1 midi
blot
4 mini blots
or 2 midi
blots
1
1
Capacity
Blots
Buffers
Buffer
volume
Midi blot tray: 150 mL
Mini blot tray 75 mL per
side
Reagents
dispense 2
recover 2
dispense 2
recover 2
Maximum
reagent
50 mL each
50 mL each
Minimum
reagent
per blot
Midi blot tray: 7 mL, 6 mL
can be recovered
Mini blot: 3.5 mL per blot, 3
mL can be recovered
Protocol
steps
9
9
Washes
per step
10
10
5 to 40,
independent
for each step
5 to 40
independent
for each step
Rocks per
minute
9
Operator’s Manual for the Freedom Rocker™ BlotBot®
Power Requirement: 12 VDC, 2.1 Amp
Relative Humidity: 5 – 90% non
condensing
Operating Temperature: 4 - 40°C
Altitude: <2000m
Storage Temperature: -40 to 50°C
WARRANTY
Next Advance warrants its Products
against defects in materials and
workmanship for time periods which
vary according to the Product. Within
these time periods, Next Advance will
replace or repair, without charge to the
original purchaser, any part which is
defective.
BlotBot warranty = Two years
The warranty is void if the Product
is defective due to product accident,
product modification, exposure to
radiation other than for sterilization,
connection to an improper electrical
supply, lack of proper maintenance,
contamination, improper installation or
misuse. If the product is used in a
manner
not
specified
by
the
manufacturer, the protection provided by
the equipment may be impaired. The
warranty shall also not apply to defects
arising from fire, flood, lightning or
other conditions unrelated to correct
operation of the Product.
Next Advance’s liability is limited,
at the company’s election, to (1) refund
of the original purchaser’s purchase
price for the Product (2) repair of the
Product, or (3) replacement of the
Product or defective parts. Evidence of
purchase by the original purchaser is
required. Next Advance may also
request documentation of proper
maintenance, if applicable.
Next Advance makes no other
warranty, expressed or implied, with
respect to its Products. NEXT
ADVANCE MAKES NO WARRANTY
RESPECTING
THE
MERCHANTABILITY
OF
THE
PRODUCTS
OR
THEIR
SUITABILITY OR FITNESS FOR
ANY PARTICULAR PURPOSE OR
USE. Next Advance shall not be liable
for indirect, special, incidental or
consequential damages of any nature.
Any recovery for any claim shall be
limited to the original purchase price for
the product.
OPERATOR’S RESPONSIBILITY
Provide proof of purchase and provide
normal care and maintenance.
WARNINGS AND CAUTIONS
Read the user’s manual before operating.
Do not open the window when the
BlotBot is in use.
Use recommended accessories only.
Substitutions
may
result
in
unsatisfactory performance.
Do not remove any panels or screws. No
user serviceable parts are behind the
panels.
For indoor use only.
Pollution Degree 2 per EN 61010-1.
Overvoltage Category II per EN 610101.Enclosure Protection: Not Protected
Against the Ingress of External
Moisture.
Do not immerse in liquid.
10
Operator’s Manual for the Freedom Rocker™ BlotBot®
DISCLAIMER
Next Advance, Inc. makes no
representations or warranties, expressed,
statutory or implied, regarding the
fitness or merchantability of this product
for any particular purpose. In no event
shall Next Advance be liable for
incidental or consequential damages.
Next Advance, Inc. is not liable for any
damages, including but not limited to,
lost profits, lost savings, or other
incidental or consequential damages
arising from ownership or use of this
product, or for any delay in the
performance of its obligations under the
warranty due to causes beyond its
control.
Next Advance, Inc. also reserves the
right to make any improvements or
modifications to the product described in
this manual at any time, without notice
of these changes. Next
Advance, Inc. products are not designed,
intended, or authorized for use in
applications or as system components
intended to support or sustain human
life, as a clinical medical device for
humans, or for any application in which
the failure of the product could create a
situation where personal injury or death
may occur.
All brand and product names used in this
manual are the trademarks of their
respective owners.
CONTACT INFO
Next Advance, Inc.
Averill Park, NY, USA
Telephone 518-674-3510
www.nextadvance.com
Email: [email protected]
11