1
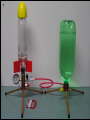
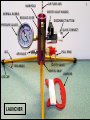
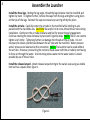
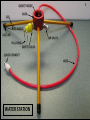
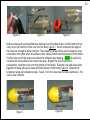
Rabbit
Rockets
www.rabbitrockets.com
USER MANUAL
2
Disclaimer
Rabbit Rockets™ are dangerous devices and should always be handled with care and used with common sense.
By purchasing or by using this product you acknowledge that Rabbit Rockets™ takes no responsibility for
damages, legal issues, personal injuries, or other unforeseen problems. Rabbit Rockets™ only warrants the
quality of its products. The use of Rabbit-Rockets’ products is beyond our control and therefore is the sole
responsibility of the purchaser and user. Due to varying procedures and conditions, Rabbit-Rockets™’ written
instructions are based on experience with its products. There are risks and dangers associated with the use of
the products of Rabbit Rockets™ and you hereby acknowledge the receipt of and that you have read the
written instructions applicable to the use of any products of Rabbit-Rockets. Rabbit Rockets™ strongly
recommends thorough inspection and testing of all products prior to actual use. Do not allow children, under
the age of 14, to use any products of Rabbit Rockets™ without adult supervision. This agreement releases and
holds harmless Rabbit Rockets™ in connection with the sale of any products of Rabbit Rockets™ against any
federal, state, and/or local laws. All legal consequences arising from the purchase, storage, and/or use of any
products of Rabbit Rockets™ is the sole responsibility of the purchaser and user. You agree to fully indemnify,
hold harmless, and defend Rabbit Rockets™ from and against all claims, actions, suits, demands, damages,
liabilities, obligations, losses, settlements, judgments, costs and expenses (including without limitation
reasonable attorney fees and costs), whether or not involving a third-party claim, which arise out of, relate to
or result from the use of any products of Rabbit-Rockets™. You hereby specifically forever waive and release
Rabbit Rockets™ and its principals and agents from any liability for injury arising out of the inherent risks from
using any products of Rabbit Rockets™.
Our Mission
3
Our mission is to provide Rabbit Rockets™ customers with the absolute highest quality water rocket
equipment available on the market today! We use aircraft quality anodized aluminum for our launcher and
water station that is CNC machined to very tight tolerances to provide our customers with the smoothest
operating and longest lasting water rocket equipment available. We don’t consider our equipment to be a
toy, though it is very fun to use. If taken care of properly, our ground equipment will provide you with a
lifetime of “High Quality Fun”! Our system is designed to be very portable and efficient to use. We want to
minimize your effort, while maximizing your fun. The Rabbit Rockets launcher provides you, our customer,
with an easy to use compact, lightweight, yet very stable platform for water rocket launches. With the water
station, a Rabbit Rockets™ exclusive feature, filling the water rocket is quick and easy with very little effort
required. Our rocket kits are light weight, easy to install, and high flying. No more rockets that don’t fly
correctly or tear apart easily. You can even use your own rocket design, with our nozzle, if you so desire. Put
down those smart phones, T.V. remotes, and game controllers, get off the couch, and get outside to the fresh
air and water rocket country for some good old-fashioned outdoor fun for kids and adults alike!
About this Manual
This manual has been written to provide in-depth detail for the assembly and operation of the Rabbit
Rockets™ water rocket system. The assembly of components is actually very simple and can be done in very
little time. The photographic figures are provided to mirror the text instructions. We have made every effort
to explain all aspects of this system. We reserve the right to modify this manual as required.
4
User Agreement
By purchasing this product you agree to the following safety requirements:
1. Do not transport, carry or handle any pressurized bottles
2. Do not allow any part of your body in the path of the rocket. Do wear safety glasses and a helmet.
3. Do not over-pressurize the rocket or water station
4. Do not tamper with the safety valves
5. Do not use a damaged bottle or a bottle not conforming to the specifications in this manual.
6. Do not pressurize the rocket without wearing NIOSH approved safety glasses
7. Do not launch the rocket around people, animals, buildings, structures, vehicles, power lines or
anything that could be damaged by the falling rocket
8. Do not allow water to freeze in the rocket or water station
9. Do not allow children under the age of 14 to use the launcher or water station
10. Do not use Rabbit Rockets to do intentional damage or harm
11. Do not operate without an accurate pressure gauge
12. Do not stand over the rocket as it is being pressurized
13. Do not launch the rocket without warning everyone in the immediate area
14. Do not allow anyone within 20 feet of a pressurized rocket
15. Do not use hot water to fill the rocket. Use only clean, room temperature water with no chemical or
particulate additives.
16. Do not attempt to recover a rocket from any dangerous place, or private property without permission
17. Do not attempt to catch the rocket at any time during flight
18. Do not launch the rocket during adverse weather conditions such as high winds over 15 miles per hour
or lightning conditions
19. Do not allow anyone to use the launcher or water station without their awareness and compliance to
the above requirements.
Warnings
1.
2.
3.
4.
5.
6.
7.
SELECT ONLY PLASTIC CARBONATED BEVERAGE BOTTLES AS DESCRIBED ON PAGES 7 AND 9.
DO NOT USE ANY SOLVENTS ON THE BOTTLES, ESPECIALLY THOSE CONTAINING ACETONE, WHICH CAN
DAMAGE THE BOTTLE.
ALWAYS WEAR NIOSH APPROVED SAFETY GLASSES IN CASE OF BOTTLE RUPTURE.
DO NOT ALLOW ANY PART OF YOUR BODY, OR ANYONE ELSE, TO GET ABOVE OR INTO THE PATH OF
THE PRESSURIZED ROCKET.
DO NOT PULL HARD OR JERK THE LANYARD.
DO NOT ATTEMPT TO CATCH THE ROCKET OR ALLOW IT TO CONTACT YOU AS IT RETURNS TO EARTH.
BEFORE SEPARATING THE BOTTLE FROM THE LAUNCHER OR WATERSTATION, OR FOR LAUNCH ABORT
OR TRANSPORT, RELEASE PRESSURE FROM THE BOTTLE BY PULLING THE PULL-RING ON THE SAFETY
VALVE. FAILURE TO RELEASE PRESSURE CAN RESULT IN PERSONAL INJURY - NEVER CARRY OR
TRANSPORT A PRESSURIZED BOTTLE.
Tools and Supplies
1.
2.
3.
4.
5.
6.
Pliers (Optional)
Diagonal cutters, figure 4. (Optional)
Cellophane tape, figure 5. (Optional)
Mineral Spirits (Optional)
Dull knife, figure 6. (Optional)
Tape measure, figure 10. (Optional)
7.
8.
9.
10.
Bicycle air pump, figure 15. (Air source required)
Safety glasses, figure 15. (Required)
Safety helmet, figure 15. (Required)
Water (Required)
5
6
MANIFOLD
NORMAL BUBBLE
AIR TUBE AXIS
7
WATER VALVE HANDLE
RELEASE LEVER
DISCONNECT BUTTON
PRESSURE GAUGE
QUICK CONNECT
LEG
AIR VALVE
LEG ANGLE
PULL RING
SAFETY VALVE
SWIVEL-SNAP
LEG CAP
LAUNCHER
LANYARD
8
Assemble the Launcher
Install the three legs. Noting the leg angle, thread the leg clockwise into the manifold and
tighten by hand. To tighten further, remove the caps from the legs and tighten using pliers
on the tips of the legs. Reinstall the caps to conceal any scarring left by the pliers.
Install the air tube. Carefully center the air tube in the manifold while holding its axis
parallel with the manifolds axis. CAUTION: Be careful not to cross-thread the air tube during
installation. Gently turn the air tube clockwise and feel for proper thread engagement.
Continue rotating the tube clockwise by hand until it gently stops. NOTE: There is no need to
tighten any further. Tightening further can damage the threads of the air tube. It is not
necessary to obtain a perfect seal between the air tube and the manifold. Water pressure
and air pressure are balanced at this connection. NOTE: The launcher can be used without
the air tube. However, pressurizing the rocket is made easier with the air tube by not having
to force air through the water. And returning excess water to the water station is made
possible by use of the air tube.
Install the release lanyard. Attach release lanyard string to the swivel-snap using a suitable
knot such as a square knot, figure 1.
SWIVEL-SNAP
Figure 1.
9
GASKET INSIDE
BASE
LEG
LEG ANGLE
LEG CAP
PULL-RING
SAFETY VALVE
QUICK CONNECT
(MALE)
WATER STATION
AIR VALVE
CAP
HOSE
Assemble the Water Station
10
Install the three legs. Noting the leg angle, thread each leg clockwise into the base and
tighten by hand. For optimum rigidity, remove the caps from the legs and tighten using
pliers on the tips of the legs. Reinstall the caps to conceal any scarring left by the pliers.
Install the bottle. Obtain a 2 liter plastic carbonated beverage bottle or smaller. Most of
the popular soft drinks are carbonated with bottles designed to withstand internal pressure.
Fill the bottle with clean water until about ¾ full. With the bottle upright, thread the base
onto the bottle snugly, but do not over tighten, Figure 2. After the bottle and gasket make
initial contact, tighten 1/8 turn. The gasket will become distorted if over tightened. If a leak
occurs under pressure, simply tighten further until the leak stops, or replace the gasket.
WARNING: BEFORE SEPARATING THE BOTTLE FROM THE BASE, ORIENT THE BOTTLE AS
SHOWN IN FIGURE 2. RELEASE PRESSURE FROM THE BOTTLE BY PULLING THE PULL-RING ON
THE SAFETY VALVE. FAILURE TO RELEASE PRESSURE CAN RESULT IN PERSONAL INJURY.
Pressure has been released when the bottle can be easily compressed by hand.
O-RING
The optional Garden Hose
Adapter can be used in place
of the water station.
GASKET INSIDE
Figure 2.
11
NOSE
BOTTLE “FOOT”
ADHESIVE DISC
*CARBONATED
DRINK BOTTLE
ADHESIVE TAB
WRAP
FIN
ROCKET
O-RING
GASKET INSIDE
NOZZLE
WRAP
12
Assemble the Rocket
Select a Bottle. Carbonated beverage bottles are not supplied with the Rabbit Rocket kit. Select a
bottle at your local supermarket in the special section for flavored drinks. Select a 17 oz.
carbonated beverage bottle with straight sides and about 2.4 inches in diameter to fit with the
Rabbit Rocket wrap. To optimize adhesion of the nose, select a bottle with large flat surface area
on the bottom, figure 3. WARNING: SELECT ONLY A PLASTIC CARBONATED DRINK BOTTLE. This
type of bottle is designed to withstand internal pressure, other types of bottles are unsuitable.
Additionally, the threads of the Rabbit Rocket nozzle are not designed to engage with a noncarbonated drink bottle. NOTE: Bottles larger than 17 oz. require more water per launch and also
require more pressurized air. The Rabbit Rocket kit is designed for the 17 oz. bottle because it
gives the most fun for the least amount of effort.
POOR
GOOD
GOOD
Figure 3.
Rabbit Rocket
Rocket Kit
Prep the bottle. Remove the label from the carbonated beverage bottle and cover the remaining
glue with a strip of waxed paper. A preferred option is to remove the glue with mineral spirits and
then wash with soap and water. Paint thinners containing 100% mineral spirits may be used.
WARNING: DO NOT USE ANY OTHER TYPE SOLVENTS, ESPECIALLY THOSE CONTAINING ACETONE,
WHICH CAN DAMAGE THE BOTTLE. Remove the contents from the bottle. Remove the bottle-cap
tamper-ring using side-cutters or other safe cutting tool, figure 4. Refill the bottle with water
removing all trapped air and reinstall the cap.
Install the nose. The wrap is used as an alignment tool for installation of the nose. With the bottle
full of water, face the straight edge of the wrap towards the bottom of the bottle, figure 5. Form
the wrap around the center of the bottle as tightly as possible while aligning the overlapped wrap
edges. NOTE: Do not remove the preinstalled tape backing from the wrap at this time. If
required, the wrap may be temporarily secured with two small strips of cellophane tape. Slide the
wrap to the bottom of the bottle so that it extends about one inch beyond the bottom, figure 6.
13
Tape
Bottom
Figure 4.
Align Edges
Figure 5.
About 1 Inch
Figure 6.
Before removing the preinstalled tape backing from the adhesive disc on the bottom of the
nose, do a trial insertion of the nose into the wrap, figure 7. Gently compress the edge of
the nose just enough to allow insertion. The temporary wrap will be used to keep the nose
centered on the bottle when the adhesive disc makes contact with the bottom of the bottle.
Pull the nose out of the wrap and remove the adhesive tape backing. NOTE: Be careful to
not allow the nose adhesive to contact the wrap. Repeat the trial procedure to
permanently install the nose onto the bottom of the bottle. Slide the nose and wrap down
together to make adhesive contact with the bottom of the bottle, figure 8. Remove the
temporary wrap and cellophane tape, if used. Push the nose down to ensure adhesion. The
nose is now installed.
Test Fit
Figure 7.
Adhere Nose
Figure 8.
14
Install the wrap. With the waxed paper still in place covering the bottle label glue, or if glue has
been removed, form the wrap tightly around the middle of the bottle. The bottle should be full
of water for rigidity. The wrap should be oriented so that the tabs are facing towards the
bottom of the bottle and the straight end of the wrap is facing toward the neck of the bottle.
The “Fill Line” text on the wrap should read correctly, not inside-out. The long strip of
preinstalled adhesive tape on the wrap should lap outside the mating edge of the wrap. Adjust
the wrap so that the edges are aligned, figure 9. Carefully hold the wrap to maintain a tight fit
around the bottle while keeping the edges in alignment. Allow the taped edge of the wrap to
spring out allowing access to the long tape strip. Remove the adhesive backing using a dull
knife, finger nail, or tooth pick, figure 10. Be careful not to touch exposed adhesive strip.
Keeping the wrap tight to the bottle and the edges aligned, carefully push the long adhesive
strip down making contact with the other edge of the wrap. The wrap should form a tight circle
around the bottle and the edges should be aligned.
Backing
Align Edges
Dull Knife
Figure 9.
Figure 10.
Coin
Figure 11.
Stand the bottle on its cap with the cap sitting on a coin. Slide the wrap along the bottle so that
the squared end of the wrap contacts the flat surface. Carefully bend back one of the four tabs
taking care not to kink it. Remove the paper backing from the adhesive with a dull knife or
fingernail. While ensuring the wrap is still square on the flat surface and the bottle is sitting on
the coin, press the tab against the bottle, figure 11. Repeat for the remaining three tabs.
Remove the coin.
15
Install the fins. The installed wrap should sit squarely on the flat surface without rocking. Peel
the paper backing from the fin adhesive strip, figure 12. Carefully align the fin near one of the
three fin boxes printed on the installed wrap. Slowly bring the fin into contact with the wrap
while maintaining alignment with the printed fin box, figure 13. NOTE: Align the fin as
carefully as possible. A misaligned fin will cause the rocket to fly erratically. Gently press the
inside of the wrap underneath the fin to improve adhesion of the fin to the wrap. Repeat for
remaining two fins.
Install the nozzle. Drain the bottle. Thread the nozzle onto the bottle snugly but do not over
tighten. After the bottle and gasket make initial contact, tighten 1/8 turn. The gasket will
become distorted if over tightened and the nozzle may become misaligned. If a leak occurs
under pressure, release pressure and tighten the nozzle further, or replace the gasket, figure
14. The rocket is now ready to connect to the launcher. NOTE: If the rocket does not become
lost or damaged it may be used over and over.
Figure 12.
Figure 13.
Figure 14.
16
Launch the Rocket
Select a Launch Site. Find a private open area, such as a field void of people, power lines,
buildings, trees, automobiles, and any objects that can be damaged by the moving rocket. The
rocket may descend within a 200 foot radius, or more, from the point of launch.
Connect the components. Place the launcher and water station on level ground. Connect your
air pump to the launcher air valve and connect the water station to the launcher with the quickconnect, figure 15. The quick-connect should easily insert and click to indicate the connection is
made. If the quick-connect will not insert, reset the coupling by depressing the disconnect button
and then retry the connection. Unroll the lanyard string a minimum of 15 feet.
Connect the rocket. Place the rocket and nozzle down over the air tube and gently press down
until the nozzle bottoms against the launcher. A wet nozzle O-ring inserts more easily. Push the
lever down but do not force it. CAUTION: If it does not latch easily then the nozzle is not all the
way into the launcher. The magnetic latch will provide slight retention of the lever. Lifting force
from the pressurized rocket will cause the latch to self-energize and latch more securely as
pressure increases.
Open the water valve. WARNING: ALWAYS WEAR NIOSH APPROVED SAFETY GLASSES IN CASE
OF BOTTLE RUPTURE. Bottles with defects can rupture although this is considered rare. The
water valve lever should be pointing towards the quick connect. Using your air pump, add air to
the water station through the launcher until the manifold gauge reads between 40 and 70 psi.
NOTE: Exceeding 70 psi will cause the water station safety valve to actuate and release pressure.
WARNING: DO NOT ALLOW ANY PART OF YOUR BODY, OR ANYONE ELSE, TO GET ABOVE OR
INTO THE PATH OF THE PRESSURIZED ROCKET.
17
Close the water valve. The water valve lever should be turned clockwise 90 degrees (¼ turn) from
the open position and the valve handle should be pointing toward you as shown on pages 5 and 6.
While holding the launcher with one hand, use the pull-ring on the launcher safety valve to release
rocket pressure. The pressure in the water station will be retained.
Open the water valve. Fill the rocket to the fill line indicated on the wrap and close the valve.
Exact water level is not critical. Experiment using more or less water. If too much water is added
to the rocket, simply use your air pump to force the excess water back into the water station - Add
air pressure to the rocket and use the water valve to meter water back into the water station.
NOTE: The air tube must be in place for this feature to function. REPEAT WARNING: DO NOT
ALLOW ANY PART OF YOUR BODY, OR ANYONE ELSE, TO GET ABOVE OR INTO THE PATH OF THE
PRESSURIZED ROCKET.
Pressurize the rocket. REPEAT WARNING: ALWAYS WEAR NIOSH APPROVED SAFETY GLASSES IN
CASE OF BOTTLE RUPTURE. Bottles with defects can rupture although this is considered rare. Use
your air pump to pressurize the rocket up to a maximum pressure of 100 psi indicated on the
launcher gauge. NOTE: Some bicycle air pump gauges give erroneous readings. The oil-filled
gauge on the launcher manifold is likely more accurate than a bicycle pump gauge. The manifold
safety valve is set to release at approximately 115 psi.
Announce launch. Check to ensure all personnel are cleared from the immediate area and aware
the rocket is about to be launched.
Pull the lanyard. Gently pull the lanyard to release the rocket. WARNING: DO NOT PULL HARD OR
JERK THE LANYARD. Doing so is dangerous because it can cause the rocket to tip over and possibly
release in a horizontal direction toward people. WARNING: DO NOT ATTEMPT TO CATCH THE
ROCKET OR ALLOW IT TO CONTACT YOU AS IT RETURNS TO EARTH. If the bottle is distorted after a
hard landing, do not worry, it will be corrected once it has been re-pressurized for the next launch.
Enjoy the show!
18
Quick-Connect
Water Connector
Safety Glasses
Air Connector
Air Pump
11.
Launcher
Figure 15.
Water Station
19