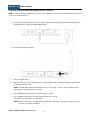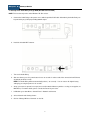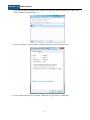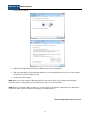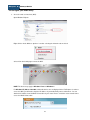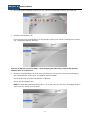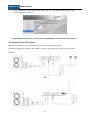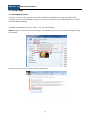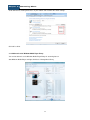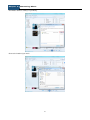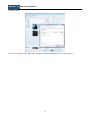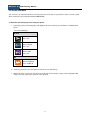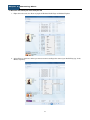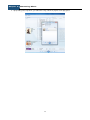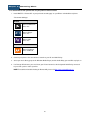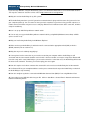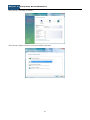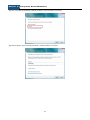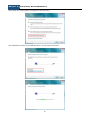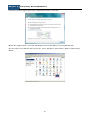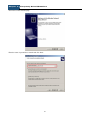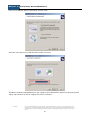
1
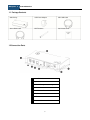
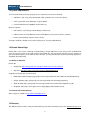
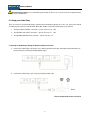
Audio Relay
User Manual
For further information, please consult audiorelay.arctic.ac
V1.1
10/2012
Table of Contents
Chapter 1
Introduction
1.1
Package Contents……………………………………………………………………………..…....3
1.2
Connection Ports……………..……………………………………………………………………...3
1.3
System Requirements……………………………………………………………………………….4
1.4
Remote Control App…………….....……………………………………….………………………..4
1.5
Chapter 2
2.1
1.4.1
Where to download
1.4.2
Tutorial and troubleshooting
Warranty……………………………………………………………………………………………...4
Setup Guide
Setup your Audio Relay …………………………………………………………………………….5
2.1 A
…through an Ethernet (Cable) connection
2.1 B
…through WPS and a Wi-Fi connection
2.1 C
…through WCN (Windows Connect Now)
2.2
Configure your Audio Relay.................................................................................................10
2.3
Connect to your Hi-Fi System………………………………………..………………...………….12
Chapter 3
3.1
Streaming Music
Getting Ready ………………………………………….......……………………………………….13
3.1.1
Enable media streaming
3.1.2
Add music to the Windows Media Player library
3.2 Stream Your Music.......……………………………………………………………………………..17
Chapter 4
3.2 A
Stream and control your music from your phone
3.2 B
Stream and control your music from your PC
3.2 C
Stream music from your PC and use your phone as remote control
Frequently Asked Questions.…………………………………………………….…..…..21
Chapter 1
Introduction
1.1 Package Contents
Audio Relay
USB Power Adapter
Mini USB Cable
Stereo RCA Cable
Wi-Fi Antenna
Quick Start Guide
Quick Start
Guide
1.2 Connection Ports
1
Stereo RCA Out
2
Optical Out
3
Mini USB Port (power use only)
4
USB 2.0 Host
5
RJ45 Ethernet Port
6
WPS Button
7
Wi-Fi Antenna
8
Power Switch
3
Chapter 1
Introduction
1.3 System Requirements
To ensure Audio Relay to function properly, you are required to have all of the following:
a Windows 7 PC, or any other OS/NAS with UPnP or DLNA server* and a music library;
a Hi-Fi system with stereo RCA input or optical SPDIF;
a network with Ethernet at100Mbit/s or Wi-Fi 802.11g.
Below are optional:
LAN cable (for connecting your Audio Relay to an Ethernet);
USB flash drive (for using Windows Connect Now (WCN) to connect to the wireless network);
Router (when operating under the wireless mode)
* Examples of DPnP or DLNA server include Twonkyserver, TVersity and Mediatomb.
1.4 Remote Control App
Remote AR is a free remote control app for Audio Relay to stream digital music tracks from your PC or DLNA/UPnP
server to your Hi-Fi system on the shelf using the phone/tablet PC. You may browse and edit your music playlists on
your phone/tablet and listen to it in different rooms. Besides, you may download your preferred streaming app which is
compatible with Audio Relay.
1.4.1 Where to download
Remote AR
•
Google Play (https://play.google.com/store/apps/details?id=com.arctic.remote.ar)
•
App Store (http://itunes.apple.com/us/app/remote-ar/id501006700?mt=8)
Compatible streaming apps (recommended)
•
BubbleUPnP (Android) (https://play.google.com/store/apps/details?id=com.bubblesoft.android.bubbleupnp)
•
2Player (Android) (https://play.google.com/store/apps/details?id=com.twoplay.twoplayer)
•
Skifta (Android) (https://play.google.com/store/apps/details?id=com.skifta.android.app&hl=en_GB)
•
PlugPlayer (iOS) (https://itunes.apple.com/us/app/plugplayer/id411195253?mt=12)
1.4.2 Tutorial and Troubleshooting
Online support is available at http://www.remoteAR.arctic.ac.
1.5 Warranty
This ARCTIC product includes a two-year limited warranty. For further information, please visit www.warranty.arctic.ac.
4
Chapter 2
Setup Guide
Restore factory settings: press and hold the power button for at least 15 seconds to restore the original factory
settings of your Audio Relay.
2.1 Setup your Audio Relay
There are 3 ways to setup the Audio Relay, explained in the following paragraphs (2.1 A to 2.1 C). Choose the method
according to your preference and follow 2.1 A, 2.1 B or 2.1 C to connect the Audio Relay to your network.
1. Through an Ethernet/Cable connection --- please refer to 2.1 A
OR;
2. Through WPS and a Wi-Fi connection --- please refer to 2.1 B
OR;
3. Through WCN (Windows Connect Now) --- please refer to 2.1 C.
2.1 A Setup the Audio Relay through an Ethernet (Cable) connection
a. Connect the Audio Relay to the power source with the provided USB cable. Alternatively the Audio Relay can
be powered by any USB port providing 600mA output.
b. Connect the Audio Relay to your router by an Ethernet/LAN cable.
Router
Please continue with Section 2.2 on P.10
5
Chapter 2
Setup Guide
2.1 B Setup of the Audio Relay through WPS and a Wi-Fi connection
NOTE: In order to connect through WPS, your router has to support this function. If you have followed the setup under
2.1 A, please continue with 2.2.
a. Connect the Audio Relay to the power source with the provided USB cable. Alternatively the Audio Relay can
be powered by any USB port providing 600mA output.
b. Install the included Wi-Fi antenna.
c.
Turn on the Audio Relay.
d. After one minute, press the power button for 5 to 10 seconds in order to switch the connection from Ethernet
(by default) to wireless mode.
NOTE: The Audio Relay will then automatically reboot (~ 30 seconds). You can restore all original factory
settings by pressing the power for 15 seconds.
e. Press the WPS button on the router and hold it for three seconds.
f.
Press the WPS button at the back of the Audio Relay for three seconds.
Your Wi-Fi connection will then be established.
NOTE: Some routers may use a flashing light to indicate that a connection is in progress until the connection
has been successfully established.
Please continue with Section 2.2 on P.10
6
Chapter 2
Setup Guide
2.1 C Setup of the Audio Relay through WCN (Windows Connect Now)
NOTE: This function only works under Windows XP SP2 or later.
a. Connect the Audio Relay to the power source with the provided USB cable. Alternatively the Audio Relay can
be powered by any USB port providing 600mA output.
b. Install the included Wi-Fi antenna.
c.
Turn on the Audio Relay.
d. After one minute, press the power button for 5 to 10 seconds in order to switch the connection from Ethernet
(by default) to wireless mode.
NOTE: The Audio Relay will then automatically reboot (~ 30 seconds). You can restore all original factory
settings by pressing the power for 15 seconds.
e. Set up your router to operate in an open (unsecured) network without any wireless security (no encryption, no
MAC filters). For further details, please consult the manual of your router.
f.
In Windows go to Start Menu > Control Panel > Network and Internet.
g. Select “Network and Sharing Center”.
h. Click on “Manage Wireless Networks” on the left.
7
Chapter 2
Setup Guide
i.
Connect to your wireless network by right clicking on the appropriate wireless network or click “Add” if your
wireless network is not already listed.
j.
Click on the “Copy this network profile to a USB flash drive” link at the bottom of the menu.
k.
Insert a USB flash drive into your computer’s USB port to copy your wireless configuration.
8
Chapter 2
l.
Setup Guide
Click “Next” to continue.
m. Switch off the Audio Relay and insert this USB flash drive into the Audio Relay.
n. Switch on Audio Relay and open Windows Explorer to see if the Audio Relay is listed as one of the available
media devices under the Network section
o. Remove the USB flash drive
NOTE: WCN is a function available in Windows XP SP2 or later version. Please also note that the Audio Relay
deletes the wireless configuration from the USB flash drive after successful connection.
NOTE: Before you activate a Wi-Fi encryption on your router again, go through the configuration of the Audio Relay
(Section 2.2 of this manual) and add the encryption on the Audio Relay first.
Please continue with Section 2.2 on P.10
9
Chapter 2
Setup Guide
2.2 Configure your Audio Relay
a. Access the web user interface (WUI)
Open Windows Explorer
Right click the “Arctic Wireless Speaker” icon after selecting the “Network” tab on the left
Select “View device webpage” to enter the WUI.
NOTE: The above steps apply to Windows Vista and Windows 7.
For Windows XP, Mac or Linux OS, multimedia devices are not displayed in the File Explorer. In order to
access the WUI, you will need to input the IP address of your Audio Relay onto a web browser. You can
obtain this IP address from the DHCP clients table of your router. Please consult the router manual how to
access the DHCP clients table.
10
Chapter 2
Setup Guide
b. Select your preferred language by clicking on one of the listed country flags located on the “Home” tab.
c.
Select the “Friendly Name” tab.
If you have more than one Audio Relay, you may decide to rename each of them according to their locations
(e.g., Living Room, Bedroom, Room A).
If you use an Ethernet connection (Step 2.1 A) to configure your Audio Relay, continue with d) and e),
otherwise move on to Section 2.3.
d. Select the “Connection Mode” tab. In this menu you will choose how you like to connect the Audio Relay to
your network after this setup process: through Wi-Fi or Ethernet/Cable
Click on the desired connection mode (Wireless or Ethernet).
Click on the “Save/Apply” button.
NOTE: The Audio Relay will automatically reboot (~ 30 seconds) after you click on the “Save/Apply” button in
order to save the changes you have made.
11
Chapter 2
Setup Guide
e. If you chose wireless, click on the “Connect to Wi-Fi” tab, select your Wi-Fi network, input your Wi-Fi
password and click on “Connect”.
Congratulations! You have successfully set up your Audio Relay. Please continue with Section 2.3
2.3 Connect to your Hi-Fi system
Bring your Audio Relay to where you want to have music (e.g. living room or bedroom).
Connect the Audio Relay through the stereo RCA or an optical cable to your Hi-Fi system or active speakers.
Example:
OR
12
Chapter 3
Streaming Music
3.1 Getting Ready
3.1.1 Enable Media Streaming
In order to stream music from your PC, you need to have Windows Media Player 12 or later and enable media
streaming. If you are not using Windows 7 OS, please refer to the instructions of your UPnP/DLNA server to activate
media streaming functionality.
Start Windows Media Player and click “Stream > Turn on media streaming …”.
NOTE: The option “Turn on home media streaming” is not available on the stream menu if the streaming has already
been enabled.
Then you need to click on the “Turn on media streaming” button.
13
Chapter 3
Streaming Music
Scroll down the list showing the devices on your network and customize the stream settings.
Click “OK” to finish.
3.1.2 Add music to the Windows Media Player library
You need to add music to the Windows Media Player library for streaming later on.
Start Windows Media Player and right click Music > Manage Music library
14
Chapter 3
Streaming Music
Click Add to add music folder(s) to your library.
Choose the location of your music.
15
Chapter 3
Streaming Music
Click OK to finish.
The music in the folder you’ve added will be included in the Windows Media Player for streaming later on.
16
Chapter 3
Streaming Music
3.2 Stream your Music
You can choose to control and stream music from your phone or PC and use your phone or PC as a remote control,
all the instructions are illustrated in 3.2 A, 3.2 B and 3.2 C.
3.2 A Stream and control your music from your phone
1. Install your preferred streaming app* (with digital media server function) on your iPhone or Android-based
phone.
* Recommended Apps:
Android
Name: BubbleUPnP
Price: free
Name: 2Player
Price: free
Name: Skifta
Price: free
iOS
Name: PlugPlayer
Price: USD 4.99
2. Connect your phone to the same wireless network as your Audio Relay.
3. Browse the music you have on your phone using the app and stream the song(s) to the designated Audio
Relay connected to your Hi-Fi system or active speakers.
17
Chapter 3
Streaming Music
3.2 B Stream and control your music from your PC
1. Right click on the track, the album or playlist in Windows Media Player or Windows Explorer.
2. Select “Play to” and choose where you want to stream according to the name of your Audio Relay (e.g., Arctic
Wireless Speaker).
18
Chapter 3
Streaming Music
3. By repeating same step above, you add further songs, albums or playlists to the play queue.
19
Chapter 3
Streaming Music
3.2 C Stream music from your PC and use your phone as remote control
1. Install ARCTIC’s “Remote AR” or your preferred streaming app* on your iPhone or Android-based phone.
* Recommended Apps:
Android
Name: BubbleUPnP
Price: free
Name: 2Player
Price: free
Name: Skifta
Price: free
iOS
Name: PlugPlayer
Price: USD 4.99
2. Connect your phone to the same wireless network as your PC and Audio Relay.
3. Select your music library (prepared in Windows Media Player) and the Audio Relay you would like to play it on.
4. Use Remote AR to browse your music from your PC and stream it to the designated Audio Relay connected
to your Hi-Fi system or active speakers.
NOTE: For tutorial and troubleshooting for Remote AR, please visit http://www.remoteAR.arctic.ac
20
Chapter 4
Frequently Asked Questions
If you have any difficulties using the Audio Relay, please consult with the FAQ below for our recommended solutions.
You may also contact our customer service center at http://www.arctic.ac/en/support.htm.
Q: Why do I need an Audio Relay for my hi-fi system?
A: The Audio Relay transforms your hi-fi system into a networked music player which streams all of your music from
your computer wirelessly. You can control or share your music anywhere in your house using your PC or phone as a
remote control. This allows everyone to access and play different music in different rooms at the same time, all with a
unique shared library.
Q: Can I set up my Audio Relay without a network cable?
A: You can only set up your Audio Relay without a network cable by using WCN (Windows Connect Now) or WPS
(refer to section 2.1.2).
Q: Why can I not find my Audio Relay in the Windows Explorer?
A: Make sure that your Audio Relay is switched on and is connected to the appropriate wired (LAN) or wireless
(WLAN) network (refer to section 2.1.2).
Q: Why does my music suddenly stop playing?
A: You may have lost the connection so you need to ensure that your computer and the Audio Relay are still
connected onto the same network. Another reason for this is because another user may be using his/her Remote AR
to stream songs to the same Audio Relay as you are at the same time. In the latter case, the Audio Relay will execute
the most recent command. Therefore, you need to replay your music again.
Q: How do I stop the music when someone who streamed his or her music to an Audio Relay has left the network?
A: Use Remote AR on your smartphone/tablet to send a pause command to the respective Audio Relay or switch off
the Audio Relay to stop streaming.
Q: How do I configure my wireless connection with Windows Connect Now (WCN) if I am using Windows Vista?
A: You need to insert a USB flash drive into your PC. Click on “Start Menu > Control Panel > Network and Internet >
Network and Sharing Center”
21
Chapter 4
Frequently Asked Questions
Select “Set up a connection or network”.
Select “Set up a wireless router or access point” and then click “Next”.
22
Chapter 4
Frequently Asked Questions
Click “Next” to set up your home or small business network.
Select “Create wireless network settings and save to USB flash drive”.
23
Chapter 4
Frequently Asked Questions
Type the exact name of the wireless network you want to connect and then click “Next”.
Type the passphrase or password of your wireless network and then click “Next”.
24
Chapter 4
Frequently Asked Questions
Select “Keep the custom settings I currently have” and click “Next”.
Check whether the location of your USB flash drive is correct and then click “Next”.
25
Chapter 4
Frequently Asked Questions
Follow the instructions step-by-step to finish configuring your wireless connection.
Q: How do I configure wireless connection with Windows Connect Now (WCN) if I am using Windows XP?
A: You need to insert a USB flash drive into your PC. Select “Start Menu > Control Panel > Wireless Network Setup
Wizard”.
26
Chapter 4
Frequently Asked Questions
Click “Next” on the welcome page.
Enter the name of your wireless network and click “Next”.
27
Chapter 4
Frequently Asked Questions
Select “Use a USB flash drive (recommended)” and click “Next”.
Select the correct drive for your USB flash drive and then click “Next”.
The Wireless Network Setup Wizard will save your settings to your USB flash drive. After that, it will guide you with
step-by-step instructions on how to configure your wireless connection.
ARCTIC Switzerland AG
© 2012 ARCTIC (HK) Ltd. All Rights Reserved.
www.arctic.ac
No part of this manual including the products described in it, may be reproduced, transmitted, stored in a retrieval system, or translated into any language in any
form or by any means, except documentation kept by the purchaser for backup purposes, without the express written permission of ARCTIC (HK) Ltd. In no event
shall ARCTIC its directors or employees be liable for any indirect damages, incidental or consequential damages arising from any defect or error in this manual or
product.
28