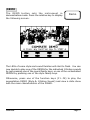
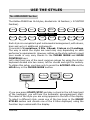
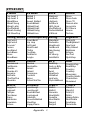
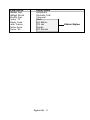
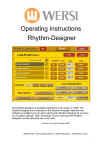
1
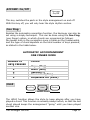
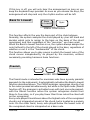
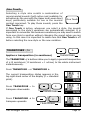
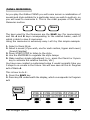
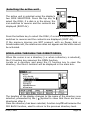
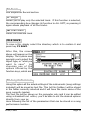
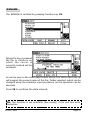
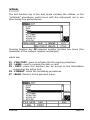
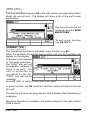
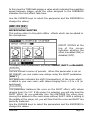
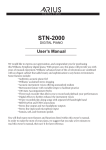
THE CONNECTION
The figure below shows the connection box placed under the Piano.
The following list explains the functions of each connector.
(1)
R
L(Mono)
AUDIO IN
(2)
R
L(Mono)
(3)
(4)
TV Out
Digital
S/PDIF
AUDIO VIDEO OUT
(5)
In
(6)
Thru
(7)
(8)
Out
USB
MIDI
1. INPUT connectors L(MONO)/R: TS Jack sockets for connecting audio sources to the internal amplification. Use the L(MONO) connector
for a monophonic source.
2. OUTPUT connectors L(MONO)/R: TS Jack sockets carrying the
instrument audio output, with the standard LINE OUT level. Use the
L(MONO) connector to get a monophonic output.
3. RCA VIdeo outputs. Using this connectors it is possible to connect a
tv set where the lyrics(*) of the song being played will be shown.
(*) if available
4. RCA Plug to be used to connect the PIANO to devices that manage
Digital audio (like Home Theater digital systems, CD recorders, Digital
Audio tape recorders and so on)
5. MIDI IN connector: 5-pin DIN socket for receiving MIDI messages
coming from an external source. Plug here the input MIDI cable,
when needed.
6. MIDI THRU connector: 5-pin DIN socket that repeats the MIDI
messages sent to the instrument.
7. MIDI OUT connector: 5-pin DIN socket for transmitting MIDI
messages. Plug here the output MIDI cable, when needed.
8. USB connector -Mass Storage-
The figure below is a detail of the instrument bottom, showing the
right front corner, with respect to the player. The following list explains
the functions of each connector.
(1)
MIC IN
(2)
GAIN
(3)
(4)
1- HEADPHONES - 2
(5)
EXPRESSION PEDAL
1. Mic./Line In.
2. Gain.
3. Headphone 1 connectors.
4. Headphone 2 connectors.
5. Expression connectors (Expression Pedal Optional)
NB:When plugging a headphone, the internal amplification is
automatically disabled.
INDEX
1. CONTROL PANEL ............................................................. 1
Cursor Keys ......................................................................... 1
Encoder .............................................................................. 1
Side Selector ....................................................................... 1
Function keys ...................................................................... 2
Lower - Upper1 - Upper2 ...................................................... 3
Selecting Sounds ................................................................. 4
Home ................................................................................. 5
Mixer .................................................................................. 5
Grand Piano ........................................................................ 6
Help ................................................................................... 6
Demo ................................................................................. 7
2. USE THE STYLES .............................................................. 8
The Arranger Section ............................................................ 8
STYLE CONTROLS ................................................................ 9
Start/Stop ........................................................................... 9
Variations ............................................................................ 9
Fills .................................................................................... 9
Intros ed Endings ................................................................ 10
Fade (In e Out) ................................................................... 10
Accomp. On/Off .................................................................. 11
One Fing ............................................................................ 11
Hold .................................................................................. 11
Bass to Lowest ................................................................... 12
Pianist ............................................................................... 12
Sync .................................................................................. 13
Tempo – e + ...................................................................... 14
Tempo Lock ........................................................................ 14
One Touch .......................................................................... 15
Transposer -/+ ................................................................... 15
Sequencer Transposer ......................................................... 16
Removing trasposition quickly ............................................... 16
Panel Memories .................................................................. 17
3. THE EDIT MENU ..............................................................19
SET-UP .............................................................................. 19
Split .................................................................................. 19
Arranger ............................................................................ 19
Fade in mode ...................................................................... 19
Galileo
Page I
Fade out mode ................................................................... 19
Freeze chord on pedal ......................................................... 20
Pianist mode Sync Start ...................................................... 20
KEY TOUCH ........................................................................ 20
MIDI ................................................................................. 21
PEDALS ............................................................................. 22
USB .................................................................................. 24
TUNING ............................................................................. 25
Master tune ........................................................................ 25
Octave transposer ............................................................... 25
OTHERS ............................................................................. 26
VIDEO ............................................................................... 26
Brightness .......................................................................... 26
Center ............................................................................... 26
Colours set ......................................................................... 26
AUDIO ............................................................................... 27
Mic In ................................................................................ 27
Line In ............................................................................... 27
4. DISK/CARD ..................................................................... 28
Accessing the function ......................................................... 28
File identification ................................................................. 28
Selecting the active unit ...................................................... 29
Scrolling through the directories ........................................... 29
FILE LOAD ......................................................................... 30
Settings ............................................................................. 31
Karaoke ............................................................................. 31
Mixer ................................................................................. 31
Monitor .............................................................................. 32
Single ................................................................................ 33
Chan-Mute ......................................................................... 33
Record ............................................................................... 33
FILE SAVE .......................................................................... 33
Song Performance ............................................................... 33
Custom Styles. ................................................................... 34
User Perfomance ................................................................. 34
Global ................................................................................ 34
List ................................................................................... 34
Back .................................................................................. 34
Entering characters ............................................................. 35
Make dir ............................................................................ 36
Rename ............................................................................. 37
Index
Page II
Delete ............................................................................... 38
List ................................................................................... 40
Saving Lists ........................................................................ 41
5.
EFFECTS ........................................................................ 46
MASTER SECTION ............................................................... 46
Type .................................................................................. 46
Level ................................................................................. 46
Time ................................................................................. 46
Hi-damp ............................................................................ 46
SOUND SETTINGS ............................................................... 47
Modulation Type .................................................................. 47
Chorus ............................................................................... 47
Flanger .............................................................................. 47
Rotary ............................................................................... 47
Delay ................................................................................ 47
Selecting the speed of rotary effect ....................................... 48
MIC. P1 ............................................................................. 49
Type .................................................................................. 49
Reverb ............................................................................... 49
Delay ................................................................................ 49
Level ................................................................................. 49
Time ................................................................................. 49
Feedback ........................................................................... 49
MIC. P2 ............................................................................. 50
Microphone shifter .............................................................. 50
Preset ................................................................................ 50
Shift .................................................................................. 50
Balance ............................................................................. 50
6. SONG COMPOSER ............................................................ 51
HOW TO RECORD A SONG ................................................... 51
Locator .............................................................................. 52
Signature ........................................................................... 52
Quantize ............................................................................ 52
Tempo ............................................................................... 52
Precount ............................................................................ 52
Click .................................................................................. 52
MERGE RECORD ................................................................. 53
DELETE .............................................................................. 54
PARAMETERS ..................................................................... 55
SONG USER SETTINGS ........................................................ 55
Galileo
Page III
START MODE ...................................................................... 56
Mode ................................................................................. 56
Loop .................................................................................. 56
Salto HEADER. .................................................................... 56
Appendix .............................................................................. A
Main Features ...................................................................... B
Style List ............................................................................ D
Sound List ........................................................................... E
Midi implementation chart ..................................................... F
Index
Page IV
CONTROL PANEL
Before starting to use the PIANO, you need to become familiar with
some of the main controls and functions that will be used in the
examples which follow.
CURSOR KEYS
These four keys are used to move around inside the display. On many
video pages, you will see a highlighted, or rather reverse-coloured,
display box that shows the position of the CURSOR. To move the
CURSOR to a different position on the screen, use the CURSOR keys to
move it up, dwn, right or left.
THE ENCODER
The ENCODER is used for a variety of operations.
With the PIANO MAIN video page displayed, the
ENCODER changes the style tempo; turning it
clockwise gradually increases the tempo,
anticlockwise decreases it.
SIDE SELECTORS
DATA ENTRY
The side selectors are the four buttons at either side of the display.
They move the CURSOR straight into one of the four sensitive zones,
meaning the zones most used during performances, which are:
LOWER
STYLE
UPPER1
UPPER2
The two side selectors on the right of the display become unit (Floppy
disk / Card) selectors with the DISK video page displayed.
Galileo
Page 1
FUNCTION KEYS
The function keys (F1…F8) underneath the display are used to select
the boxes that appear in the bottom of the screen.
F1
F3
F5
F7
F2
F4
F6
F8
Function Keys (F1...F8)
These boxes are dynamic, meaning that their functions change
depending on the page displayed. Later we will see all the functions
the function keys assume on every page, but for now we will start
from the MAIN page. When you select one of the Style family keys the
boxes at the bottom display the 8 styles in the selected family. You
can now use one of the function keys (F1…F8) corresponding to the
box with the name of the style you wish to select.
F1
Control Panel
Page 2
The same procedure also applies to the Sounds.
F1
CONDUCTOR
LOWER - UPPER1 - UPPER2
Lower
Upper1
Upper2
CONDUCTOR
These keys activate (LED on) or deactivate (LED off) the parts of the
PIANO, meaning the sounds that can be played simultaneously.
The LOWER part activates the Lh part of the keyboard (below the
SPLIT point).
For example, you may activate this part if you wish to play a Pad or
Strings sound in your left hand even together with the accompaniment,
or to select a bass sound to play in manual bass mode.
The UPPER1 and UPPER2 parts, on the other hand, can be activated on
the left-hand side of the keyboard if you have activated the LOWER
part or are in ARRANGER mode, or on the whole keyboard in PIANO
mode.
Galileo
Page 3
SELECTING SOUNDS
The sounds of the PIANO are organised into SOUND FAMILIES. There
are 16 families in all, containing different categories of instruments.
Piano
Mallet
Organ
Guitar
Bass
Strings
Ensamble
Brass
Ethnic
Percuss.
SFX
SOUND BANKS
Reeds
Wind
Lead
Pad
Syn Efx
Each family contains 8 SOUND PRESETS. Selecting a SOUND PRESET
is very easy. Press one of the SOUND FAMILY keys (PIANO, for example).
The display shows you the 8 presets available in this family. To select
one of these presets, simply press the corresponding function key
underneath the display. For example, select ClassicPiano (Key F2).
F2
Then select another family and select one of the 8 presets available.
Each family retains the last preset selected in the memory.
If you now return to the PIANO family by pressing the relative key, you
will immediately hear the sound you selected earlier. This means that
you can choose your favourite sound in each family and recall it later
by pressing just one key.
Control Panel
Page 4
HOME
The HOME key allows you to return the display to the MAIN page from any
other screen. When the MAIN page is on the display, the HOME key is lit up.
Help
Contrast
Mixer
Home
MIXER
The MIXER key accesses the PIANO mixer page, where you can modify
the following parameters directly in real time:
Help
Contrast
Mixer
Home
Volumes and Pan for the Upper and Lower sections.
Volumes and Mute for each individual accompanying track of the
Style.
Volume of the Microphone.
Volume of the song loaded in the memory, if any.
Galileo
Page 5
GRAND PIANO
The special GRAND PIANO key on the front panel
allows you to return the instrument to its switch-on
status (Piano default mode) regardless of the setup
currently activated.
Grand Piano
HELP
The PIANO has a useful HELP function to guide you
around its software. Press this key (in the top righthand corner of the display) in any screen to display
simple, immediate instructions with the page’s main
features and guidance on how to proceed. Pressing
the HELP key displays the help function for the video
page where you are operating.
Help
And the function keys become bookmarks: in other words, you can
access any other Help page by just pressing the function key of the
topic you wish to display.
Press the HELP key again to return to the page for the Help function
shown.
Control Panel
Page 6
DEMO
The DEMO button sets the instrument in
demonstration mode. Press the relative key to display
the following screen:
Demo
The LEDs of some style and sound families will start to flash. You can
now decide to play one of the DEMOs for the individual I-Motion sounds
by just pressing one of the sound family keys, or one of the orchestrated
DEMOs by pressing one of the style family keys.
Otherwise, press one of the function keys (F1…F8) to play the
presentation DEMO (Style & I-Motion Sound) and view a slide show
with the main characteristics of the PIANO.
Galileo
Page 7
USE THE STYLES
The ARRANGER Section
The Galileo PIANO has 144 styles, divided into 16 families (+ 2 CUSTOM
families).
8 Beat
16 Beat
Rock
Dance
Funky/
Blues
Contemp.
Swing
Big Band
Acoustic
Trad.1
Trad.2
MUSIC STYLES
Latin1
Latin2
60’s
USA
World
Each style is a complete 8-part instrumental arrangement, with drums,
bass and up to 6 additional instruments.
It consists of 4 variations, 3 fills, 1 Break, 2 intros and 2 endings.
The way in which the styles are used may vary depending on each
performer’s requirements. However, setting up the style section to meet
your needs is very easy thanks to the CHORD MODE and MODE
CONTROLS keys.
Let’s start from one of the most common setups for using the styles:
keyboard divided into two zones, left for chords and right for melody.
To obtain this setup, you have only to press the ACCOMP. ON and the
HOLD key in the CHORD MODE section.
Accomp
On/Off
One Fing.
Hold
Pianist
CHORD MODE
If you now press START/STOP and play a chord in the left-hand part
of the keyboard, you will hear the automatic accompaniment start.
The name of the style you are using appears in the left of the display.
To select a different style, press one of the two keys in the MUSIC
STYLES section and choose one of the 8 titles displayed, using the
Function keys underneath the display.
Galileo
Page 8
Style Controls
We will now look at the controls available for using the styles section.
START/STOP
Start
Stop
Used to start and stop the accompaniment (Styles).
Above the metronome icon, the display contains 4 round indicators
showing the tempo of the Style or Song you are playing. Before pressing
START/STOP you can book one of the INTRO, FILL or BREAK buttons
to create an introduction to the Style.
VARIATIONS
A
B
C
D
VARIATIONS
Each style consists of 4 variations that allow you to start your piece
with an accompaniment played by just a few instruments and gradually
add more to form a larger ensemble. To change the variations, press
the VARIATIONS A, B, C and D keys.
FILLS
Back
Stay
Forward
Break
FILLS
To add musical ornaments and accents to the style, use the Fills keys.
Press the Stay key to add a rhythmic passage. The passage ends at
the start of the next bar.
The Back and Forward keys in this section are used to switch from
one variation to another. Instead of just pressing the VARIATION
A,B, C or D keys as you did before, press the Back or Forward keys,
which activate the FILL function and allow you to switch to another
variation of the style.
The Arranger section
Page 9
If you press Forward you will hear a FILL after which the arranger
plays the next variation. If you press Back you will hear a FILL after
which the arranger moves back to the previous variation.
The Break key has two functions. If it is pressed on the 2nd or 3rd beat
of the bar, it simply activates a FILL to finish the bar; if it is activated
at the start of a bar, it plays a harmonised rhythmic passage, with not
only the drums but also all the tracks of the style.
INTROS ED ENDINGS
Short
Long
Short
INTRO
Long
ENDING
Each style includes a choice of 2 intros (Short and Long) and 2 endings
(Short and Long).
Intro Short: a short musical intro (from two to four bars).
Intro Long: a long musical intro (can be up to 10 bars long).
Ending Short: a short musical ending (from two to four bars).
Ending Long: a long musical ending (can be up to 10 bars long).
The start and end of the song can be enhanced with a few bars of intro
and ending, respectively by activating the INTRO option (Short or
Long) with the arranger off, and the ENDING option (Short or Long)
by pressing the relative keys with the arranger on.
FADE (IN and OUT)
In
Out
FADE
Otherwise, you have the option of the Fade IN and OUT modes, to
start and end the accompaniment with gradually increasing and
decreasing volume. You can set the number of bars (from 1 to 10) for
the duration of the FADE IN and the FADE OUT separately (SETUP
ARRANGER MENU).
Galileo
Page 10
ACCOMP. On/Off
Accomp
On/Off
This key switches the parts in the style arrangement on and off.
With this key off, you will only hear the style rhythm section.
One Fing.
Besides the automatic recognition function, the harmony can also be
set using a simply technique . This can be done using the One Fing.
(one finger) option, in which chords are recognised as follows:
the lowest note in the recognition zone is taken as the fundamental,
and the type of chord depends on the total number of keys pressed,
as stated in the table below.
AUTOMATIC ACCOMPANIMENT
ONE FINGER MODE
NUMBER OF
KEYS PRESSED
CHORD
1
2
3
4
5
Major (Maj)
Minor (Min)
Seventh(7)
Diminished (dim)
Suspended 4th (sus4)
Hold
One Fing.
Hold
Pianist
CHORD MODE
The HOLD function allows the style to keep playing after you have
played a chord. This function is normally always active, so that the last
chord played keeps the arrangement “going” until you have played
another one.
The Arranger section
Page 11
If this key is off, you will only hear the arrangement as long as you
keep the keyboard keys pressed. As soon as you release the keys, the
arrangement will stop and only the rhythm section will be left.
Bass to Lowest
Bass
to Lowest
Sync
MODE CONTROLS
This function affects the way the bass part of the style behaves.
Normally, the system analyses the chord played by your left hand and
decides which note to assign to the bass on the basis of the chord
recognised, and thus regardless of the “inversion” you have used.
When the Bass to lowest function is on, the system always assigns the
note furthest to the left of the chords played to the bass, regardless of
whether or not it is the “fundamental” of the chord.
This function allows you to play pieces in which the lowest note of the
chord moves independently, as played by the musician, without
necessarily providing harmonic base functions.
Pianist
One Fing.
Hold
Pianist
CHORD MODE
The Pianist mode is intended for musicians who have a purely pianistic
approach to the instrument; it automatically activates the Bass to lowest
function described above. The PIANO arranger recognises chords of up
to five notes pressed simultaneously, but while in the Split mode (Pianist
function off) the arranger is activated even with just one note pressed,
with the Pianist function active the system recognises chords from
three to five notes, so if you play fewer than three notes the chord will
not be recognised.
Every note played 8 semitones above the highest note of the recognised
chord is not interpreted as part of the chord, but is treated as a melody
note. On the other hand, every note played below the lowest note of
the recognised chord is interpreted as a bass note.
Galileo
Page 12
In this case the bass part of the accompaniment will play in this key
and not in the key set by the recognised chord.
What’s more, the arranger has a system capable of ensuring that a
bass note immediately corresponds to each chord played, so that chord
changes are always highlighted even if they are played quickly. This
function, combined with the Pianist mode, makes the arranger extremely
flexible.
Last but not least, in the SETUP ARRANGER SETTINGS menu you
can activate the Freeze Chord on pedal function, which allows you
to retain the last chord recognised in the memory by pressing the
damper pedal. This function allows even the most demanding musicians
to play with the accompaniment and freeze the harmony to improvise
without having to worry about an unintentional chord recognition
change.
SYNC
Bass
to Lowest
Sync
MODE CONTROLS
The Syncro key in the Mode Controls section is very useful if you wish
to start playing with both hands while simultaneously starting the
accompaniment.
If you press SYNCRO the arrangement starts as soon as you play a
chord on the left of the split. Once activated, the SYNCRO function
remains active and the style starts as soon as you play a chord on the
left. To stop the style press START/STOP. To restart, you have only to
play to the left of the split because the SYNCRO function is still active.
In the pianist mode it is possible to have the SYNCRO Function triggered
on the first note pressed or on the first chord recognized. This options
can be selected in the SETUP menu / ARRANGER SETTINGS.
You can also program the SYNCRO function to stop the arrangement
when the chord on the left is released.
To do this, switch off the HOLD key in the CHORD MODE section with
SYNCRO on.
You will now be able to control both the start and the stop of the
arrangement with your left hand.
The Arranger section
Page 13
Tempo – e +
The Tempo – and + keys are used to set or
modify the style tempo both before and during
the performance. Press them simultaneously
to activate the Tempo LOCK function.
+
TEMPO
Tempo Lock
Each style has its own pre-programmed tempo which is recalled
whenever you select the style. This guarantees that the style always
plays at the most appropriate speed, regardless of the tempo used by
the style selected before.
To shift from one style to another without changing the tempo, activate
the Tempo Lock function.
Press the TEMPO – and + keys together and T.LOCK will appear
underneath the word STYLE on the display; you have locked the tempo
currently selected.
+
TEMPO
To deactivate the function, press the TEMPO – and + keys again;
T.LOCK will disappear from the display.
Galileo
Page 14
One Touch
Selecting a style also recalls a combination of
recommended sounds (both active and available for
activation by the user with the Upper and Lower direct
One Touch
keys) particularly suitable for use in the musical
context concerned. To play these sounds, press the
One Touch key.
If One Touch is active, whenever you select a style, the sounds
associated to the style’s variations are automatically selected. It is
important to remember this because sometimes you may need to switch
from one style to another without changing the sound setup you are
using. In this case it is important to make sure that One Touch is off
before selecting the new style or the new variation.
TRANSPOSER -/+
+
Applies a transposition (in semitones)
TRANSPOSER
The TRANSPOSE -/+ buttons allow you to apply a general transposition
of ±12 semitones (12 semitones = 1 octave) to the whole instrument
instantaneously.
Press TRANSPOSE - or TRANSPOSE +.
The current transposition status appears in the
top right-hand corner of the display (0 = standard
pitch).
+
Press TRANSPOSE – to
transpose downwards.
-1
-1
TRANSPOSER
Press TRANSPOSE + to
transpose upwards.
+
1
1
TRANSPOSER
The Arranger section
Page 15
Whenever you press TRANSPOSE – the display shows a decrease of
one semitone.
Whenever you press TRANSPOSE + the display shows an increase of
one semitone.
If you keep a button held down, the transposition changes continuously
until it reaches the maximum value (-12 or +12).
Sequencer Transposer
When you activate a transposition, you will see that the values on the
display change both against the keyboard icon and next to the sequencer
icon; this means that both devices are affected in the same way.
However, you may need to transpose only the keyboard or only the
sequencer, if you wish to play in a key different from that of the MIDI
file loaded earlier, or of the Song recorded directly on the instrument.
To do this, before transposing use the CURSOR keys to select the field
to which you wish to apply the transposition and then proceed.
Removing transposition quickly
+
To remove a transposition, press the TRANSPOSE and + buttons simultaneously.
The display will return to normal (0).
If we have applied different transpositions to the
sequencer and keyboard, the transposition will be
removed from both.
Galileo
Page 16
PANEL MEMORIES
As you play the Galileo PIANO you will come across a combination of
sounds and style suitable for a particular song you wish to perform, so
you will need to memorise it. This is the main purpose of the Panel
Memories section.
A
B
Save
The keys used for the Memories are the SAVE key (for memorising)
and the A and B keys corresponding to the relative banks, each of
which is able to save 8 memories.
Using the memories is extremely easy. Let’s try this simple example.
1. Select a Music Style
2. Select a sound (if you wish, one for each section, Upper and Lower)
(Sound Families)
3. Press START/STOP to listen to the style
4. Use the ENCODER to regulate the style tempo
5. Make another simple adjustment (e.g., press the Pianist or Syncro
key to activate the relative function, etc.)
You have now created a customised setup it would normally take you
5 steps to re-create in the future. We will now save all this in Program
n.1 of Bank A.
This is how to do it:
1. Press the SAVE key
2. Press key F1 underneath the display, which corresponds to Program
n.1
Save
1
2
The Arranger section
Page 17
Your settings have been saved!
Now try changing all the parameters: choose another style and another
preset, make more changes and save all the settings in Program n. 2
using the procedure just described.
To recall the settings made, just press key A to recall the memory
bank used, and then F1 to recall the first memory, or F2 for the second,
and so on.
A
B
Save
1
2
List of the parameters that will be stored in a Panel memory location
1. Style tracks mute (On-Off)
2. Conductor status for each section (On-Off), and sounds here selected
3. Volumes and pan settings for UPPER1, UPPER2 and LOWER
4. Styles selected, tempo settings, and configuration of the various
controls (Chord Mode, Mode
Controls, Fade, Intro, Ending, Fill,
One Touch).
5. Set-Up: Split, Fade In/Out measures, Key Touch, Pedals, Tuning
Octave.
6. Mic.1 settings (main efx)
7. Mic.2 settings (Special Efx)
Galileo
Page 18
THE EDIT MENU
SET-UP
Pressing the key provided on the panel accesses the Set-Up menu
(LED on) containing 8 options that can be selected using the Function
keys (F1…F8). We will take a look at them one by one.
SPLIT (F1)
The display shows the
position of the split point
on the keyboard. Move
the ENCODER clockwise
or anticlockwise and you
will see the pointer
which shows the split
point move.
You can now choose the new split point simply using the ENCODER
or by pressing the note on the keyboard to which you wish to assign
the split point.
ARRANGER (F2)
This EDIT option contains 4 parameters. We will take a look at them
one by one:
FADE IN MODE: this
parameter sets the
number of bars (from 1
to 10) of the fade In
function activated using
the key provided on the
panel.
Use the CURSOR keys to
select the function and
the ENCODER to choose
the number of bars.
FADE OUT MODE: this parameter sets the number of bars (from 1
to 10) of the fade Out function activated using the key provided on the
panel.
Galileo
Page 19
FREEZE CHORD ON PEDAL: this function activates (ENABLED) and
deactivates (DISABLED) the freeze function, which allows you to retain
the last chord recognised in the memory by pressing the damper pedal.
Use the CURSOR keys to select the function and the ENCODER to
enable or disable the function.
NB: With the instrument in the default setup, this function is disabled.
PIANIST MODE SYNC START: this function allows you to choose the
start mode related to the SYNC key.
You have two alternatives:
1. ON SINGLE NOTE: The rhythmic accompaniment starts up when
the first note is depressed on the keyboard.
2. ON CHORD: The rhythmic accompaniment starts from the first
recognised chord in the display; because this function can only be
activated for pianist mode, the chord must have at least three notes to be recognised.
Use the CURSOR keys to select the function and the ENCODER to
choose the mode.
KEY TOUCH (F3)
This EDIT page allows you to set the dynamic sensitivity of the PIANO
keyboard.
Set-Up
Page 20
Use the ENCODER to choose the most appropriate dynamic curve for
your needs, as follows.
FIXED
No dynamic sensitivity (fixed value)
SOFT
Highest dynamic sensitivity (recommended for
those who play with a light touch)
NORMAL Optimal sensitivity (default value)
HARD
Reduced dynamic sensitivity (recommended for
those who play with a heavy touch)
MIDI (F4)
This EDIT page gives you access to the instrument’s MIDI SETTINGS,
enabling you to set the general MIDI settings and customise the
channelling. Let us look at how this is done.
The default setting is the STANDARD setting. In this condition, the
instrument sends and receives the MIDI messages on the channels
you can see assigned to each track on the display, both the parts
(UPPER 1, UPPER2 and LOWER) and the eight tracks of which the
accompaniment consists.
Turn the ENCODER to set the CURSOR on the (MIDI MODE) to display
the other modes in this section. The second MIDI Settings mode refers
to the EXPANDER.
In this mode, the MIDI messages can be sent and received on the
parts (UPPER 1, UPPER2 and LOWER) while the sequencer parts are
unaffected by the data transmission.
Proceeding, you will come to the LOCAL OFF mode. Setting the
instrument in this mode allows you to send and receive MIDI messages
on all the channels cutting out the internal sound generation system.
Galileo
Page 21
The last mode is SEQUENCER. This allows you to chose the data
transmission mode on each sequencer MIDI channel (not including the
UPPER1/2 and LOWER parts). You have 4 options:
OFF
No MIDI data transmission.
INTERNAL MIDI data sent to internal sound generation system.
EXTERNAL MIDI DATA sent to MIDI Out.
BOOTH
Transmission of handshake data (internal generation +
MIDI Out).
In each mode of this function, to change the channelling of the
instrument’s various tracks use the CURSOR keys to select the track
and the ENCODER to change the MIDI channel number.
If the MIDI channel is already in use by another track, the system will
assign the track to the first MIDI channel available.
For detailed information about the EDIT MIDI Settings screen modes,
refer to the MIDI section of this manual.
PEDALS (F5)
This EDIT page allows you to assign the various functions to the three
pedals of the PIANO. In the default condition, PIANO mode, the pedals
have the conventional piano functions: Sustain, Soft and Hold.
Set-Up
Page 22
To change the pedal functions, use the CURSOR keys to select one of
the three pedals and the ENCODER to choose from the various functions
made available for each pedal, as shown in the table below.
OFF
Sustain Upper1
PEDAL 1
Sustain Upper2
FUNCTION
Sustain Upper’s (Upp.1+Upp.2)
(right pedal)
Sustain Upper’s + Lower
OFF
Sostenuto
Start/Stop
Fill Back
Fill Stay
PEDAL 3
Fill Forward
FUNCTION
Break
(middle pedal)
Variation Down
Variation Up
Fade Out
Rotary Slow/Fast
Lower
Microphone Mute
OFF
Soft
Start/Stop
Fill Back
Fill Stay
Fill Forward
PEDAL 2
Break
FUNCTION
Variation Down
(left pedal)
Variation Up
Fade Out
Harmony
Chord Hold
Pianist
Previous Memories
Next Memories
Once the pedal settings have been made, they can be saved in a Memory.
NB: When the Piano key is pressed, the instrument restores the default
pedal settings.
Galileo
Page 23
USB (F6)
In this EDIT page you can assign to the USB port either Mass Storage
functions of your choice for the various types of system, or MIDI
“handshake” functions.
Thanks to the USB "Mass-storage" protocol (embedded in you digital
piano) your computer will manage the Smart-media card as an External
removable Hard Drive, giving a lot of benefits in terms of "comfort of
use".
In the smartmedia card is not inserted the connection between piano
and computer will not be established.
Now let us take a detailed look at the options available and the type of
system to which they refer.
NORMAL
Mass Storage Functions: Windows’98SE –
Windows ME – Windows2000
ADVANCED Mass Storage Functions: Windows XP
MAC
Mass Storage Functions: sistema MAC
MIDI
MIDI handshake (MIDI In/MIDI Out)
connection function. Only Mac e WXP S.P.2
Use the ENCODER to select one of these options. The display shows
which function is enabled and which is disabled for each function in the
two fields underneath.
Set-Up
Page 24
TUNING (F7)
This EDIT page contains two functions, TUNE and OCTAVE
TRANSPOSER
MASTER TUNE. This parameter allows you to regulate the instrument’s
overall tuning with values which range from –100 (A4=415.30Hz), to
+100(A4=466.16Hz).
The default value (0) corresponds to the standard tuning
(A4=440.00Hz).
Select the MASTER TUNE function with the CURSOR keys and turn the
ENCODER clockwise or anticlockwise to change the tuning.
OCTAVE TRANSPOSER. As the display shows, this parameter refers
to the Upper and Lower parts. The keyboard can be transposed up
one octave (OCTAVE UP) or down one octave (OCTAVE DOWN) for
each part, UPPER1/2 and LOWER, independently of each other.
In default setup the function is set as (NORMAL) for each part.
Select the part you wish to transpose with the CURSOR keys
and turn the ENCODER clockwise to transpose up one octave,
or anticlockwise to transpose down one octave. Once an octave
transposition has been set, the message OCT. DOWN or OCT.
UP will appear in the Box of the part (Upper1/2 or Lower) which
has been modified in the main video page (HOME key).
Galileo
Page 25
OTHERS (F8)
This EDIT page contains parameters relating to the VIDEO and AUDIO
connections.
Let us start to examine these parameters one by one:
VIDEO
COLOURS SET:
Enables you to adjust the colour setting, by choosing one of the
options available, for display of the lyrics included in the MIDI files
on a remote television set. You have a choice of 4 different settings,
meaning 4 colour combinations. Use the CURSOR keys to select
the function and the ENCODER to choose one of these settings.
CENTER:
This parameter centres the image of the lyrics on the TV set.
Use the CURSOR keys to select the function and the ENCODER to
centre the lyrics.
BRIGHTNESS:
This parameter changes the luminosity, with a choice of two settings:
LOW / HIGH.
Use the CURSOR keys to select the function and the ENCODER to
change the setting.
NB: To view the effects of changes to these parameters connect the
Galileo PIANO to a TV set using the RGB/SCART lead.
Set-Up
Page 26
AUDIO
LINE IN:
This parameter modifies the Line input volume. The default setting
is = 0 (recommended when no devices are connected).
Use the CURSOR keys to select the function and the ENCODER to
change the setting.
If you connect a CD player or any other external player to the Line
inputs, make sure that you have started up the remote device
before increasing the input volume, then gradually start to increase
the volume to the required level.
This is important to prevent peaks or distortion, to keep the complex
amplification system installed on the PIANO in good condition.
MIC IN:
This parameter affects the microphone connection input
gain.
Before connecting the microphone to the PIANO make
sure that the analogue GAIN is at the minimum volume,
to prevent feedback.
There are two modes available:
NORMAL
Recommended for professional dynamic
microphones.
GAIN BOOST Recommended for low-sensitivity consumer
microphones.
After connecting the microphone as described above, you can gradually
increase the analogue GAIN.
Once you have set the analogue GAIN to your requirements, you can
adjust the microphone volume in the MIXER page (the mic. default
volume is 16).
Galileo
Page 27
Disk/Card
ACCESSING THE FUNCTION
Disk/Card
Press the Disk/Card to access the disc function main video page.
For more convenient explanation, for now we will consider the system
with disk and card inserted, both legible and both containing files: we
will describe the exceptions later.
Press the DISK key: the key LED comes on and the video page shown
below will appear on the display
The heading of this screen contains the active unit (Disk / Card) followed
by the current directory.
The contents of the unit are displayed in the box underneath, with a
scroll bar: remember that the files not relevant for this instrument are
not shown on the display.
To select the files turn the ENCODER (fast scroll) or use the CURSOR
keys (Up and Down).
File identification
The instrument will associate an
identifying icon to each type of file,
appearing in front of the file: the
following is a detailed list of the file
type icons used.
Galileo
Directory
Midifile
Panel Memories
Style sets
Global
List
Page 28
Selecting the active unit
The active unit is selected using the display’s
two SIDE SELECTORS. Press the top key to
select the DISK; if a disk is in the driver, the
icon switches to reverse and the contents are
displayed (ROOT dir).
Selezione Unità
Press the bottom key to select the DISK; if a card is inserted, the icon
switches to reverse and the contents are displayed (ROOT dir).
If the memory devices are NOT present, with no floppy disk or
Smartmedia card, the relative icon does not appear and the units cannot
be activated.
SCROLLING THROUGH THE DIRECTORIES
When the cursor is on a directory (i.e. when a directory is selected),
the F1 function key assumes the OPEN function.
Locate on a directory and press the F1 function key to open the
directory; the files it contains will be displayed in the main box.
The heading of the display changes to the name of the directory now
selected, proceeded by the ( )symbol to show that there are more
directories after it.
Once the directory has been selected, function key F2 will assume the
DIR BACK function, used to return to the previous directory level.
Disk/Card
Page 29
To select another subdirectory, simply locate on it and press F1 again,
then use F2 to move back again.
This system can be used for scrolling through the various directories
on both disks and cards. The maximum permitted number of directory
levels is 5.
FILE LOAD
Starting from the screen shown in our example, select a midi file using
the ENCODER or the Cursor Down key.
Then press F1 and the system will start to load the selected song with
no further confirmation.
Once the procedure is complete, depending on the type of file loaded
the instrument will locate on its “main” page, or for midi files with
Karaoke, directly on the Lyrics page.
Galileo
Page 30
SETTINGS
The settings screen relates to the sequencer player and record; for the
sequencer record functions refer to the specific section.
When a midi file has been loaded in the memory, the system displays
this screen and the functions of the boxes become as follows:
F1 Karaoke
Displays the lyrics and chords in the midi files.
The top of the display contains two boxes.
The first displays the file name, the bar, the time (only if the midi file
is not playing) and traspose,
and the second shows the chords. The next chord is displayed at the
top and the chord being played underneath.
Disk/Card
Page 31
F2 Mixer
This screen allows you to adjust midi file parameters, such as Volume,
Pan and Program change.
In the top right-hand corner displays
the file name, the bar,number of song
measures (only iSeq. Stop), the time
and traspose.
The values for the selected
track are in the top right-hand
corner.
To change the values use the CURSOR keys: left and right to select the
track and up and down to select the value for modification. The Encoder
modifies the values.
F3 Monitor
This screen displays the events of the individual midi channels and the
position of the locator (indicating the point reached in the midi text).
Turn the Encoder to move the locator to another point quickly.
Galileo
Page 32
F4 Param.
See Sequencer Record section.
F7 Single
Allows you to play only the selected track. If this function is selected,
the corresponding box changes its function to ALL PATT, so pressing it
again allows playback of all the tracks.
F8 Chan-Mute
Mutes the selected track
FILE SAVE
To save a file, simply select the directory which is to contain it and
press key F3 SAVE.
After this, the screen
above will appear on the
display. The system now
prompts you to select the
object type, or “what you
want to save”
by
choosing one of the
options offered by the
function keys, which are:
F2 Song Performance
Using this option all the actual settings of the instruments (song settings
included) will be saved as text file. This txt file (hidden) will be stored
in the folder currently selected and it will have the same name of the
song currently loaded.
This text file will be shown on the computer only and it can be edited
using a standard text editor; you'll be able to set the desired options
directly from your pc.
Here following the list of the parameters that can be stored in a song
performance location.
Disk/Card
Page 33
List of the parameters that will be stored in a Song Performance location
1. Style tracks mute (On-Off)
2. Conductor status for each section (On-Off), and sounds here selected.
3. Volumes and pan settings for UPPER1, UPPER2 and LOWER.
4. Styles selected, tempo settings, and configuration of the various controls
(Chord Mode, Mode Controls, Fade, Intro, Ending, Fill, One Touch).
5. Set-Up: Split, Fade In/Out measures, Key Touch, Pedals, Tuning Octave.
6. Mic.1 settings (main efx).
7. Mic.2 settings (Special Efx).
8. Sequencer tracks mute (On-Off).
F3 Custom Styles
Saves all the rhythms in the custom locations en bloc. The extension
of the file created is AST.
F4 User Perfomance
Saves all the performances on the panel en bloc (*.PRF).
F5 Global
Saves all the performances, the custom styles and all the instrument
settings in a single file.
F6 List
Saves the current list
F8 Back
Press to return to the previous screen.
Once you have selected the type of file to be saved (using the
appropriate function key) a box appears providing a field where the
file name can be entered.
Galileo
Page 34
The pop-up contains the type of file being saved followed by the name
assigned and the progress bar.
Press F7 (ABORT) to interrupt the process.
Entering characters
If any circumstances when you have to give a file a name (SAVE,
RENAME) the display shows a pop-up and the function keys assume
the properties described below.
Specific keys (CURSOR right and left) are used to move the cursor,
and the ENCODER is used to select a letter.
F1CAPS LOCK
If it is active (reverse), turning the encoder only selects uppercase
letters; if it is not active (not in reverse) only lowercase letters are
selected. Press F1 to change the status
F2 SPACE
Pressing this key enters a Space and the letters to the right of the
cursor are moved forward one character.
F3 DELETE
Deletes the character on which the cursor is located.
F4 BACK SpaCe
Deletes the character before the one on which the cursor is located.
F7 ABORT
Press this key to return the instrument to the disk main page on the
current directory.
F8 DONE
Confirms the data entered; when F8 is pressed the system will start to
save the data.
Disk/Card
Page 35
WARNING!
Because of the characteristics of the USB interface, if the PIANO is
connected to a computer SAVE operations on the memory card
are not possible.
MAKE DIR
A new directory can be created from the disk mode main page.
First of all, locate on the directory which is to contain the new directory,
using keys F1 and F2 (directory scrolling). If the disk does not have
write protection, press function key F4 (which will not be available if
the unit has write protection).
The following video page will appear on the display:
The popup prompting input of the directory name appears. To prevent
the entering of empty directories, and to facilitate the process, the
system suggests the name “FOLDER 1”, which can be changed using
the CURSOR keys, the ENCODER and the tools made available by the
function keys:
Press F8 to create the directory, which will be displayed immediately.
Press F7 to return to the disk main page.
Galileo
Page 36
RENAME
The RENAME is recalled by pressing function key F5.
When this key is pressed
the file or directory on
which the cursor is
currently located will be
renamed.
As can be seen in the video page shown above, the name input pop up
will suggest the current name of the file / folder selected, which can be
changed using the character input procedure (or the operation can be
aborted).
Press F8 to confirms the data entered.
NB: The function is not available (box empty) if the unit has write
protection.
Disk/Card
Page 37
DELETE
Using the DELETE function, you can select more than one file and then
delete all the selected files with a single command, without having to
proceed one by one.
When the DELETE function is selected from the DISK mode main page,
the instrument will activate the mechanisms to allow selection of more
than one file (numbered appropriately).
You will see immediately that function keys F3 and F4 now have new
functions:
SELECT : Selects the FILE or Directory currently selected by the
CURSOR.
UNSELECT: (not visible on the screen above) : Unselects the file or
directory selected earlier (which is therefore only active if
the cursor is on a file or directory with a selection number).
Keys F1 (OPEN) and F2 (DIR BACK) are still used to scroll through the
directories, so they will only be active if the cursor is on a directory
(F1) or the system is on a sub-directory (F2).
If you wish to select the file “FunkyTown”” for deletion, simply select
the file with eth CURSOR keys and press SELECT (F3).
Galileo
Page 38
The selection number 01 will appear next to the file, indicating that it
is the first one selected; at the same time, function key F4 is made
available for unselecting it. We can continue by selecting the “Jazz”
folder and then use the same proceedure to select some more files.
Note that since “Jazz”
is a sub-directory,
function
key
F2
assumes the DIR BACK
function.
All types of files, directories included, can be selected. When you access
the DEL function any lists present will be removed. The delete function
is not active (box blank) if the unit is protected.
To abort the operation simply press function key F7 (BACK) and the
instrument returns to the main page, eliminating the selections.
If you wish to proceed, simply press function key F8 (PROCEED). The
display will show a warning message:
Press F7 (NO) to abort
the procedure (the
system returns to the
selection screen).
Press F8 (YES) to
The deletion procedure can be stopped by confirm. The screen
pressing function key F7 (ABORT).
below appears on the
display.
NB: the file being deleted will still be cancelled.
Disk/Card
Page 39
LIST
A List is the option used to program and save sequences of midi files,
which may even be saved in different directories.
To program a List, press function key F7 (LIST) from the main video
page.
The display will show the following page:
The function keys acquire the following properties
F3 SELECT - F4 UNSELECT - F5 CLEAR - F6 MASK - F8 DONE
Use the CURSOR keys (UP and DOWN) to locate the cursor on the first
song you wish to place in the List: do this by pressing button F3
(SELECT).
A selection number will be displayed next to the name of the file.
This number indicates the song’s position in the List.
Continue in the same way to enter all the songs required, which may
also be in different folders. To unselect a file entered in the List, simply
locate the
cursor on the song required and press F4 (UNSELECT).
When file selection is complete press F8 (DONE) to confirm the
programming or F5 (CLEAR) to abort the procedure.
On confirmation, the system will load the first song and switch to the
KARAOKE screen if the song contains lyrics.
Now press [PLAY] and the PIANO will start to play back the song.
After it, whether the song has ended or you have stopped it before the
end using the [STOP] button, the second song in the list will be loaded,
followed by the third, and so on. Hold the [STOP] button down for a
few moments to stop playback of the List completely.
Galileo
Page 40
To check or modify the contents of the list at any moment (even during
playback of a song), press F7 (LIST).
If you wish to change the position of a song, locate the cursor on it
with the ENCODER and use the (UP) and (DOWN) buttons to select the
required position.
If you press F4 (UNSELECT), the selected song will be deleted from
the list.
To delete all the songs from the List, press F5 (CLEAR).
SAVE THE LIST
To save a list previously programmed, please proceed with the "SAVE"
procedures described in this chapter.
The List file will be saved in the directory currently selected.
Disk/Card
Page 41
UTILS
The last function key of the disk mode contains the utilities, or the
“collateral” procedures useful more with the instrument not in use
than during live performances.
Pressing function key F8 accesses another function key menu (the
remainder of the screens remains unchanged)
which are:
F1 : FILE COPY: press to activate the file copying procedure.
F2 : LABEL: used to rename the disk or card.
F3 : INFO: press this function key for access to the information
concerning the active unit.
F4 : FORMAT: starts the formatting procedures.
F7 : BACK: Returns to the previous menu.
Galileo
Page 42
FILE COPY (F1)
Selecting the FILE COPY
function starts the multiple file selection procedure already described.
NB: This function erase
the current list.
Once the selections have been made, you may proceed by pressing
function key F8 or use F7 to abort the operation.
The active unit
can be changed
using the SIDE
SELECTORS; the
unit opposite to
the one active in
root position is
suggested
by
default.
You may create a directory using the procedures already described,
with the aid of function key F3.
After selecting the destination folder, press F7 Back to abort or F8 to
proceed. In this case the display will show:
Press F7(NO) to exit
Press F8 (YES) to proceed.
Disk/Card
Page 43
If you press function key F8 (YES) the display will show the following
page:
When the procedure is complete the system updates the current
directory and the UTILS section function keys are now available
again. To return to the main page, use the BACK key (F8).
LABEL (F2)
The Label function, associated to key F2 in the Disk / Utils section,
allows you to change the LABEL of the unit currently selected.
Once the function has been selected, the file renaming pop-up appears
and the keys make available the tools needed to rename files.
Once the LABEL has been changed, press F8 to complete the operation
or F7 to abort it.
NB: The LABEL function is not available if the current unit has write
protection or connected to the PC. The active unit cannot be changed
during file renaming.
Galileo
Page 44
INFO (F3)
This tool, activated using key F3 in the utils section, provides information
about the current unit. The display will show a list of the unit’s main
parameters.
The current unit can be
changed using the SIDE
SELECTORS.
To exit press function
key F8 (BACK).
FORMAT (F4)
The formatting function is activated using function key F4.
When it is pressed, the prompt asking which unit is to be formatted will
appear on the display.
If the disk is not inserted
or has write protection,
the “DISK” unit will not
be available; similarly, if
there is no card, the
unit is protected or
connected to the PC,
“CARD” unit will not be
available.
Press F7 (NO) to return to the disk main page.
or press function key F8 (confirm) and the system will start to format
the unit.
The display will show the progress bar that indicates that formatting is
underway.
When the operation is complete, the system returns to the disk section
TOOLS menu.
Disk/Card
Page 45
EFFECTS
To access the effects menu, press the key provided
on the Galileo PIANO front panel.
Effects
MASTER SECTION (F1)
This is the screen giving
access to this menu, where
you can modify the
parameters of the REVERB
effects of the entire
instrument,
allowing
optimal simulation of the
way sound is diffused and
propagated in an enclosed
environment.
In detail, the setting parameters available are:
TYPE: selects the type of reverb:
HALL1
reverb typical of a concert hall.
HALL2
simulates the strong reverberation of a big concert hall,
such as a theatre.
PLATE
ROOM
STAGE
simulates the reverb generated with a metal plate, typical
of the ‘70s.
this effect simulates a reverb of an average-size room (a
performance room).
this effect simulates a reverb typical of a stage.
LEVEL:parameter which sets the reverb output level, with values from
0 to 127.
TIME:parameter which sets the reverb duration or depth, with values
from 0 to 8.
HI-DAMP: parameter which sets the filter on the reverb's high
frequencies, with values from 0 to 24. In this case 0 is equivalent to a
fully open filter; as the value gradually increases, the filter is closed.
Use the CURSOR keys to select the function and the ENCODER to
change the setting.
Galileo
Page 46
SOUND SETTINGS (F2)
This function allows you to modify the values of the sends to the reverb
and modulation effects for each individual sound (Sound Preset).
Locate the CURSOR on the TIMBRE parameter and turn the ENCODER
to select the Preset for modification. As you turn the ENCODER you
will realise that the Presets marked with the
(i-motion) symbol
activate two more modules: Modulation Type and Speed. In other
words, for these sounds you can choose the type of modulation, from
those offered, and the speed of the modulant, with values from 0 to
127.
For the MIDI General Presets these two fields are not activated, so the
modulation parameter always refers to the CHORUS effect.
i
Modulation Type
This section contains three classic modulation effects and a Delay,
more often called an echo.
modulation effect which adds depth and a sense of space
to the sound.
FLANGER modulation effect similar to the resonance obtained inside
a tunnel.
an effect which simulates a rotary diffuser.
ROTARY
CHORUS
DELAY
typical echo effect.
Use the CURSOR keys to select the MOD. TYPE parameter and turn the
ENCODER to select the effect. To change the modulation SPEED
parameter, locate the CURSOR on the parameter and turn the ENCODER
to change the value, except for the ROTARY effect, which is modulated
as follows.
Effects
Page 47
SELECTING THE SPEED OF THE ROTARY EFFECT
As already mentioned, the Rotary effect simulates the classical rotary
speaker system which became famous with the advent of the
electromagnetic organ.
This system had speakers which could be turned at two different speeds,
Slow or Fast.
On this instrument, the Rotary effect speeds are selected by activating
the Rotary Slw/Fst function on the Soft pedal (central pedal), as
described in the PEDALS section of this manual.
In this menu the boxes corresponding to function keys F7 and F8 are
activated and assume the following values:
F7 (RESTORE ): Restores the default setting.
F8 (STORE): Saves the changes.
NB: If you change sound or exit this function without pressing function
key F8, any changes made will be lost. If you wish to return the
sound to the default settings, even after changes have been saved,
simply press F7 RESTORE.
Galileo
Page 48
MIC. P1 (F3)
MICROPHONE AMBIENCE
This section contains ambience effects relating to the microphone.
EFFECT STATUS at the top of the screen indicates whether the effect is
enabled (ON) or disabled (OFF).
The display shows 4 parameters, TYPE, LEVEL, TIME and FEEDBACK,
the last only activated if the DELAY effects are selected.
Let us now examine these parameters one by one:
TYPE
this parameter is used to choose the type of reverb to be assigned to
the microphone. There are 8 ambiences available, 6 for REVERB and
2 for DELAY effects, as follows:
REVERB ROOM 1 - ROOM 2 - ROOM 3 - HALL 1 - HALL 2 - PLATE
DELAY
DELAY - PANDELAY
LEVEL
Parameter which sets the reverb output level, with values from 0 to
127.
TIME
parameter which sets the reverb duration or depth, with values from 0
to 8.
FEEDBACK
As already mentioned, this parameter is activated when the DELAY or
PANDELAY effect is chosen in the TYPE field.
Effects
Page 49
In this case the TIME field assigns a value which indicates the repetition
speed between stages, while the value assigned to the FEEDBACK
indicates the total effect fade time.
Use the CURSOR keys to select the parameter and the ENCODER to
change the values.
MIC. P2 (F4)
MICROPHONE SHIFTER
This section refers to the pitch shifter effects which can be added to
the microphone.
EFFECT STATUS at the
top of the screen
indicates whether the
effect is enabled (ON) or
disabled (OFF).
The display shows 3 parameters, as follows: PRESET, SHIFT and BALANCE.
PRESET
You are offered a series of presets. When this parameter is set as
NO PRESET, you can create new setups using the SHIFT parameter.
SHIFT
this parameter indicates the shift (transposition) of the voice which
is added to your own voice, with values ranging from –12 to +12 (in
semitones).
BALANCE
This parameter balances the voice on the SHIFT effect, with values
ranging from 0 to 127. If the value 0 is selected, you will only hear the
SHIFT effect. As you gradually turn the ENCODER the value rises,
moving the balance to the voice alone without SHIFT. With a setting in
the middle of the range, 64, you will hear that the voice and SHIFT are
perfectly balanced.
Use the CURSOR keys to select the parameters and the ENCODER to
change the values.
Galileo
Page 50
SONG COMPOSER
The Midi Sequencer is one of the features of many instruments equipped
with an arranger. It allows you to record what you play using the
instrument’s own internal sounds and styles. The recordings made
with the sequencer of the PIANO are saved as midi files.
The big advantage of recording a SONG is that you have a large number
of options open. If you make a mistake while you are recording, you
can go back and correct it.
How to Record a Song
Before starting to record a new song, prepare the instrument so that
everything is ready to record the song you have chosen, then select
the Style, the Sound and all the settings needed for the performance.
As soon as you are ready, press the
REC key.
Rec
Play
Stop
At this point, if you have loaded a Song recorded on the PIANO into the
memory, the instrument accesses the record function to make changes
or add tracks to a Song already recorded. If you have loaded a midi file
into the memory, the system will ask whether you wish to delete the
midi file and access the record function, or to leave the midi file in the
memory and exit the function, in which case the display will switch to
the Monitor screen.
Once you have accessed the RECORD function the display will show
the following page:
The LEDs of the Track1, Track 2, Track 3, Track 4, Drm/Acmp and
Settings keys will shine red, and the Rec key will start to flash.
Song Composer
Page 51
Each track corresponds to a part of the instrument, as follows:
Track1 = Upper1
Track2 = Upper1
Track3 = Lower
Track4 = Arranger/ Bass
Drm/Acmp = Arranger / Drum and accompaniment
Tracks 1, 2 and 3 are available for recording in soloist mode, while
tracks 4 and 5 are linked to the arranger. Track 4 (Bass) records the
bass of the arrangement, so you can only record this track if you are
using the Styles. This means that the bass track can be deactivated if
you wish to create customised bass melody lines using one of the
three tracks available.
You can now use the CURSOR keys to move the cursor into the various
Song setting fields.
In detail, the possible settings are:
LOCATOR 1/1 : this parameter indicates the position of the locator,
meaning the bar reached in the recording. At this point 1/1 will appear
because you are in the first bar of the song, since you have not yet
recorded anything.
SIGNATURE: This parameter allows you to choose the time signature
of the song you are about to record. Use the ENCODER to choose a
time signature other than the default setting, 4/4.
QUANTIZE: This parameter allows you to activate a priori quantisation
of the recording. By default, the value is set as OFF; use the ENCODER
to choose the quantisation value, which is from 1/2 to 1/96. The
quantize function can only be applied on the Upper1/2 and Lower
parts (Trck1/2/3), since the Track4 (Bass) and Drm/Acmp. parts are
assigned to the Styles.
TEMPO: To choose the recording tempo, locate the cursor on the
TEMPO field and turn the ENCODER.
PRECOUNT: Activates (On) and deactivates (OFF) the precount bar
before the recording starts.
CLICK: Activates (On) and deactivates (OFF) the metronome click
during recording.
Galileo
Page 52
Once you have made the general settings, to start recording just press
the Rec key.
As soon as you have finished your performance press the Stop key.
The LED of the track you have recorded turns blue, while the tracks
which are empty or have not yet recorded any events will still be red,
so the first time the STOP key is pressed during recording, the
sequencer switches to pause status.
Rec
Play
Stop
Press Stop again if you wish to end the recording. The display will
return to the monitor screen. To continue recording, press the Rec
key.
If you have finished recording a track (e.g. Track1) you can start
recording again by choosing an empty track (e.g. Track2) and so on.
If you press the key of the Track where you have recorded (blue LED)
twice, you will see the LED go out. This means that the track is in Mute
status, so it will not be played while you are recording another track.
Merge Record
You can also add notes to a recorded track using the “merge” mode.
To record in merge mode, press the key corresponding to the track
already recorded (blue LED) and the LED will change colour (blue+red).
Use the locator to choose the bar from which you intend to add notes,
and continue recording as before.
The merge mode cannot be used for the tracks assigned to the arranger
(Track4 e Drm/Acmp.).
Song Composer
Page 53
DELETE
The bottom part of the display (function keys) contains the delete
functions.
F1 deletes the whole Song
F2 deletes track 1 (Upper1)
F3 deletes track 2 (Upper2)
F4 deletes track 3(Lower)
F5 deletes track 4(Arranger bass)
F6 deletes track Drm/Acmp (Arranger)
F7 (GO) starts the recording (an alternative to the Rec key) and key
F8 (Exit) exits the function: the display switches to the Monitor screen.
For the function in this screen, refer to the Disk section of this manual.
Galileo
Page 54
F4 (PARAMETERS)
Pressing F4 displays the following screen.
It contains the song playback setting functions.
SONG USER SETTINGS
This function allows you to set the way the instrument will behave in
case of .TXT files (SMF parameters) created by the PIANO after a
saving procedure. These parameters can be set as:
MODE = FILE-HOLD: If there is no .TXT file present the status of the
MIDI SONG SETTINGS will remain unchanged.
MODE = FILE-RESET: If there is no . TXT file all the MIDI SONG
SETTINGS functions will be deactivated (Seq.Transpose=0 and all track
play).
MODE = HOLD:The status of the MIDI SONG SETTINGS will remain
unchanged even if there is a .TXT file present.
MODE = RESET: All the MIDI SONG SETTINGS function will remain
deactivated even if there is a .TXT file present.
Song Composer
Page 55
START MODE
This option contains the parameters for setting the list playback mode
and whether or not the song header skip function is activated.
MODE: sets the playback mode for songs loaded by means of a list.
If SINGLE is selected, after a Song is loaded the system waits for you
to
press the [PLAY] button to play the new song.
If CONTINUE is selected, the Song loaded will be played automatically.
LOOP: Specifies whether, once it comes to the last song in a list, the
system has to stop the playback or start again from the first Song.
Select YES to play the list again.
Select NO to end playback at the end of the list.
HEADER SKIP: specifies whether skipping of the MIDI data before the
first note event or the first syllable of the lyrics is activated (by selecting
YES) or not. This function offers the considerable advantage that the
sound generation setup messages can be loaded at very high speed
without having to wait for the system to read the initial "empty" bars
before starting to play.
Galileo
Page 56
Maestro II/Grande II
Appendix
Appendix
A
Main Features
Keyboard
88 Grand Response PRO Hammer Action Keys
Graded Hammer design with escapement mechanism
Tone generation Extended i-motion® piano technology.
Voices
Rhythm Styles
Chord Mode
Polyphony max 192 notes.
12 i-motion® pure quality voices.
144 styles, 576 variations, 2 Intros, 2 Endings, 3 fills One touch settings.
Standard, Intelligent Pianist Mode® (for automatic chord
recognizing).
Effects
Hi quality Programmable Reverb with 48bit resolution,
Hi quality Programmable Modulation with Rotary effects.
Song Player /
composer
SMF, 16 tracks player with Lyrics capabilities, Song
composer with direct access buttons.
Data storage
16 Panel Memories,
3 1/2 FDD driver + Smartmedia ™ card (also usable for
software upgrades).
Metronome
Yes
Pedals
Damper, Soft, Sostenuto (All Programmable), optional
Expression
Input output
Microphone, USB, MIDI, Digital Out, TV output, Line
outputs and inputs
Display
High contrast Graphic LCD 240*128 pixels
Amplifier
240 watts (2*120) - 3-Way Acoustic-Chamber PRO Sound
System
Finish
High Gloss Black, High Gloss Mahogany, High Gloss White
Cabinet Features Hand-made in Italy, Two-stage sliding key cover, 19-ply Wood
Rim, Brass Pedals, Lifting Prop Lid, Folding Music Desk.
Dimensions
54"x38"x35" (WxDxH)
Weight
Net Weight 320 lbs, Gross Weight 370 lbs
Appendix
B
STYLE LIST
8 Beat
16 Beat
Rock
Dance
Pop beat 1
Pop beat 2
8BeatSlow
8Beat Song
8Beat Latin
ShuffleBeat
8Beat Analog
6/8 SlowPop
Ballad 1
Ballad 2
Sweet Ballad
Brush&Beat
16BeatPop1
16BeatPop2
16BeatSong
16BeatLive
Stadium!
LiveRock
LiteRock
SoftRock
16th Rock
ShuffleRock
ModernBallad
6/8Rock
Disco
DiscoFunk
Disco’70
DanceLatin
Incognito
DJ Dance
House
Techno
Funky/Blues Contemporany Swing
BigBand
PopFunk1
PopFunk2
Groovin’
Fusion
SoulBand
RockBlues
Blues
SlowBlues
DownBeat
Hip Hop
EstCoast
WestCoast
Chillin
CoolRap
AcidJazzz
Jungle
Standard
Moderate
SlowBrush
FastBrush
EasySwing
Fast!
50’sSong
JazzWaltz
Midnight
TheBigBand!
NewYork
Miky’sBand
BigBrass
Boogie
FoxTrot
QickStep
Latin1
Latin2
60’s
Bossanova
FastBossa
Mambo
Mambo#5
Beguine
Bachata
ChaChaCha
Rhumba
Samba
SambaRio
Salsa1
Salsa2
Merengue
Cumbia
Bajon
DiscoChaCha
USA
BeatPop
Rock-a-Billy
Rock&Roll
Twist
SlowRock
60Ballad
UsaFunk
Rhytm&Blues
CountryPop
BeatStep
Country
CowBoy
Bluegrass
CountryWaltz
Charleston
Dixieland
World
Acoustic
Trad.1
Trad.2
Reggae1
reggae2
Cançao
Carribean
Gipsy
Jamaican
Hawaiian
Bolero
LoveSong1
LoveSong2
Brush&Steel
Unplugged
Emotion
AcousticBallad
SteelPop
HappyPiano
Waltz1
Waltz2
Mazurka
SlowWaltz
Musette
WienWaltz
Tango1
Tango2
March1
March2
Folk2/4
Polka
HappyPolka
PasoDoble
Sevillana
Tarantella
Appendix
C
CUSTOM1
CUSTOM2
16Beat Age
16Beat Brush
Shuffle Pop
Funky ‘70
Steely Funk
Latin Fusion
Carlos Rock
Dance ‘80
HullyGully
Pizzicato Folk
Carousel
Rikdi
2/4 Ethnic
7/8 Laz
Yaman
9/8 Roman
Appendix
D
Ethnic Styles
SOUND LIST
PIANO
Grand Piano
Classic Piano
Bright Piano
HonkyTonky
Elec.Vintage
FM Piano
Harpsichord
Clavinet
MALLET
Celesta
Glockenspiel
Music box
Vibraphone
Marimba
Xylophone
Tubular Bell
Dulcimer
ORGAN
B3 Smith
Full Drawbars
Rock Organ
Church organ
Reed Organ
Accordion
Harmonica
Musette
GUITAR
Ac. Nylon
Ac. Steel
El. Jazz
El. Clean
El. Muted
Overdrive
Distortion
Harmonics
BASS
Acoustic
Fingered
Picked
Fretless
Slap
Thunder
Wonder
Moog
STRINGS
Violin
Viola
Cello
Contrabass
Tremolo Strings
Pizzicato Strings
Orchestral Harp
Timpani
ENSAMBLE
Strings
Slow Ensamble
Syntex
JP Strings
Haa Choir
Doo voice
FM Angels
Orch. Hit
BRASS
Trumpet
Trombone
Tuba
Muted Trumpet
French Horn
Brass Section
Syn Brass
Analogic Brass
REEDS
Soprano Sax
Alto Sax
Tenor Sax
Baritone Sax
Oboe
English Horn
Bassoon
Clarinet
WIND
Piccolo
Flute
Recorder
Pan flute
Blown Bottle
Shakuhachi
Whistle
Ocarina
SYNT LEAD
Digi Sine
Minibit
Calliope
OBX Lead
Modular
GhostVox
Fifths
Pulse
SYNT PAD
Digi Pad
Warm Pad
OBX Pad
Vox Pad
Galaxian
Iron Pad
Halo Pad
Sweep Pad
SYN EFX
Falling
Resonance
Crystal bell
Gothic
Heaven
Underground
On Space
Metal Wind
ETHNIC
Sitar
Banjo
Shmisen
Koto
Kalimba
Bag Pipe
Fiddle
Shanai
PERCUSSION
Tinkle Bell
Agogo
Steel Drums
Woodblock
Taiko Drum
Melodic Tom
Synt Drum
Reverse Cymbal
SFX
Fret Noise
Breath Noise
Sea Shore
Birds
Telephone
Helicopter
Applause
Gun Shot
Appendix
E
MIDI IMPLEMENTATION CHART
Galileo Maestro/Grande II
Ensamble Digiltal Piano
FUNCTION
BASIC
CHANNEL
MODE
Date:24/03/2006
Ver.:1.1
TRASMITTED
Default
Changed
Default
Messages
Altered
NOTE
NUMBER
True Voice
VELOCITY Note ON
Note OFF
AFTER
Key’s
TOUCH
Ch’s
CONTROL
CHANGE
0
7
11
30
1-16
1-16
Mode 3
X
O
O
O
O
O
O
O
O
O
O
O
O
O
O
O
O
0-127
0-127
O
X
X
X
0-127
0-127
O
X
X
X
O
O
O
O
X
O
O
X
X
O
O
X
64
66
67
91
93
120
121
123
PROGRAM
True #
CHANGE
SYSTEM EXCLUSIVE
Song Pos
SYSTEM
Song Sel
COMMON
Tune
Clock
SYSTEM
REAL TIME Commands
AUX
Local On-Off
MESSAGES All Note Off
ActiveSense
Reset
RECOGNIZED
1-16
1-16
Mode 3
X
*********
0-127
21-108
O
O
X
X
O
O
O
O
REMARKS
some timbre limits
0-127
to narrower range
21-108
O
O (*1)
X
X
Bank Select MSB
O
Main Volume
O
Expression Contr.
O
Slow/Fast Rotary Speed
O
Damper Pedal
Sustain Pedal
Soft Pedal
Reverb
Chorus
All Sound Off
Reset all controllers
All Note Off
NOTES: (*1) I-Motion Sounds only
Mode 1: Omni On, Poly
Mode 3: Omni Off, Poly
Mode 2: Omni On, Mono
Mode 4: Omni Off, Mono
Appendix
F
O = YES
X = NO
NOTE: This equipment has been tested and found to comply with the limits for a Class B
digital Device, persuant to Part 15 if the FCC Rules. These limits are designed to provide
reasonable protection against harmful interference in a residential installation. This equipment
generates, uses and can radiate radio frequency energy and, if not installed and used in
accordance with the instruction, may cause harmful interference to radio comunications.
However, there is no guarantee that the interference will not occur in a particular installation. If
this equipment does cause harmful interference to radio or television reception, which can be
determinated by turning the equipment off and on, the user is encuraged to try to correct the
interference by one or more of the following measures:
-
Reorient or relocate the receiving antenna.
Increase the separation between the equipment and receiver.
Connect the equipment into an outlet on a circuit different from that to which the receiver
is connected.
Consult the dealer or an experienced Radio/Tv technician for help.
The user is cautioned that any changes or modification not expressly approved by the party
responsable for compliance could void the user’s authority opearate the equipment.
Life’s better when you play