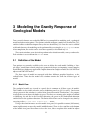
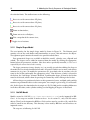
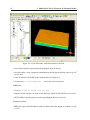
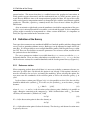
1
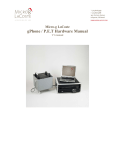
BHGravi 1.1 User’s Manual
Bernard Giroux, Michel Chouteau
August 13, 2015
Contents
Contents
3
List of Figures
5
1
Introduction
7
2
Installation
9
2.1
Requirements . . . . . . . . . . . . . . . . . . . . . . . . . . . . . . . . . . . . . .
9
2.1.1
Software Key . . . . . . . . . . . . . . . . . . . . . . . . . . . . . . . . . .
9
2.2
Microsoft Windows . . . . . . . . . . . . . . . . . . . . . . . . . . . . . . . . . . .
10
2.3
Mac OS X . . . . . . . . . . . . . . . . . . . . . . . . . . . . . . . . . . . . . . . . .
10
2.4
Linux . . . . . . . . . . . . . . . . . . . . . . . . . . . . . . . . . . . . . . . . . . .
10
3
Modeling the Gravity Response of Geological Models
11
3.1
Definition of the Model . . . . . . . . . . . . . . . . . . . . . . . . . . . . . . . . .
11
3.1.1
Model View . . . . . . . . . . . . . . . . . . . . . . . . . . . . . . . . . . .
11
3.1.2
Simple Shape Model . . . . . . . . . . . . . . . . . . . . . . . . . . . . . .
12
3.1.3
GoCAD Model . . . . . . . . . . . . . . . . . . . . . . . . . . . . . . . . .
12
3.1.4
UBC-GIF Model . . . . . . . . . . . . . . . . . . . . . . . . . . . . . . . . .
16
3.1.5
A note about the system of coordinates . . . . . . . . . . . . . . . . . . .
17
Definition of the Survey . . . . . . . . . . . . . . . . . . . . . . . . . . . . . . . .
19
3.2.1
Reference station . . . . . . . . . . . . . . . . . . . . . . . . . . . . . . . .
19
3.2.2
Borehole profiles . . . . . . . . . . . . . . . . . . . . . . . . . . . . . . . .
20
3.2.3
Ground surveys . . . . . . . . . . . . . . . . . . . . . . . . . . . . . . . . .
20
Visualization of the Results . . . . . . . . . . . . . . . . . . . . . . . . . . . . . .
21
3.3.1
21
3.2
3.3
Borehole profiles . . . . . . . . . . . . . . . . . . . . . . . . . . . . . . . .
3
4
Contents
3.3.2
4
5
Ground surveys . . . . . . . . . . . . . . . . . . . . . . . . . . . . . . . . .
21
Specific functionalities
23
4.1
23
Batch runs . . . . . . . . . . . . . . . . . . . . . . . . . . . . . . . . . . . . . . . .
Software Specifications
25
5.1
Numerical . . . . . . . . . . . . . . . . . . . . . . . . . . . . . . . . . . . . . . . .
25
5.2
Geological models . . . . . . . . . . . . . . . . . . . . . . . . . . . . . . . . . . . .
25
5.3
Field data . . . . . . . . . . . . . . . . . . . . . . . . . . . . . . . . . . . . . . . . .
25
5.4
User Interface . . . . . . . . . . . . . . . . . . . . . . . . . . . . . . . . . . . . . .
25
5.5
What’s new in version 1.1 . . . . . . . . . . . . . . . . . . . . . . . . . . . . . . .
26
References
27
Index
29
List of Figures
3.1
A cylinder striking east and dipping 45 degrees. . . . . . . . . . . . . . . . . . .
13
3.2
A GoCAD model, with closed surfaces selected. . . . . . . . . . . . . . . . . . .
14
3.3
A GoCAD model imported in BHGravi. . . . . . . . . . . . . . . . . . . . . . . .
15
3.4
UBC-GIF model import window. . . . . . . . . . . . . . . . . . . . . . . . . . . .
16
3.5
A UBC-GIF model imported in BHGravi. . . . . . . . . . . . . . . . . . . . . . .
18
3.6
Panels allowing the definition of the survey parameters. . . . . . . . . . . . . .
20
5.1
Effect of rotation angle on a plate: plate 1 (brownish) has a strike and a dip of
respectively 30° and 60°, while plate 2 (purple) has the same values of strike and
dip plus a rotation of 20°. . . . . . . . . . . . . . . . . . . . . . . . . . . . . . . . .
26
5
6
List of Figures
1 Introduction
BHGravi is a program developed primarily to interpret borehole gravity data, but it has been
extended to include surface data as well. As of version 1.1, BHGravi can be used to compute
the response of a given geological model and compare this response to measured data. The geological model can either be built by the user using predefined simple shapes, or built outside
in a third party application and subsequently imported and edited in BHGravi.
7
8
1. Introduction
2 Installation
2.1
Requirements
BHGravi is programmed in the Java language (http://www.oracle.com/technetwork/
java/index.html), but rely on an extended version of the native VTK library (the Visualization Toolkit version 6, http://www.vtk.org/) for visualization and modeling, and is
therefore not “pure Java”. As a consequence, the program runs on platforms supported by
Java and VTK. Currently, BHGravi is available for the Microsoft Windows, Apple Mac OS X,
and linux platforms, all 64-bit binaries. If you installed java on your computer but still get a message
saying that java is required to run BHGravi, make sure that you have a 64-bit version of java.
Other external Java libraries are: the Scientific Graphics Toolkit (SGT, http://www.epic.
noaa.gov/java/sgt/), used to plot the modeling results, and the Java Matrix Package
(JAMA, http://math.nist.gov/javanumerics/jama/), selected for some of the core
computing routines. These libraries are open source and freely available. They are all included
in the installer.
On Windows machines, version 6 or later of the Java Virtual Machine (JVM) is needed to
run BHGravi. A JVM is included in the Java Runtime Environment (JRE) or the Java SE Development Kit (JDK) installation programs found at http://java.com. On OS X, Java 6 (available at https://support.apple.com/kb/DL1572) must be installed because changes in
API that occurred in Java 7 breaked the rendering technique used by VTK with Java.
Hardware requirements are limited to monitors supporting 1024 by 768 screen resolution.
2.1.1
Software Key
In order to run with complete functionalities, a software key must be input to BHGravi. You
should contact Bernard Giroux (mailto:[email protected]) to obtain a key
for your computer. Without the key, BHGravi will run in demo mode, in which saving the
projects or the modeling results is not possible.
The user is prompted to enter the key when starting BHGravi for the first time. If the key is
net yet available, clicking the cancel button will default the program to demo mode. The key
can be input later on be selecting the Help -> Activate full version... menu.
9
10
2.2
2. Installation
Microsoft Windows
If Java is not available on your computer, the first step is to install it. Go to http://www.
oracle.com/technetwork/java/javase/downloads/index.html and follow the instructions in order to do so.
All other libraries are contained in the installer. Simply click on BHGravi setup.exe
and follow the instructions. If you wish to remove BHGravi from your system, execute the
uninstall program found in the BHGravi directory (in Program Files), or go to the Control
Panel and Add/remove programs utility.
To run batch jobs, the file BHGravi.bat (found in the installation directory) must be
edited if the program was not installed on drive C, in C:\Program Files\BHGravi. In
such case, the variable BHDIR must be changed to point to the right directory. BHGravi.bat
can be called from anywhere, the installation directory being added in the path.
2.3
Mac OS X
Simply open BHGravi.dmg and drag the application to your Applications folder. To uninstall
BHGravi, drag the application to the trash. In order to invoke BHGravi from the command
line to perform batch calculations, you must define the following in your $HOME/.bashrc:
BHGravi()
{
DYLD_LIBRARY_PATH=/Applications/BHGravi.app/Contents/Resources/Java
java -jar /Applications/BHGravi.app/Contents/Resources/Java/BHGravi.jar $1 $2 $3
}
2.4
Linux
Untar the file BHGravi.tgz in your preferred location (typically in /usr/local), i.e.:
cd /usr/local
tar xvfz /where/you/saved/BHGravi.tgz
A directory BHGravi holding all the program files is then created. To launch the program,
invoke or double clic on /usr/local/BHGravi/BHGravi. If the installation directory is not
/usr/local, the launch script BHGravi must be edited to set the variable BHGRAVI HOME to
the installation directory.
3 Modeling the Gravity Response of
Geological Models
Two essential elements are needed by BHGravi to accomplish its modeling task: a geological
model and observation points. The options to build or import a model are described in § 3.1,
and the facilities to build or import survey data are detailed in § 3.2. Once the user is satisfied
with both elements, the modeling can be performed by accessing the Modeling->Run menu.
After completion, the results can be viewed or exported, as described in § 3.3.
Three main windows were devised to perform tasks related to models, surveys and results.
Each window is accessed from the Window menu.
3.1
Definition of the Model
Two options are currently available to the user to define the earth model: building a “simple shape” model from scratch using basic geometrical shapes, or importing a more complex
model built in a third party application. Import formats for complex models are GoCAD TSurf
objects and UBC-GIF meshes.
The three types of model are managed with three different graphical interfaces, as described below. Note that the model view window remains the same for all three types of
model.
3.1.1
Model View
The geological models are viewed in a panel that is common to all three types of models.
This window is also visible when the survey definition panel (see § 3.2) is active. One feature
always present in this window is a white frame (hereafter named “Domain box”). Its purpose
is to help the user to situate the bodies in space. The three axes starting at the origin are colored
as following: the red lies in the East-West direction, the green in the North-South direction
and the blue in the up-down direction. The limits of this frame can be changed at any time by
accessing to the Project->Set Domain Box... menu.
Using a three-button mouse over the model view panel, it is possible to rotate (left button),
zoom (right button) or move the model (middle button). There is also a tool bar at the bottom
of the model view panel that allows to reset the view, take a snapshot of the model or adjust
11
12
3. Modeling the Gravity Response of Geological Models
the color bar limits. The toolbar items are the following:
Reset view with camera above XZ plane;
Reset view with camera above YZ plane;
Reset view with camera above XY plane;
Zoom to domain box;
Zoom out to view all objects;
Take a snapshot of the current view;
Toggle view of stations.
3.1.2
Simple Shape Model
The user interface for the simple shape model is shown in Figure 3.1. The leftmost panel
contains a list of the earth bodies and functionalities to create, edit and remove the objects.
The rightmost panel contains the model view panel described above.
Four geometrical shapes are available to build the model: cylinder, cone, ellipsoid and
cuboid. The shapes can be added or removed from the model by clicking the appropriate
button below the parameters window. Note that unless specifically intended, it is the user’s
responsibility the ensure that no bodies overlap.
The shape parameters (name, density, etc.) are usually given before adding the shape to
the model, but can also be modified afterwards. All spatial variables are in meter, and density
contrasts are in g/cm3 . To modify the parameters of a given body after its creation, select its
name in the list box and modify the appropriate values. Note that once a body is selected in
the list box, the “Add shape” button is disabled. To add another shape, all items in the list box
must be deselected, which is done be pressing the Control key while clicking in the list box.
All four shapes are positioned relative to their geometrical center, and both strike and dip
rotations are performed relative to the center point. An example is given in Fig. 3.1 to illustrate
this. In this figure, the domain box has its origin at (-50, -50, -100) and is extending 100 meters
in all three directions, and a cylinder striking east and dipping 45 degrees is illustrated.
3.1.3
GoCAD Model
Models created in GoCAD (http://www.earthdecision.com) can be imported in BHGravi. A few steps are needed in order to do so. As of version 1.1, only GoCAD surface
objects (TSurf) can be imported in BHGravi. Each surface must be saved in a file, and all files
must be stored in one directory. This directory is then read by BHGravi and all surfaces are
imported at once.
The steps are as following. In GoCAD:
3.1 Definition of the Model
Figure 3.1: A cylinder striking east and dipping 45 degrees.
13
14
3. Modeling the Gravity Response of Geological Models
Figure 3.2: A GoCAD model, with closed surfaces selected.
• create closed surfaces representing the geological units of interest;
• for each surface, create a property named density and assign the density value in g/cm3
to each unit;
• select all surfaces that build up the whole model (see Figure 3.2);
• Go to menu File->Save Objects... to save the selected surfaces.
In BHGravi:
• Go to Menu->Import Model (new project)...;
• choose GoCAD and give the name of the directory where the GoCAD files were saved;
• all TSurf files in the directory are read and geological objects are created.
Important remarks:
• BHGravi expects GoCAD objects with elevation rather than depth as vertical axis (see
§ 3.1.5).
3.1 Definition of the Model
15
Figure 3.3: A GoCAD model imported in BHGravi.
• It is the user’s responsibility to ensure that all GoCAD surfaces are closed1 . BHGravi will
yield erroneous results otherwise.
• It is the user’s responsibility to ensure that, unless specifically intended, the whole volume bounded by the GoCAD objects is indeed occupied by closed surfaces objects. Unwanted mass deficit will otherwise occur and generate noise.
Once a model has been imported, the panel on the left part of the screen is updated to
show a table listing all imported objects. From this table, it is possible to toggle the display of
the objects and to edit their density (Figure 3.3). To change the density of a given unit, simply
change the corresponding value in the table. Besides, it is also possible to clip the model
independently with three orthogonal planes in order to visualize the internal structure of the
model. Note that clipped parts are not excluded when computing the synthetic gravity.
1 BHGravi
is very sensitive to this constraint. For example, we have found that if a closed GoCAD surface
is composed of many surfaces geometrically tied together, the latter must be all merged within the former (in
GoCAD’s Surface “Edit” menu, go to “Part”->“Merge all”) otherwise the ordering of the facets of the resulting
surface is incorrect.
16
3. Modeling the Gravity Response of Geological Models
Figure 3.4: UBC-GIF model import window.
3.1.4
UBC-GIF Model
It is also possible to import models in UBC-GIF format (http://www.geology.ubc.ca/
research/ubcgif/). This format consists of two mandatory and one optional files. Figure 3.4 shows the window where the file names are entered.
The first file contains the 3D mesh which defines the model region. It has the following
structure:
NE NN NV
E0 N0 V0
dE1 dE2 ... dEne
dN1 dN2 ... dNnn
dV1 dV2 ... dVnv
where
• NE Number of cells in the East direction.
• NN Number of cells in the North direction.
• NV Number of cells in the vertical direction.
• E0, N0, V0 Coordinates, in meters, of the southwest top corner, specified in (Easting,
Northing, Elevation). The elevation can be relative, but it needs to be consistent with the
elevation used to specify the topography.
• dEn Cell widths in the easting direction (from W to E).
• dNn Cell widths in the northing direction (from S to N).
• dVn Cell depths (top to bottom).
The second file contains the cell values of the density model. The density contrast must
have values in g/cm3 . The following is the file structure of this file:
den_1,1,1
den_1,1,2
:
3.1 Definition of the Model
17
den_1,1,NV
den_1,2,1
:
den_i,j,k
:
den_NN,NE,NV
where den i,j,k is the density at location [i j k]. [i j k]=[1 1 1] is defined as the cell
at the top-south-west corner of the model. The total number of lines in this file should equal
NN×NE×NV, where NN is the number of cells in the North direction, NE is the number of cells
in the East direction, and NV is the number of cells in the vertical direction. The lines must
be ordered so that k changes the quickest (from 1 to NV), followed by j (from 1 to NE), then
followed by i (from 1 to NN).
The third optional file is used to define the surface topography of the 3D model by specifying the elevation at different locations. This file has the following structure:
! comment
!
npt
E1 N1 elev1
E2 N2 elev2
:
E_npt N_npt elev_npt
where top lines beginning with ! are comments, and
• npt number of points.
• E i,N i,elev i are Easting, Northing and elevation of the ith point.
The elevation in this file and Vo in the mesh file must be specified relative to a common reference. The lines in this file can be in any order as long as the total number is equal to npt. For
faster importation, the topographic data should be supplied on a regular grid corresponding
to the center points of the cells in the horizontal plane of the mesh. If this condition is not met,
the user must select the “Krige topography data” button in the import window (Figure 3.4). To
ensure the accurate discretization of the topography, it is important that the topographic data
be supplied over the entire area above the model and that the supplied elevation data points
are not too sparse. If the topography file is not supplied, the top surface will be treated as
being flat.
3.1.5
A note about the system of coordinates
The general convention in applied geophysics is to define the direction of the vertical gravity,
gz , toward the center of the earth. Besides, all vertical coordinates in BHGravi are elevations
(z axis positive upward) because elevation coordinates are independent of the position of the
18
3. Modeling the Gravity Response of Geological Models
Figure 3.5: A UBC-GIF model imported in BHGravi.
3.2 Definition of the Survey
19
ground surface. This means that there is a conflict between the geophysical convention, in
which positive means downward, and the mathematical one, in which positive means upward. Because BHGravi aims at the interpretation of geophysical data, the sign of the results
of the vertical gravity computation routines is changed to agree with the convention in applied
geophysics. Therefore, a positive gz anomaly means the excess of mass is below the point of
observation.
Also, to maintain a right-hand system of coordinates (needed for computation of the gravity), the x axis is oriented toward the east and the y axis toward the north. As three component
gravity might eventually be incorporated in a future version of BHGravi, it is important to
clarify the sign convention for the attraction vector.
3.2
Definition of the Survey
Two types of measurements are considered in BHGravi: borehole profiles and three-dimensional
surveys such as ground or airborne surveys. Both types can be imported in simple ASCII column files. It is also possible to create straight boreholes profiles and flat grid surveys within
the GUI. There are also facilities to enter the parameters of a reference station, needed to link
the synthetic data to the field data.
The survey parameters window is accessible from the Window menu, or with the ctrl-B
keyboard shortcut. There are three subwindows accessible in the survey window: the first
for the reference station, the second for boreholes and the last for ground surveys (Figure 3.6).
3.2.1
Reference station
When comparing sythetic data to field data, it is necessary to define a common reference station to tie up all the data. By default, this option is not selected. If this option is desired, it
must be selected by the user prior to running the modeling. When selecting this option, the
user must enter the coordinates of the reference point as well as the reference gravity gz in
µGal.
In the reference station panel (Figure 3.6a), it is also possible to select if the free-air effect
should be added to the synthetic gz . If it is the case, the synthetic gz at an elevation z1 simply
becomes
gz + 308.6 h
[µGal]
(3.1)
where h = zre f − z1 and zre f is the elevation at the reference point. Similarly, it is possible to
apply a Bouguer correction to the computed gz . With h defined above with zre f the datum
elevation, the correction is (Telford et al., 1990)
2πGρh
(3.2)
if h < 0 (the observation point is above the datum), or
4πGρh
(3.3)
if h > 0 (the observation point is below the datum). The density ρ and datum elevation must
be given by the user.
20
3. Modeling the Gravity Response of Geological Models
(a)
(b)
(c)
Figure 3.6: Panels allowing the definition of the survey parameters.
3.2.2
Borehole profiles
From the user interface, it is possible to define straight borehole paths with regular station
interval. This interface is shown in Figure 3.6b. There are no restrictions on the number of
boreholes or station interval, except the limitations imposed by the computer memory. To
add a straight borehole, enter the desired parameters and press the “+” button. To remove a
borehole, first select it in the list and press the “-” button.
Curved boreholes with irregular station interval can be handled by the program, but must
be defined outside and imported. To import borehole data, push the arrow button. The import
file format is a simple three or five column text file in which the columns correspond respectively to the easting, northing and elevation coordinates and optional fourth and fifth columns
for the gravity measured in the field and the measure standard deviation, both in µGal. If
the standard deviation is unknown, a column of zeros must be provided. Note that the file
extension must be *.xyz.
3.2.3
Ground surveys
Similarly to boreholes profiles, it is possible to create a ground survey grid or import field
data. It is possible to create/import only one ground survey per project. The procedure and
file format to import ground survey data is the same as for borehole profiles. The station can be
at any elevation. It is important to note however that in order to display the modeled gravity,
3.3 Visualization of the Results
21
a surface is triangulated from the station coordinates. This will most likely lead to problems if
the survey stations exist at two or more superimposed levels.
To create a flat survey grid, enter the desired parameters in the corresponding fields (Figure 3.6c), and push the “+” button. The survey can be removed from the project by pressing
the “-” button.
3.3
Visualization of the Results
Facilities to visualize and export the modeling results are accessible from the Window->Results
menu.
3.3.1
Borehole profiles
It is possible to view gz and ∆gz /∆z profiles for one or many boreholes simultaneously: simply
select the desired boreholes in the list. Field data can also be displayed along with the modeled
profiles by activating the toggle button below the list of boreholes. The selected profiles can
be export to an ASCII file by pressing the button with a floppy disk icon. A snapshot of the
current plots can also be saved by pushing the button with a camera icon.
3.3.2
Ground surveys
For ground surveys, the modeled gravity is displayed on a surface built after triangulation
of the station coordinates. On this surface, it is also possible to view independently the measured gravity map or the fit between the field data and the modeled data. In order to make
the surface appear, the user must press the “Show map” toggle button. When the surface is
displayed, it is possible to draw a color scale by checking the box below this button.
If the surveys is made of profiles (such as the surveys created in BHGravi), it is also possible
to plot one or many profiles simultaneously.
22
3. Modeling the Gravity Response of Geological Models
4 Specific functionalities
4.1
Batch runs
It is possible to perform modeling calculations outside the GUI, from the command line. Parameter files must be created in order to do so. These parameter files can be created in the
GUI for a given project (from the menu Project -> create batch files...), and subsequently copied and edited to create a set of input files.
The batch files are saved in a directory named after the name of the project, with the extension .batch. This directory contains a file with the extension .par: this is the parameter file.
In order to launch the calculations, go to the .batch directory and, on windows, type
BHGravi.bat -v -p file with extension.par
The -v switch causes runtime messages to be displayed on screen. The modeling results are
saved in a file with the extension .out.
23
24
4. Specific functionalities
5 Software Specifications
5.1
Numerical
There are two core computing routines to model the gravitational response: one for models
based on rectilinear grids and one for objects made of arbitrary polyhedra. The former relies
on an algorithm described in Li and Chouteau (1998) for right rectangular prisms, the latter is
an implementation of the method of Singh and Guptasarma (2001). Although all three components of gravity can be computed with both routines, only the vertical component is computed
and stored in the current version of the program.
5.2
Geological models
The program can import models in UBC-GIF format, as well as GoCAD TSurf files. It is possible to change the densities, but not alter the geometry of the models. Topography is handled
for both.
It is also possible to build models from scratch with objects of four primitive shapes: cone,
cuboid, cylinder and ellipsoid.
5.3
Field data
Borehole and ground survey data can be imported in the program. The file format is a simple
five column ASCII file with data ordered as following: x y z g z std dev.
The modeled response can be tied to a reference station defined by the user. Free-air effect
and Bouguer correction can be applied to the modeled gravity.
5.4
User Interface
The program can be run with or without a GUI. To use the program without the GUI, input
files must be provided. Such input files can be prepared with the help of the GUI.
The GUI user interface provide with windows to
25
26
5. Software Specifications
• build, edit or import the geological models;
• define a reference station, import borehole or ground survey data, or build synthetic
surveys;
• visualize the modeling results and compare with field data.
The modeling results can be exported to ASCII files. Snapshots of the model and plots of
the results can be saved in various formats.
5.5
What’s new in version 1.1
Version 1.1 brings many bug fixes that make the UI more robust. A third axis of rotation was
aslo added to simple shapes to complement the existing strike and dip angles. Figure 5.1
shows an example of the effect of this rotation angle on a plate.
Figure 5.1: Effect of rotation angle on a plate: plate 1 (brownish) has a strike and a dip of
respectively 30° and 60°, while plate 2 (purple) has the same values of strike and dip plus a
rotation of 20°.
References
Li, X. and Chouteau, M. (1998). Three-dimentional gravity modeling in all space. Surveys in
Geophysics, 19:339–368. 25
Singh, B. and Guptasarma, D. (2001). New method for fast computation of gravity and magnetic anomalies from arbitrary polyhedra. Geophysics, 66(2):521–526. 25
Telford, W. M., Geldart, L. P., and Sheriff, R. E. (1990). Applied Geophysics. Cambridge University Press, 2 edition. 19
27
28
References
Index
Batch runs, 10, 23
Borehole
add straight, 20
curved, 20
import, 20
remove, 20
Bouguer
correction, 19
Coordinates
system of, 17
Density
contrast, 12
Domain box, 11
Free-air, 19
Ground survey
add, 21
import, 20
remove, 21
simple shape, 12
UBC, 16
view, 11
Modeling
run, 11
Reference station, 19
Results, 21
borehole profiles, 21
ground survey, 21
SGT, 9
Specifications, 25
Survey, 19–21
borehole profiles, 20
ground, 20
reference station, 19
Units
density, 12
space, 12
VTK, 9
Installation, 9–10
key, 9
linux, 10
Mac OS X, 10
MS Windows, 10
Requirements, 9
64-bit, 9
JAMA, 9
Java, 9
Model, 11–19
cone, 12
cuboid, 12
cylinder, 12
ellipsoid, 12
GoCAD, 12
29