1
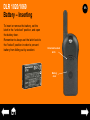
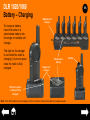
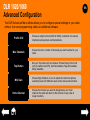
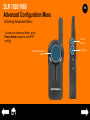
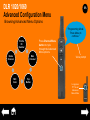
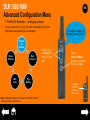
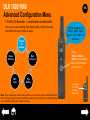
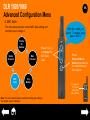
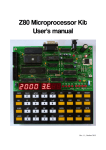
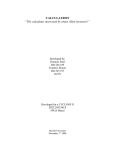
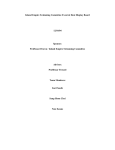
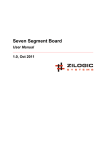
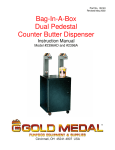
DLR SERIES DIGITAL MADE EASY Click to begin QUICK REFERENCE GUIDE FOR RADIO FEATURES MOTOROLA, MOTO, MOTOROLA SOLUTIONS and the Stylized M Logo are trademarks or registered trademarks of Motorola Trademark Holdings, LLC and are used under license. All other trademarks are the property of their respective owners. © 2015 Motorola Solutions, Inc. All rights reserved. Specifications are subject to change without notice. All specifications shown are typical. DLR SERIES Quick Reference Guide Table of Contents: 1. Radio Overview 2. Battery – Insert and Charge Models: DLR 1020 – 2 channels DLR 1060 – 6 channels Frequency band: ISM 900 MHz 3. Basic Operations 4. Advanced Configuration 5. Special Call Features 6. CPS Software 7. Troubleshooting and FAQ DLR 1020/1060 Radio Overview Top Button Power Button Antenna Tx/Rx Indicator LED Volume/ UpDown Control Buttons Audio accessory connector Battery Channel/Menu Button PTT Button Microphone Speaker Holster DLR 1020/1060 Battery – Inserting To insert or remove the battery, set the latch in the “unlocked“ position, and open the battery door. Remember to always set the latch back to the “locked” position in order to prevent battery from falling out by accident. Unlocked/Locked latch Battery door DLR 1020/1060 Battery – Charging Multiple-unit charger To charge a battery, insert the radio or a stand-alone battery into the single or multiple unit charger. The light on the charger is red when the radio is charging. It turns to green once the radio is fully charged. Stand-alone battery Single-unit charger LED turns green – battery is fully charged Note: Turn off the radio prior to charging. You don’t need to remove the holster to charge the radio. Holster DLR 1020/1060 Basic Operations PRIVATE REPLY Press Top Button to queue up for Private Reply* (while someone is ON/OFF Power Button – long press to turn the device ON/OFF, short press to check battery status. speaking to your channel), then push PTT to call the last person speaking. VOLUME [+] / [-] buttons – press to adjust volume TALK PTT (Push To Talk) Button – push firmly, wait for the TPT (Talk Permit Tone), speak into the mic (5 inches away from mouth) Note: *Private Reply function is described here. CHANNELS Channel/Menu Button – press to check the current channel. You can now use [+] and [-] buttons to switch channels. Press PTT to exit channel browsing. DLR 1020/1060 Advanced Configuration The DLR Advanced Menu Mode allows you to configure special settings in your radio without the need programming cables or additional software. Profile ID # Choose a 4-digit number (0000 to 9999). Customize it to ensure interference free/private communications. Max Channels Choose the max. number of channels you want to allow for your radio. Top Button Set your Top button with one feature: Private Reply, Direct Call (only if enabled via CPS), Call All Available, Page All Available, Mute, Disabled. MIC Gain Choose High, Medium or Low to adjust the radio microphone sensitivity level to fit different users and/or noise environments. Home Channel Choose the channel you want to designate as your main channel: the radio will return to this channel in any case of longer inactivity. DLR 1020/1060 Advanced Configuration Menu Entering Advanced Menu To enter the Advanced Menu, push Power Button together with PTT and [+]. PTT (Push-to-Talk) Button Power Button [+] Button DLR 1020/1060 Advanced Configuration Menu Browsing Advanced Menu Options “Programming Mode. Press Menu to continue.” Press Channel/Menu button to cycle through the Advanced Menu options. Profile ID Number Home Channel MIC Gain Max Channel Top Button Voice prompt Long press PTT to exit Advanced Menu Mode. DLR 1020/1060 Advanced Configuration Menu 1. Profile ID Number – current value The radio announces the current PROFILE ID number and prompts you to change it: Profile ID Number Home Channel MIC Gain Max Channel Press [+] or [-] to enter the Profile ID number Sub-Menu. Top Button ATTENTION: Default Profile ID number is “0000”! Make sure to change it to avoid interferences and ensure privacy. “Current Profile ID: <Digit1, Digit2, Digit3, Digit4>; to change, press [+] or [-]” Press Channel/Menu button to proceed to next Advanced Menu option. Long press PTT to exit Advanced Menu Mode. DLR 1020/1060 Advanced Configuration Menu 1. Profile ID Number – changing values As you press the [+] or [-], the radio will announce the first digit value and prompt you to change it: “First digit <number>.To change, press [+] or [-].” Profile ID Number Home Channel MIC Gain Max Channel Top Button Note: Profile ID numbers to choose from: 0000 to 9999 – 10,000 possible combinations. Press [+] or [-] to change the first Profile ID digit. Press Channel/Menu button to continue to the next digit. Long press PTT to exit Advanced Menu Mode. DLR 1020/1060 Advanced Configuration Menu 1. Profile ID Number – sub-menu As you press [+] or [-] to change the current digit, radio will announce the values. Digit1 Digit2 Digit3 Digit4 Once you set the last digit of the Profile ID Number with the Channel/Menu button, you will proceed to the next Advanced Menu option. “zero, one, two, (…), nine, zero…” Press Channel/Menu button to set digit and proceed to the next one. Long press PTT to exit Advanced Menu Mode. Note: You can move forward through the 4 digits, but not backwards. DLR 1020/1060 Advanced Configuration Menu 1. Profile ID Number – modification confirmation Once you’ve done setting the 4-digits profile number, the radio will confirm the new Profile ID value. Profile ID Number Home Channel MIC Gain Max Channel Top Button Note: If you realize the number set is not the one you want, press the Menu/Channel button and go through the Advanced Menu options until you’re back on the beginning of the Profile ID option and repeat the steps. “Profile ID saved as: <digit1, digit2, digit3, digit4>. Press Menu to continue.” Press Channel/Menu button to proceed to the next Advanced Menu option. Long press PTT to exit Advanced Menu Mode. DLR 1020/1060 Advanced Configuration Menu 2. Maximum Channels The radio announces the current maximum number of channels and prompts you to change it: Profile ID Number Home Channel MIC Gain Max Channel Press [+] or [-] to change the number of channels. Top Button Note: The maximum number of channels you can set up depends on the radio model: DLR1060 – 6 channels; DLR1020 – 2 channels. “Max Channels <number>. To change, press [+] or [-].” Press Channel/Menu button to proceed to the next Advanced Menu option. Long press PTT to exit Advanced Menu Mode. DLR 1020/1060 Advanced Configuration Menu 3. Top Button – current feature The radio announces the current Top Button feature and prompts you to change it: Profile ID Number Home Channel MIC Gain Max Channel Press [+] or [-] to change the Top Button feature. Top Button Note: The default function of Top Button is “Private Reply”. Top Button “Programmable Button <Top Button Feature>. To change, press [+] or [-].” Press Channel/Menu button to proceed to the next Advanced Menu option. Long press PTT to exit Advanced Menu Mode. DLR 1020/1060 Advanced Configuration Menu 3. Top Button – sub-menu options Use [+] / [-] buttons to browse the Top Button functions – you will hear their names read. Top Button “<Top button feature>” Private Reply Direct Call* Disabled Top Button Press [+] or [-] to change the Top Button feature. Press Channel/Menu button to proceed to the next Advanced Menu option. Call All Available Mute Page All Available Note: In order to use the Direct Call option, you must first set it up using CPS software – otherwise, the top button will respond with a “bonk” sound. Long press PTT to exit Advanced Menu Mode. DLR 1020/1060 Advanced Configuration Menu 4. MIC Gain The radio announces the current MIC Gain setting and prompts you to change it: Profile ID Number Home Channel MIC Gain Max Channel Press [+] or [-] to change the MIC Gain level. Top Button Note: You can switch between Low/Medium/High gain settings. The default value is “Medium”. “MIC Gain <MIC gain level>. To change, press plus or minus.” Press Channel/Menu button to proceed to the next Advanced Menu option. Long press PTT to exit Advanced Menu Mode. DLR 1020/1060 Advanced Configuration Menu 5. Home Channel The radio announces the current Home Channel setting and prompts you to change it: Profile ID Number Home Channel MIC Gain Max Channel Press [+] or [-] to change the Home Channel setting. Top Button Note: The options to choose from are “Disabled” or “Channel #” (or channel name, in case it has been set up via CPS). The default setting is “Disabled”. “Home Channel <Home channel setting> to change press [+] or [-].” Press Channel/Menu button to proceed to the next Advanced Menu option. Long press PTT to exit Advanced Menu Mode. Special Call Features DLR 1020/1060 Special Call Features As mentioned before, the Top Button can be configured to serve different functions: Special Call Features: • Private Reply Private Reply • Direct Call • Page All Available Direct Call* Disabled • Call All Available Top Button Mute: instant mute function Disabled: disables the Top Button Call All Available Mute * Except for Private Reply and Mute, you can also assign special call features to a designated channel instead of the Top Button. Page All Available Note: Private Reply is the default Top Button function. Go to Advanced Functions Menu to learn how to change it. ** To set up Direct Call function for the first time (Top Button or specific channel ) you will need to use the CPS. Learn more here. DLR 1020/1060 Special Call Features – Private Reply Private Call feature allows you to talk privately to the person currently talking to a group after the group radio transmission is over. This allows to free the radio channel from unnecessary back and forward chatter. Top Button (with LED) This function engages the Top Button and the PTT button. PTT Button Go to the next slide to see how it works. Note: Private Reply is the default Top Button function. Go to “Advanced Functions Menu” chapter to learn how to change it. DLR 1020/1060 Special Call Features – Private Reply Step by step 1. User A is talking to a group. 2. You want to talk privately to the User A (currently speaking). You push the Top button and hear a “Private Reply” prompt. The LED light begins to blink, and the private talk is in queue. 3. When the group talk is over, you push PTT – User A hears a “Private” prompt, and you start a private talk. Whenever they press PTT to reply back, they are talking privately and nobody else can hear them. The radio plays a distinctive private TPT (Talk Permit Tone) during the private talk. User A You Next step DLR 1020/1060 Special Call Features – Private Reply Step by step 1. User A is talking to a group. 2. You want to talk privately to the User A (currently speaking). You push the Top button and hear a “Private Reply” prompt. The LED light begins to blink, and the private talk is in queue. 3. When the group talk is over, you push PTT – User A hears a “Private” prompt, and you start a private talk. Whenever they press PTT to reply back, they are talking privately and nobody else can hear them. The radio plays a distinctive private TPT (Talk Permit Tone) during the private talk. User A Previous step You Next step DLR 1020/1060 Special Call Features – Private Reply Step by step 1. User A is talking to a group. 2. You want to talk privately to the User A (currently speaking). You push the Top button and hear a “Private Reply” prompt. The LED light begins to blink, and the private talk is in queue. 3. When the group talk is over, you push PTT – User A hears a “Private” prompt, and you start a private talk. Whenever you or User A presses PTT to reply back, you are talking privately and nobody else can hear you . The radio plays a distinctive private TPT (Talk Permit Tone) during the private talk. User A Previous step You DLR 1020/1060 Special Call Features – Private Reply During the private communication, the LED on the Top Button illuminates a solid light. If any of the radio users take too long to push the PTT button (10 seconds by default*), the private communication ends with a “Private Over” voice prompt on both radio, and LEDs go off – you are back in the normal group call mode. If your request is not successful because, for example, another person’s private reply request has been queued first, the radio will give you a busy tone. Top Button(with LED) – solid light when in Private Private Hang Time = 10 seconds PTT Button Note: *The length of inactivity period is called “Private Hang Time” and can be changed using the CPS. DLR 1020/1060 Special Call Features – Private Reply A tip: How to apply Private Reply in your daily job The use of this feature reduces the need for phone extensions or cell phone calls to talk privately. Simply call on the radio the name of the person you want to talk to privately. When he or she responds to you, simply push the Private Reply button and then press the PTT to initiate the one to one private conversation. DLR 1020/1060 Special Call Features – Direct Call The Direct Call Feature allows you to call one-on-one privately another pre-determined user that has been mapped into the radio Top Button (this feature needs to be pre-programmed*) or to any radio channel instead. Top Button (with LED) This way your radio can have Top Button available for other radio features (like Private Reply or Mute) and Direct Call set up in a special channel. You can set up different direct calls in different channels. PTT Button Go to the next slide to see how it works. *Note: To set up Direct Call function for the first time (Top Button or specific channel) you need to use the CPS. Learn more here. DLR 1020/1060 Special Call Features – Direct Call Step by step “<User B> Name” 1. To talk directly to User B press Top Button*. Your radio plays voice prompt with the “Private Name” (as programmed in CPS, if enabled) and top LED starts blinking orange, showing you are in queue waiting to talk privately to User B. 2. Now, Press PTT to talk Privately to User B (who is NOT in a radio conversation). Both radios illuminate solid orange. Radio B hears radio voice prompt “Private” indicating there is a Direct Private Call in progress. Radio plays a distinctive Private TPT tone. You User B 3. Whenever you or User B presses PTT to reply back, you will talk privately to each other. (Radio plays a distinctive Private TPT tone). Nobody else will hear you. Next step *Note: Top Button should be previously configured to Direct Call function and direct call User ID should be configured via CPS). DLR 1020/1060 Special Call Features – Direct Call Step by step 1. To talk directly to User B press Top Button*. Your radio plays voice prompt with the “Private Name” (as programmed in CPS, if enabled) and top LED starts blinking orange, showing you are in queue waiting to talk privately to User B. 2. Now, Press PTT to talk Privately to User B (who is NOT in a radio conversation). Both radios illuminate solid orange. Radio B hears radio voice prompt “Private” indicating there is a Direct Private Call in progress. Radio plays a distinctive Private TPT tone. Direct Call in progress You “Private” User B 3. Whenever you or User B presses PTT to reply back, you will talk privately to each other. (Radio plays a distinctive Private TPT tone). Nobody else will hear you. Previous step Next step *Note: Top Button should be previously configured to Direct Call function and direct call User ID should be configured via CPS). DLR 1020/1060 Special Call Features – Direct Call Step by step 1. To talk directly to User B press Top Button*. Your radio plays voice prompt with the “Private Name” (as programmed in CPS, if enabled) and top LED starts blinking orange, showing you are in queue waiting to talk privately to User B. 2. Now, Press PTT to talk Privately to User B (who is NOT in a radio conversation). Both radios illuminate solid orange. Radio B hears radio voice prompt “Private” indicating there is a Direct Private Call in progress. Radio plays a distinctive Private TPT tone. Direct Call in progress You User B 3. Whenever you or User B presses PTT to reply back, you will talk privately to each other. (Radio plays a distinctive Private TPT tone). Nobody else will hear you. Previous step Next step *Note: Top Button should be previously configured to Direct Call function and direct call User ID should be configured via CPS). DLR 1020/1060 Special Call Features – Direct Call “Private Over” Step by step 4A. If any of the radio users takes too long to push the PTT and reply back, the radio will time out (“Private Hang Time“ of 10 sec) and end the private communication while a playing “Private Over” voice prompt that both users will hear. The TOP button LED will go OFF . 4B. If the radio user B (who initiated the Direct Call), wants to end the call he can do so by long pressing the Top Button and the radio will play “Private Over” voice prompt that both users hear, indicating the private call is over. The TOP button LED will go off. 10 sec Private Hang Time is out You “Private Over “ User B 5. After you and User B finish your Direct Call, you will be back to join the radio group transmissions in your channel. Previous step Next step *Note: Top Button should be previously configured to Direct Call function and direct call User ID should be configured via CPS). DLR 1020/1060 Special Call Features – Direct Call “Private Over” Step by step 4A. If any of the radio users takes too long to push the PTT and reply back, the radio will time out (“Private Hang Time“ of 10 sec) and end the private communication while a playing “Private Over” voice prompt that both users will hear. The TOP button LED will go OFF . 4B. If the radio user B (who initiated the Direct Call), wants to end the call he can do so by long pressing the Top Button and the radio will play “Private Over” voice prompt that both users hear, indicating the private call is over. The TOP button LED will go off. You “Private Over “ User B 5. After you and User B finish your Direct Call, you will be back to join the radio group transmissions in your channel. Previous step Next step *Note: Top Button should be previously configured to Direct Call function and direct call User ID should be configured via CPS). DLR 1020/1060 Special Call Features – Direct Call Step by step 4A. If any of the radio users takes too long to push the PTT and reply back, the radio will time out (“Private Hang Time“ of 10 sec) and end the private communication while a playing “Private Over” voice prompt that both users will hear. The TOP button LED will go OFF . 4B. If the radio user B (who initiated the Direct Call), wants to end the call he can do so by long pressing the Top Button and the radio will play “Private Over” voice prompt that both users hear, indicating the private call is over. The TOP button LED will go off. Back to group transmission You User B 5. After you and User B finish your Direct Call, you will be back to join the radio group transmissions in your channel. Previous step *Note: Top Button should be previously configured to Direct Call function and direct call User ID should be configured via CPS). DLR 1020/1060 Special Call Features – Direct Call Top Button (with LED) A tip: Why and how to use Direct Call: Set up your employees to be able to contact directly and privately their supervisor, the Manager on Duty or to reach a designated person for special requests. To make a Direct Call simply press the Top Button and then push the PTT button to talk. PTT Button If the Direct Call was set up in a specific channel, simple change to the Direct Call Channel and press PTT to talk privately. DLR 1020/1060 Special Call Features – Call All Available Call All Available allows to start a group transmission to anyone not engaged in a call. This creates a Group Call in a temporary “super channel group” with a 4-second group hang time. This means that anyone within this super group can respond by simply pushing the PTT – but after 4 seconds of inactivity the group will terminate. Radio initiates Call All Available Radios busy in private conversation This is in order to avoid all users to be tied up indefinitely in unnecessary group conversations. In the picture , the radio will create a “super channel group” consisting of all radios from channel A and C. Channel B busy Channel A available Super channel group (4-sec group hang time) Note: This feature does not interrupt ongoing communications – only available groups are involved. Call All Available feature can be assigned to either the radio top button or a designated channel. Channel C available DLR 1020/1060 Special Call Features – Call All Available A tip: How Call All Available can be applied: An employee in a retail store is trying to see if anyone took the backroom scanner. He presses the Top Button, then the PTT button and asks: “Does anybody know who has the backroom scanner? “. >>> Whoever is available in any of the channels can talk back to all the whole group of users (who were tied up in the super-channel group call) and provide information. Note: This feature does not interrupt ongoing communications – only available groups are involved. DLR 1020/1060 Special Call Features – Page All Available This feature is useful if you have more than 1 or 2 channels. It allows the ability to communicate a message to all available radio users at once, without having to change through each channel individually. Radio initiates Page All Available Radios busy in private conversation One-way group announcement Page All Available is a one way group voice announcement to all users in different channels, who are not currently tied up in ongoing radio conversation*. Receivers of Page All Available announcement can only reply with a Private Call. In the picture , a one-way announcement will be transmitted to all radios from channel A and C. Channel B busy Channel A available Channel C available Note: *This feature does not interrupt ongoing communications – only available groups are involved. DLR 1020/1060 Special Call Features – Page All Available Application examples: 6 channel radio Top Button: Private Reply Channel 1: Page All Available Example 1: An employee in a retail store is looking for anyone (in any of the group radio channels) who can come over to give him a hand in the back room. He presses the Top Button (or changes to Page All Available channel), then pushes the PTT button and says: “We need someone to come over to the warehouse to help unload the truck “. > >> Whoever is available can Privately Reply him asking more details or confirming they are available . Example 2: Anna needs to talk privately John and she is not sure in which channel to find him. It is cumbersome to browse all channels asking for John. She speaks in Channel #1 (assigned Page All Available) and asks: “John Smith, are you available ?” > >> If John is available, he will reply privately (Top Button). If no response is heard, it means he is busy in another radio call or not within the range. DLR 1020/1060 Customer Programming Software – CPS Customer Programming Software (CPS) allows you to program or change features in your radio. To use CPS, you need to download it from the internet and connect your radio with the computer using the CPS Programming Cable. Using CPS, you can set Private Hang Time, Group Hang Time, program all radio buttons, channels and much more. Please refer to the User Manual for details. CPS software is available for free as web-based downloadable software at: www.motorolasolutions.com/DLR DLR 1020/1060 Customer FAQ and Troubleshooting To help you answer some of the Frequently Asked Questions and give you some Troubleshooting tips here are some useful documents. Click adequate buttons to open PDF attachments: DLR Troubleshooting Private Reply & Direct Call FAQ For more information refer to the User Guide or go to our DLR website: www.motorolasolutions.com/DLR DLR SERIES DIGITAL MADE EASY