1
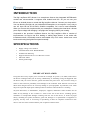
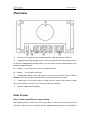
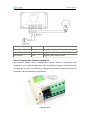
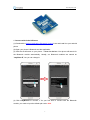
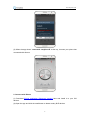
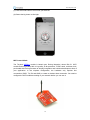
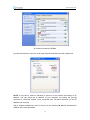
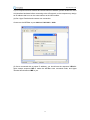
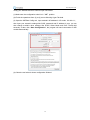
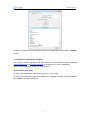
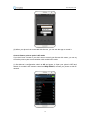
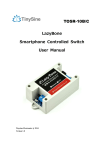
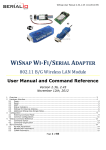
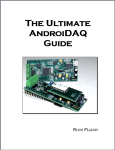
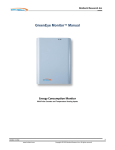
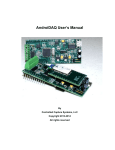
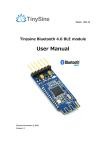
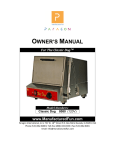
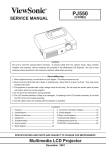
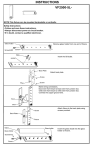
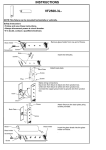
Big LazyBone Dimmer User Manual Tinysine Electronics @ 2015 Version 1.0 1 www.tinysine.com INTRODUCTION The Big LazyBone WiFi dimmer is a smartphone dimmer that integrated WiFi/Bluetooh module and microcontroller. It supports both Android and iOS. So you can use your iPhone or Android phone to control this Big LazyBone dimmer. Connect your lamp with it. You can dimming the light via your Android/iOS smartphone or a computer. It very easy to use. AC input can be AC110-240V, 50/60Hz compatible. So it can be used worldwide. When you connect this Lazybone with your smartphone. Rotating the virtual knob. dimmer ports output voltage will changing. Lamp light also changing follow your rotating. Compared to the previous LazyBone dimmer, the Big LazyBone offers a number of improvements. It's can be set as a leading or trailing edge dimmer. It can works with incandescent bulb, LED blub(It must be a dimmable one) or AC motor. It also have a real knob can dimming the light/motor speed manually. SPECIFICATIONS Supply voltage: AC110-240V Communication mode: Bluetooth/WiFi 50/60Hz auto detecting Support Android: above V2.3/ iPhone 4s or later Max load: 300W Gentle gradient light IMPORTANT DISCLAIMER Using this device may require you to connect the civil high AC power (110~240V). Please leave the device uncharged when you are wiring. Additionally, if something wrong has happened with the device and you want to check it, please disconnect the power first. Any incorrect wiring or shorts on the board can potentially cause damage to the controller itself. Extreme care must be taken when using this device to avoid any damage to your equipment. In particular, never touch the power input and output ports without protective measures when the device is working. Tinysine Electronics, its shareholders, employees, suppliers, distributors and/or resellers are not liable for any damage or loss of data as a result of the use of this device, including special, incidental or consequential damages resulting from the use of this device, or under any legal theory, including lost profits, downtime, good will, damage to or replacement of equipment or property, and any costs or recovering or reproducing of data on computers connected to this device. Your use of this circuit indicates your acceptance of these terms. 2 www.tinysine.com Overview ①-- Real Knob: This knob can dim the light manually. Click the knob turn ON/OFF. ②-- Leading/Trailing Edge Setting Switch: in order to achieve better control performance, we provide a leading/trailing setting switch, you can choose correct setting based on your electrical equipment’s type. Leading --- If your load is AC motor or incandescent bulb. Trailing --- If your load is LED bulb.. ③ -- Configuration Switch: (For WiFi version use only) Set the WiFi module to AP or Normal mode. You can also control this dimmer without a router in AP mode. ④ -- Power Input: AC110-240V power in. GND port can connect with ground or leave open. Here we have L1 and L2 port. They are totally same function. ⑤-- Dimmer Output: N(Left),L(Right) How to use Step1: Power Input/Dimmer output wiring Big LazyBone Dimmer works with AC110~240V power, There are 4 power input ports and 2 dimmer output ports. Big LazyBone dimmer supports external switch turn ON/OFF the 3 www.tinysine.com lamp. 1.Normal Connection In this mode, you just need to connect the live wire to dimmer’s input port(L1 or L2), connect the zero wire to N. By the way, if your AC power and/or electrical equipment have GND, we strongly suggest you to connect it with dimmer’s GND. Device Action State Real Knob Click Toggle the lamp ON/OFF state Virtual Knob(APP) Click Toggle the lamp ON/OFF state 2.With External SPDT Switch In this mode, you can turn on/off the lamp with a SPDT switch. A typical SPDT switch have 3 ports: COM, L1 and L2. Connect AC power’s live wire to SPDT’s COM, then connect SPDT’s L1 and L2 to dimmer’s L1 and L2 respectively. Also, you need to connect AC power’s zero wire to N. 4 www.tinysine.com Device Action State Real Knob Click Toggle the lamp ON/OFF state Virtual Knob(APP) Click Toggle the lamp ON/OFF state SPDT Switch Push Toggle the lamp ON/OFF state Step2: Connect with electrical equipment Big LazyBone Dimmer have a leading/trailing switch, choose a appropriate mode according to your electrical equipment’s type, this dimmer supports incandescent bulb, LED bulb and AC motor. Just connect your equipment to dimmer’s output port directly, but remember to do this with dimmer un-powered. Leading Switch 5 www.tinysine.com Trailing Switch NOTE: For the AC waveform changed, the AC motor will have some noise when using this dimmer to control it. Step3: Connect to Smartphone Big LazyBone Dimmer works with Bluetooth or WiFi, can be controlled by your android phone or iPhone easily! Bluetooth Control Mode The Tinysine Bluetooth Bee V2 module is a Bluetooth 4.0 smart ready wireless module that integrated both EDR and BLE, which means you can control board by Android and iOS. It based on CC2540 Bluetooth chipset which has a compact size and the pinout is compatible with XBee, suitable for all kinds of microcontroller systems who have 3.3 power out. The module comes with an onboard antenna which can provides better signal quality. It acts like a transparent serial port, which works with a variety of Bluetooth adapter and Bluetooth phones. 6 www.tinysine.com 1. Connect with Android Phones (1) Download the Android application (Bluetooth Version) here and install it to your android phone. (2) Open your phone’s Bluetooth and the application. (3) Click the small button on your phone → Scan for devices. Your phone will search for the Bluetooth module automatically. Usually, our Bluetooth modules are named as “LazyBone-E”, but you can change it. (4) Click LazyBone-E to connect, if it’s your first time to connect with the Bluetooth module, you need to input the default pair code: 1234. 7 www.tinysine.com (5) When the app shows “connected: LazyBone-E” at the top, it means your phone has connected with dimmer. 2. Connect with iPhone (1) Download iPhone application (Bluetooth Version) here and install it to your iOS devices. (2) Open the app and click the small button to detect nearby BLE devices. 8 www.tinysine.com (3) When the app find a device named “LazyBone-B”, click this device to connect directly because BLE devices don’t need pair code. When dimmer has connected to iPhone, you will see the name from the top. 3. Controlled by smartphone with Bluetooth After your phone has connected to dimmer, you can use it to control lights or other equipment. 9 www.tinysine.com (1) Click the small button to turn on/off your devices. (2) Rotate the big button to dim light. WiFi Control Mode The Tinysine WiFiBee module is based upon Roving Networks' robust RN-171 Wi-Fi module and incorporates 802.11 b/g radio, 32 bit processor, TCP/IP stack, real-time clock, pre-loaded with Roving firmware to simplify integration and minimize development time of your application. In the simplest configuration, the hardware only requires four connections (PWR, TX, RX and GND) to create a wireless data connection. You need to configure the WiFi module according to your network before you can use it. 10 www.tinysine.com 1. Configure WiFiBee Here we use two methods to configure WiFiBee module: The first method is to use Hyper Terminal. (1) Set configuration switch to“AP”position, then power the dimmer. Once WiFiBee is powered, it will create an AP network. Set configuration switch to AP (2) Set your computer to obtain IP address automatically and open the network list. You should see a new wireless network named Wifly-EZX-XX(XX stands for the last two characters of the WiFi module’s MAC address). Obtain IP address automatically 11 www.tinysine.com AP network created by WiFiBee (3) Click the network to connect, it’s an open network that does not need a password. NOTE: It may take a while for Windows to connect to the network and assign an IP address. You can check the IP address of your computer by running the ipconfig command in command window. Once connected, this command will show you the IP address and net mask. The IP address assigned by Auto IP must be on the subnet 192.168.1.x, otherwise the WiFiBee will not be accessible. 12 www.tinysine.com If your computer has both wireless and wired interface hardware, please disable the wired LAN interface hardware before connecting to the AP network, or the computer may assign an IP address that is not on the same subnet as the WiFi module. (4) Run Hyper Terminal and create a new connection. Connect to the WiFiBee on port 2000 and 192.168.1.1 2000. (5) Once connected with a proper IP address, you should see the response *HELLO*. Input escape sequence $$$ to make the WiFiBee enter command mode, and Hyper Terminal should return CMD to you. 13 www.tinysine.com (6) Now you can setup the WiFiBee’s settings. Input every command and click Enter to send, Hyper Terminal should return AOK. set wlan phrase <your WPA password> set wlan ssid <your network ssid> set wlan join 1 save If you need a fixed IP address, please use these commands below: set ip a <your IP address> set ip dhcp 0 14 www.tinysine.com set sys printlvl 0 save In the manual, we set IP address to 192.168.1.185 for demo purposes. (7) When the configuration has finished, disconnect dimmer from AC power, change the configuration switch back to “Normal”position. Set configuration switch back to Normal The second way is to use WiFiBee AP mode config tool powered by TinySine Electronics. It’s a small program works with Windows computer, aiming at provides a easy way to 15 www.tinysine.com config your WiFiBee and don’t need to input commands. (1) Make sure the configuration switch is in“AP”position. (2) Finish the operations from (2) to (3) as we did using Hyper Terminal. (3) Open the WiFiBee Config tool, input module’s AP address in AP mode: 192.168.1.1, then input your network’s settings like SSID, password and IP address in turn, you can also change module’s other settings, like DHCP, Silent Mode and IDLE Time(0~300 seconds). At last, click “Start Configuration”, the program will send commands to WiFi module automatically. (4) Close the tool when it shows configuration finished. 16 www.tinysine.com (5) Disconnect dimmer from AC power and set the configuration switch back to “Normal” position. 3. Controlled by smartphone with WiFi You can also use the application with WiFi version to control dimmer, please download android application and iPhone application and install them to your smartphones. Here we can control dimmer with two ways by WiFi! Control dimmer via router (1) Open your smartphone’s WiFi and connnect it to your router. (2) Click the small button, then input WiFiBee’s IP address you have set before(default port is 2000 if you didn’t change it). 17 www.tinysine.com (3) When your phone has connected with dimmer, you can use the app to control it. Control dimmer point to point in AP mode If you don’t have a router or you don’t want to control your dimmer with router, you can try to use the peer-to-peer communication with module’s AP mode. (1) Set dimmer’s configuration switch to AP and power it. Open your phone’s WiFi and search for module’s AP network named as Wifly-EZX-XX, connect you phone to this AP network. 18 www.tinysine.com (2) Open the app on your phone, set IP as 192.168.1.1(the default IP address in AP mode, not the IP you configured based on your wireless network). (3) Once connected, you can control dimmer now! Commands We also provided a very simple command set for developer developing their own APP. The Lazybone operates with an easy to use command set as described in the table below. Command (Hex) Action Get lamp states - sends 2 bytes back to the controller: 'on/off state'+'light value' 5B 00 0D on/off state: 0-OFF, 1-ON light value: 0x00-0xFF, 0x00- Brightest, 0xFF- Darkest 67 xx 0D xx - light value. 0x00-0xFF, 65 00 0D Turn on Lamp 6F 00 0D Turn off Lamp 19 0x00- Brightest, 0xFF- Darkest www.tinysine.com NOTICE 1. Make sure your wire is strong enough to bear high voltage and that the electrical equipment is certified as reliable and secure. 2. Keep your device uncharged when wiring or checking for problems. Never try to touch the power input and/or output ports when powered, as this can be extremely dangerous! Take extra precaution if you have to examine the power input or output ports. 3. Keep your device working in a dry environment, and never pour liquid on the device. This device doesn’t have waterproof performance. 4. Don’t open the shell of the device or leave the circuit board exposed when working. 5. Keep your kids or pets away from this device. APPENDIX 1. GL5A Relay Datasheet 2. RN171 WiFi Module Datasheet 3. Bluetooth BLE/EDR Setting Tool 4. WiFiBee Setting Guide 5. Control WiFi LazyBone with Internet Contact us Address: Tinysine (Tinyos) Electronics 4-3 Hui Gu Park, Hai Tang Road, Hefei, Anhui, China Telephone: +86-551-65365921 Ext 801 Fax: +86-551-65365931 Working Time: 9:00-17:30 (GTM +8) Email: [email protected] 20