1
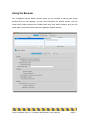
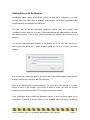
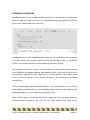
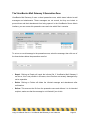
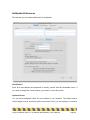
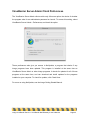
User's Manual
Intego VirusBarrier Server 2 / VirusBarrier Mail Gateway 2 User's Manual
Page 1
VirusBarrier Server 2 and VirusBarrier Mail Gateway 2 for Macintosh
© 2008 Intego. All Rights Reserved
Intego
www.intego.com
This manual was written for use with Intego VirusBarrier Server 2 and VirusBarrier Mail
Gateway 2 software for Macintosh. This manual and the Intego VirusBarrier Server 2 and
VirusBarrier Mail Gateway 2 software described in it are copyrighted, with all rights
reserved. This manual and the Intego VirusBarrier Server 2 and VirusBarrier Mail Gateway
2 software may not be copied, except as otherwise provided in your software license or as
expressly permitted in writing by Intego, Inc.
The Software is owned by Intego, and its structure, organization and code are the valuable
trade secrets of Intego. The Software is protected by United States Copyright Law and
International Treaty provisions.
Intego VirusBarrier Server 2 / VirusBarrier Mail Gateway 2 User's Manual
Page 2
Contents
1- About VirusBarrier Server 2 and VirusBarrier Mail Gateway 2 ............................. 4 Controlling Viruses on a Mac OS X Server............................................................................ 5 How VirusBarrier Server 2 and VirusBarrier Mail Gateway 2 Work ............................... 6 Intego VirusBarrier Server 2 Features ..................................................................................... 8 Intego VirusBarrier Mail Gateway 2 Features ....................................................................... 8 2—Installation..................................................................................................................... 9 System Requirements............................................................................................................... 10 Installing Intego VirusBarrier Server 2 and VirusBarrier Mail Gateway 2 ................... 10 Installing VirusBarrier Server Admin ................................................................................................10 Installing Remote Installation Packages.............................................................................................11 Installation Directly on the Server ......................................................................................................11 Installation Using Apple Remote Desktop 1.x ..................................................................................12 Installation Using Apple Remote Desktop 2.x or 3.x .......................................................................12 Installation Using Command Line Tools ...........................................................................................12 Uninstalling Intego VirusBarrier Server 2 or VirusBarrier Mail Gateway 2.................................13 Configuring a Firewall ............................................................................................................. 13 3—Using Intego VirusBarrier Server 2 and VirusBarrier Mail Gateway 2 .............. 14 Launching VirusBarrier Server Admin................................................................................. 15 Using the Browser ..................................................................................................................... 17 Server Information ................................................................................................................................18 Intego Products ......................................................................................................................................19 Server Log ...............................................................................................................................................20 Adding Servers to the Browser............................................................................................................21 Managing Products via the Browser...................................................................................... 23 Adding Product Serial Numbers.........................................................................................................24 Changing Product Settings from the Browser ..................................................................... 25 VirusBarrier Server 2 Settings..............................................................................................................26 Trusted Zone ..........................................................................................................................................28 Schedules and Events............................................................................................................................29 Running Scans ........................................................................................................................... 30 NetUpdate Settings ...............................................................................................................................37 NetUpdate Preferences .........................................................................................................................40 Managing Serial Numbers ...................................................................................................................42 Removing Serial Numbers ...................................................................................................................43 Using the Console Log ............................................................................................................. 44 VirusBarrier Server Admin Client Preferences................................................................... 45 Using the VirusBarrier X5 Application on your Server ..................................................... 46 Using VirusBarrier Server 2 and VirusBarrier Mail Gateway 2 from the Command
Line............................................................................................................................................... 47 4—Technical Support........................................................................................................ 48 Intego VirusBarrier Server 2 / VirusBarrier Mail Gateway 2 User's Manual
Page 3
1- About VirusBarrier Server 2 and
VirusBarrier Mail Gateway 2
Intego VirusBarrier Server 2 / VirusBarrier Mail Gateway 2 User's Manual
Page 4
Controlling Viruses on a Mac OS X Server
System administrators are well aware of the threat of viruses on a server. While a virus on
a client computer can damage files on that computer, and eventually propagate throughout
a network via files that are emailed or sent over a network, a virus on a server could
damage all the computers on the network. Viruses on a file server that don’t affect the
server itself, if it is running a different operating system from client computers, can still
propagate as users copy files to their computers. Beyond viruses, many types of malware,
such as worms and Trojan horses, can infect servers, granting remote access to malicious
users.
Mac OS X servers are used in a variety of environments, from Mac-only networks to
networks contain a mixture of Macs, Windows PCs and computers running Unix or Linux
systems. Protecting a Mac OS X server against viruses requires that not only Mac viruses
be detected, but also Windows viruses, Word and Excel macro viruses and Unix and Linux
viruses.
Intego VirusBarrier Server 2 and VirusBarrier Mail Gateway 2 provide this protection,
ensuring that infected files that get onto your server don’t go any further, as well as
preventing many types of exploits from being executed on your server.
VirusBarrier Server 2 automatically scans every file that is copied to a Mac OS X Server
computer where it is installed, as well as any files that are launched on the server. If
viruses are found, infected files are quarantined, and administrators can determine which
actions to take. VirusBarrier Server 2 can also be set to run scheduled scans of both local
and network volumes.
VirusBarrier Mail Gateway 2 offers full protection for all e-mail that is sent or received via
Mac OS X Server’s built-in e-mail server. It automatically scans all e-mail messages that
pass through the server, checking e-mails for infected attachments. If viruses are found,
the e-mails are quarantined, and notifications can be sent to administrators informing them
of this activity.
Intego VirusBarrier Server 2 / VirusBarrier Mail Gateway 2 User's Manual
Page 5
VirusBarrier Server 2 and VirusBarrier Mail Gateway 2 include a copy of Intego
VirusBarrier X5, which, installed on your server, allows you to set some additional options
and gives you access to certain functions on the server.
How VirusBarrier Server 2 and VirusBarrier Mail Gateway
2 Work
Virus Scanning
VirusBarrier Server 2 and VirusBarrier Mail Gateway 2 work in several ways. While the
programs watch over your server at all times, protecting you from any viruses, you can use
the included VirusBarrier X5 client program to manually scan any disk or network volume
at any time. You can also set up scheduled scans of both local and network volumes, and
have scans run automatically when certain events occur, such as following updates to
virus definitions.
Automatic Repairs, Quarantine or Deletion of Infected Files
You can choose how VirusBarrier Server 2 and VirusBarrier Mail Gateway 2 act when
viruses are found: files can be repaired automatically, quarantined until an administrator
can check them, and VirusBarrier Mail Gateway 2 can delete infected messages.
Scan Logs
VirusBarrier Server 2 and VirusBarrier Mail Gateway 2 provide complete logs of all activity,
including any viruses or suspicious files it finds. VirusBarrier Mail Gateway 2 can send email notifications to the recipient of your choice, alerting you to the presence of any
infected files as soon as they are detected.
NetUpdate
VirusBarrier Server 2 and VirusBarrier Mail Gateway 2 work with Intego's NetUpdate,
which manages program updates and new virus definitions automatically. You can set the
update frequency in NetUpdate itself, so the program checks for updates daily, weekly or
monthly.
Intego VirusBarrier Server 2 / VirusBarrier Mail Gateway 2 User's Manual
Page 6
Trusted Zone
VirusBarrier Server 2 and VirusBarrier Mail Gateway 2 offer the option to set up a Trusted
Zone. This is an area that will not be scanned. This zone should only be used for safe files
that have already been scanned.
Intego VirusBarrier Server 2 / VirusBarrier Mail Gateway 2 User's Manual
Page 7
Intego VirusBarrier Server 2 Features
Intego VirusBarrier Server 2 offers the following features:
•
A GUI administration console
•
Full quarantine zone to isolate infected files
•
Detailed logs of all infected files sent automatically to administrators
•
Scans of all files written to or opened on the server
•
Scheduled scans of local and network volumes
•
Automatic scans after virus definitions are updated
•
A Trusted Zone that is not scanned
•
Self-protection to ensure that VirusBarrier Server 2 doesn’t get infected
•
Heuristic and behavioral analysis
•
Automatic updates of program and virus definitions via Intego NetUpdate
•
Universal binary, fully compatible with both PowerPC and Intel processors
Intego VirusBarrier Server 2 requires Mac OS X 10.4 or later, running on an Xserve or any
other Mac configured as a server.
Intego VirusBarrier Mail Gateway 2 Features
Intego VirusBarrier Mail Gateway 2 offers all the features of VirusBarrier Server 2, but also
provides the following features:
•
Scans of all e-mail sent and received via the Mac OS X Server e-mail server
•
Full quarantine zone to isolate infected e-mails
•
Infected e-mails can be repaired and disinfected in the quarantine zone
•
Notifications of infected e-mails sent automatically to administrators
Intego VirusBarrier Mail Gateway 2 requires Mac OS X Server 10.4 or later, running on an
Xserve or any other Mac configured as a server, running the built-in e-mail server.
Intego VirusBarrier Server 2 / VirusBarrier Mail Gateway 2 User's Manual
Page 8
2—Installation
Intego VirusBarrier Server 2 / VirusBarrier Mail Gateway 2 User's Manual
Page 9
System Requirements
VirusBarrier Server 2:
Mac OS X 10.4 (Tiger) or higher or Mac OS X Server 10.4 (Tiger) or higher.
VirusBarrier Mail Gateway 2:
Mac OS X Server 10.4 (Tiger) running the built-in e-mail server.
Installing Intego VirusBarrier Server 2 and VirusBarrier
Mail Gateway 2
Intego VirusBarrier Server 2 and VirusBarrier Mail Gateway 2 are provided as a set of .pkg
files which you can install on remote servers using Apple Remote Desktop or command
line tools. Before installing, you must accept the terms and conditions presented in the
"License" file.
Your CD has three folders: one is labeled Virus Barrier Server Admin, one Packages &
Utilities, and a third Manuals. The packages you need to install are in the first two folders.
Installing VirusBarrier Server Admin
VirusBarrier Server Admin is the program you will use on a remote computer to administer
VirusBarrier Server 2 or VirusBarrier Mail Gateway 2 on your server. This program has a
standard GUI installer. To install VirusBarrier Server Admin, open the VirusBarrier Server
Admin folder then double-click the VirusBarrier Server Admin file and follow the
instructions. You will have to restart your computer after this installation.
Intego VirusBarrier Server 2 / VirusBarrier Mail Gateway 2 User's Manual
Page 10
Installing Remote Installation Packages
The remote installation packages are those that must be installed on your server. They
include the following packages:
RMCClient
CommonServices
Netupdate
VirusBarrier Server 2 or VirusBarrier Mail Gateway 2
Note that you must install the "CommonServices" package to use any Intego software.
Installation Directly on the Server
You can install these files directly on the server, if you can access it in this manner, by
simply double-clicking the installer files and following the instructions; the standard Apple
Installer application carries out the installation.
Intego VirusBarrier Server 2 / VirusBarrier Mail Gateway 2 User's Manual
Page 11
Installation Using Apple Remote Desktop 1.x
1. Open Apple Remote Desktop.
2. Select a server.
3. Choose Manage > Install Package…
4. Select an Intego package.
5. Click Install.
Installation Using Apple Remote Desktop 2.x or 3.x
1. Open Apple Remote Desktop.
2. Select all the target servers.
3. Choose Manage > Install Packages…
4. Select the Intego packages you want to install.
5. Click Install.
Installation Using Command Line Tools
1. Copy the packages to the remote server using ftp, afp or scp.
2. Use the installer command line tool to install each package:
sudo /usr/sbin/installer -pkg "/path/to/package.pkg" -target /
3. Restart the server.
Intego VirusBarrier Server 2 / VirusBarrier Mail Gateway 2 User's Manual
Page 12
Uninstalling Intego VirusBarrier Server 2 or VirusBarrier Mail
Gateway 2
If you ever want to uninstall Intego VirusBarrier Server 2 or VirusBarrier Mail Gateway 2,
you can use the two uninstallation shell scripts that are included in the Remote Installation
Packages & Utilities folder of the VirusBarrier Server 2 or VirusBarrier Mail Gateway 2 CD.
The first script, uninstall_all, uninstalls all components of VirusBarrier Server 2 or
VirusBarrier Mail Gateway 2. The second script, uninstall_VirusBarrier, uninstalls only the
VirusBarrier X5 client program. You can run these scripts by double-clicking them on the
server from which you want to uninstall the software, or by running them from Terminal.
To uninstall VirusBarrier Server Admin, run the uninstall_VirusBarrier_Server_Admin file in
the Packages & Utilities folder.
Configuring a Firewall
For VirusBarrier Server Admin to be able to connect to remote servers, and they must be
able to accept connections through ports 8500 and 8502 TCP. If servers use a firewall,
such as Intego NetBarrier X5 or the built-in firewall included with Mac OS X Server, or if
there is another firewall upstream from the servers, this port must be open for VirusBarrier
Server Admin to be able to access the servers.
Using Intego VirusBarrier Server 2 and/or VirusBarrier Mail
Gateway 2 in Evaluation Mode
Intego VirusBarrier Server 2 and VirusBarrier Mail Gateway 2 offer an evaluation mode, to
allow you to discover how the programs work before purchasing them. When VirusBarrier
Server 2 or VirusBarrier Mail Gateway 2 run in evaluation mode, they function for 30 days,
during which the programs will not repair any files, nor will they allow virus definitions to be
updated automatically.
Intego VirusBarrier Server 2 / VirusBarrier Mail Gateway 2 User's Manual
Page 13
3—Using Intego VirusBarrier Server 2
and VirusBarrier Mail Gateway 2
Intego VirusBarrier Server 2 / VirusBarrier Mail Gateway 2 User's Manual
Page 14
Launching VirusBarrier Server Admin
After you have installed VirusBarrier Server 2 or VirusBarrier Mail Gateway 2 on the server
you wish to manage, and VirusBarrier Server Admin on your administrator's computer,
open VirusBarrier Server Admin, located in /Applications/Server. The program displays the
Browser tab.
Intego VirusBarrier Server 2 / VirusBarrier Mail Gateway 2 User's Manual
Page 15
VirusBarrier Server Admin contains three tabs, each of which provides access to
information or management functions:
•
Browser: the Browser tab lets you browse servers and select the VirusBarrier
Server 2 or Virus Barrier Mail Gateway programs installed. You can make
changes to settings from this tab, and you can view logs and quarantine
information. You can also access NetUpdate on your servers to check for and
manage updates to VirusBarrier Server 2 and its virus definitions.
•
Serial numbers: the Serial numbers tab lets you view the serial numbers used
for VirusBarrier Server 2 or Virus Barrier Mail Gateway on the servers you
manage.
•
Console log: the Console log tab provides a log of all actions made from the
VirusBarrier Server Admin application.
Intego VirusBarrier Server 2 / VirusBarrier Mail Gateway 2 User's Manual
Page 16
Using the Browser
The VirusBarrier Server Admin browser gives you an overview of servers and Intego
products that you can manage. You can view information for specific servers, you can
check which Intego products are installed and verify their serial numbers, and you can
check logs to see what actions have been applied to specific servers.
Intego VirusBarrier Server 2 / VirusBarrier Mail Gateway 2 User's Manual
Page 17
Server Information
When you click the Browser tab, VirusBarrier Server Admin displays a list of servers that
you can manage. If you click a server in the Server list, VirusBarrier Server Admin displays
detailed information about that computer.
VirusBarrier Server Admin displays the following information about servers:
•
Software: this section displays the operating system version and build, the
kernel version, the RMC Client version (an RMC Client component must be
installed on the server with VirusBarrier Server 2 and/or VirusBarrier Mail
Gateway 2 to ensure remote management), the computer name (as set on the
server), and the visible computer name. You can change this visible computer
name by replacing the text in this field.
•
Hardware: this section shows the type of computer, the processor and bus
speed, the amount of RAM installed, and the computer's serial number.
•
Network: this displays the server's IP address, subnet mask, IP broadcast and
Ethernet (or MAC) address.
A colored icon appears before the names of the computers in the server list. Three colored
icons may appear in this column:
•
Green: VirusBarrier Server Admin is connected to the server.
•
Red: VirusBarrier Server Admin is not connected to the server; the server is not
available on the local network.
•
Orange: VirusBarrier Server Admin is not connected to the server; the connection has
failed.
If one or more server does not respond you can attempt to reconnect to these servers by
clicking the Connect All button.
Intego VirusBarrier Server 2 / VirusBarrier Mail Gateway 2 User's Manual
Page 18
Intego Products
The Intego products tab, which displays when the Browser tab is active and a server is
selected, shows a list of all Intego products available on the selected server, their version
numbers and their serial numbers.
This tab shows you if any serial numbers are not recognized (which also includes serial
numbers you have not yet added to VirusBarrier Server Admin for specific products), or if a
serial number is not needed, as is the case for Intego NetUpdate. If a product displays
“Running in demo mode” in the Serial Number column then you haven’t yet entered its
serial number and it is still within the 30 day evaluation period.
In the version column, you can see both the version of the Intego product and the date of
the last update to VirusBarrier Server 2’s or VirusBarrier Mail Gateway 2’s virus definitions.
Intego VirusBarrier Server 2 / VirusBarrier Mail Gateway 2 User's Manual
Page 19
Server Log
The Server log tab shows which actions have been performed on the selected server. This
log displays the Date & Time, the Product, or Intego program that has been acted on, the
Type of action, and the Result.
Two icons display in the right-hand column of the Server log: a green icon indicates that
the action was successful, and a red icon that the action failed. Actions such as reading or
writing preferences may fail if there is a connection failure with the remote computer while
the action is carried out. If an action fails, the Result column shows an error message
explaining why the action was not successful.
You can sort the log by any of its columns by clicking a column header, and you can
change the sort order by clicking a column header again. The triangle in the column
header indicates the sort order.
Intego VirusBarrier Server 2 / VirusBarrier Mail Gateway 2 User's Manual
Page 20
Adding Servers to the Browser
VirusBarrier Server Admin automatically detects all Mac OS X computers on a local
network, where the RMC client is installed, using Bonjour. All servers accessible locally
therefore display automatically in the Browser.
The best way to manage Macintosh computers outside your local network with
VirusBarrier Server Admin is to create a VPN tunnel between the administration computer
and remote servers. If you do this, remote computers will display in the Servers list via
Bonjour.
You can also add computers manually to the Server list. To do this, click the plus (+)
button below the Server list. A sheet displays asking you to enter a server name and
address.
You can enter any name you wish for the server; this is the visible computer name that will
display in the Server information tab of the browser.
Enter an IP address for the remote computer. You must have direct access to a remote
server to add it in this manner; if the server is behind a router, you must set up port
mapping so ports 8500 and 8502 TCP is mapped to the remote server.
Once VirusBarrier Server Admin has detected a server, or once you have added one to
the browser, it remains in the list, even if it is not available when you launch VirusBarrier
Intego VirusBarrier Server 2 / VirusBarrier Mail Gateway 2 User's Manual
Page 21
Server Admin at a later time. You can remove a server, if you wish, by clicking its name to
select it, then clicking the minus (–) button below the Server list.
Intego VirusBarrier Server 2 / VirusBarrier Mail Gateway 2 User's Manual
Page 22
Managing Products via the Browser
When you click one of the computers in the Server list, a list of available Intego products
displays in the Product column. You can select one of these products to get information
about the product and access its settings.
Below the Browser’s Product column you can see if a program does not need a serial
number (this is the case for NetUpdate), if it is running in demo mode, or if it has been
serialized.
Intego VirusBarrier Server 2 / VirusBarrier Mail Gateway 2 User's Manual
Page 23
Adding Product Serial Numbers
The first time you click on a product that requires a serial number in the Browser,
VirusBarrier Server Admin will ask you to enter a serial number for the product. The
following dialog displays:
Enter your name, company and serial number, then click OK. If you want to run the
program in demo mode, click Evaluate.
You can also add serial numbers by clicking the Serial Numbers tab at the top of the
VirusBarrier Server Admin window and clicking the + icon at the bottom of the window; the
procedure is the same.
Intego VirusBarrier Server 2 / VirusBarrier Mail Gateway 2 User's Manual
Page 24
Changing Product Settings from the Browser
Once you have entered the appropriate serial numbers for the Intego products you are
managing, you can make changes to any of these programs from the Browser. To do this,
select a server, then a product. This presents an interface that allows you to apply settings
and carry out certain actions.
Intego VirusBarrier Server 2 / VirusBarrier Mail Gateway 2 User's Manual
Page 25
VirusBarrier Server 2 Settings
If you select VirusBarrier Server 2 from the Products column, you will see the following:
You can enable and change settings for VirusBarrier Server 2, and you can also carry out
actions on the VirusBarrier Server 2 Trusted zone, Quarantine Zone, set schedules, run
scans and view the log.
Intego VirusBarrier Server 2 / VirusBarrier Mail Gateway 2 User's Manual
Page 26
Real-Time Scanner Settings
To enable the Real-Time Scanner, check the box. This ensures that your server and your
e-mail are scanned in real-time. If you ever need to disable the Real-Time Scanner for
troubleshooting, you can do so by unchecking this box.
The next section lets you indicate what VirusBarrier Server 2 or VirusBarrier Mail Gateway
2 should do when they find a virus. Your options are:
•
Send an e-mail: this has VirusBarrier Server 2 or VirusBarrier Mail Gateway 2
send you an e-mail whenever a file or e-mail containing a virus is found. To
configure the e-mail address to which this is sent, click the Configure button.
•
Put in Quarantine Zone: this ensures that the file cannot be opened or read. See
the Quarantine Zone section below.
•
Repair: this attempts to remove the virus.
Advanced Settings
•
Scan for Windows viruses: VirusBarrier Server 2 or VirusBarrier Mail Gateway 2
will watch for viruses that affect Windows.
If you leave this unchecked, the
programs will only stand for Mac malware.
•
Scan e-mails: this option lets you turn on or off scanning of e-mail files on the
server. For VirusBarrier Mail Gateway 2, you cannot turn this off unless Mail
Gateway support is turned off. Support for the Mac OS X mail server is only
available with VirusBarrier Mail Gateway 2, and is activated or deactivated from the
MailGateway tab.
•
Scan archives: this tells VirusBarrier Server 2 or VirusBarrier Mail Gateway 2 to
scan compressed archives for viruses. By default, VirusBarrier X5 will scan all
archive types that it understands; however, you can choose to scan only certain
archive types by clicking the File types... button. A window will appear where you
can select and unselect archive types according to your preference.
Intego VirusBarrier Server 2 / VirusBarrier Mail Gateway 2 User's Manual
Page 27
Trusted Zone
VirusBarrier Server 2 and VirusBarrier Mail Gateway 2 offer the option to add files, folders
or volumes to a Trusted Zone. The programs will trust all files you add to this zone, and
will not scan them. You should only use this for safe files that have already been scanned.
To add an item to the Trusted Zone, click the + button, browse to an item, then click
Choose. Note that adding a folder or volume tells VirusBarrier Server 2 or VirusBarrier Mail
Gateway 2 to trust all files contained in the selected item and any subfolders it contains.
To remove an item from the Trusted Zone, click it to select it, then click the – button.
The Quarantine Zone
VirusBarrier Server 2 and Mail Gateway use a virtual quarantine zone, which stores
infected files. These files are not moved, but they are locked to prevent them from being
opened. In the VirusBarrier Server Admin interface, you can access this quarantine zone
and view which files it contains.
To act on a file in the quarantine zone, select the file, then click one of the two buttons
below the quarantine zone list:
•
Consider Safe: Clicking on Consider Safe assumes that you are sure that the file is
virus-free. The file is then released from the Quarantine Zone.
•
Delete from Disk: Clicking on Delete from Disk will delete the infected file after
confirmation.
If you wish to repair an infected file, you should go to the infected computer and launch the
VirusBarrier X5 client program installed on that computer. From there, check the program’s
Quarantine Zone to repair the file.
Intego VirusBarrier Server 2 / VirusBarrier Mail Gateway 2 User's Manual
Page 28
Schedules and Events
VirusBarrier Server 2 and VirusBarrier Mail Gateway 2 can automatically run scans when
specific events occur, and can be set to run automatically at pre-arranged times. Click the
arrow on the Schedule tab to set schedules.
VirusBarrier Server 2 and VirusBarrier Mail Gateway 2 can run scans or scan and repair
files when volumes are mounted; choose an action from the popup menu to activate this
function. You can also choose to not scan read-only volumes if desired.
The programs can also run scans or scan and repair files after a virus definition update.
Virus definitions are updated regularly, and especially when a new virus is discovered to
offer protection against that virus. Therefore, you should perform a new scan at those
times to check for the new virus, whether manually or (by checking this checkbox)
automatically.
To turn on scheduling, click the Schedule checkbox. In the popup menu next to it, you can
select whether VirusBarrier Server 2 and VirusBarrier Mail Gateway 2 will simply scan files
at the appointed time, or also repair any infected files found.
Below these settings is a scheduling selector, where you can say which volume or
directory should be examined, and when. The first popup menu lists the items you are
Intego VirusBarrier Server 2 / VirusBarrier Mail Gateway 2 User's Manual
Page 29
most likely to want to scan: the entire computer, or only its startup volume. If you wish to
scan a different directory, choose Other and select it.
The second popup menu lets you choose whether you want to perform the operation every
day or every week. If you select Every Day, you’ll be able to choose the time you prefer;
select Every Week, and you’ll also be able to choose your preferred day.
You can create multi-part schedules, for example to scan a specific directory every night,
and your entire computer once a week. To do so, click the + button to the right of the
schedule item: another schedule item will appear beneath it. Make changes in that
schedule item as you like. You can add as many schedule items as you like this way; to
remove one of them, click the – button next to it.
The order of schedule items is not important; if you’ve scheduled two scans to run at the
same time, they will occur simultaneously.
Running Scans
This tab will show any currently active scans, such as those set in a schedule (see above),
launched following an event such as a mounted volume or a virus definition update (see
above), manual scans run locally using VirusBarrier X5, or command line scans, run
locally or remotely.
If you wish to stop any scan that is running, select it then click Stop the Scan. This cannot
be done for manual scans.
Intego VirusBarrier Server 2 / VirusBarrier Mail Gateway 2 User's Manual
Page 30
Logs
This log shows all activity relative to VirusBarrier Server 2 or VirusBarrier Mail Gateway 2.
Click Fetch Remote Logs to view logs from a server. Logs show the following activities:
•
Scans run manually, remotely, scheduled or following events
•
Infected or corrupted files, if VirusBarrier Server 2 finds any
•
Actions taken on infected files, such as repairs or deletions
You can also clear the log or export the log by clicking the appropriate buttons at the
bottom of the window.
Click the Settings tab to choose to automatically export logs. You can choose a frequency,
(Every Day, Every Week, Every Month), a file format (Text, HTML or XML), and a
destination (VirusBarrier X5 client on the server or a specific directory).
Intego VirusBarrier Server 2 / VirusBarrier Mail Gateway 2 User's Manual
Page 31
The Background Activity Log
An additional log is stored on the server, and records background activity, such as
discovery of infected files, repairs or deletions of files, and user attempts to access files in
the Quarantine Zone. You can also view this log in Apple Server Admin; select Mail in the
Computers & Services list, click the Logs tab, then select Show: Virus.
This log file is stored in /var/log/virusbarrier.log; you can view it remotely via Terminal, or
locally with Console.
Intego VirusBarrier Server 2 / VirusBarrier Mail Gateway 2 User's Manual
Page 32
VirusBarrier Mail Gateway 2 Settings
VirusBarrier Mail Gateway 2 displays settings similar to those of VirusBarrier Server 2, but
it also has a Mail Gateway tab that allows you to control settings for virus scans of e-mail
messages and attachments.
To activate VirusBarrier Mail Gateway 2 support, check the appropriate checkbox. This
deactivates the built-in antivirus solution and turns on VirusBarrier Mail Gateway 2.
To tell VirusBarrier to repair e-mails instead of simply scanning and placing infected emails in the quarantine zone (see below), check Repair Mails.
Intego VirusBarrier Server 2 / VirusBarrier Mail Gateway 2 User's Manual
Page 33
If you choose to add certificates to incoming and outgoing e-mail messages, VirusBarrier
Mail Gateway 2 adds an X-SCANNED header to all messages certifying that messages
have been scanned: “by Intego VirusBarrier Mail Gateway 2 Scanner at $mydomain”. If
VirusBarrier Mail Gateway 2 finds an infected attachment and removes it, the e-mail
message containing that attachment will display the following text:
Attachment removed by Intego VirusBarrier Mail Gateway 2 [name of attachment]
If you change any of these settings, click the Apply button to apply the settings, or click
Revert to cancel your change.
Intego VirusBarrier Server 2 / VirusBarrier Mail Gateway 2 User's Manual
Page 34
The VirusBarrier Mail Gateway 2 Quarantine Zone
VirusBarrier Mail Gateway 2 uses a virtual quarantine zone, which stores infected e-mail
messages and attachments. These messages are not moved, but they are locked to
prevent them and their attachments from being opened. In the VirusBarrier Server Admin
interface, you can access this quarantine zone and view which files it contains.
To act on an e-mail message in the quarantine zone, select the message, then click one of
the three buttons below the quarantine zone list:
•
Repair: Clicking on Repair will repair the infected file, if VirusBarrier Mail Gateway 2
can do so; this is not possible in all cases, since files that are severely damaged may
not be reparable.
•
Delete: Clicking on Delete will delete the infected message and attachments after
confirmation.
•
Deliver: This removes the file from the quarantine zone and delivers it to its intended
recipient; make sure that the message is not infected if you do this.
Intego VirusBarrier Server 2 / VirusBarrier Mail Gateway 2 User's Manual
Page 35
Sending Virus Notifications
The Apple Server Admin application allows you to send virus notifications automatically to
a selected e-mail address. In this program, select the Mail service, then click the Filters
tab.
First, make sure Scan email for viruses is checked, then choose the appropriate action to
be taken for infected messages. If you wish to have notifications sent, check the
appropriate checkbox and enter your administrator’s e-mail address. You can also have
notifications sent to recipients.
Intego VirusBarrier Server 2 / VirusBarrier Mail Gateway 2 User's Manual
Page 36
NetUpdate Settings
VirusBarrier Server Admin also lets you manage Intego NetUpdate on the servers running
VirusBarrier Server 2 or VirusBarrier Mail Gateway 2. NetUpdate is a program used to
check for new updates to the programs and virus definitions; it checks for updates to all
Intego programs at the same time, and downloads and installs updates for the programs
installed on your computer.
NetUpdate can carry out automatic checks at the frequency you choose, or you can make
manual checks whenever you wish. You can also choose to install updates in the
Intego VirusBarrier Server 2 / VirusBarrier Mail Gateway 2 User's Manual
Page 37
background, check for updates on a local server (if you wish to download them once for all
your computers), and receive e-mail notifications when updates are available.
Intego VirusBarrier Server 2 / VirusBarrier Mail Gateway 2 User's Manual
Page 38
NetUpdate Scheduling Preferences
You can set Intego NetUpdate to check for new versions of your software automatically.
This pane allows you to choose the frequency for these checks.
Automatically check for updates
If you check this option, NetUpdate automatically connects to the Intego NetUpdate
server to check for updates. Choose at which frequency the updates will occur.
Choose a day of the week, and NetUpdate checks each week on this day for new
updates. If you do not check this option, you can manually check for updates by
connecting to your server via Apple Remote Desktop or a VNC client, opening the
NetUpdate application (in the Applications folder) and clicking the Check now…
button.
Background update
If you check this option, NetUpdate will attempt to update your Intego programs in
the background. This will quit any programs that need to be updated, and will
restart your computer if required.
Also process major upgrades
If you check this option, NetUpdate will also install major upgrades if these
upgrades are available to you free of charge.
Intego VirusBarrier Server 2 / VirusBarrier Mail Gateway 2 User's Manual
Page 39
NetUpdate Preferences
This tab lets you set certain preferences for NetUpdate.
Identification
Enter an e-mail address and password to identify yourself with the NetUpdate server. If
you need to change the e-mail address, you can do so from this section.
Update Sources
You can have NetUpdate check for new software in two locations. The default choice,
Check Intego’s server, should be used in most cases. But if you are working on a network,
Intego VirusBarrier Server 2 / VirusBarrier Mail Gateway 2 User's Manual
Page 40
and have multiple user licenses for Intego products, you can choose a NetUpdate folder
anywhere on your network.
To do this, select Check local or network folder: and click the Select button to select a
folder, or enter the folder's path in the text field. If you use a local NetUpdate folder on a
remote volume, this volume must be mounted on each computer at check time to access
the NetUpdate archives.
To use a local NetUpdate archive folder, first download update files to one computer. From
NetUpdate on your server, select the update you want to download by checking it in the
update list, then select File > Download Item to... and copy or move them to the NetUpdate
archive folder you have set.
Note: when updating Intego software via update files located in a local NetUpdate
folder, NetUpdate needs to check with the Intego server to verify the subscription
rights of the program being updated. Computers updating Intego software in this
manner therefore need to be able to access the Internet.
Email Notification
Two email notification options are available on this pane:
Notify me when new updates become available
If you check this option, you will receive email messages whenever new updates to
Intego products are released.
Send information about new Intego products
Checking this box means that you allow Intego to use the email address you
register to send you occasional messages presenting its new products.
Intego VirusBarrier Server 2 / VirusBarrier Mail Gateway 2 User's Manual
Page 41
Managing Serial Numbers
VirusBarrier Server Admin requires that you enter valid serial numbers for all the programs
it manages. These serial numbers can be single-user serial numbers for individual
programs, multi-user serial numbers, or site licenses that cover all the servers in your
company or institution. The serial numbers you enter in VirusBarrier Server Admin must
correspond to those used on your servers.
The Serial numbers tab shows you all the serial numbers you have added to VirusBarrier
Server Admin, and which correspond to serial numbers that have been entered for
individual products on managed servers. This tab lists each product, the serial number for
the product, and the number of seats used for the product license. For example, if a
product shows 8/10 used seats, this means that it is a 10-seat license, and that 8 seats are
being used.
To add a serial number, click the + icon at the bottom of the Serial numbers pane. A sheet
displays asking you to enter a serial number. Type the serial number in the Serial number
field; VirusBarrier Server Admin recognizes which program it applies to and displays the
program name, the type of license and the number of seats in the Information section of
the sheet. Click Add to add this serial number for the selected product.
Intego VirusBarrier Server 2 / VirusBarrier Mail Gateway 2 User's Manual
Page 42
Removing Serial Numbers
If you wish to remove a serial number, select a serial number and click the minus (–) icon
at the bottom of the serial number list. An alert displays, asking you to confirm the deletion.
Click Yes to delete the serial number or click No to cancel.
If too many servers are using a given serial number, the number of used seats will display
in red, showing a number such as 12/10, which would mean that there are twelve
computers attempting to use a 10-seat license. If you click this serial number, the Server
list displays the first 10 servers in black, meaning that they are authorized, and the
following 2 servers in red, meaning that they exceed your license rights.
You cannot remove serial numbers for individual servers; you must therefore uninstall the
program on the server(s) that displays in red, or purchase a license for these additional
servers.
Intego VirusBarrier Server 2 / VirusBarrier Mail Gateway 2 User's Manual
Page 43
Using the Console Log
The Console log tab shows you a list of all actions you have carried out with VirusBarrier
Server Admin on all servers. Like the Server Log tab in the Browser, this log shows which
actions have been performed on the selected server. This log displays the Result, the
Type of action, the Date & Time, and the Product, or Intego program that has been acted
on. It also shows which server these actions were performed on.
Two icons display in the right-hand column of the console log: a green icon indicates that
the action was successful, and a red icon that the action failed. Actions such as reading or
writing preferences may fail if there is a connection failure with the remote computer when
the action is carried out. If an action fails, the Result column shows an error message
explaining why the action was not successful.
You can sort the log by any of its columns by clicking a column header, and you can
change the sort order by clicking a column header again. The triangle in the column
header indicates the sort order.
You can also narrow down the display in the console log using the search field at the
bottom of the window. You can enter a string containing part of a name of a server, a
product, a date, type of action or a result. As you type, the log displays only those log
entries that contain your search string.
Intego VirusBarrier Server 2 / VirusBarrier Mail Gateway 2 User's Manual
Page 44
VirusBarrier Server Admin Client Preferences
The VirusBarrier Server Admin client module only offers one option: the choice of whether
the program asks for an administrator password on launch. To access this setting, select
VirusBarrier Server Admin > Preferences, and check the option.
These preferences also give you access to NetUpdate, a program that checks if any
Intego programs have been updated. This program is installed at the same time as
VirusBarrier Server Admin or other Intego programs. It checks for updates for all of these
programs at the same time, and can download and install updates for the programs
installed on your computer. To check for updates, click Check Now.
For more on using NetUpdate, see the Intego Getting Started Manual.
Intego VirusBarrier Server 2 / VirusBarrier Mail Gateway 2 User's Manual
Page 45
Using the VirusBarrier X5 Application on your Server
A copy of VirusBarrier X5 is provided with VirusBarrier Server 2 and VirusBarrier Mail
Gateway 2. VirusBarrier X5 is not a substitute for VirusBarrier Sever or VirusBarrier Mail
Gateway 2 on a server; the program extends the functions of these server programs.
For more on using VirusBarrier X5, see the VirusBarrier X5 manual, available from the
Help menu of VirusBarrier X5.
Intego VirusBarrier Server 2 / VirusBarrier Mail Gateway 2 User's Manual
Page 46
Using VirusBarrier Server 2 and VirusBarrier Mail
Gateway 2 from the Command Line
VirusBarrier Server 2 and VirusBarrier Mail Gateway 2 also give you the option of
scanning files and volumes from the command line. The following describes the use of this
command.
/Library/Intego/virusbarrier.bundle/Contents/Resources/virusbarriers
[-rtcCaz] <pathname_to_scan> [<current_directory_pathname>]
The following options are available:
-r:
-t:
-c:
-C:
-a:
-z:
Repairs infected files.
Uses Turbo Mode; scans only those files that have not been modified
since the previous scan.
Counts files before scanning.
Counts files, but do not scan.
Scans all files, including those symlinked to other volumes
(or other mount points in /Volumes)
Scans compressed archives (including those in e-mail attachments)
<pathname_to_scan>: This is required; it can be a relative or absolute path.
[<current_directory_pathname>]: This is optional; it is the current working
directory if a relative path is used as the first argument.
Example:
/Library/Intego/virusbarrier.bundle/Contents/Resources/virusbarriers
-tacz /
This scans all volumes for which the user has read permission, scanning archives
and counting the number of files to scan before beginning. If you run the command
preceded by sudo, and authenticate, you can scan all files.
You can also define aliases to simplify the use of this command.
For bash:
alias vbscan=/Library/Intego/virusbarrier.bundle/Contents/Resources/
virusbarriers
For tcsh:
alias vbscan /Library/Intego/virusbarrier.bundle/Contents/Resources/
virusbarriers
This allows you to run the same command as follows:
vbscan -tacz /
Intego VirusBarrier Server 2 / VirusBarrier Mail Gateway 2 User's Manual
Page 47
4—Technical Support
Intego VirusBarrier Server 2 / VirusBarrier Mail Gateway 2 User's Manual
Page 48
Technical support is available for registered purchasers of VirusBarrier Server 2 and
VirusBarrier Mail Gateway 2.
By e-mail
[email protected]
From the Intego web site
www.intego.com
Intego VirusBarrier Server 2 / VirusBarrier Mail Gateway 2 User's Manual
Page 49