1
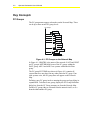
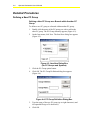
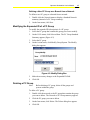
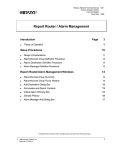
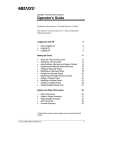
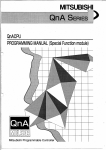
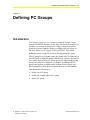
Operator Workstation User’s Manual
4-1
Chapter 4
Defining PC Groups
Introduction
A PC group (group) is a set of systems or other PC groups. Group
systems by location, function, or any other convenient association. For
example, if a network facility has two wings, it might be useful to
group the systems within the facility according to the two wings. In
this case, define two PC groups: EAST and WEST. Then, when
defining a system, assign the system to the appropriate PC group.
The PC group level of organization is not global data; it resides only at
the OWS used to define the groups, and Metasys software does not use
it to control objects. However, for the operator’s understanding of the
facility, the group level might be very helpful. In addition, the PC
group name appears on alarm reports, change-of-state reports, and
other summaries to help quickly pinpoint the source of information.
This chapter describes how to:
•
define a new PC group
•
modify the expanded ID of a PC group
•
delete a PC group
© November 1, 2001 Johnson Controls, Inc.
Code No. LIT-120146
www.johnsoncontrols.com
4-2
Operator Workstation User’s Manual
Key Concepts
PC Groups
The PC group names appear as branches on the Network Map. There
can be up to three nested PC group levels.
PC Groups
HDQTRS
EAST
1st Floor
2nd Floor
3rd Floor
4th Floor
AHU1
AHU2
Mechroom
Boiler
West
1st Floor
pcgroups
Figure 4-1: PC Groups on the Network Map
In Figure 4-1, HDQTRS is the name of the network. EAST and WEST
are PC groups. MECHROOM is one of the PC groups within the
EAST group. AHU1 and AHU2 are systems within the 4th Floor
group.
The PC group SYSTEMS (not shown in Figure 4-1) contains all
systems that were not placed in any other particular PC group. If no
such systems exist, this PC group does not appear on the Network
Map.
Defining a new PC group involves naming the group and specifying its
expanded ID. To define a new group, display the PC Group Definition
dialog box from the PC Group summary or from the Network Map.
Define a PC group either as a branch from the network itself, or as a
branch within another PC group.
Operator Workstation User’s Manual
4-3
PC Group Summary
The PC Group Summary lists all the items in the selected PC group.
Figure 4-2 shows an example of a PC Group summary.
Figure 4-2: PC Group Summary
Table 4-1 details the information displayed in the PC Group Summary.
Table 4-1: PC Group Summary Fields
Field
Description
Name
Name of the system or group within the PC group
Description
Expanded ID of the system or group within the group
4-4
Operator Workstation User’s Manual
Detailed Procedures
Defining a New PC Group
Defining a New PC Group as a Branch within Another PC
Group:
To define a new PC group as a branch within another PC group:
1.
Double-click the name of the PC group you wish to add to the
other PC group. The PC Group summary appears (Figure 4-2).
2.
On the Item menu, click New. The Item New dialog box appears
(Figure 4-3).
Figure 4-3: Item New Dialog Box
(for PC Groups and Systems)
3.
Click the PC Group option button.
4.
Click OK. The PC Group Definition dialog box appears
(Figure 4-4).
Figure 4-4: PC Group Definition Dialog Box
5.
Type the name of the new PC group (up to eight characters) and
its expanded ID (up to 24 characters).
6.
Click OK.
Operator Workstation User’s Manual
4-5
Defining a New PC Group as a Branch from a Network
To define a new PC group as a branch from a network:
1.
Double-click the Network name to display a Standard Network
summary (instead of a PC Group summary).
2.
On the Item menu, click New.
Modifying the Expanded ID of a PC Group
To modify the expanded ID (description) of a PC group:
1.
Select the PC group that contains the group you want to modify.
2.
On the GoTo menu, click Selected Item. The PC Group Standard
Summary appears (Figure 4-2).
3.
Select the PC group.
4.
On the Action menu, click Modify Group/System. The Modify
dialog box appears.
Figure 4-5: Modify Dialog Box
5.
Make the necessary changes to the Expanded ID field.
6.
Click OK.
Deleting a PC Group
Note:
Before deleting a PC group, delete all the groups and
systems within the group.
To delete a PC group:
1.
Double-click the network or the PC group that contains the group
you want to delete. The Network or PC Group summary appears.
2.
Click the PC group you want to delete.
3.
On the Item menu, click Delete. The Delete dialog box appears.
4.
Click OK.
4-6
Operator Workstation User’s Manual
Troubleshooting
Correcting Invalid Entries
If a dialog box field contains invalid information, a message appears
when you attempt to save the new PC group. Acknowledge the
message by clicking the OK button. Then correct the field and try
saving the PC group again.
An entry might be invalid because it is not in the correct format.