1
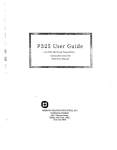
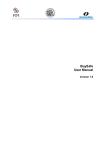
INSTRUCTION MANUAL
COMMERCIAL BLENDER
ED-5190PRO
DEAR CUSTOMER
In order to achieve the best performance of your product, please read this instruction
manual carefully before using, and keep it for future reference.
If you need extra support, please write to [email protected]
INSTRUCTION MANUAL
Important Safeguards......................................................................2
Save These Instructions..................................................................3
Parts Description & Control Panel...................................................3
How to Use......................................................................................4
Lid, Measuring Cup, Seal Ring........................................................4
Cleaning & Storage.........................................................................5
Notice for Operation........................................................................5
Specifications..................................................................................6
PREMIER CUSTOMER SERVICE
Venezuela :
0800 – ELECTRIC (353-2874)
Panama :
300-5185
Website :
www.premiermundo.com
E-mail :
[email protected]
NOTE
This unit may be submitted to changes in specifications, characteristics and/or operation
without prior notice to the user, in order to continue improving and developing its technology.
IMPORTANT SAFEGUARDS
When using electrical appliances, base safety precautions should always be followed
including the following :
• Read all instructions.
• Before plugging in the appliance, check that the electrical rating shown on the rating
plate corresponds with your household electricity supply.
• To protect against risk of electrical shock, do not put appliance in water or other liquid.
• Close supervision is necessary when any appliance is used by or near children.
• Unplug from outlet when not in use, before putting on or taking off parts, and before
cleaning.
• Avoid contacting moving parts.
• Do not operate any appliance with a damaged cord or plug or after the appliance
malfunctions, or is dropped or damaged in any manner. Return appliance to the
nearest authorized service facility for examination, repair or electrical or mechanical
adjustment.
• The use of attachments not recommended by the manufacturer may cause risk of
injury to persons.
• This appliance is designed for commercial use.
• Do not let cord hang over edge of table or counter
• Always operate blender with cover in place.
• Never put the power cord or plug into water for cleaning. Do not wipe the plug prongs
with damp cloth, nor plug in with wet hands.
• Plug the appliance to the wall outlet properly & securely. Loose plug may lead to
overheat or electric shock.
• Never let the appliance unattended.
• Keep hands and utensils out of the container while blending to reduce the risk of
severe injury to persons or damage to blender. A scraper may be used but must be
used only when the blender is not running.
• Do not run the appliance without loading in the blender jar.
• To prevent spillage, do not put liquid in the blender jar exceeding the MAX line.
• Do not expose the appliance to source of heat such as a radiator or sun shining
through a window. For good ventilation, do not place cloth underneath the appliance.
• Always operate with the lid in place. When processing hot beverages, properly secure
the lid in place to avoid scalding due to spraying of hot liquids.
• Switch off the appliance and disconnect from supply before changing accessories or
approaching parts that move in use.
• Care is needed when handling cutting blades, especially when removing the blade
from the bowl, emptying the bowl and during cleaning.
• If the motor has overheated, the temperature monitoring system will trigger and the
motor will stop. Switch off the appliance and let the motor cool down. The motor
temperature monitoring system resets after the blender is unplugged from wall socket
for 45 minutes. In this time, the blender can be used again.
• The blade is very sharp, use caution when handling the blade. Do not attempt to
disassemble the blade assembly and touch any rotating parts.
• Warning : Flashing light indicates ready to operate. Avoid any contact with blades or
moveable parts.
2
SAVE THESE INSTRUCTIONS
Note of plug :
This appliance has a polarized plug (one blade is wider than the other). To reduce the risk
of electric shock, this plug will fit in a polarized outlet only one way. If the plug does not fit
fully in the outlet, reverse the plug. If it still does not fit, contact a qualified electrician. Do
not modify the plug in any way.
PARTS DESCRIPTION & CONTROL PANEL
Measuring Cup
Lid
Blender Jug
PULSE
Speed Dial
LED Light
Drive Gear
Blender Jug Mat
Top Cover
Knob decoration ring
Motor unit
Switch Knob
Bottom Cover
Power Cord
Anti-skid Rubber Foot
3
CONTROL PANEL
Speed Dial
Turn dial clockwise to choose from manual speed settings from Low to High
Once you select a speed, the blender will run until you turn it back to OFF.
PULSE
Turn the speed dial counterclockwise to the PULSE Setting, Then hold at Pulse
position for the desired time.
LED Light
The red LED will be blinking at 1Hz when the blender was in stand-by mode and
During the operation, the red LED will be illuminated.
HOW TO USE
•
•
•
•
•
Plug in the unit to the power source corresponding to the voltage indicated on the
appliance.
Stand-by Mode
The jar was placed firmly on the base and the base was plugged into electricity
supply.
The red LED will be blinking at 1 Hz. Now the blender was in stand-by mode.
Operation mode
Any time when the motor was moving (Including variable speed operation and
PULSE operation). The red LED will be illuminated (no blinking).
Speed Setting
This blender has 10 stepless variable speeds (from 0 to 10) plus a Pulse function.
Rotates clockwise from OFF position the Blender will operate in the corresponding
speed setting. Further continue to rotate in clockwise to increase the speed. The
maximum speed setting will be achieved when the arrow was pointed at Speed
“10”. During the operation, the red LED will be illuminated. The blender will be
automatically turned off after 10 minutes. You must turn the knob back to OFF
position again in order to reset the blender before next operation.
Pulse
Turn the knob anti-clockwise from OFF position and hold at Pulse position(the arrow
was pointed at “Pulse”) to activate the PULSE mode. The motor increases the full
speed (i.e. speed10 setting) in the PULSE mode, The red LED will be illuminated.
Release to stop PULSE mode. The blender will be back to stand-by-mode and now
the red LED will be blinking again.
LID, MEASURING CUP, SEAL RING
•
Insert the measuring cup to the lid by aligning the two taps to the grooves of the lid
and twist to lock it at the bottom position. Then push in the lid to the blender jar to
close it. To open, pull up the flap of the lid.
4
CLEANING & STORAGE
•
•
•
•
•
•
Unplug the appliance from the wall outlet.
Do not immerse the motor unit or power cord into water or other liquids.
Clean surface of the blender jar with soft cloth or spongy. The measuring cup and
the seal ring can be disassembled for cleaning.
The blender jar can be rinsed with water. It can also be cleaned by filling 2 cups of
water in the blender jar, close the lid and then operate the blender in Pulse mode.
Then pour out the water and dry it with soft cloth.
After cleaning, put the blender jar on the side or upside down (Note 1) to dry. Do not
immerse the whole jar in water.
Clean the motor unit by soft cloth. NEVER put it in water.
Note : If put the blender jar in upside down position, please remove the residual
water by dry cloth. Do not leave it close to the sink or basin to avoid water
spraying to the bottom part of the jar. This may cause the rusting of the
bearing and hence affecting the performance of the blender.
NOTICE FOR OPERATION
•
•
•
•
•
•
The blender may not be operated on following situation
- The jar was not firmly placed on the base
- The knob was turned in variable speed selection range before the jar was placed
firmly on the base
- The jar was taken away during operation and then put back You need to turn
the knob back to OFF position and then make sure the jar was placed firmly on
the base. Now the blender was reset and please follows the operating
instruction again.
If the motor is dragged to a low speed since the food is too thick or there is too less
liquid in the jar, and operates for a prolonged period, the temperature monitoring
system will trigger and stop the operation of the motor. The red LED will be blinking
at 2 Hz, In this case, unplug and put the blender to a place with good ventilation
to cool down the motor temperature for 45 minutes. The system will reset and the
blender can be used again.
During operation, close the lid tightly to avoid scalding due to spraying of hot liquids.
Keep hands and utensils out of the container while the motor is running to prevent
the possibility of severe personal injury and/or damage.
In making hot beverage such as soybean milk, hot soup, please check whether the
lid is secured tightly to the jar to prevent it from falling. It is advisable to start the
operation at low speed setting and then increase the speed gradually, or use the
PULSE mode.
When making sauces (eg. almond sauce, jam and sesame sauce), stuffing and nuts,
put in between 2 and 3 cups of ingredients. The amount should neither be too large
or too little. Keep the blending time below 2 min. to prevent any burnt smell due to
overheating. Too much ingredients may lead to overloading and overheating of the
motor. In this case, wait till the motor temperature falls before operating again.
5
NOTICE FOR OPERATION
•
•
•
•
•
Please put liquid and soft food before putting in hard food or ice cubes.
When the operation finishes, please wait until the blade assembly comes to a
complete stop before taking up the blender jar. Otherwise, the Drive Gear may be
damaged.
If you feel a scorch smell from the blender, stop the operation immediately. It may be
caused by the abrasion at the rubber cushion base if it is not properly assembled.
When blending thick and sticky food using high speed, please start the operation at
low speed. If the turning is still idle, disconnect the power and stir the blender jar
using a rubber stirrer to drive out the air capsule trapped in the food. Then close the
lid and switch on to proceed the operation
Do not operate for more than 10 minutes at a time.
CIRCUIT DIAGRAM
L
ACN
N
ACL
SW4
Interlock
switch
SW3
Interlock
switch
SW6
Switch
Knob
MBL70 9530 Motor
Nons elf-resettingt hemal
protector(TF115)
SPECIFICATIONS
Product :
Model :
Rating :
Max Power :
Dimensions :
COMMERCIAL BLENDER
ED-5190PRO
120V ~ 60Hz
1050W
197mm (L) x 218mm (W) x 430mm (H)
6
PCB
LED Light
RECIPES